該系列文章是本人在學習 Spring 的過程中總結下來的,里面涉及到相關源碼,可能對讀者不太友好,請結合我的源碼注釋 Spring 源碼分析 GitHub 地址 進行閱讀
Spring 版本:5.1.14.RELEASE
開始閱讀這一系列文章之前,建議先查看《深入了解 Spring IoC(面試題)》這一篇文章
該系列其他文章請查看:《死磕 Spring 之 IoC 篇 - 文章導讀》
Spring 應用上下文 ApplicationContext
前面一系列文章都是圍繞 BeanFactory 進行分析的,BeanFactory 是 Spring 底層 IoC 容器的實現,完成了 IoC 容器的基本功能。在實際的應用場景中,BeanFactory 容器有點簡單,它並不適用於生產環境,我們通常會選擇 ApplicationContext。ApplicationContext 就是大名鼎鼎的 Spring 應用上下文,它不僅繼承了 BeanFactory 體系,還提供更加高級的功能,更加適用於我們的正式應用環境。如以下幾個功能:
- 繼承 MessageSource,提供國際化的標准訪問策略
- 繼承 ApplicationEventPublisher ,提供強大的事件機制
- 擴展 ResourceLoader,可以用來加載多個 Resource,可以靈活訪問不同的資源
- 對 Web 應用的支持
ApplicationContext 體系結構
先來看看 ApplicationContext 接口的繼承關系
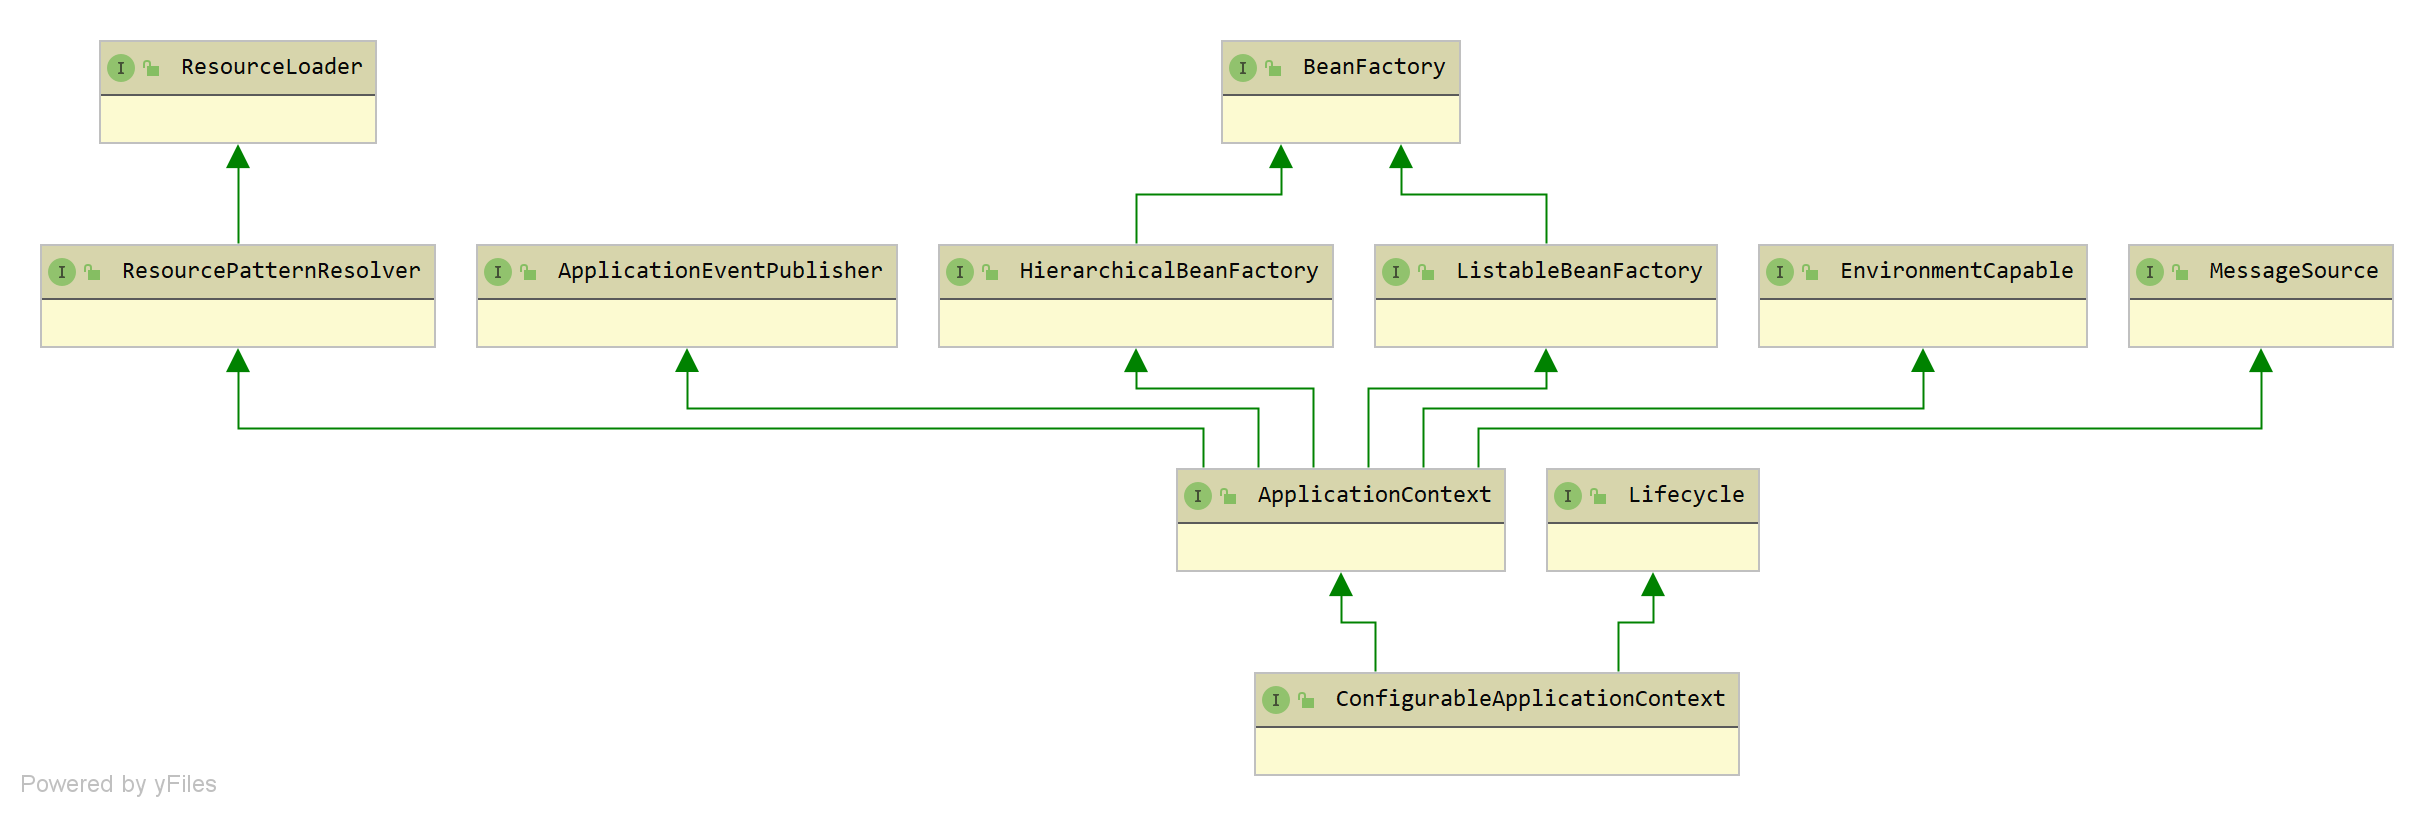
可以看到 ApplicationContext 除了繼承 BeanFactory 接口以外,還繼承了 MessageSource、ApplicationEventPublisher、ResourceLoader 等接口
簡單描述幾個接口:
org.springframework.core.io.ResourceLoader,資源加載接口,用於訪問不同的資源org.springframework.context.ApplicationEventPublisher,事件發布器接口,支持發布事件org.springframework.context.MessageSource,消息資源接口,提供國際化的標准訪問策略org.springframework.core.env.EnvironmentCapable,環境暴露接口,Spring 應用上下文支持多環境的配置org.springframework.context.ApplicationContext,Spring 應用上下文,僅可讀org.springframework.context.ConfigurableApplicationContext,Spring 應用上下文,支持配置相關屬性
接下來我們來看看它們的實現類的繼承關系(部分)
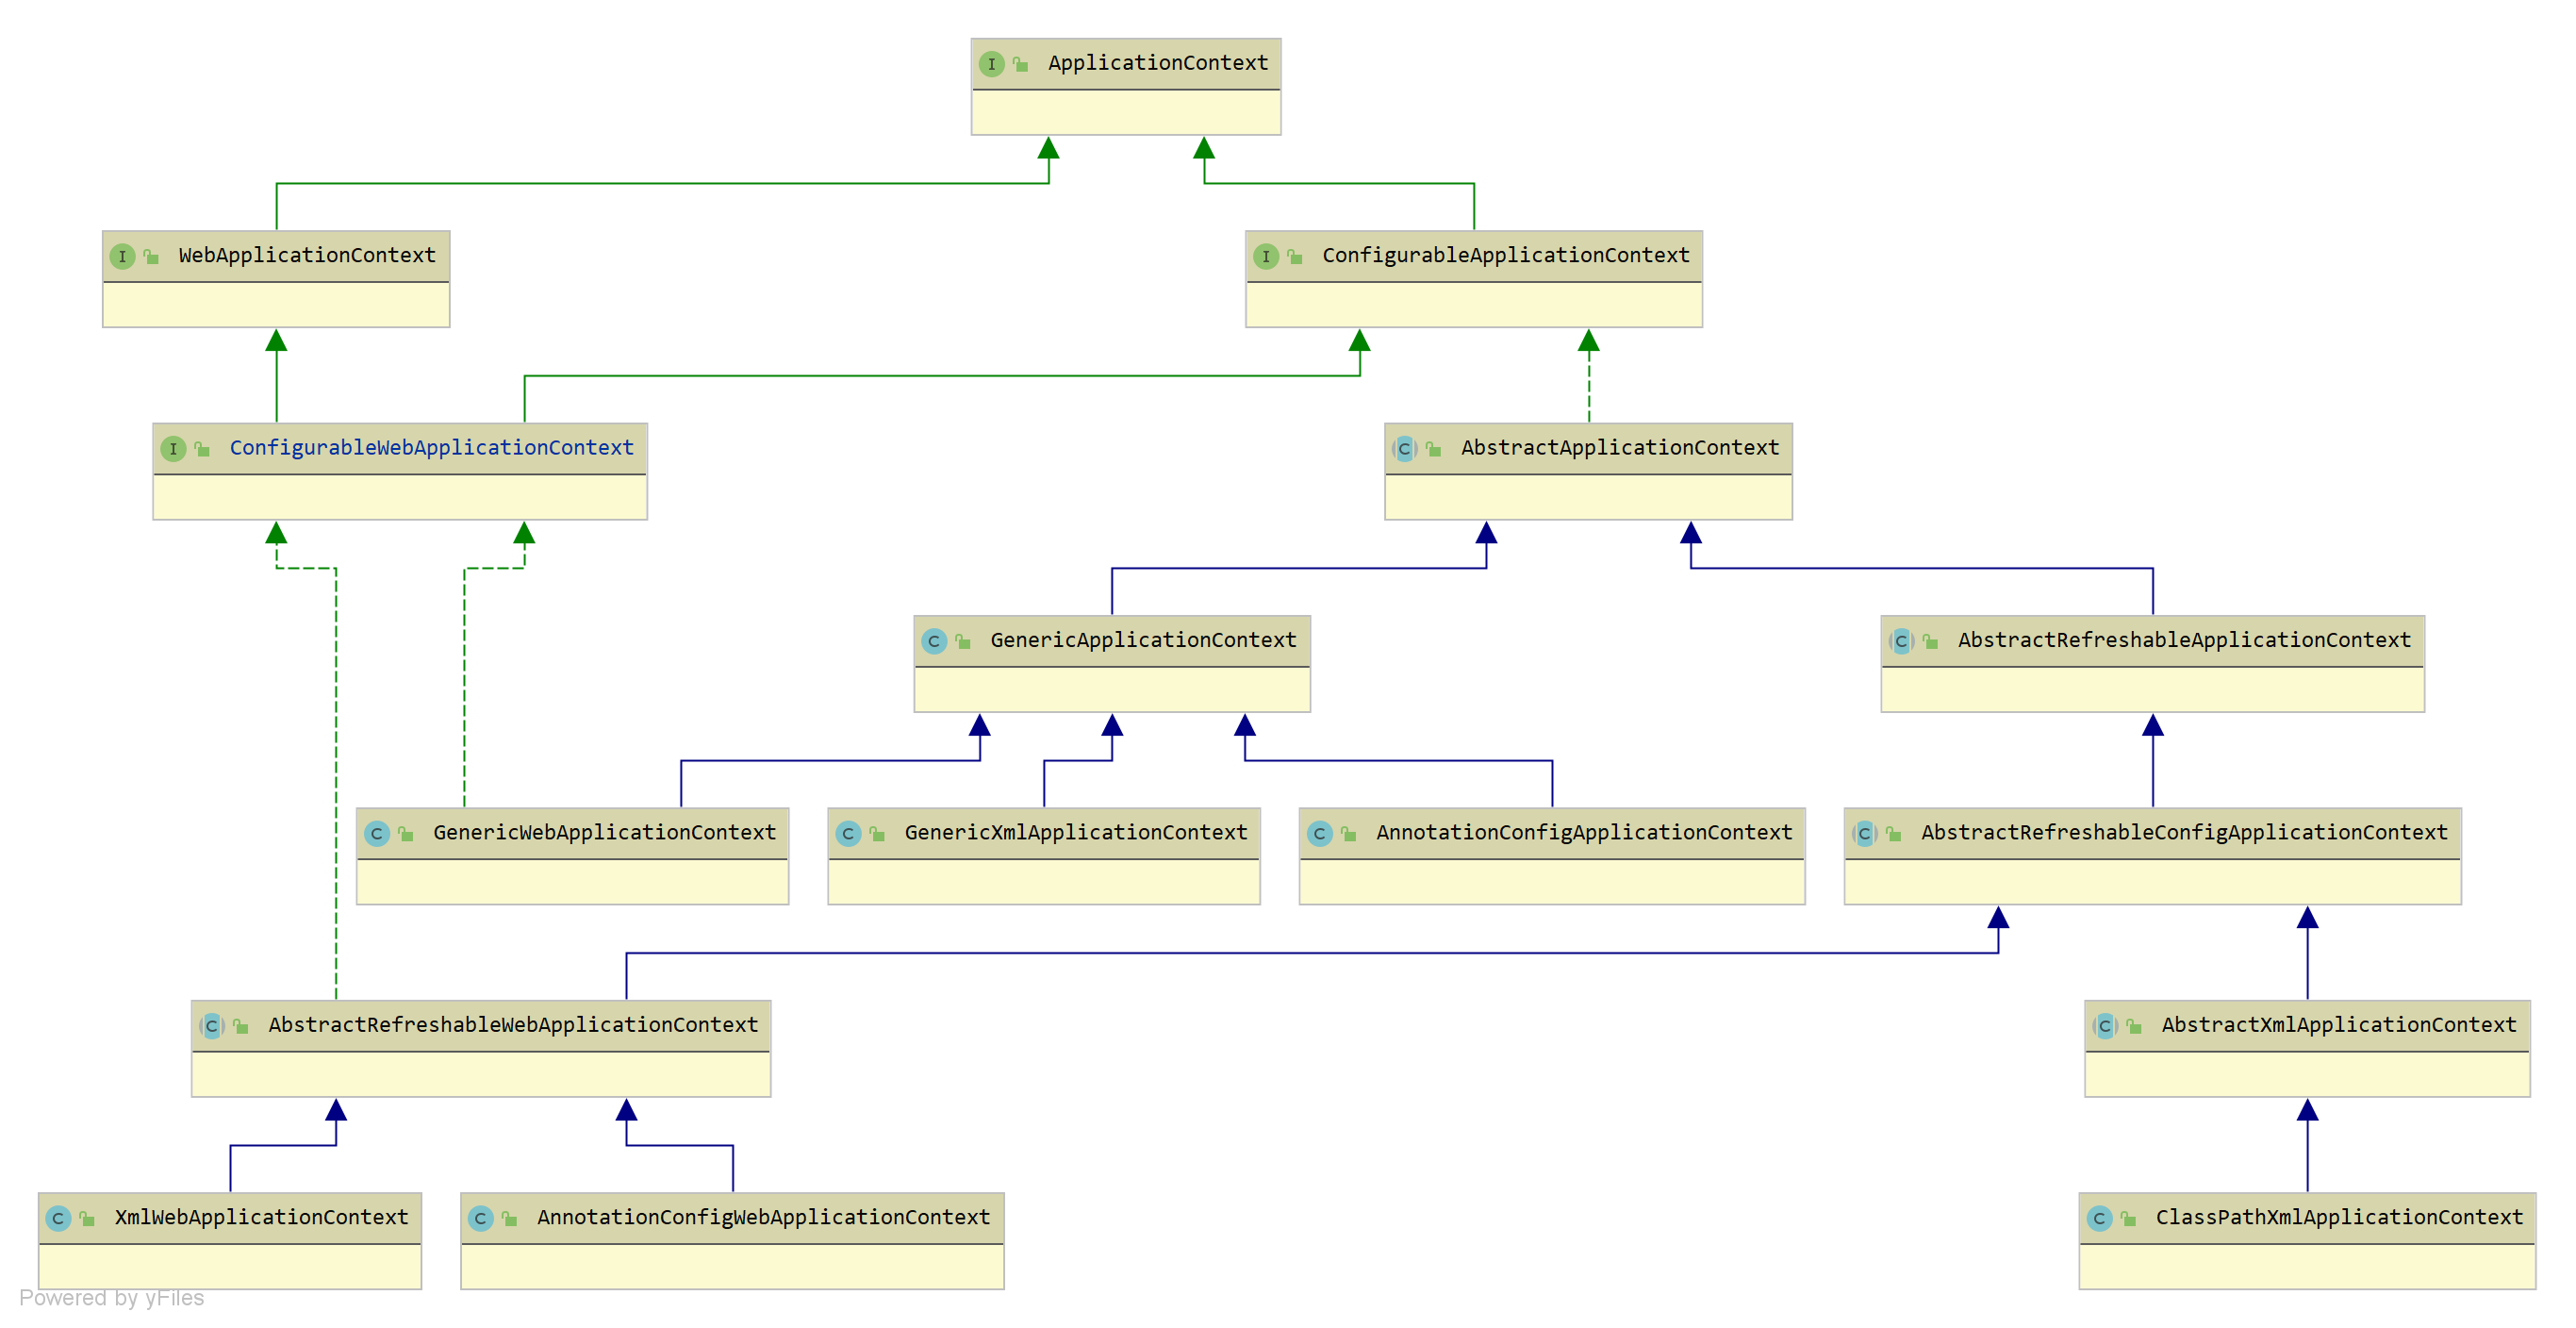
簡單描述上面幾個關鍵的類:
org.springframework.context.support.AbstractApplicationContext,Spring 應用上下文的抽象類,實現了大部分功能,提供骨架方法交由子類去實現org.springframework.web.context.ConfigurableWebApplicationContext,可配置的 Spring 應用上下文接口,支持 Web 應用org.springframework.context.support.AbstractRefreshableConfigApplicationContext,支持設置 XML 文件org.springframework.web.context.support.AbstractRefreshableWebApplicationContext,支持 Web 應用org.springframework.web.context.support.AnnotationConfigWebApplicationContext,支持 Web 應用,可以設置 XML 文件,並可以掃描注解下面的 Beanorg.springframework.context.annotation.AnnotationConfigApplicationContext,支持掃描注解下面的 Beanorg.springframework.web.context.support.ClassPathXmlApplicationContext,支持設置 XML 文件,也可以從 classpath 下面掃描相關資源
ApplicationContext 的子類比較多,主要根據支持 Web、支持注解、支持 XML 文件三個功能進行區分,我們大致了解每個實現類的作用即可。其中基本的實現都是在 AbstractApplicationContext 這個抽象類中完成的,在它的 refresh() 方法體現了 Spring 應用上下文的生命周期。AbstractApplicationContext#refresh() 這個方法可以說是 Spring 應用上下文的准備階段,在使用 Spring 時該方法會被調用,本文就圍繞它進行展述。
可以先看到我的另一篇文章《精盡Spring MVC源碼分析 - WebApplicationContext 容器的初始化》,在 Spring MVC 啟動過程中,創建 Spring 應用上下文后會調用其 refresh() 方法進行刷新,讓 Spring 應用上下文准備就緒。
AbstractApplicationContext
org.springframework.context.support.AbstractApplicationContext,Spring 應用上下文的抽象類,實現了大部分功能,提供骨架方法交由子類去實現
先來看看它的相關屬性
public abstract class AbstractApplicationContext extends DefaultResourceLoader
		implements ConfigurableApplicationContext {

	public static final String MESSAGE_SOURCE_BEAN_NAME = "messageSource";

	public static final String LIFECYCLE_PROCESSOR_BEAN_NAME = "lifecycleProcessor";

	public static final String APPLICATION_EVENT_MULTICASTER_BEAN_NAME = "applicationEventMulticaster";

	static {
		// Eagerly load the ContextClosedEvent class to avoid weird classloader issues
		// on application shutdown in WebLogic 8.1. (Reported by Dustin Woods.)
		ContextClosedEvent.class.getName();
	}

	/** Unique id for this context, if any. */
	private String id = ObjectUtils.identityToString(this);

	/** Display name. */
	private String displayName = ObjectUtils.identityToString(this);

	/** 父應用上下文 */
	@Nullable
	private ApplicationContext parent;

	/** 當前應用上下文的環境 */
	@Nullable
	private ConfigurableEnvironment environment;

	/** BeanFactory 的處理器 */
	private final List<BeanFactoryPostProcessor> beanFactoryPostProcessors = new ArrayList<>();

	/** 啟動時間 */
	private long startupDate;

	/** 是否處於激活狀態 */
	private final AtomicBoolean active = new AtomicBoolean();

	/** 是否處於關閉狀態 */
	private final AtomicBoolean closed = new AtomicBoolean();

	/** 啟動和銷毀時的鎖對象 */
	private final Object startupShutdownMonitor = new Object();

	/** 鈎子函數,用於 JVM 關閉時的回調 */
	@Nullable
	private Thread shutdownHook;

	/** ResourcePatternResolver used by this context. */
	private ResourcePatternResolver resourcePatternResolver;

	/** LifecycleProcessor for managing the lifecycle of beans within this context. */
	@Nullable
	private LifecycleProcessor lifecycleProcessor;

	/** MessageSource we delegate our implementation of this interface to. */
	@Nullable
	private MessageSource messageSource;

	/** 事件廣播器 */
	@Nullable
	private ApplicationEventMulticaster applicationEventMulticaster;

	/** 事件監聽器 */
	private final Set<ApplicationListener<?>> applicationListeners = new LinkedHashSet<>();

	/** 早期(Spring 應用上下文還未就緒)注冊的時間監聽器 */
	@Nullable
	private Set<ApplicationListener<?>> earlyApplicationListeners;

	/** 早期(Spring 應用上下文還未就緒)發布的事件 */
	@Nullable
	private Set<ApplicationEvent> earlyApplicationEvents;

	public AbstractApplicationContext() {
		this.resourcePatternResolver = getResourcePatternResolver();
	}

	public AbstractApplicationContext(@Nullable ApplicationContext parent) {
		this();
		setParent(parent);
	}
}
屬性不多,上面都有注釋
publishEvent 方法
publishEvent(ApplicationEvent event) 方法,發布事件,因為它繼承了 ApplicationEventPublisher 事件發布器,如下:
@Override
public void publishEvent(ApplicationEvent event) {
    publishEvent(event, null);
}

protected void publishEvent(Object event, @Nullable ResolvableType eventType) {
    Assert.notNull(event, "Event must not be null");

    // Decorate event as an ApplicationEvent if necessary
    ApplicationEvent applicationEvent;
    if (event instanceof ApplicationEvent) {
        applicationEvent = (ApplicationEvent) event;
    }
    else {
        // 如果不是 ApplicationEvent 類型的事件,則封裝成 PayloadApplicationEvent
        applicationEvent = new PayloadApplicationEvent<>(this, event);
        if (eventType == null) {
            eventType = ((PayloadApplicationEvent<?>) applicationEvent).getResolvableType();
        }
    }

    // Multicast right now if possible - or lazily once the multicaster is initialized
    if (this.earlyApplicationEvents != null) {
        this.earlyApplicationEvents.add(applicationEvent);
    }
    else {
        // 廣播該事件
        getApplicationEventMulticaster().multicastEvent(applicationEvent, eventType);
    }

    // Publish event via parent context as well...
    // 父容器也要發布事件
    if (this.parent != null) {
        if (this.parent instanceof AbstractApplicationContext) {
            ((AbstractApplicationContext) this.parent).publishEvent(event, eventType);
        }
        else {
            this.parent.publishEvent(event);
        }
    }
}
過程如下:
- 如果不是 ApplicationEvent 類型的事件,則封裝成 PayloadApplicationEvent
- 如果
earlyApplicationEvents不為null,則表示當前 Spring 應用上下文正在處於刷新階段,還沒有准備就緒,則先將這個早期事件添加至earlyApplicationEvents;否則,Spring 應用上下文已經准備就緒了,此時就對該事件進行廣播 - 如果存在父應用上下文,也需要進行廣播
上面的第 2 步中的 earlyApplicationEvents 如果不為 null ,為什么 Spring 應用上下文還沒有准備就緒呢?答案會在后面體現
addBeanFactoryPostProcessor 方法
addBeanFactoryPostProcessor(BeanFactoryPostProcessor postProcessor) 方法,添加 BeanFactoryPostProcessor 處理器,如下:
@Override
public void addBeanFactoryPostProcessor(BeanFactoryPostProcessor postProcessor) {
    Assert.notNull(postProcessor, "BeanFactoryPostProcessor must not be null");
    this.beanFactoryPostProcessors.add(postProcessor);
}
直接往 beanFactoryPostProcessors 添加,BeanFactoryPostProcessor 處理器用於在 Spring 應用上下文刷新階段對創建好的 BeanFactory 進行后綴處理
addApplicationListener 方法
addApplicationListener(ApplicationListener<?> listener) 方法,添加事件監聽器,如下:
@Override
public void addApplicationListener(ApplicationListener<?> listener) {
    Assert.notNull(listener, "ApplicationListener must not be null");
    if (this.applicationEventMulticaster != null) {
        this.applicationEventMulticaster.addApplicationListener(listener);
    }
    this.applicationListeners.add(listener);
}
如果事件廣播器不為空則將該監聽器添加進去,然后再添加到本地的 applicationListeners 中
【核心】refresh 方法
refresh() 方法,Spring 應用上下文的刷新,讓 Spring 應用上下文處於准備就緒狀態,如下:
/**
 * 刷新上下文,在哪會被調用?
 * 在 **Spring MVC** 中,{@link org.springframework.web.context.ContextLoader#initWebApplicationContext} 方法初始化上下文時,會調用該方法
 */
@Override
public void refresh() throws BeansException, IllegalStateException {
    // <1> 來個鎖,不然 refresh() 還沒結束,你又來個啟動或銷毀容器的操作,那不就亂套了嘛
    synchronized (this.startupShutdownMonitor) {

        // <2> 刷新上下文環境的准備工作,記錄下容器的啟動時間、標記'已啟動'狀態、對上下文環境屬性進行校驗
        prepareRefresh();

        // <3> 創建並初始化一個 BeanFactory 對象 `beanFactory`,會加載出對應的 BeanDefinition 元信息們
        ConfigurableListableBeanFactory beanFactory = obtainFreshBeanFactory();

        // <4> 為 `beanFactory` 進行一些准備工作,例如添加幾個 BeanPostProcessor,手動注冊幾個特殊的 Bean
        prepareBeanFactory(beanFactory);

        try {
            // <5> 對 `beanFactory` 在進行一些后期的加工,交由子類進行擴展
            postProcessBeanFactory(beanFactory);

            // <6> 執行 BeanFactoryPostProcessor 處理器,包含 BeanDefinitionRegistryPostProcessor 處理器
            invokeBeanFactoryPostProcessors(beanFactory);

            // <7> 對 BeanPostProcessor 處理器進行初始化,並添加至 BeanFactory 中
            registerBeanPostProcessors(beanFactory);

            // <8> 設置上下文的 MessageSource 對象
            initMessageSource();

            // <9> 設置上下文的 ApplicationEventMulticaster 對象,上下文事件廣播器
            initApplicationEventMulticaster();

            // <10> 刷新上下文時再進行一些初始化工作,交由子類進行擴展
            onRefresh();

            // <11> 將所有 ApplicationListener 監聽器添加至 `applicationEventMulticaster` 事件廣播器,如果已有事件則進行廣播
            registerListeners();

            // <12> 設置 ConversionService 類型轉換器,**初始化**所有還未初始化的 Bean(不是抽象、單例模式、不是懶加載方式)
            finishBeanFactoryInitialization(beanFactory);

            // <13> 刷新上下文的最后一步工作,會發布 ContextRefreshedEvent 上下文完成刷新事件
            finishRefresh();
        }
        // <14> 如果上面過程出現 BeansException 異常
        catch (BeansException ex) {
            if (logger.isWarnEnabled()) {
                logger.warn("Exception encountered during context initialization - " +
                        "cancelling refresh attempt: " + ex);
            }
            // <14.1> “銷毀” 已注冊的單例 Bean
            destroyBeans();

            // <14.2> 設置上下文的 `active` 狀態為 `false`
            cancelRefresh(ex);

            // <14.3> 拋出異常
            throw ex;
        }
        // <15> `finally` 代碼塊
        finally {
            // Reset common introspection caches in Spring's core, since we
            // might not ever need metadata for singleton beans anymore...
            // 清除相關緩存,例如通過反射機制緩存的 Method 和 Field 對象,緩存的注解元數據,緩存的泛型類型對象,緩存的類加載器
            resetCommonCaches();
        }
    }
}
整個過程比較長,每一個步驟都調用一個方法,過程如下:
- 來個鎖,不然
refresh()還沒結束,你又來個啟動或銷毀容器的操作,那不就亂套了嘛 - 應用上下文啟動准備階段,調用
prepareRefresh()方法,說明:刷新上下文環境的准備工作,記錄下容器的啟動時間、標記'已啟動'狀態、對上下文環境屬性進行校驗 - BeanFactory 創建階段,調用
obtainFreshBeanFactory()方法,說明:創建並初始化一個 BeanFactory 對象beanFactory,會加載出對應的 BeanDefinition 元信息們 - BeanFactory 准備階段,調用
prepareBeanFactory()方法,說明:為beanFactory進行一些准備工作,例如添加幾個 BeanPostProcessor,手動注冊幾個特殊的 Bean - BeanFactory 后置處理階段,調用
postProcessBeanFactory(ConfigurableListableBeanFactory)方法,說明:對beanFactory在進行一些后期的加工,交由子類進行擴展 - BeanFactory 后置處理階段,調用
invokeBeanFactoryPostProcessors(ConfigurableListableBeanFactory)方法,說明:執行 BeanFactoryPostProcessor 處理器,包含 BeanDefinitionRegistryPostProcessor 處理器 - BeanFactory 注冊 BeanPostProcessor 階段,調用
registerBeanPostProcessors(ConfigurableListableBeanFactory)方法,說明:對 BeanPostProcessor 處理器進行初始化,並添加至 BeanFactory 中 - 初始化內建 Bean:MessageSource,調用
initMessageSource()方法,說明:設置上下文的 MessageSource 對象 - 初始化內建 Bean:Spring 事件廣播器,調用
initApplicationEventMulticaster()方法,說明:設置上下文的 ApplicationEventMulticaster 對象,上下文事件廣播器 - Spring 應用上下文刷新擴展階段,調用
onRefresh()方法,說明:刷新上下文時再進行一些初始化工作,交由子類進行擴展 - Spring 事件監聽器注冊階段,調用
registerListeners()方法,說明:將所有 ApplicationListener 監聽器添加至applicationEventMulticaster事件廣播器,如果已有事件則進行廣播 - BeanFactory 初始化完成階段,調用
finishBeanFactoryInitialization(ConfigurableListableBeanFactory)方法,說明:設置 ConversionService 類型轉換器,初始化所有還未初始化的 Bean(不是抽象、單例模式、不是懶加載方式) - 應用上下文刷新完成階段,調用
finishRefresh()方法,說明:刷新上下文的最后一步工作,會發布 ContextRefreshedEvent 上下文完成刷新事件 - 如果上面過程出現 BeansException 異常
- “銷毀” 已注冊的單例 Bean
- 設置上下文的
active狀態為false - 拋出異常
finally代碼塊,清除相關緩存,例如通過反射機制緩存的 Method 和 Field 對象,緩存的注解元數據,緩存的泛型類型對象,緩存的類加載器
可以看到該過程分為許多階段,每個階段都非常關鍵,將在后續已經進行分析
registerShutdownHook 方法
registerShutdownHook() 方法,向 JVM 注冊一個鈎子函數,當 JVM 關閉時執行該函數,如下:
@Override
public void registerShutdownHook() {
    if (this.shutdownHook == null) {
        // No shutdown hook registered yet.
        this.shutdownHook = new Thread() {
            @Override
            public void run() {
                synchronized (startupShutdownMonitor) {
                    doClose();
                }
            }
        };
        // 為當前的 JVM 運行環境添加一個鈎子函數,用於關閉當前上下文
        Runtime.getRuntime().addShutdownHook(this.shutdownHook);
    }
}
這個鈎子函數也就是調用了 doClose() 方法,用於關閉當前 Spring 應用上下文
close 方法
close() 方法,關閉當前 Spring 應用上下文,如下:
@Override
public void close() {
   synchronized (this.startupShutdownMonitor) {
      doClose();
      // If we registered a JVM shutdown hook, we don't need it anymore now:
      // We've already explicitly closed the context.
      if (this.shutdownHook != null) {
         try {
            Runtime.getRuntime().removeShutdownHook(this.shutdownHook);
         }
         catch (IllegalStateException ex) {
            // ignore - VM is already shutting down
         }
      }
   }
}
關閉當前 Spring 應用上下文,也是調用 doClose() 方法,同時如果存在鈎子函數則將其從 JVM 中移除,因為上面已經關閉了
doClose 方法
doClose() 方法,關閉當前 Spring 應用上下文,如下:
protected void doClose() {
    // Check whether an actual close attempt is necessary...
    if (this.active.get() && this.closed.compareAndSet(false, true)) {
        // Live Beans JMX 撤銷托管
        LiveBeansView.unregisterApplicationContext(this);

        try {
            // Publish shutdown event.
            // 發布當前 Spring 應用上下文關閉事件
            publishEvent(new ContextClosedEvent(this));
        }
        catch (Throwable ex) {
            logger.warn("Exception thrown from ApplicationListener handling ContextClosedEvent", ex);
        }

        // Stop all Lifecycle beans, to avoid delays during individual destruction.
        if (this.lifecycleProcessor != null) {
            try {
                // 關閉 Lifecycle Beans
                this.lifecycleProcessor.onClose();
            }
            catch (Throwable ex) {
                logger.warn("Exception thrown from LifecycleProcessor on context close", ex);
            }
        }

        // Destroy all cached singletons in the context's BeanFactory.
        // 銷毀所有的單例 Bean
        destroyBeans();

        // Close the state of this context itself.
        // 關閉底層 BeanFactory 容器
        closeBeanFactory();

        // Let subclasses do some final clean-up if they wish...
        // 提供給子類去實現,用於清理相關資源
        onClose();

        // Reset local application listeners to pre-refresh state.
        if (this.earlyApplicationListeners != null) {
            this.applicationListeners.clear();
            this.applicationListeners.addAll(this.earlyApplicationListeners);
        }

        // Switch to inactive.
        this.active.set(false);
    }
}
主要做以下事情:
- Live Beans JMX 撤銷托管
- 發布當前 Spring 應用上下文關閉事件
- 銷毀所有的單例 Bean,調用 DefaultListableBeanFactory#destroySingletons() 方法
- 關閉底層 BeanFactory 容器
- 回調 onClose() 方法
1. 應用上下文啟動准備階段
AbstractApplicationContext#prepareRefresh() 方法,如下:
// AbstractApplicationContext.java
protected void prepareRefresh() {
    // 設置啟動時間
    this.startupDate = System.currentTimeMillis();
    // 設置當前 ApplicationContext 的狀態
    this.closed.set(false);
    this.active.set(true);

    // Initialize any placeholder property sources in the context environment.
    // 初始化 ApplicationContext 的 Environment(上下文環境)的相關屬性,交由子類去實現,如果是 Web 則會設置 ServletContext 和 ServletConfig
    initPropertySources();

    // Validate that all properties marked as required are resolvable:
    // see ConfigurablePropertyResolver#setRequiredProperties
    // 對屬性進行必要的驗證
    getEnvironment().validateRequiredProperties();

    // Store pre-refresh ApplicationListeners...
    if (this.earlyApplicationListeners == null) {
        this.earlyApplicationListeners = new LinkedHashSet<>(this.applicationListeners);
    }
    else {
        // Reset local application listeners to pre-refresh state.
        this.applicationListeners.clear();
        this.applicationListeners.addAll(this.earlyApplicationListeners);
    }

    // Allow for the collection of early ApplicationEvents,
    // to be published once the multicaster is available...
    this.earlyApplicationEvents = new LinkedHashSet<>();
}
主要做了以下事情:
- 設置啟動時間:startupDate
- 設置 Spring 應用上下文的狀態標識:closed(false)、active(true)
- 初始化 PropertySources - initPropertySources(),初始化 ApplicationContext 的 Environment(上下文環境)的相關屬性,交由子類去實現,如果是 Web 則會設置 ServletContext 和 ServletConfig
- 校驗 Environment 中必須屬性
- 初始化早期 Spring 事件集合
earlyApplicationEvents,注意這里創建了一個空的集合,也就是不為 null,回到前面的publishEvent(...)方法,如果earlyApplicationEvents不為 null 則會添加到這個集合里面,不會進行廣播。這一步的目的就是在 Spring 應用上下文還未完全就緒時,如果發布了事件,則需要先存儲起來,等就緒后才進行廣播
2. BeanFactory 創建階段
整個過程會創建一個 DefaultListableBeanFactory 對象作為底層 IoC 容器,然后從資源文件或者根據指定路徑下 .class 文件(標注了@ Component 注解)加載出所有的 BeanDefinition
2.1 obtainFreshBeanFactory 方法
AbstractApplicationContext#obtainFreshBeanFactory() 方法,如下:
protected ConfigurableListableBeanFactory obtainFreshBeanFactory() {
    refreshBeanFactory();
    return getBeanFactory();
}
這兩個方法都是抽象方法,交由子類實現,我們來看到 AbstractRefreshableApplicationContext 的實現
2.2 refreshBeanFactory 方法
AbstractRefreshableApplicationContext#refreshBeanFactory() 方法,如下:
@Override
protected final void refreshBeanFactory() throws BeansException {
    // 若已有 BeanFactory ,銷毀它的 Bean 們,並銷毀 BeanFactory
    if (hasBeanFactory()) {
        destroyBeans();
        closeBeanFactory();
    }
    try {
        // 創建 DefaultListableBeanFactory 對象
        DefaultListableBeanFactory beanFactory = createBeanFactory();
        // 指定序列化編號
        beanFactory.setSerializationId(getId());
        // 定制 BeanFactory 相關屬性(是否允許 BeanDefinition 重復定義,是否允許循環依賴,默認都是允許)
        customizeBeanFactory(beanFactory);
        // 加載 BeanDefinition 們
        loadBeanDefinitions(beanFactory);
        synchronized (this.beanFactoryMonitor) {
            this.beanFactory = beanFactory;
        }
    }
    catch (IOException ex) {
        throw new ApplicationContextException("I/O error parsing bean definition source for " + getDisplayName(), ex);
    }
}

protected DefaultListableBeanFactory createBeanFactory() {
    return new DefaultListableBeanFactory(getInternalParentBeanFactory());
}

protected void customizeBeanFactory(DefaultListableBeanFactory beanFactory) {
    if (this.allowBeanDefinitionOverriding != null) {
        beanFactory.setAllowBeanDefinitionOverriding(this.allowBeanDefinitionOverriding);
    }
    if (this.allowCircularReferences != null) {
        beanFactory.setAllowCircularReferences(this.allowCircularReferences);
    }
}
主要做以下事情:
- 若已有 BeanFactory ,銷毀它的 Bean 們,並銷毀 BeanFactory
- 創建 BeanFactory,DefaultListableBeanFactory 對象
- 設置 BeanFactory Id
- 定制 BeanFactory 相關屬性(是否允許 BeanDefinition 重復定義,是否允許循環依賴,默認都是允許)
- 加載出 BeanDefinition 們 -
loadBeanDefinitions(DefaultListableBeanFactory beanFactory)方法,交由子類實現(主要是 XML 和 Annotation 的區別) - 關聯 BeanFactory 到 Spring 應用上下文(ApplicationContext)
上面第 6 步會將第 2 步創建的 DefaultListableBeanFactory 設置為 Spring 應用上下文的 BeanFactory 對象,也就可以通過 getBeanFactory() 獲取
我們再來看到 loadBeanDefinitions(...) 抽象方法的實現,主要為注解和 XML 的區別,先來看到 AbstractXmlApplicationContext 的實現
2.3 loadBeanDefinitions 方法(XML)
AbstractXmlApplicationContext#loadBeanDefinitions(DefaultListableBeanFactory beanFactory) 方法,如下:
@Override
protected void loadBeanDefinitions(DefaultListableBeanFactory beanFactory) throws BeansException, IOException {
    // Create a new XmlBeanDefinitionReader for the given BeanFactory.
    // 創建 XmlBeanDefinitionReader 對象
    XmlBeanDefinitionReader beanDefinitionReader = new XmlBeanDefinitionReader(beanFactory);

    // Configure the bean definition reader with this context's
    // resource loading environment.
    // 對 XmlBeanDefinitionReader 進行環境變量的設置
    beanDefinitionReader.setEnvironment(this.getEnvironment());
    beanDefinitionReader.setResourceLoader(this);
    beanDefinitionReader.setEntityResolver(new ResourceEntityResolver(this));

    // Allow a subclass to provide custom initialization of the reader,
    // then proceed with actually loading the bean definitions.
    // 對 XmlBeanDefinitionReader 進行設置,可以進行覆蓋
    initBeanDefinitionReader(beanDefinitionReader);

    // 從 Resource 們中,加載 BeanDefinition 們
    loadBeanDefinitions(beanDefinitionReader);
}

protected void loadBeanDefinitions(XmlBeanDefinitionReader reader) throws BeansException, IOException {
    // 從配置文件 Resource 中,加載 BeanDefinition 們
    Resource[] configResources = getConfigResources();
    if (configResources != null) {
        reader.loadBeanDefinitions(configResources);
    }
    // 從配置文件地址中,加載 BeanDefinition 們
    String[] configLocations = getConfigLocations();
    if (configLocations != null) {
        reader.loadBeanDefinitions(configLocations);
    }
}
可以看到這里創建了 《BeanDefinition 的加載階段(XML 文件)》這篇文章中講到的 XmlBeanDefinitionReader 資源解析器對象,然后通過它解析 XML 配置文件,解析過程在之前的文章中已經分析過了。
配置文件怎么來的呢?
在 《精盡Spring MVC源碼分析 - WebApplicationContext 容器的初始化》的 ContextLoader#configureAndRefreshWebApplicationContext(...) 方法中可以看到,會將
web.xml文件中配置的contextConfigLocation設置到 Spring 應用上下文中
我們再來看到 AnnotationConfigWebApplicationContext 的實現
2.3 loadBeanDefinitions 方法(注解)
AnnotationConfigWebApplicationContext#loadBeanDefinitions(DefaultListableBeanFactory beanFactory) 方法,如下:
@Override
protected void loadBeanDefinitions(DefaultListableBeanFactory beanFactory) {
    AnnotatedBeanDefinitionReader reader = getAnnotatedBeanDefinitionReader(beanFactory);
    ClassPathBeanDefinitionScanner scanner = getClassPathBeanDefinitionScanner(beanFactory);

    BeanNameGenerator beanNameGenerator = getBeanNameGenerator();
    if (beanNameGenerator != null) {
        reader.setBeanNameGenerator(beanNameGenerator);
        scanner.setBeanNameGenerator(beanNameGenerator);
        beanFactory.registerSingleton(AnnotationConfigUtils.CONFIGURATION_BEAN_NAME_GENERATOR, beanNameGenerator);
    }

    ScopeMetadataResolver scopeMetadataResolver = getScopeMetadataResolver();
    if (scopeMetadataResolver != null) {
        reader.setScopeMetadataResolver(scopeMetadataResolver);
        scanner.setScopeMetadataResolver(scopeMetadataResolver);
    }

    if (!this.componentClasses.isEmpty()) {
        if (logger.isDebugEnabled()) {
            logger.debug("Registering component classes: [" +
                    StringUtils.collectionToCommaDelimitedString(this.componentClasses) + "]");
        }
        reader.register(ClassUtils.toClassArray(this.componentClasses));
    }

    if (!this.basePackages.isEmpty()) {
        if (logger.isDebugEnabled()) {
            logger.debug("Scanning base packages: [" +
                    StringUtils.collectionToCommaDelimitedString(this.basePackages) + "]");
        }
        // 掃描指定包路徑下 @Component 注解的 .class 文件,會解析出 BeanDefinition 對象
        scanner.scan(StringUtils.toStringArray(this.basePackages));
    }

    String[] configLocations = getConfigLocations();
    if (configLocations != null) {
        for (String configLocation : configLocations) {
            try {
                Class<?> clazz = ClassUtils.forName(configLocation, getClassLoader());
                if (logger.isTraceEnabled()) {
                    logger.trace("Registering [" + configLocation + "]");
                }
                reader.register(clazz);
            }
            catch (ClassNotFoundException ex) {
                if (logger.isTraceEnabled()) {
                    logger.trace("Could not load class for config location [" + configLocation +
                            "] - trying package scan. " + ex);
                }
                int count = scanner.scan(configLocation);
                if (count == 0 && logger.isDebugEnabled()) {
                    logger.debug("No component classes found for specified class/package [" + configLocation + "]");
                }
            }
        }
    }
}

protected ClassPathBeanDefinitionScanner getClassPathBeanDefinitionScanner(DefaultListableBeanFactory beanFactory) {
    return new ClassPathBeanDefinitionScanner(beanFactory, true, getEnvironment());
}
我們主要看到關鍵的一步,會創建一個 ClassPathBeanDefinitionScanner 掃描器對象,然后調用其 scan(String... basePackages) 方法去掃描指定包路徑下的 .class 文件,整個掃描過程在 《BeanDefinition 的解析過程(面向注解)》 這篇文章中已經分析過了
3. BeanFactory 准備階段
AbstractApplicationContext#prepareBeanFactory(ConfigurableListableBeanFactory) 方法,如下:
protected void prepareBeanFactory(ConfigurableListableBeanFactory beanFactory) {
    // 設置 ClassLoader 類加載器
    beanFactory.setBeanClassLoader(getClassLoader());
    // 設置 BeanExpressionResolver 表達式語言處理器,Spring 3 開始增加了對語言表達式的支持,例如可以使用 #{bean.xxx} 的形式來調用這個 Bean 的屬性值
    beanFactory.setBeanExpressionResolver(new StandardBeanExpressionResolver(beanFactory.getBeanClassLoader()));
    // 添加一個默認的 PropertyEditorRegistrar 屬性編輯器
    beanFactory.addPropertyEditorRegistrar(new ResourceEditorRegistrar(this, getEnvironment()));

    /*
     * 添加一個 BeanPostProcessor 處理器,ApplicationContextAwareProcessor,初始化 Bean 的**前置**處理
     * 這個 BeanPostProcessor 其實是對幾種 Aware 接口的處理,調用其 setXxx 方法
     * 可以跳到 AbstractAutowireCapableBeanFactory 的 initializeBean(...) 方法(調用 Bean 的初始化方法)中看看
     */
    beanFactory.addBeanPostProcessor(new ApplicationContextAwareProcessor(this));
    // 忽略 Aware 回調接口作為依賴注入接口
    beanFactory.ignoreDependencyInterface(EnvironmentAware.class);
    beanFactory.ignoreDependencyInterface(EmbeddedValueResolverAware.class);
    beanFactory.ignoreDependencyInterface(ResourceLoaderAware.class);
    beanFactory.ignoreDependencyInterface(ApplicationEventPublisherAware.class);
    beanFactory.ignoreDependencyInterface(MessageSourceAware.class);
    beanFactory.ignoreDependencyInterface(ApplicationContextAware.class);

    // 設置幾個自動裝配的特殊規則,當你自動注入下面這些類型的 Bean 時,注入的就是右邊的值
    // 可以看到 ApplicationContext.class 對應當前對象
    beanFactory.registerResolvableDependency(BeanFactory.class, beanFactory);
    beanFactory.registerResolvableDependency(ResourceLoader.class, this);
    beanFactory.registerResolvableDependency(ApplicationEventPublisher.class, this);
    beanFactory.registerResolvableDependency(ApplicationContext.class, this);

    // Register early post-processor for detecting inner beans as ApplicationListeners.
    // 添加一個 BeanPostProcessor 處理器,ApplicationListenerDetector,用於裝飾監聽器
    // 初始化 Bean 的時候,如果是 ApplicationListener 類型且為單例模式,則添加到 Spring 應用上下文
    beanFactory.addBeanPostProcessor(new ApplicationListenerDetector(this));

    // 增加對 AspectJ 的支持,AOP 相關
    if (beanFactory.containsBean(LOAD_TIME_WEAVER_BEAN_NAME)) {
        beanFactory.addBeanPostProcessor(new LoadTimeWeaverAwareProcessor(beanFactory));
        // Set a temporary ClassLoader for type matching.
        beanFactory.setTempClassLoader(new ContextTypeMatchClassLoader(beanFactory.getBeanClassLoader()));
    }

    // 注冊幾個 ApplicationContext 上下文默認的 Bean 對象
    if (!beanFactory.containsLocalBean(ENVIRONMENT_BEAN_NAME)) {
        beanFactory.registerSingleton(ENVIRONMENT_BEAN_NAME, getEnvironment());
    }
    if (!beanFactory.containsLocalBean(SYSTEM_PROPERTIES_BEAN_NAME)) {
        beanFactory.registerSingleton(SYSTEM_PROPERTIES_BEAN_NAME, getEnvironment().getSystemProperties());
    }
    if (!beanFactory.containsLocalBean(SYSTEM_ENVIRONMENT_BEAN_NAME)) {
        beanFactory.registerSingleton(SYSTEM_ENVIRONMENT_BEAN_NAME, getEnvironment().getSystemEnvironment());
    }
}
主要做以下事情:
- 設置 ClassLoader 類加載器
- 設置 BeanExpressionResolver 表達式語言處理器,Spring 3 開始增加了對語言表達式的支持,例如可以使用 #{bean.xxx} 的形式來獲取這個 Bean 的屬性值
- 添加一個默認的 PropertyEditorRegistrar 屬性編輯器 - ResourceEditorRegistrar
- 添加一個 BeanPostProcessor 處理器 -
ApplicationContextAwareProcessor,相關 Aware 回調接口的實現,調用其 setXxx 方法 - 忽略 Aware 回調接口作為依賴注入接口
- 注冊 ResolvableDependency 對象 - BeanFactory、ResourceLoader、ApplicationEventPublisher 以及 ApplicationContext,依賴注入這幾個對象時注入的都是當前 Spring 應用上下文,在《@Autowired 等注解的實現原理》這篇文章中有講到
- 添加一個 BeanPostProcessor 處理器 -
ApplicationListenerDetector,初始化 Bean 的時候,如果是 ApplicationListener 類型且為單例模式,則添加到 Spring 應用上下文 - 添加一個 BeanPostProcessor 處理器 - LoadTimeWeaverAwareProcessor,增加對 AspectJ 的支持,AOP 相關
- 注冊幾個單例對象 - Environment、SystemProperties(Java System Properties)、SystemEnvironment(OS 環境變量)
4. BeanFactory 后置處理階段
有序地執行所有 BeanFactoryPostProcessor(包括 BeanDefinitionRegistryPostProcessor)處理器,例如 @Bean 等注解定義的 Bean 的就是通過 BeanDefinitionRegistryPostProcessor 處理器接續出來的
4.1 postProcessBeanFactory 方法
該抽象方法交由子類實現,例如 AbstractRefreshableWebApplicationContext#postProcessBeanFactory(ConfigurableListableBeanFactory) 方法,如下:
@Override
protected void postProcessBeanFactory(ConfigurableListableBeanFactory beanFactory) {
    // 添加 ServletContextAwareProcessor 到 BeanFactory 容器中,
    // 該 processor 實現 BeanPostProcessor 接口,主要用於將 ServletContext 傳遞給實現了 ServletContextAware 接口的 bean
    beanFactory.addBeanPostProcessor(new ServletContextAwareProcessor(this.servletContext, this.servletConfig));
    // 忽略 ServletContextAware、ServletConfigAware,上面的 ServletContextAwareProcessor 已代替
    beanFactory.ignoreDependencyInterface(ServletContextAware.class);
    beanFactory.ignoreDependencyInterface(ServletConfigAware.class);

    // 注冊 WEB 應用特定的域(scope)到 beanFactory 中,以便 WebApplicationContext 可以使用它們。
    // 比如'request','session','globalSession','application'
    WebApplicationContextUtils.registerWebApplicationScopes(beanFactory, this.servletContext);
    // 注冊 WEB 應用特定的 Environment bean 到 beanFactory 中,以便 WebApplicationContext 可以使用它們
    // 如:'contextParameters','contextAttributes'
    WebApplicationContextUtils.registerEnvironmentBeans(beanFactory, this.servletContext, this.servletConfig);
}
添加 ServletContext 相關內容
4.2 invokeBeanFactoryPostProcessors 方法
AbstractApplicationContext#invokeBeanFactoryPostProcessors(ConfigurableListableBeanFactory) 方法,如下:
protected void invokeBeanFactoryPostProcessors(ConfigurableListableBeanFactory beanFactory) {
    // 執行所有的BeanFactoryPostProcessor處理器
    PostProcessorRegistrationDelegate.invokeBeanFactoryPostProcessors(beanFactory, getBeanFactoryPostProcessors());

    // Detect a LoadTimeWeaver and prepare for weaving, if found in the meantime
    // (e.g. through an @Bean method registered by ConfigurationClassPostProcessor)
    // 在 prepareBeanFactory() 方法中也有相同操作
    if (beanFactory.getTempClassLoader() == null && beanFactory.containsBean(LOAD_TIME_WEAVER_BEAN_NAME)) {
        beanFactory.addBeanPostProcessor(new LoadTimeWeaverAwareProcessor(beanFactory));
        beanFactory.setTempClassLoader(new ContextTypeMatchClassLoader(beanFactory.getBeanClassLoader()));
    }
}
這里借助於 PostProcessorRegistrationDelegate 這個類執行所有 BeanFactoryPostProcessor 處理器,對前面創建的 BeanFactory 進行后置處理
4.3 invokeBeanFactoryPostProcessors 方法
PostProcessorRegistrationDelegate#invokeBeanFactoryPostProcessors 方法,如下(方法比較長,可直接查看下面的總結):
public static void invokeBeanFactoryPostProcessors(ConfigurableListableBeanFactory beanFactory, List<BeanFactoryPostProcessor> beanFactoryPostProcessors) {

    // Invoke BeanDefinitionRegistryPostProcessors first, if any.
    Set<String> processedBeans = new HashSet<>();

    // <1> 執行當前 Spring 應用上下文和底層 BeanFactory 容器中的 BeanFactoryPostProcessor、BeanDefinitionRegistryPostProcessor 們的處理
    if (beanFactory instanceof BeanDefinitionRegistry) {
        BeanDefinitionRegistry registry = (BeanDefinitionRegistry) beanFactory;
        List<BeanFactoryPostProcessor> regularPostProcessors = new ArrayList<>();
        List<BeanDefinitionRegistryPostProcessor> registryProcessors = new ArrayList<>();

        // <1.1> 先遍歷當前 Spring 應用上下文中的 `beanFactoryPostProcessors`,如果是 BeanDefinitionRegistryPostProcessor 類型則進行處理
        for (BeanFactoryPostProcessor postProcessor : beanFactoryPostProcessors) {
            if (postProcessor instanceof BeanDefinitionRegistryPostProcessor) {
                BeanDefinitionRegistryPostProcessor registryProcessor = (BeanDefinitionRegistryPostProcessor) postProcessor;
                // 執行
                registryProcessor.postProcessBeanDefinitionRegistry(registry);
                // 添加,以供后續執行其他 `postProcessBeanFactory(registry)` 方法
                registryProcessors.add(registryProcessor);
            }
            else {
                regularPostProcessors.add(postProcessor);
            }
        }

        // Do not initialize FactoryBeans here: We need to leave all regular beans
        // uninitialized to let the bean factory post-processors apply to them!
        // Separate between BeanDefinitionRegistryPostProcessors that implement
        // PriorityOrdered, Ordered, and the rest.
        // 臨時變量,用於臨時保存 BeanFactory 容器中的 BeanDefinitionRegistryPostProcessor 對象
        List<BeanDefinitionRegistryPostProcessor> currentRegistryProcessors = new ArrayList<>();

        // First, invoke the BeanDefinitionRegistryPostProcessors that implement PriorityOrdered.
        // <1.2> 獲取底層 BeanFactory 容器中所有 BeanDefinitionRegistryPostProcessor 類型的 Bean 們,遍歷進行處理
        String[] postProcessorNames = beanFactory.getBeanNamesForType(BeanDefinitionRegistryPostProcessor.class, true, false);
        for (String ppName : postProcessorNames) {
            // 如果實現了 PriorityOrdered 接口,則獲取到對應的 Bean
            if (beanFactory.isTypeMatch(ppName, PriorityOrdered.class)) {
                // 初始化
                currentRegistryProcessors.add(beanFactory.getBean(ppName, BeanDefinitionRegistryPostProcessor.class));
                processedBeans.add(ppName);
            }
        }
        // 排序
        sortPostProcessors(currentRegistryProcessors, beanFactory);
        // 臨時保存起來
        registryProcessors.addAll(currentRegistryProcessors);
        // 執行
        invokeBeanDefinitionRegistryPostProcessors(currentRegistryProcessors, registry);
        // 清理
        currentRegistryProcessors.clear();

        // Next, invoke the BeanDefinitionRegistryPostProcessors that implement Ordered.
        // <1.3> 獲取底層 BeanFactory 容器中所有 BeanDefinitionRegistryPostProcessor 類型的 Bean 們,遍歷進行處理
        postProcessorNames = beanFactory.getBeanNamesForType(BeanDefinitionRegistryPostProcessor.class, true, false);
        for (String ppName : postProcessorNames) {
            // 如果實現了 Ordered 接口並且沒有執行過,則獲取到對應的 Bean
            if (!processedBeans.contains(ppName) && beanFactory.isTypeMatch(ppName, Ordered.class)) { // Ordered類型
                // 初始化
                currentRegistryProcessors.add(beanFactory.getBean(ppName, BeanDefinitionRegistryPostProcessor.class));
                processedBeans.add(ppName);
            }
        }
        // 排序
        sortPostProcessors(currentRegistryProcessors, beanFactory);
        // 臨時保存起來
        registryProcessors.addAll(currentRegistryProcessors);
        // 執行
        invokeBeanDefinitionRegistryPostProcessors(currentRegistryProcessors, registry);
        // 清理
        currentRegistryProcessors.clear();

        // Finally, invoke all other BeanDefinitionRegistryPostProcessors until no further ones appear.
        boolean reiterate = true;
        while (reiterate) {
            reiterate = false;
            // <1.4> 獲取底層 BeanFactory 容器中所有 BeanDefinitionRegistryPostProcessor 類型的 Bean 們,遍歷進行處理
            postProcessorNames = beanFactory.getBeanNamesForType(BeanDefinitionRegistryPostProcessor.class, true, false);
            for (String ppName : postProcessorNames) {
                // 如果該 BeanDefinitionRegistryPostProcessors 在上述過程中沒有執行過,則獲取到對應的 Bean
                if (!processedBeans.contains(ppName)) {
                    // 初始化
                    currentRegistryProcessors.add(beanFactory.getBean(ppName, BeanDefinitionRegistryPostProcessor.class));
                    processedBeans.add(ppName);
                    reiterate = true;
                }
            }
            // 排序
            sortPostProcessors(currentRegistryProcessors, beanFactory);
            // 臨時保存起來
            registryProcessors.addAll(currentRegistryProcessors);
            // 執行
            invokeBeanDefinitionRegistryPostProcessors(currentRegistryProcessors, registry);
            // 清理
            currentRegistryProcessors.clear();
        }

        // Now, invoke the postProcessBeanFactory callback of all processors handled so far.
        /*
         * <1.5> 上述執行完當前 Spring 應用上下文和底層 BeanFactory 容器中所有 BeanDefinitionRegistryPostProcessor 處理器中的 postProcessBeanDefinitionRegistry(registry) 方法后,
         * 接下來執行它們的 postProcessBeanFactory(beanFactory) 方法
         *
         * 注意:BeanDefinitionRegistryPostProcessor 繼承 BeanFactoryPostProcessor 接口
         */
        invokeBeanFactoryPostProcessors(registryProcessors, beanFactory);
        /*
         * <1.6> 這里我們執行當前 Spring 應用上下文中 BeanFactoryPostProcessor 處理器(非 BeanDefinitionRegistryPostProcessors 類型)的
         * postProcessBeanFactory(beanFactory) 方法
         *
         * 例如:PropertyPlaceholderConfigurer、PropertySourcesPlaceholderConfigurer
         */
        invokeBeanFactoryPostProcessors(regularPostProcessors, beanFactory);
    }

    // <2> 執行當前 Spring 應用上下文中的 BeanFactoryPostProcessor 處理器的 postProcessBeanFactory(beanFactory) 方法
    else {
        // Invoke factory processors registered with the context instance.
        invokeBeanFactoryPostProcessors(beanFactoryPostProcessors, beanFactory);
    }

    // Do not initialize FactoryBeans here: We need to leave all regular beans
    // uninitialized to let the bean factory post-processors apply to them!
    // <3> 獲取底層 BeanFactory 容器中所有 BeanFactoryPostProcessor 類型的 Bean 們
    String[] postProcessorNames = beanFactory.getBeanNamesForType(BeanFactoryPostProcessor.class, true, false);

    // Separate between BeanFactoryPostProcessors that implement PriorityOrdered,
    // Ordered, and the rest.
    List<BeanFactoryPostProcessor> priorityOrderedPostProcessors = new ArrayList<>();
    List<String> orderedPostProcessorNames = new ArrayList<>();
    List<String> nonOrderedPostProcessorNames = new ArrayList<>();
    for (String ppName : postProcessorNames) {
        if (processedBeans.contains(ppName)) { // 上面已經執行過了則跳過
            // skip - already processed in first phase above
        }
        else if (beanFactory.isTypeMatch(ppName, PriorityOrdered.class)) { // PriorityOrdered
            priorityOrderedPostProcessors.add(beanFactory.getBean(ppName, BeanFactoryPostProcessor.class));
        }
        else if (beanFactory.isTypeMatch(ppName, Ordered.class)) { // Ordered
            orderedPostProcessorNames.add(ppName);
        }
        else { // nonOrder
            nonOrderedPostProcessorNames.add(ppName);
        }
    }

    // First, invoke the BeanFactoryPostProcessors that implement PriorityOrdered.
    // <3.1> PriorityOrdered 類型的 BeanFactoryPostProcessor 對象
    // 排序
    sortPostProcessors(priorityOrderedPostProcessors, beanFactory);
    // 執行
    invokeBeanFactoryPostProcessors(priorityOrderedPostProcessors, beanFactory);

    // Next, invoke the BeanFactoryPostProcessors that implement Ordered.
    // <3.2> Ordered 類型的 BeanFactoryPostProcessor 對象
    List<BeanFactoryPostProcessor> orderedPostProcessors = new ArrayList<>();
    for (String postProcessorName : orderedPostProcessorNames) {
        orderedPostProcessors.add(beanFactory.getBean(postProcessorName, BeanFactoryPostProcessor.class));
    }
    // 排序
    sortPostProcessors(orderedPostProcessors, beanFactory);
    // 執行
    invokeBeanFactoryPostProcessors(orderedPostProcessors, beanFactory);

    // Finally, invoke all other BeanFactoryPostProcessors.
    // <3.2> nonOrdered 的 BeanFactoryPostProcessor 對象
    List<BeanFactoryPostProcessor> nonOrderedPostProcessors = new ArrayList<>();
    for (String postProcessorName : nonOrderedPostProcessorNames) {
        nonOrderedPostProcessors.add(beanFactory.getBean(postProcessorName, BeanFactoryPostProcessor.class));
    }
    // 無需排序,直接執行
    invokeBeanFactoryPostProcessors(nonOrderedPostProcessors, beanFactory);

    // Clear cached merged bean definitions since the post-processors might have
    // modified the original metadata, e.g. replacing placeholders in values...
    beanFactory.clearMetadataCache();
}
主要做以下事情:
- 如果當前 Spring 應用上下文是 BeanDefinitionRegistry 類型,則執行當前 Spring 應用上下文中所有 BeanDefinitionRegistryPostProcessor、BeanFactoryPostProcessor 的處理,以及底層 BeanFactory 容器中 BeanDefinitionRegistryPostProcessor 的處理,處理順序如下:
- 當前 Spring 應用上下文中所有 BeanDefinitionRegistryPostProcessor#postProcessBeanDefinitionRegistry
- 底層 BeanFactory 容器中所有 BeanDefinitionRegistryPostProcessor#postProcessBeanDefinitionRegistry(優先級:PriorityOrdered > Ordered > 無)
- 當前 Spring 應用上下文和底層 BeanFactory 容器中所有 BeanDefinitionRegistryPostProcessor#postProcessBeanFactory
- 當前 Spring 應用上下文中所有 BeanFactoryPostProcessor#postProcessBeanFactory
- 否則,執行當前 Spring 應用上下文中所有 BeanFactoryPostProcessor#postProcessBeanFactory
- 執行底層 BeanFactory 容器中所有 BeanFactoryPostProcessor#postProcessBeanFactory,上面已經處理過的會跳過,執行順序和上面一樣:PriorityOrdered > Ordered > 無
總結:有序地執行所有 BeanFactoryPostProcessor(包括 BeanDefinitionRegistryPostProcessor)處理器
5. BeanFactory 注冊 BeanPostProcessor 階段
將所有已加載出來的 BeanPostProcessor 類型的 BeanDefinition 通過依賴查找獲取到 Bean 們,然后有序的添加至 BeanFactory 中
AbstractApplicationContext#registerBeanPostProcessors(ConfigurableListableBeanFactory) 方法,如下:
protected void registerBeanPostProcessors(ConfigurableListableBeanFactory beanFactory) {
    PostProcessorRegistrationDelegate.registerBeanPostProcessors(beanFactory, this);
}
這里也借助於 PostProcessorRegistrationDelegate 這個類注冊所有 BeanPostProcessor 處理器,如下:
public static void registerBeanPostProcessors(ConfigurableListableBeanFactory beanFactory, AbstractApplicationContext applicationContext) {

    // <1> 獲取所有的 BeanPostProcessor 類型的 beanName
    // 這些 beanName 都已經全部加載到容器中去,但是沒有實例化
    String[] postProcessorNames = beanFactory.getBeanNamesForType(BeanPostProcessor.class, true, false);

    // Register BeanPostProcessorChecker that logs an info message when
    // a bean is created during BeanPostProcessor instantiation, i.e. when
    // a bean is not eligible for getting processed by all BeanPostProcessors.
    // <2> 記錄所有的 BeanPostProcessor 數量,為什么加 1 ?因為下面又添加了一個
    int beanProcessorTargetCount = beanFactory.getBeanPostProcessorCount() + 1 + postProcessorNames.length;
    // 注冊 BeanPostProcessorChecker,它主要是用於在 BeanPostProcessor 實例化期間記錄日志
    // 當 Spring 中高配置的后置處理器還沒有注冊就已經開始了 bean 的實例化過程,這個時候便會打印 BeanPostProcessorChecker 中的內容
    beanFactory.addBeanPostProcessor(new BeanPostProcessorChecker(beanFactory, beanProcessorTargetCount));

    // Separate between BeanPostProcessors that implement PriorityOrdered, Ordered, and the rest.
    // <3> 開始注冊 BeanPostProcessor
    // 實現了 `PriorityOrdered` 接口的 BeanPostProcessor 對應的 Bean 集合
    List<BeanPostProcessor> priorityOrderedPostProcessors = new ArrayList<>();
    // MergedBeanDefinitionPostProcessor 類型對應的 Bean 集合
    List<BeanPostProcessor> internalPostProcessors = new ArrayList<>();
    // 實現了 `Ordered` 接口的 BeanPostProcessor 對應的 beanName 集合
    List<String> orderedPostProcessorNames = new ArrayList<>();
    // 沒有順序的 BeanPostProcessor 對應的 beanName 集合
    List<String> nonOrderedPostProcessorNames = new ArrayList<>();
    for (String ppName : postProcessorNames) {
        // PriorityOrdered
        if (beanFactory.isTypeMatch(ppName, PriorityOrdered.class)) {
            // 調用 getBean(...) 方法獲取該 BeanPostProcessor 處理器的 Bean 對象
            BeanPostProcessor pp = beanFactory.getBean(ppName, BeanPostProcessor.class);
            priorityOrderedPostProcessors.add(pp);
            if (pp instanceof MergedBeanDefinitionPostProcessor) {
                internalPostProcessors.add(pp);
            }
        }
        // Ordered
        else if (beanFactory.isTypeMatch(ppName, Ordered.class)) {
            orderedPostProcessorNames.add(ppName);
        }
        // 無序
        else {
            nonOrderedPostProcessorNames.add(ppName);
        }
    }

    // First, register the BeanPostProcessors that implement PriorityOrdered.
    // 第一步,對所有實現了 PriorityOrdered 的 BeanPostProcessor 進行排序
    sortPostProcessors(priorityOrderedPostProcessors, beanFactory);
    // 進行注冊,也就是添加至 DefaultListableBeanFactory 中
    registerBeanPostProcessors(beanFactory, priorityOrderedPostProcessors);

    // Next, register the BeanPostProcessors that implement Ordered.
    // 第二步,獲取所有實現了 Ordered 接口的 BeanPostProcessor 對應的 Bean 們
    List<BeanPostProcessor> orderedPostProcessors = new ArrayList<>();
    for (String ppName : orderedPostProcessorNames) {
        // 調用 getBean(...) 方法獲取該 BeanPostProcessor 處理器的 Bean 對象
        BeanPostProcessor pp = beanFactory.getBean(ppName, BeanPostProcessor.class);
        orderedPostProcessors.add(pp);
        if (pp instanceof MergedBeanDefinitionPostProcessor) {
            internalPostProcessors.add(pp);
        }
    }
    // 對所有實現了 Ordered 的 BeanPostProcessor 進行排序
    sortPostProcessors(orderedPostProcessors, beanFactory);
    // 進行注冊,也就是添加至 DefaultListableBeanFactory 中
    registerBeanPostProcessors(beanFactory, orderedPostProcessors);

    // Now, register all regular BeanPostProcessors.
    // 第三步注冊所有無序的 BeanPostProcessor
    List<BeanPostProcessor> nonOrderedPostProcessors = new ArrayList<>();
    for (String ppName : nonOrderedPostProcessorNames) {
        // 調用 getBean(...) 方法獲取該 BeanPostProcessor 處理器的 Bean 對象
        BeanPostProcessor pp = beanFactory.getBean(ppName, BeanPostProcessor.class);
        nonOrderedPostProcessors.add(pp);
        if (pp instanceof MergedBeanDefinitionPostProcessor) {
            internalPostProcessors.add(pp);
        }
    }
    // 注冊,無需排序
    registerBeanPostProcessors(beanFactory, nonOrderedPostProcessors);

    // Finally, re-register all internal BeanPostProcessors.
    // 最后,注冊所有的 MergedBeanDefinitionPostProcessor 類型的 Bean 們
    sortPostProcessors(internalPostProcessors, beanFactory);
    registerBeanPostProcessors(beanFactory, internalPostProcessors);

    // Re-register post-processor for detecting inner beans as ApplicationListeners,
    // moving it to the end of the processor chain (for picking up proxies etc).
    // 重新注冊 ApplicationListenerDetector(探測器),用於探測內部 ApplicationListener 類型的 Bean
    // 在完全初始化 Bean 后,如果是 ApplicationListener 類型且為單例模式,則添加到 Spring 應用上下文
    beanFactory.addBeanPostProcessor(new ApplicationListenerDetector(applicationContext));
}
主要做以下事情:
- 獲取所有 BeanPostProcessor 類型的 beanName
- 添加 BeanPostProcessor - BeanPostProcessorChecker,用於打印日志(所有 BeanPostProcessor 還沒有全部實例化就有 Bean 初始化完成)
- 獲取所有 BeanPostProcessor 實現類(依賴查找),添加至 BeanFactory 容器中(順序:PriorityOrdered > Ordered > 無)
- 注意,第
3步添加的 BeanPostProcessor 如果是 MergedBeanDefinitionPostProcessor 類型,會再次添加(先移除再添加,也就是將順序往后挪) - 重新添加 BeanPostProcessor - ApplicationListenerDetector,目的將其移至最后,因為這個后置處理器用於探測 ApplicationListener 類型的 Bean,需要保證 Bean 完全初始化,放置最后比較合適
對與上述第
4步是否疑惑?我的理解是 MergedBeanDefinitionPostProcessor 主要是依賴注入的實現,需要保證當前 Spring Bean 的相關初始化工作已完成,然后再進行依賴注入
總結:將所有已加載出來的 BeanPostProcessor 類型的 BeanDefinition 通過依賴查找獲取到 Bean 們,然后有序的添加至 BeanFactory 中
6. 初始化內建 Bean:MessageSource
AbstractApplicationContext#initMessageSource() 方法,如下:
protected void initMessageSource() {
    ConfigurableListableBeanFactory beanFactory = getBeanFactory();
    // 如果當前上下文中包含名稱為 `messageSource` 的 Bean 對象
    if (beanFactory.containsLocalBean(MESSAGE_SOURCE_BEAN_NAME)) {
        this.messageSource = beanFactory.getBean(MESSAGE_SOURCE_BEAN_NAME, MessageSource.class);
        // 如果有父 ApplicationContext,並且 `messageSource` 為 HierarchicalMessageSource 對象,分級處理的 MessageSource
        if (this.parent != null && this.messageSource instanceof HierarchicalMessageSource) {
            HierarchicalMessageSource hms = (HierarchicalMessageSource) this.messageSource;
            if (hms.getParentMessageSource() == null) {
                // Only set parent context as parent MessageSource if no parent MessageSource registered already.
                // 如果 `messageSource` 沒有注冊父 MessageSource,則設置為父類上下文的的 MessageSource
                hms.setParentMessageSource(getInternalParentMessageSource());
            }
        }
        if (logger.isTraceEnabled()) {
            logger.trace("Using MessageSource [" + this.messageSource + "]");
        }
    }
    else {
        // Use empty MessageSource to be able to accept getMessage calls.
        // 使用空 MessageSource
        DelegatingMessageSource dms = new DelegatingMessageSource();
        dms.setParentMessageSource(getInternalParentMessageSource());
        this.messageSource = dms;
        beanFactory.registerSingleton(MESSAGE_SOURCE_BEAN_NAME, this.messageSource);
        if (logger.isTraceEnabled()) {
            logger.trace("No '" + MESSAGE_SOURCE_BEAN_NAME + "' bean, using [" + this.messageSource + "]");
        }
    }
}
初始化當前 Spring 應用上下文的 MessageSource 對象,MessageSource 對象和國際化文案相關,Spring 默認情況不提供國際化文案,但是 MessageSource Bean 對象(空實現)是存在的,在 Spring Boot 中有實現,參考 MessageSourceAutoConfiguration 自動裝配類
7. 初始化內建 Bean:Spring 事件廣播器
AbstractApplicationContext#initApplicationEventMulticaster() 方法,如下:
protected void initApplicationEventMulticaster() {
    ConfigurableListableBeanFactory beanFactory = getBeanFactory();
    // 如果當前上下文中包含名稱為 `applicationEventMulticaster` 的 Bean 對象
    if (beanFactory.containsLocalBean(APPLICATION_EVENT_MULTICASTER_BEAN_NAME)) {
        this.applicationEventMulticaster = beanFactory.getBean(APPLICATION_EVENT_MULTICASTER_BEAN_NAME, ApplicationEventMulticaster.class);
    }
    else {
        // 沒有則新建 SimpleApplicationEventMulticaster,並將該 Bean 注冊至當前上下文
        this.applicationEventMulticaster = new SimpleApplicationEventMulticaster(beanFactory);
        beanFactory.registerSingleton(APPLICATION_EVENT_MULTICASTER_BEAN_NAME, this.applicationEventMulticaster);
    }
}
初始化當前 Spring 應用上下文的 ApplicationEventMulticaster 事件廣播器對象,Spring 默認情況下為 SimpleApplicationEventMulticaster 對象
8.應用上下文刷新擴展階段
AbstractApplicationContext#onRefresh() 方法,空方法,交由子類實現,如 AbstractRefreshableWebApplicationContext 的實現
@Override
protected void onRefresh() {
    this.themeSource = UiApplicationContextUtils.initThemeSource(this);
}
Web 場景下的 Spring 應用上下文會初始化 ThemeSource 對象
9. Spring 事件監聽器注冊階段
AbstractApplicationContext#registerListeners() 方法,如下:
protected void registerListeners() {
    // <1> 將當前 Spring 應用上下文已有的事件監聽器依次添加至事件廣播器
    for (ApplicationListener<?> listener : getApplicationListeners()) {
        getApplicationEventMulticaster().addApplicationListener(listener);
    }

    // Do not initialize FactoryBeans here: We need to leave all regular beans
    // uninitialized to let post-processors apply to them!
    // <2> 從底層 BeanFactory 容器中獲取所有 ApplicationListener 類型的 beanName 們(還未初始化),然后依次添加至事件廣播器
    String[] listenerBeanNames = getBeanNamesForType(ApplicationListener.class, true, false);
    for (String listenerBeanName : listenerBeanNames) {
        getApplicationEventMulticaster().addApplicationListenerBean(listenerBeanName);
    }

    // Publish early application events now that we finally have a multicaster...
    //<3> 至此,已經完成將事件監聽器全部添加至事件廣播器,接下來將早期的事件通過該事件廣播器廣播到所有的事件監聽器
    // 早期事件:在當前 Spring 應用上下文刷新的過程中已經發布的事件(此時發布不會被監聽到,因為事件監聽器才剛全部找到,需要到此處通過事件廣播器進行廣播)
    Set<ApplicationEvent> earlyEventsToProcess = this.earlyApplicationEvents;
    /**
     * 將 `earlyApplicationEvents` 置為 `null`
     * 這里很關鍵!!!后續發布的事件不再是早期事件,會立即被事件廣播器廣播。因為當前 Spring 應用中的事件廣播器已經就緒了,事件監聽器也都獲取到了(雖然還沒有初始化)
     * 不過在下面廣播的時候,如果事件監聽器能夠處理該事件,則會通過依賴注入的方式初始化該事件監聽器
     */
    this.earlyApplicationEvents = null;
    if (earlyEventsToProcess != null) {
        for (ApplicationEvent earlyEvent : earlyEventsToProcess) {
            // 廣播該事件,能夠處理該事件的事件監聽器會被初始化
            getApplicationEventMulticaster().multicastEvent(earlyEvent);
        }
    }
}
主要做以下事情:
- 將當前 Spring 應用上下文已有的事件監聽器依次添加至事件廣播器
- 從底層 BeanFactory 容器中獲取所有 ApplicationListener 類型的 beanName 們(還未初始化),然后依次添加至事件廣播器
- 復制全部的
earlyApplicationEvents早期事件,然后將earlyApplicationEvents置為null - 廣播早期事件,如果事件監聽器能夠處理該事件,則會通過依賴注入的方式初始化該事件監聽器
早期事件:在當前 Spring 應用上下文刷新的過程中已經發布的事件(此時發布不會被監聽到,因為事件監聽器才剛全部找到,需要到此處通過事件廣播器進行廣播)
上面第 3 步會將 earlyApplicationEvents 置為 null,前面的 publishEvent 方法中你可以看到,如果該對象為 null 則會直接廣播事件
10. BeanFactory 初始化完成階段
主要為底層 BeanFactory 容器設置 ConversionService 類型轉換器,初始化所有還未初始化的 Bean(不是抽象、單例模式、不是懶加載方式)
finishBeanFactoryInitialization 方法
AbstractApplicationContext#finishBeanFactoryInitialization(ConfigurableListableBeanFactory) 方法,如下:
protected void finishBeanFactoryInitialization(ConfigurableListableBeanFactory beanFactory) {
    // 如果底層 BeanFactory 容器包含 ConversionService 類型轉換器,則初始化並設置到底層 BeanFactory 容器的屬性中
    if (beanFactory.containsBean(CONVERSION_SERVICE_BEAN_NAME) && beanFactory.isTypeMatch(CONVERSION_SERVICE_BEAN_NAME, ConversionService.class)) {
        beanFactory.setConversionService(beanFactory.getBean(CONVERSION_SERVICE_BEAN_NAME, ConversionService.class));
    }

    // 如果底層 BeanFactory 容器沒有設置 StringValueResolver 解析器,則添加一個 PropertySourcesPropertyResolver 解析器
    if (!beanFactory.hasEmbeddedValueResolver()) {
        beanFactory.addEmbeddedValueResolver(strVal -> getEnvironment().resolvePlaceholders(strVal));
    }

    // Initialize LoadTimeWeaverAware beans early to allow for registering their transformers early.
    // 提前初始化 LoadTimeWeaverAware 類型的 Bean,AOP 相關
    String[] weaverAwareNames = beanFactory.getBeanNamesForType(LoadTimeWeaverAware.class, false, false);
    for (String weaverAwareName : weaverAwareNames) {
        getBean(weaverAwareName);
    }

    // Stop using the temporary ClassLoader for type matching.
    // 將臨時的 ClassLoader 置為 null,它主要用於 AOP
    beanFactory.setTempClassLoader(null);

    // Allow for caching all bean definition metadata, not expecting further changes.
    // 凍結底層 BeanFactory 容器所有的 BeanDefinition,目的是不希望再去修改 BeanDefinition
    beanFactory.freezeConfiguration();

    // 【重點】初始化所有還未初始化的 Bean(不是抽象、單例模式、不是懶加載方式),依賴查找
    beanFactory.preInstantiateSingletons();
}
我們看到最后一步,會調用 DefaultListableBeanFactory 的 preInstantiateSingletons() 方法,初始化所有還未初始化的 Bean(不是抽象、單例模式、不是懶加載方式),依賴查找
preInstantiateSingletons 方法
DefaultListableBeanFactory#preInstantiateSingletons() 方法,如下:
@Override
public void preInstantiateSingletons() throws BeansException {
    if (logger.isTraceEnabled()) {
        logger.trace("Pre-instantiating singletons in " + this);
    }

    // Iterate over a copy to allow for init methods which in turn register new bean definitions.
    // While this may not be part of the regular factory bootstrap, it does otherwise work fine.
    // 復制一份本地的所有 beanNames 集合
    List<String> beanNames = new ArrayList<>(this.beanDefinitionNames);

    // Trigger initialization of all non-lazy singleton beans...
    // 遍歷所有的 beanName
    for (String beanName : beanNames) {
        // 從容器中獲取 beanName 相應的 RootBeanDefinition 對象
        RootBeanDefinition bd = getMergedLocalBeanDefinition(beanName);
        // 如果該 Bean 的定義為:不是抽象、單例模式、不是懶加載方式,則進行初始化
        if (!bd.isAbstract() && bd.isSingleton() && !bd.isLazyInit()) {
            // 如果是 FactoryBean 類型的 Bean
            if (isFactoryBean(beanName)) {
                // 初始化 FactoryBean 類型本身這個 Bean,注意這里在 beanName 的前面添加了一個 '&'
                Object bean = getBean(FACTORY_BEAN_PREFIX + beanName);
                // 如果這個 FactoryBean 為 SmartFactoryBean 類型,並且需要提前初始化
                // 則初始 beanName 對應的 Bean,也就是調用 FactoryBean 的 getObject() 方法
                if (bean instanceof FactoryBean) {
                    final FactoryBean<?> factory = (FactoryBean<?>) bean;
                    boolean isEagerInit;
                    if (System.getSecurityManager() != null && factory instanceof SmartFactoryBean) {
                        isEagerInit = AccessController.doPrivileged((PrivilegedAction<Boolean>)
                                        ((SmartFactoryBean<?>) factory)::isEagerInit,
                                getAccessControlContext());
                    }
                    else {
                        isEagerInit = (factory instanceof SmartFactoryBean && ((SmartFactoryBean<?>) factory).isEagerInit());
                    }
                    if (isEagerInit) {
                        getBean(beanName);
                    }
                }
            }
            else {
                // 初始化 beanName 對應的 Bean
                getBean(beanName);
            }
        }
    }

    // Trigger post-initialization callback for all applicable beans...
    for (String beanName : beanNames) {
        Object singletonInstance = getSingleton(beanName);
        if (singletonInstance instanceof SmartInitializingSingleton) {
            final SmartInitializingSingleton smartSingleton = (SmartInitializingSingleton) singletonInstance;
            if (System.getSecurityManager() != null) {
                AccessController.doPrivileged((PrivilegedAction<Object>) () -> {
                    smartSingleton.afterSingletonsInstantiated();
                    return null;
                }, getAccessControlContext());
            }
            else {
                smartSingleton.afterSingletonsInstantiated();
            }
        }
    }
}
首先會遍歷所以的 beanName,如果該 Bean 的定義滿足下面三個條件,則進行初始化過程
- 不是抽象
- 單例模式
- 不是懶加載方式
實際就是通過 getBean(String beanName) 方法進行初始化,在前面的 《開啟 Bean 的加載》 等文章中已經分析過了。注意,如果是 FactoryBean 類型的 Bean,需要先初始化 FactoryBean 本身這個 Bean,beanName 前面加 &,然后再初始化這個 beanName,也就是調用 FactoryBean#getObject() 方法
在初始化所有的 Bean 后,其實還有一個初始化完成階段,會遍歷所有已初始化好的 Bean,如果是 SmartInitializingSingleton 類型,則調用這個 Bean 的 afterSingletonsInstantiated() 方法
SmartInitializingSingleton 的作用?
通過 getBean(beanName) 初始化一個 Bean 的時候也會初始化依賴的對象,這樣可能會出現過早的初始化問題(例如可能有些 BeanPostProcessor 還未添加進來就初始化了),導致相關 Bean 可能還未完全初始化,Spring 4.1 之后就提供了 SmartInitializingSingleton 接口機制讓你可以確保 Bean 的初始化行為比較正常。
還有就是在所有的 Bean 完成初始化后,可以在這里進行注解的相關處理,例如 @EventListener 注解就是通過 EventListenerMethodProcessor 實現的,會將@EventListener 注解標注的方法解析成 ApplicationListener 事件監聽器,並注冊至 Spring 應用上下文。
11. 應用上下文刷新完成階段
AbstractApplicationContext#finishRefresh() 方法,如下:
protected void finishRefresh() {
    // Clear context-level resource caches (such as ASM metadata from scanning).
    // 清除當前 Spring 應用上下文中的緩存,例如通過 ASM(Java 字節碼操作和分析框架)掃描出來的元數據
    clearResourceCaches();

    // Initialize lifecycle processor for this context.
    // 初始化 LifecycleProcessor 到當前上下文的屬性中
    initLifecycleProcessor();

    // Propagate refresh to lifecycle processor first.
    // 通過 LifecycleProcessor 啟動 Lifecycle 生命周期對象
    getLifecycleProcessor().onRefresh();

    // 發布 ContextRefreshedEvent 事件,會通過事件廣播器進行廣播,可通過自定義監聽器在當前 Spring 應用上下文初始化完后進行相關操作
    publishEvent(new ContextRefreshedEvent(this));

    // Participate in LiveBeansView MBean, if active.
    // 如果當前 Spring 應用上下文的 Environment 環境中配置了 'spring.liveBeansView.mbeanDomain'
    // 則向 MBeanServer(JMX 代理層的核心)托管 Live Beans,也就是讓 Spring Bean 橋接到 MBeanServer
    LiveBeansView.registerApplicationContext(this);
}
主要做以下事情:
- 清除當前 Spring 應用上下文中的緩存,例如通過 ASM(Java 字節碼操作和分析框架)掃描出來的元數據
- 初始化 LifecycleProcessor 到當前上下文的屬性中
- 通過 LifecycleProcessor 啟動 Lifecycle 生命周期對象
- 發布
ContextRefreshedEvent上下文刷新完成事件,會通過事件廣播器進行廣播 - 如果當前 Spring 應用上下文的 Environment 環境中配置了
spring.liveBeansView.mbeanDomain,則向 MBeanServer(JMX 代理層的核心)托管 Live Beans,也就是讓 Spring Bean 橋接到 MBeanServer
總結
ApplicationContext 就是大名鼎鼎的 Spring 應用上下文,底層 IoC 容器就是 DefaultListableBeanFactory 這個類,在它的基礎上提供出更多的高級功能,更加適用於正式的應用環境。子類 AbstractApplicationContext 抽象類實現了大部分功能,調用它的 refresh() 方法可以讓 Spring 應用上下文處於准備就緒狀態,使用 Spring 都會顯示或者隱式地調用該方法,這個方法中有非常多核心的步驟,這些步驟在上面的每個小節中依次進行分析過,具體過程可查看上面的每個小節。
AbstractApplicationContext#refresh() 方法在哪被調用?
可以看到我的另一篇文章《精盡Spring MVC源碼分析 - WebApplicationContext 容器的初始化》,在 Spring MVC 啟動過程中,創建 Spring 應用上下文后,(在 ContextLoader#configureAndRefreshWebApplicationContext 方法中)會調用其
refresh()方法進行刷新,讓 Spring 應用上下文准備就緒。
至此,Spring IoC 的相關內容差不多都講完了,關於 @Bean 等注解的處理在下一篇文章中進行分析。