前面的章節中我們介紹了libtorch的環境搭建(VS和Qt),libtorch張量常用操作,簡單的MLP,CNN和LSTM模型搭建,以及數據加載類的使用。本章將以圖像分類任務為例,詳細介紹如何使用c++訓練一個圖片分類器。
模型
本文以VGG為例,對比pytorch下的模型搭建和訓練,闡述Libtorch的模型搭建,模型加載預訓練(from ImageNet)權重。VGG模型是2014年的ImageNet分類冠軍,由於后續深度學習的發展,添加了一些成分,如BatchNorm,形成一些新變種。本文以vgg16bn為例作介紹,vgg16bn就是vgg16加上了后續提出的BatchNorm層。
分析模型
首先介紹pytorch的模型源碼,pytorch的torchvision.models.VGG中有提供官方的VGG模型代碼。直接復制上來分析:
class VGG(nn.Module):

    def __init__(self, features, num_classes=1000, init_weights=True):
        super(VGG, self).__init__()
        self.features = features
        self.avgpool = nn.AdaptiveAvgPool2d((7, 7))
        self.classifier = nn.Sequential(
            nn.Linear(512 * 7 * 7, 4096),
            nn.ReLU(True),
            nn.Dropout(),
            nn.Linear(4096, 4096),
            nn.ReLU(True),
            nn.Dropout(),
            nn.Linear(4096, num_classes),
        )
        if init_weights:
            self._initialize_weights()

    def forward(self, x):
        x = self.features(x)
        x = self.avgpool(x)
        x = torch.flatten(x, 1)
        x = self.classifier(x)
        return x

    def _initialize_weights(self):
        for m in self.modules():
            if isinstance(m, nn.Conv2d):
                nn.init.kaiming_normal_(m.weight, mode='fan_out', nonlinearity='relu')
                if m.bias is not None:
                    nn.init.constant_(m.bias, 0)
            elif isinstance(m, nn.BatchNorm2d):
                nn.init.constant_(m.weight, 1)
                nn.init.constant_(m.bias, 0)
            elif isinstance(m, nn.Linear):
                nn.init.normal_(m.weight, 0, 0.01)
                nn.init.constant_(m.bias, 0)

def make_layers(cfg, batch_norm=False):
    layers = []
    in_channels = 3
    for v in cfg:
        if v == 'M':
            layers += [nn.MaxPool2d(kernel_size=2, stride=2)]
        else:
            conv2d = nn.Conv2d(in_channels, v, kernel_size=3, padding=1)
            if batch_norm:
                layers += [conv2d, nn.BatchNorm2d(v), nn.ReLU(inplace=True)]
            else:
                layers += [conv2d, nn.ReLU(inplace=True)]
            in_channels = v
    return nn.Sequential(*layers)

cfgs = {
    'A': [64, 'M', 128, 'M', 256, 256, 'M', 512, 512, 'M', 512, 512, 'M'],
    'B': [64, 64, 'M', 128, 128, 'M', 256, 256, 'M', 512, 512, 'M', 512, 512, 'M'],
    'D': [64, 64, 'M', 128, 128, 'M', 256, 256, 256, 'M', 512, 512, 512, 'M', 512, 512, 512, 'M'],
    'E': [64, 64, 'M', 128, 128, 'M', 256, 256, 256, 256, 'M', 512, 512, 512, 512, 'M', 512, 512, 512, 512, 'M'],
}

def _vgg(arch, cfg, batch_norm, pretrained, progress, **kwargs):
    if pretrained:
        kwargs['init_weights'] = False
    model = VGG(make_layers(cfgs[cfg], batch_norm=batch_norm), **kwargs)
    if pretrained:
        state_dict = load_state_dict_from_url(model_urls[arch],
                                              progress=progress)
        model.load_state_dict(state_dict)
    return model
和現在的復雜模型相比,VGG模型結構較為簡單,就是簡單的多次卷積+下采樣堆疊,后接一個三層的MLP。代碼中VGG模型類有三個成員函數,一個初始化函數__init__,一個前向傳播函數forward,最后一個權重初始化函數。類外部有一個函數make_layers函數用於生成CNN主干,返回一個nn.Sequential對象。
打開python編輯器(or IDE,默認有pytorch編程經驗)。輸入下面代碼:
from torchvision.models import vgg16,vgg16_bn

model = vgg16_bn(pretrained=True)
for k,v in model.named_parameters():
    print(k)
發現打印出模型每一層(有權重的層,不包括類似激活函數層)的名稱。打印的層名稱如下:
features.0.weight
features.0.bias
features.1.weight
features.1.bias
features.3.weight
features.3.bias
features.4.weight
features.4.bias
features.7.weight
features.7.bias
features.8.weight
features.8.bias
features.10.weight
features.10.bias
features.11.weight
features.11.bias
features.14.weight
features.14.bias
features.15.weight
features.15.bias
features.17.weight
features.17.bias
features.18.weight
features.18.bias
features.20.weight
features.20.bias
features.21.weight
features.21.bias
features.24.weight
features.24.bias
features.25.weight
features.25.bias
features.27.weight
features.27.bias
features.28.weight
features.28.bias
features.30.weight
features.30.bias
features.31.weight
features.31.bias
features.34.weight
features.34.bias
features.35.weight
features.35.bias
features.37.weight
features.37.bias
features.38.weight
features.38.bias
features.40.weight
features.40.bias
features.41.weight
features.41.bias
classifier.0.weight
classifier.0.bias
classifier.3.weight
classifier.3.bias
classifier.6.weight
classifier.6.bias
還行,不是很長。這步操作對后續模型搭建和加載權重很重要,因為torch的模型加載必須要有一一對應的權重層的名稱。如果代碼中的模型和加載路徑對應的權重提供的權重層名稱不一致,就會產生錯誤。
分析模型打印的名稱,其實就會發現只有features,classifier,weight和bias和數字。聯系前面的官方代碼的初始化函數__init__,函數內部有self.classifer和self.features,就很容易得出pytorch模型的內部層名稱命名規律了。weight和bias對應conv層里的self.conv和self.bias。點和數字表示nn.Sequential里的序號。
搭建模型
下面在c++中搭建一個和pytorch下完全一致的vgg16bn。如果不一致的話其實不影響正常的模型訓練和預測,但是影響初始化狀態,模型加載從ImageNet數據集訓練好的權重以后,訓練收斂的速度和收斂后的精度都會好很多。
首先是.h文件中要做的,一個conv_options確定卷積超參數,因為常用所以inline一下。maxpool_options函數確定MaxPool2d的超參數。如何定義一個和pytorch一致的make_features函數,再在VGG類中聲明和pytorch一致的初始化和前向傳播函數。最后則是一個vgg16bn函數,返回vgg16bn模型。
//和前面章節一致,定義一個確定conv超參數的函數
inline torch::nn::Conv2dOptions conv_options(int64_t in_planes, int64_t out_planes, int64_t kerner_size,
    int64_t stride = 1, int64_t padding = 0, bool with_bias = false) {
    torch::nn::Conv2dOptions conv_options = torch::nn::Conv2dOptions(in_planes, out_planes, kerner_size);
    conv_options.stride(stride);
    conv_options.padding(padding);
    conv_options.bias(with_bias);
    return conv_options;
}

//仿照上面的conv_options,定義一個確定MaxPool2d的超參數的函數
inline torch::nn::MaxPool2dOptions maxpool_options(int kernel_size, int stride){
    torch::nn::MaxPool2dOptions maxpool_options(kernel_size);
    maxpool_options.stride(stride);
    return maxpool_options;
}

//對應pytorch中的make_features函數,返回CNN主體,該主體是一個torch::nn::Sequential對象
torch::nn::Sequential make_features(std::vector<int> &cfg, bool batch_norm);

//VGG類的聲明,包括初始化和前向傳播
class VGGImpl: public torch::nn::Module
{
private:
    torch::nn::Sequential features_{nullptr};
    torch::nn::AdaptiveAvgPool2d avgpool{nullptr};
    torch::nn::Sequential classifier;
public:
    VGGImpl(std::vector<int> &cfg, int num_classes = 1000, bool batch_norm = false);
    torch::Tensor forward(torch::Tensor x);
};
TORCH_MODULE(VGG);

//vgg16bn函數的聲明
VGG vgg16bn(int num_classes);
然后在.cpp文件中定義好.h文件中的聲明。.cpp文件的內容如下:
torch::nn::Sequential make_features(std::vector<int> &cfg, bool batch_norm){
    torch::nn::Sequential features;
    int in_channels = 3;
    for(auto v : cfg){
        if(v==-1){
            features->push_back(torch::nn::MaxPool2d(maxpool_options(2,2)));
        }
        else{
            auto conv2d = torch::nn::Conv2d(conv_options(in_channels,v,3,1,1));
            features->push_back(conv2d);
            if(batch_norm){
                features->push_back(torch::nn::BatchNorm2d(torch::nn::BatchNorm2dOptions(v)));
            }
            features->push_back(torch::nn::ReLU(torch::nn::ReLUOptions(true)));
            in_channels = v;
        }
    }
    return features;
}

VGGImpl::VGGImpl(std::vector<int> &cfg, int num_classes, bool batch_norm){
    features_ = make_features(cfg,batch_norm);
    avgpool = torch::nn::AdaptiveAvgPool2d(torch::nn::AdaptiveAvgPool2dOptions(7));
    classifier->push_back(torch::nn::Linear(torch::nn::LinearOptions(512 * 7 * 7, 4096)));
    classifier->push_back(torch::nn::ReLU(torch::nn::ReLUOptions(true)));
    classifier->push_back(torch::nn::Dropout());
    classifier->push_back(torch::nn::Linear(torch::nn::LinearOptions(4096, 4096)));
    classifier->push_back(torch::nn::ReLU(torch::nn::ReLUOptions(true)));
    classifier->push_back(torch::nn::Dropout());
    classifier->push_back(torch::nn::Linear(torch::nn::LinearOptions(4096, num_classes)));

    features_ = register_module("features",features_);
    classifier = register_module("classifier",classifier);
}

torch::Tensor VGGImpl::forward(torch::Tensor x){
    x = features_->forward(x);
    x = avgpool(x);
    x = torch::flatten(x,1);
    x = classifier->forward(x);
    return torch::log_softmax(x, 1);
}

VGG vgg16bn(int num_classes){
    std::vector<int> cfg_dd = {64, 64, -1, 128, 128, -1, 256, 256, 256, -1, 512, 512, 512, -1, 512, 512, 512, -1};
    VGG vgg = VGG(cfg_dd,num_classes,true);
    return vgg;
}
由於c++中元組如果太長的話聲明也會很長,而列表或者vector只接受同類型的數據,就將原來pytorch中的cfg里的'M'改成-1。在讀取cfg時判斷又原來的'M'變成判斷是否-1即可。
需要注意的是,給模型不同層命名時,代碼里只出現了register_module對features和classifier命名,這和pytorch保持一致。
利用預訓練權重
下面查看我們c++定義的模型是否和pytorch完全一致。在主函數中實例化一個VGG的對象,然后打印各個層的名稱,代碼如下:
std::vector<int> cfg_16bn = {64, 64, -1, 128, 128, -1, 256, 256, 256, -1, 512, 512, 512, -1, 512, 512, 512, -1};
auto vgg16bn = VGG(cfg_16bn,1000,true);
auto dict16bn = vgg16bn->named_parameters();
for (auto n = dict16bn.begin(); n != dict16bn.end(); n++)
{
    std::cout<<(*n).key()<<std::endl;
}
可以發現,各個層名稱和pytorch中的模型內部層的名稱完全一致。這樣我們將pytorch的模型權重保存下來,然后加載到c++中。
保存pytorch模型的權重不能直接用torch.save保存模型,這樣存下來的模型不能被c++加載。我們利用部署時常用的torch.jit.script模型來保存。python的保存權重代碼如下:
import torch
from torchvision.models import vgg16,vgg16_bn

model=model.to(torch.device("cpu"))
model.eval()
var=torch.ones((1,3,224,224))
traced_script_module = torch.jit.trace(model, var)
traced_script_module.save("vgg16bn.pt")
這樣,模型的卷積層,歸一化層,線性層的權重就保存到.pt文件中了。下面嘗試加載到c++中。c++中的加載代碼較為簡單,直接在定義好的vgg16bn模型后面加載試試:
std::vector<int> cfg_16bn = {64, 64, -1, 128, 128, -1, 256, 256, 256, -1, 512, 512, 512, -1, 512, 512, 512, -1};
auto vgg16bn = VGG(cfg_16bn,1000,true);
torch::load(vgg16bn,"your path to vgg16bn.pt");
如果編譯運行到下面的函數中中斷,則可能原因有:
- 模型保存錯了,無法正確加載
- 路徑不對,沒正確指向(可能非常大)
- c++中定義的模型和python中定義的不一致,最好打印下來,復制到文件中對比文檔。
template <typename Value, typename... LoadFromArgs>
void load(Value& value, LoadFromArgs&&... args) {
  serialize::InputArchive archive;
  archive.load_from(std::forward<LoadFromArgs>(args)...);
  archive >> value;
}
正常運行過了一般就代表模型已經成功加載了。
數據加載
和第四章一樣,本章還是使用pytorch官網提供的昆蟲分類數據集。下載解壓后有train和val文件夾,里面分別有兩類昆蟲圖片。數據加載模塊代碼和上一章一致,就不重復了,感興趣的往前面博客翻。
封裝
聲明
解決了基本的模型定義和加載,數據加載等問題,下面就可以定義一個Classifier類了。這個類的功能主要有:
- 初始化:在初始化中完成模型掛載,是cpu還是某個gpu;定義好分類器並加載預訓練的權重,實現更好更快訓練。
- 訓練:可以指定分類器訓練的周期數,訓練的batch_size,學習率以及模型保存的路徑。
- 預測:傳入圖片就可以返回分類器預測的類別。
- 加載權重。
類的聲明很簡單:
class Classifier
{
private:
    torch::Device device = torch::Device(torch::kCPU);
    VGG vgg = VGG{nullptr};
public:
    Classifier(int gpu_id = 0);
    void Initialize(int num_classes, std::string pretrained_path);
    void Train(int epochs, int batch_size, float learning_rate, std::string train_val_dir, std::string image_type, std::string save_path);
    int Predict(cv::Mat &image);
    void LoadWeight(std::string weight);
};
定義
類的成員函數定義較為復雜:
void Classifier::LoadWeight(std::string weight){
    torch::load(vgg,weight);
    vgg->eval();
    return;
}
LoadWeight沒太多要講的,很簡單的加載模型並置為eval()。需要注意的是初始化和訓練函數,初始化函數由於模型最后一層的num_class不定,所以不能直接加載之前保存的權重。而訓練函數要分別用train和val,並且要注意損失設置等。
初始化
首先是初始化函數,初始化函數首先先定義一個num_class對應的分類器vgg16bn,然后定義一個num_class=1000的vgg16bn。加載時加載后者,然后將權重拷貝至前者中。拷貝過程非常精華,需要讀者細細揣摩。除了拷貝參數,初始化還會定義好加載到gpu_id對應的GPU上,或者設置gpu_id小於0加載到cpu上。
Classifier::Classifier(int gpu_id)
{
    if (gpu_id >= 0) {
        device = torch::Device(torch::kCUDA, gpu_id);
    }
    else {
        device = torch::Device(torch::kCPU);
    }
}

void Classifier::Initialize(int _num_classes, std::string _pretrained_path){
    std::vector<int> cfg_d = {64, 64, -1, 128, 128, -1, 256, 256, 256, -1, 512, 512, 512, -1, 512, 512, 512, -1};
    auto net_pretrained = VGG(cfg_d,1000,true);
    vgg = VGG(cfg_d,_num_classes,true);
    torch::load(net_pretrained, _pretrained_path);
    torch::OrderedDict<std::string, at::Tensor> pretrained_dict = net_pretrained->named_parameters();
    torch::OrderedDict<std::string, at::Tensor> model_dict = vgg->named_parameters();

    for (auto n = pretrained_dict.begin(); n != pretrained_dict.end(); n++)
    {
        if (strstr((*n).key().data(), "classifier")) {
            continue;
        }
        model_dict[(*n).key()] = (*n).value();
    }

    torch::autograd::GradMode::set_enabled(false);  // 使參數可以拷貝
    auto new_params = model_dict;
    auto params = vgg->named_parameters(true );
    auto buffers = vgg->named_buffers(true);
    for (auto& val : new_params) {
        auto name = val.key();
        auto* t = params.find(name);
        if (t != nullptr) {
            t->copy_(val.value());
        }
        else {
            t = buffers.find(name);
            if (t != nullptr) {
                t->copy_(val.value());
            }
        }
    }
    torch::autograd::GradMode::set_enabled(true);
    try
    {
        vgg->to(device);
    }
    catch (const std::exception&e)
    {
        std::cout << e.what() << std::endl;
    }

    return;
}
訓練
然后是訓練函數,訓練函數分別使用train_loader和val_loader,前者加載train文件夾下的圖片訓練,后者用於評估。訓練過程定義好優化器,損失函數等。
void Classifier::Train(int num_epochs, int batch_size, float learning_rate, std::string train_val_dir, std::string image_type, std::string save_path){
    std::string path_train = train_val_dir+ "\\train";
    std::string path_val = train_val_dir + "\\val";

    auto custom_dataset_train = dataSetClc(path_train, image_type).map(torch::data::transforms::Stack<>());
    auto custom_dataset_val = dataSetClc(path_val, image_type).map(torch::data::transforms::Stack<>());

    auto data_loader_train = torch::data::make_data_loader<torch::data::samplers::RandomSampler>(std::move(custom_dataset_train), batch_size);
    auto data_loader_val = torch::data::make_data_loader<torch::data::samplers::RandomSampler>(std::move(custom_dataset_val), batch_size);

    float loss_train = 0; float loss_val = 0;
    float acc_train = 0.0; float acc_val = 0.0; float best_acc = 0.0;
    for (size_t epoch = 1; epoch <= num_epochs; ++epoch) {
        size_t batch_index_train = 0;
        size_t batch_index_val = 0;
        if (epoch == int(num_epochs / 2)) { learning_rate /= 10; }
        torch::optim::Adam optimizer(vgg->parameters(), learning_rate); // 學習率
        if (epoch < int(num_epochs / 8))
        {
            for (auto mm : vgg->named_parameters())
            {
                if (strstr(mm.key().data(), "classifier"))
                {
                    mm.value().set_requires_grad(true);
                }
                else
                {
                    mm.value().set_requires_grad(false);
                }
            }
        }
        else {
            for (auto mm : vgg->named_parameters())
            {
                mm.value().set_requires_grad(true);
            }
        }
        // 遍歷data_loader,產生批次
        for (auto& batch : *data_loader_train) {
            auto data = batch.data;
            auto target = batch.target.squeeze();
            data = data.to(torch::kF32).to(device).div(255.0);
            target = target.to(torch::kInt64).to(device);
            optimizer.zero_grad();
            // Execute the model
            torch::Tensor prediction = vgg->forward(data);
            auto acc = prediction.argmax(1).eq(target).sum();
            acc_train += acc.template item<float>() / batch_size;
            // 計算損失大小
            torch::Tensor loss = torch::nll_loss(prediction, target);
            // 計算梯度
            loss.backward();
            // 更新權重
            optimizer.step();
            loss_train += loss.item<float>();
            batch_index_train++;
            std::cout << "Epoch: " << epoch << " |Train Loss: " << loss_train / batch_index_train << " |Train Acc:" << acc_train / batch_index_train << "\r";
        }
        std::cout << std::endl;

        //驗證
        vgg->eval();
        for (auto& batch : *data_loader_val) {
            auto data = batch.data;
            auto target = batch.target.squeeze();
            data = data.to(torch::kF32).to(device).div(255.0);
            target = target.to(torch::kInt64).to(device);
            torch::Tensor prediction = vgg->forward(data);
            // 計算損失,NLL和Log_softmax配合形成交叉熵損失
            torch::Tensor loss = torch::nll_loss(prediction, target);
            auto acc = prediction.argmax(1).eq(target).sum();
            acc_val += acc.template item<float>() / batch_size;
            loss_val += loss.item<float>();
            batch_index_val++;
            std::cout << "Epoch: " << epoch << " |Val Loss: " << loss_val / batch_index_val << " |Valid Acc:" << acc_val / batch_index_val << "\r";
        }
        std::cout << std::endl;


        if (acc_val > best_acc) {
            torch::save(vgg, save_path);
            best_acc = acc_val;
        }
        loss_train = 0; loss_val = 0; acc_train = 0; acc_val = 0; batch_index_train = 0; batch_index_val = 0;
    }
}
預測
最后是預測,返回類別ans,中間計算置信度prob。
int Classifier::Predict(cv::Mat& image){
    cv::resize(image, image, cv::Size(448, 448));
    torch::Tensor img_tensor = torch::from_blob(image.data, { image.rows, image.cols, 3 }, torch::kByte).permute({ 2, 0, 1 });
    img_tensor = img_tensor.to(device).unsqueeze(0).to(torch::kF32).div(255.0);
    auto prediction = vgg->forward(img_tensor);
    prediction = torch::softmax(prediction,1);
    auto class_id = prediction.argmax(1);
    int ans = int(class_id.item().toInt());
    float prob = prediction[0][ans].item().toFloat();
    return ans;
}
末尾貼一個訓練時的圖:
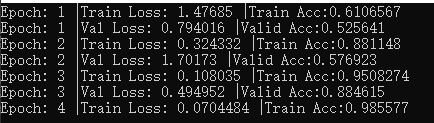 。
。
訓練時的參數設置如下:
    std::string vgg_path = "your path to vgg16_bn.pt";
    std::string train_val_dir = "your path to hymenoptera_data";
    Classifier classifier(0);
    classifier.Initialize(2,vgg_path);
    classifier.Train(300,4,0.0003,train_val_dir,".jpg","classifer.pt");
其實,周期數設置300時,前面很多個周期都在做固定CNN的遷移學習(or finetune)。可以設置小一些查看直接訓練全部模型會怎樣,以及思考為何會這樣。
至此,libtorch初級教程已經完成,坑很多,作者已經為你踩好,更高級的部分在准備中。
分享不易,如果有用請不吝給我一個👍,轉載注明出處:https://allentdan.github.io/
代碼見LibtorchTutorials