使用 ListView 是為了向用戶展示某些數據,期望用戶根據這些數據做出一些反饋,比如買某個東西。而我們會經常需要訪問、修改一個 ListView 展現的數據。現在我們就來看看怎么做。
一、訪問數據
ListModel 的 count 屬性表示 Model 中有多少條數據,int 類型。dynamicRoles 屬性為布爾值,為 true 時表示 Model 中的 role 對應的值的類型可以動態改變,默認值是 false。要設置 dynamicRoles,必須在添加數據之前。不過要注意的是,一旦你使能了 dynamicRoles,ListModel 的性能會大大下降,通常它帶來的性能損失是使用靜態類型的 4〜6 倍。
ListModel 的get()方法接受一個 int 類型的參數,用來獲取指定索引位置的數據,返回一 個 QML 對象。然后,我們就可以像訪問屬性那樣訪問數據的 role 了,正如我們在前面使用的那樣:
var data = listView.model.get(listView.currentIndex}
listView.footerltem.text = data.name + " , " + data.cost + " , " + data.manufacturer
二、刪除數據
如果你想刪除一條或多條數據,可以使用 ListModel 的remove(int index, int count)方法,它有兩個整型參數,第一個參數指明要刪除的數據的索引位置,第二個參數表示要刪除的數據條數,默認值為 1。
如果你想清空一個 Model,可以直接調用 clear() 方法。
現在我們將 phone_list_footer.qml 另存為 phone_list_change.qml,將 phoneDelegate 內的 MouseArea 對象修改為下面的樣子:
MouseArea {
	anchors.fill: parent
    onClicked: {
		wrapper.ListView.view.currentlndex = index
	}

	onDoubleClicked: {
		wrapper.ListView.view.model.remove(index)
	}
}
然后執行 “qmlscene phone_list_change.qml” 命令,用鼠標左鍵雙擊某個 Item,該 Item 就會從 ListView 中刪除。
讓我們再修改一下 footer 組件,添加一個清除按鈕,用來清除所有的數據。footer 組件的新代碼如下:
Component {
    id: footerView
    Item{
        id: footerRootItem
        width: parent.width
        height: 30
        property alias text: txt.text
        signal clean()

        Text {
            anchors.left: parent.left
            anchors.top: parent.top
            anchors.bottom: parent.bottom
            id: txt
            font.italic: true
            color: "blue"
            verticalAlignment: Text.AlignVCenter
        }

        Button {
            id: clearAll
            anchors.right: parent.right
            anchors.verticalCenter: parent.verticalCenter
            text: "Clear"
            onClicked: footerRootItem.clean()
        }
    }
}
給 ListView 添加 Component.onCompleted 附加信號處理器:
Component.onCompleted: {
    listView.footerItem.clean.connect(listView.model.clear)
}
現在可以運行 phone_list_change.qml 了,看到界面右下角的 “Clear” 按鈕了吧,點擊它,列表所有數據就沒啦。
三、修改數據
要想修改 Model 的數據,可以使用 ListModel 的setProperty(int index,string property, variant value)方法。該方法有三個參數,第一個是數據的索引,第二個是數據內 role 的名字,第三個是mle的值。比如要修改 “MI 2S" 的價格,可以這樣:
listView.model.setProperty(5, "cost", 16999)
如果想替換某一條數據,可以使用set(int index, jsobject dict)方法。我們經常用對象的字面量表示法構造一個對象傳遞給 set() 方法。比如想把 “iPhone 3GS” 替換為 “Z5S mini”,可以這樣:
listView.model.set(0, {"name" : "25S mini ", "cost" : 1999, "manufacturer" : "ZhongXing"})
四、添加數據
要向 Model 的尾部添加數據,可以使用append()方法。append() 的參數是 jsobject,在 ECMAScript 中可以使用對象的字面量表示法來構造這個 jsobject,即花括號加 key-value 對的 集合,類似於這樣:{"name" : "zhangsan", "age" : 28},key-value 對之間使用逗號分隔。這種方式與 QML 對象聲明的方式略有不同。給個簡單的例子:
function addOne(){
    model.append(
        {
            "name": "MX3",
            "cost": "1799",
            "manufacturer": "MeiZu"
        }
    );
}
如果想在指定位置添加數據,可以使用insert()方法,它的第一個參數是整型的,代表插 入的索引位置,第二個參數是 jsobject。
再來修改下phone_list_change.qml,新增添加數據的代碼,全新的內容如下:
import QtQuick 2.2
import QtQuick.Controls 1.2
import QtQuick.Layouts 1.1

Rectangle {
    width: 360
    height: 300
    color: "#EEEEEE"

    Component {
        id: headerView
        Item {
            width: parent.width
            height: 30
            RowLayout {
                anchors.left: parent.left
                anchors.verticalCenter: parent.verticalCenter
                spacing: 8
                Text {
                    text: "Name"
                    font.bold: true
                    font.pixelSize: 20
                    Layout.preferredWidth: 120
                }
                // 省略。。。
            }
        }
    }

    Component {
        id: footerView
        Item{
            id: footerRootItem
            width: parent.width
            height: 30
            property alias text: txt.text

            // 1.自定義信號
            signal clean()
            signal add()

            Text {
                anchors.left: parent.left
                anchors.top: parent.top
                anchors.bottom: parent.bottom
                id: txt
                font.italic: true
                color: "blue"
                verticalAlignment: Text.AlignVCenter
            }

            Button {
                id: clearAll
                anchors.right: parent.right
                anchors.verticalCenter: parent.verticalCenter
                text: "Clear"
                onClicked: footerRootItem.clean()
            }

            Button {
                id: addOne
                anchors.right: clearAll.left
                anchors.rightMargin: 4
                anchors.verticalCenter: parent.verticalCenter
                text: "Add"
                onClicked: footerRootItem.add()
            }
        }
    }

    Component {
        id: phoneDelegate
        Item {
            id: wrapper
            width: parent.width
            height: 30

            MouseArea {
                anchors.fill: parent

                onClicked: {
                    wrapper.ListView.view.currentIndex = index
                    mouse.accepted = true
                }

                onDoubleClicked: {
                    wrapper.ListView.view.model.remove(index)
                    mouse.accepted = true
                }
            }

            RowLayout {
                anchors.left: parent.left
                anchors.verticalCenter: parent.verticalCenter
                spacing: 8

                Text {
                    id: col1
                    text: name
                    color: wrapper.ListView.isCurrentItem ? "red" : "black"
                    font.pixelSize: wrapper.ListView.isCurrentItem ? 22 : 18
                    Layout.preferredWidth: 120
                }
                // 省略。。。
            }
        }
    }

    Component {
        id: phoneModel;
        ListModel {
            ListElement{
                name: "iPhone 3GS"
                cost: "1000"
                manufacturer: "Apple"
            }
            // 省略。。。
        }
    }

    ListView {
        id: listView
        anchors.fill: parent

        delegate: phoneDelegate
        model: phoneModel.createObject(listView)
        header: headerView
        footer: footerView
        focus: true
        highlight: Rectangle{
            color: "lightblue"
        }

        onCurrentIndexChanged: {
            if( listView.currentIndex >=0 ){
                var data = listView.model.get(listView.currentIndex)
                listView.footerItem.text = data.name + " , " + data.cost + " , " + data.manufacturer
            }else{
                listView.footerItem.text = ""
            }
        }

        // 2.槽函數:添加數據
        function addOne() {
            model.append(
                        {
                            "name": "MX3",
                            "cost": "1799",
                            "manufacturer": "MeiZu"
                        }
            )
        }

        // 3.連接信號槽
        Component.onCompleted: {
            listView.footerItem.clean.connect(listView.model.clear)
            listView.footerItem.add.connect(listView.addOne)
        }
    }
}
執行 “qmlscenephone_list_change.qml" 命令后的初始效果如下圖所示。

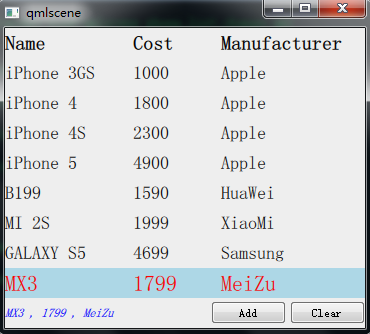
點擊 "Add" 按鈕后的效果如下圖所示。
到現在為止,這個例子涵蓋了 ListView 的基本應用,包括怎樣初始化一個 ListView、訪問數據、刪除數據、動態添加數據、處理高亮等內容。你可以點擊 “Clear” 按鈕、點擊某個 Item 或者雙擊某個 Item 看看效果。
五、下載鏈接
全部代碼下載鏈接:https://github.com/confidentFeng/QML_Demo/tree/master/ListViewPhone
參考:
《Qt Quick核心編程》第13章