一、前言
由於 FFmpeg 是使用 C 語言開發,所有和函數調用都是面向過程的。所以這里全部代碼先放在 main 函數中實現,經過測試和修改后功能正常,再以 C++ 面向對象的方式逐步將代碼分解和封裝。
二、效果展示
下面代碼只先實現音視頻解碼,解碼數據寫入文件。解碼后的 RGB 和 PCM 數據存放在工程目錄下的 dove_640x360.rgb 和 dove.pcm 文件。
使用 yuvplayer 播放 RGB 文件,如下圖所示:

使用 AudioConverter 軟件播放 PCM 文件,如下圖所示:

三、搭建開發環境
平台:Windows
IDE:VS2019 + Qt5.15.2
編譯器:MSVC2017_64
FFmpeg版本:Vcpkg的最新版本(FFmpeg 4.3.2)
VS2109 和 Qt 的安裝可以參考:VS2019 Qt5.15.2 開發環境搭建
Vcpkg 部署 FFmpeg 庫可以參考:C++開源庫 - 包管理工具Vcpkg安裝使用教程
- 如果不想使用 Vcpkg 安裝 FFmpeg 庫,源碼內也存放了個 3.xx 版本的 FFmpeg 庫,添加到 include 和 lib 依賴路徑即可使用。
- FFmpeg 的傳統安裝方法參考下面。
FFmpeg安裝
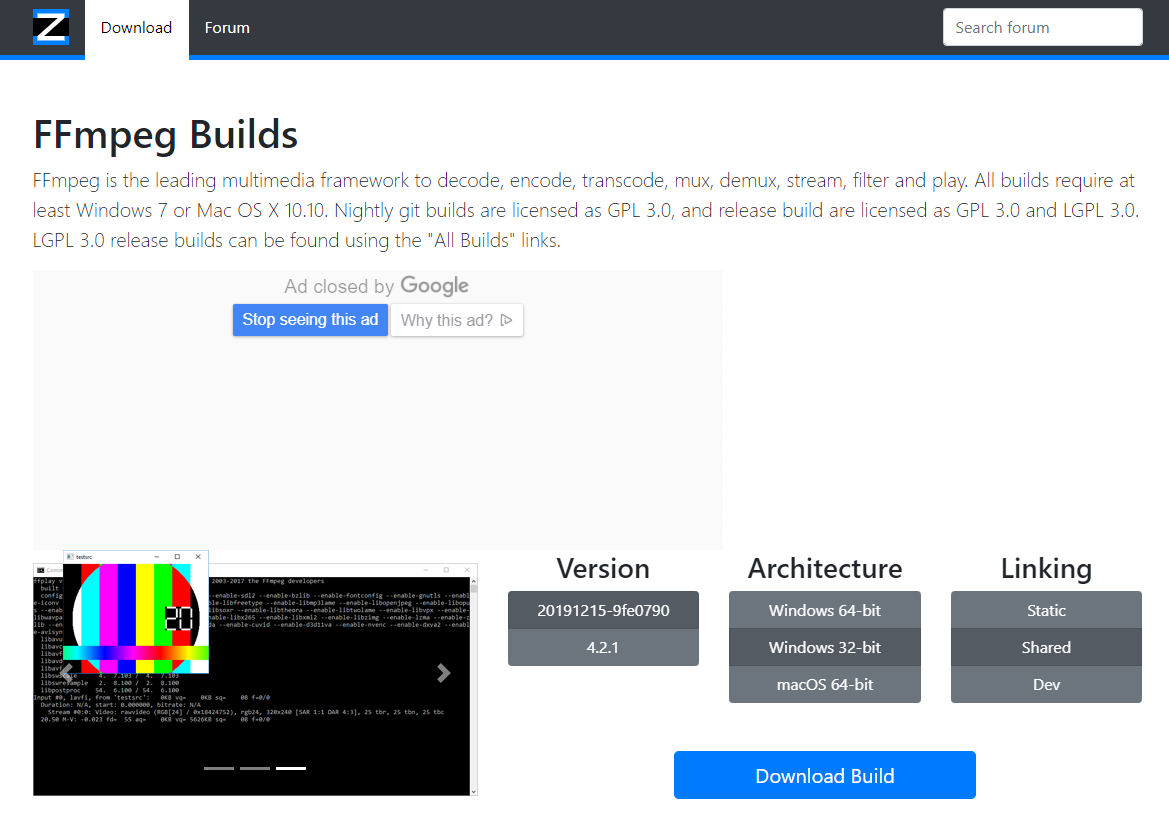
FFmpeg 下載地址:
點擊上面地址后彈出界面如下圖 1 所示,然后選擇Windows 32-bit的 FFmpeg,當然你也可以選擇 64 位的,不過我選擇的是 32 位。
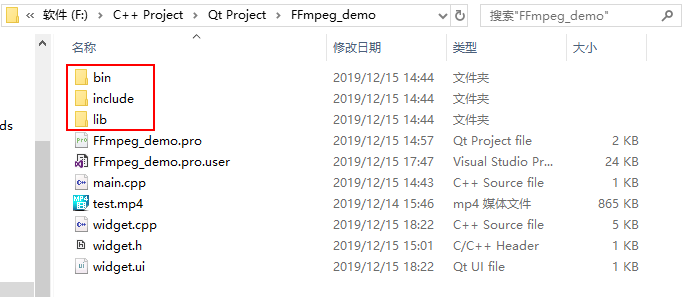
之后我們需要將它右側 Linking 下的Shared和Dev下載下來,解壓后 Dev 的 include 里是它的頭文件、lib 里是他的靜態鏈接庫,Shared 里的 bin 是它的 dll 和 .exe 程序。之后我們將它 Dev 里的 include、lib 和 Shared 里的 bin 拷貝出來形成如下圖 2 所示。
四、代碼實現
VS2019 新建一個 Win32 控制台空項目,添加一個 main.cpp 文件。輸出路徑設置為../bin/win64/,中間目錄設置為../bin/win64/obj/。main 函數中的全部代碼在下面。
步驟0:准備工作
#include <iostream>
#include <fstream>

extern "C" {
#include "libavformat/avformat.h"
#include "libavcodec/avcodec.h"
#include "libswscale/swscale.h"
#include "libswresample/swresample.h"
}
// 傳統安裝方法需要
#pragma comment(lib,"avformat.lib")
#pragma comment(lib,"avutil.lib")
#pragma comment(lib,"avcodec.lib")
#pragma comment(lib,"swscale.lib")
#pragma comment(lib,"swresample.lib")

using namespace std;

static double r2d(AVRational r)
{
	return r.den == 0 ? 0 : (double)r.num / (double)r.den;
}

int main(int argc, char* argv[])
{
	// 打開rgb文件
	FILE* outFileRgb = fopen("../bin/win64/dove_640x360.rgb", "wb");
	if (outFileRgb == NULL) {
		cout << "file not exist!" << endl;
		return false;
	}
	// 打開pcm文件
	FILE* outFilePcm = fopen("../bin/win64/dove.pcm", "wb");
	if (outFilePcm == NULL) {
		cout << "file not exist!" << endl;
		return false;
	}

    // ....(省略下面代碼)
}
步驟1:打開視頻文件、探測獲取流信息
//===================1、打開視頻文件===================
const char* path = "dove_640x360.mp4";
// 參數設置
AVDictionary* opts = NULL;
// 設置rtsp流已tcp協議打開
av_dict_set(&opts, "rtsp_transport", "tcp", 0);
// 網絡延時時間
av_dict_set(&opts, "max_delay", "500", 0);

// 解封裝上下文
AVFormatContext* pFormatCtx = NULL;
int nRet = avformat_open_input(
    &pFormatCtx,
    path,
    0,  // 0表示自動選擇解封器
    &opts // 參數設置,比如rtsp的延時時間
);
if (nRet != 0)
{
    char buf[1024] = { 0 };
    av_strerror(nRet, buf, sizeof(buf) - 1);
    cout << "open " << path << " failed! :" << buf << endl;
    return -1;
}
cout << "open " << path << " success! " << endl;

// 探測獲取流信息
nRet = avformat_find_stream_info(pFormatCtx, 0);

// 獲取媒體總時長,單位為毫秒
int totalMs = pFormatCtx->duration / (AV_TIME_BASE / 1000);
cout << "totalMs = " << totalMs << endl;
// 打印視頻流詳細信息
av_dump_format(pFormatCtx, 0, path, 0);
步驟2:獲取音視頻流索引
//===================2、獲取音視頻流索引===================
int nVStreamIndex = -1; // 視頻流索引(讀取時用來區分音視頻)
int nAStreamIndex = -1; // 音頻流索引
// 獲取視頻流索引(新版本方法:使用av_find_best_stream函數)
nVStreamIndex = av_find_best_stream(pFormatCtx, AVMEDIA_TYPE_VIDEO, -1, -1, NULL, 0);
if (nVStreamIndex == -1) {
    cout << "find videoStream failed!" << endl;
    return -1;
}
// 打印視頻信息(這個pStream只是指向pFormatCtx的成員,未申請內存,為棧指針無需釋放,下面同理)
AVStream* pVStream = pFormatCtx->streams[nVStreamIndex];
cout << "=======================================================" << endl;
cout << "VideoInfo: " << nVStreamIndex << endl;
cout << "codec_id = " << pVStream->codecpar->codec_id << endl;
cout << "format = " << pVStream->codecpar->format << endl;
cout << "width=" << pVStream->codecpar->width << endl;
cout << "height=" << pVStream->codecpar->height << endl;
// 幀率 fps 分數轉換
cout << "video fps = " << r2d(pVStream->avg_frame_rate) << endl;
// 幀率 fps 分數轉換
cout << "video fps = " << r2d(pFormatCtx->streams[nVStreamIndex]->avg_frame_rate) << endl;

// 獲取音頻流索引
nAStreamIndex = av_find_best_stream(pFormatCtx, AVMEDIA_TYPE_AUDIO, -1, -1, NULL, 0);
if (nVStreamIndex == -1) {
    cout << "find audioStream failed!" << endl;
    return -1;
}
// 打印音頻信息
AVStream* pAStream = pFormatCtx->streams[nAStreamIndex];
cout << "=======================================================" << endl;
cout << "AudioInfo: " << nAStreamIndex << endl;
cout << "codec_id = " << pAStream->codecpar->codec_id << endl;
cout << "format = " << pAStream->codecpar->format << endl;
cout << "sample_rate = " << pAStream->codecpar->sample_rate << endl;
// AVSampleFormat;
cout << "channels = " << pAStream->codecpar->channels << endl;
// 一幀數據?? 單通道樣本數
cout << "frame_size = " << pAStream->codecpar->frame_size << endl;
這里使用av_find_best_stream來獲取音視頻索引,而不是遍歷查找方法,更加方便且效率更高,推薦使用。
步驟3:打開音視頻解碼器
//===================3、打開視頻解碼器===================
// 根據codec_id找到視頻解碼器
AVCodec* pVCodec = avcodec_find_decoder(pVStream->codecpar->codec_id);
if (!pVCodec)
{
    cout << "can't find the codec id " << pVStream->codecpar->codec_id;
    return -1;
}
cout << "find the AVCodec " << pVStream->codecpar->codec_id << endl;

// 創建視頻解碼器上下文
AVCodecContext* pVCodecCtx = avcodec_alloc_context3(pVCodec);
// 配置視頻解碼器上下文參數
avcodec_parameters_to_context(pVCodecCtx, pVStream->codecpar);
// 八線程視頻解碼
pVCodecCtx->thread_count = 8;

// 打開視頻解碼器上下文
nRet = avcodec_open2(pVCodecCtx, 0, 0);
if (nRet != 0)
{
    char buf[1024] = { 0 };
    av_strerror(nRet, buf, sizeof(buf) - 1);
    cout << "avcodec_open2  failed! :" << buf << endl;
    return -1;
}
cout << "video avcodec_open2 success!" << endl;

//===================3、打開音頻解碼器===================
// 找到音頻解碼器
AVCodec* pACodec = avcodec_find_decoder(pFormatCtx->streams[nAStreamIndex]->codecpar->codec_id);
if (!pACodec)
{
    cout << "can't find the codec id " << pFormatCtx->streams[nAStreamIndex]->codecpar->codec_id;
    return -1;
}
cout << "find the AVCodec " << pFormatCtx->streams[nAStreamIndex]->codecpar->codec_id << endl;

// 創建音頻解碼器上下文
AVCodecContext* pACodecCtx = avcodec_alloc_context3(pACodec);
// /配置音頻解碼器上下文參數
avcodec_parameters_to_context(pACodecCtx, pFormatCtx->streams[nAStreamIndex]->codecpar);
// 八線程音頻解碼
pACodecCtx->thread_count = 8;

// 打開音頻解碼器上下文
nRet = avcodec_open2(pACodecCtx, 0, 0);
if (nRet != 0)
{
    char buf[1024] = { 0 };
    av_strerror(nRet, buf, sizeof(buf) - 1);
    cout << "avcodec_open2  failed! :" << buf << endl;
    return -1;
}
cout << "audio avcodec_open2 success!" << endl;
步驟4:循環解碼前初始化各緩沖區
//===================4、循環解碼前初始化各緩沖區===================
// malloc AVPacket並初始化
AVPacket* pkt = av_packet_alloc();
AVFrame* frame = av_frame_alloc();

// 像素格式和尺寸轉換上下文
SwsContext* vSwsCtx = NULL;
unsigned char* rgb = NULL;

// 音頻重采樣 上下文初始化
SwrContext* actx = swr_alloc();
actx = swr_alloc_set_opts(actx,
	av_get_default_channel_layout(2),	// 輸出格式
	AV_SAMPLE_FMT_S16,					// 輸出樣本格式
	pACodecCtx->sample_rate,			// 輸出采樣率
	av_get_default_channel_layout(pACodecCtx->channels), // 輸入格式
	pACodecCtx->sample_fmt,
	pACodecCtx->sample_rate,
	0, 0
);
// 初始化音頻采樣數據上下文
nRet = swr_init(actx);
if (nRet != 0)
{
	char buf[1024] = { 0 };
	av_strerror(nRet, buf, sizeof(buf) - 1);
	cout << "swr_init  failed! :" << buf << endl;
	return -1;
}
unsigned char* pcm = NULL;
// 緩沖區大小 = 采樣率(44100HZ) * 采樣精度(16位 = 2字節)
int MAX_AUDIO_SIZE = 44100 * 2;
uint8_t* out_audio = (uint8_t*)av_malloc(MAX_AUDIO_SIZE);;
// 獲取輸出的聲道個數
int out_nb_channels = av_get_channel_layout_nb_channels(AV_CH_LAYOUT_STEREO);
步驟5:解碼
//===================5、開始循環解碼===================
while(1)
{
	int nRet = av_read_frame(pFormatCtx, pkt);
	if (nRet != 0)
	{
#if 0
		// 循環"播放"
		cout << "==============================end==============================" << endl;
		int ms = 3000; // 三秒位置 根據時間基數(分數)轉換
		long long pos = (double)ms / (double)1000 * r2d(ic->streams[pkt->stream_index]->time_base);
		av_seek_frame(ic, nVStreamIndex, pos, AVSEEK_FLAG_BACKWARD | AVSEEK_FLAG_FRAME);
		continue;
#else
		// "播放"完一次之后退出
		break;
#endif
	}
	cout << "pkt->size = " << pkt->size << endl;
	// 顯示的時間
	cout << "pkt->pts = " << pkt->pts << endl;
	// 轉換為毫秒,方便做同步
	cout << "pkt->pts ms = " << pkt->pts * (r2d(pFormatCtx->streams[pkt->stream_index]->time_base) * 1000) << endl;
	// 解碼時間
	cout << "pkt->dts = " << pkt->dts << endl;

	AVCodecContext* cc = 0;
	if (pkt->stream_index == nVStreamIndex)
	{
		cout << "圖像" << endl;
		cc = pVCodecCtx;
	}
	if (pkt->stream_index == nAStreamIndex)
	{
		cout << "音頻" << endl;
		cc = pACodecCtx;
	}

	// 解碼視頻
	// 發送packet到解碼線程  send傳NULL后調用多次receive取出所有緩沖幀
	nRet = avcodec_send_packet(cc, pkt);
	// 釋放,引用計數-1 為0釋放空間
	av_packet_unref(pkt);

	if (nRet != 0)
	{
		char buf[1024] = { 0 };
		av_strerror(nRet, buf, sizeof(buf) - 1);
		cout << "avcodec_send_packet  failed! :" << buf << endl;
		continue;
	}

	for (;;)
	{
		// 從線程中獲取解碼接口,一次send可能對應多次receive
		nRet = avcodec_receive_frame(cc, frame);
		if (nRet != 0) break;
		cout << "recv frame " << frame->format << " " << frame->linesize[0] << endl;

		// 視頻
		if (cc == pVCodecCtx)
		{
			vSwsCtx = sws_getCachedContext(
				vSwsCtx,	// 傳NULL會新創建
				frame->width, frame->height,		// 輸入的寬高
				(AVPixelFormat)frame->format,	// 輸入格式 YUV420p
				frame->width, frame->height,	// 輸出的寬高
				AV_PIX_FMT_RGBA,				// 輸出格式RGBA
				SWS_BILINEAR,					// 尺寸變化的算法
				0, 0, 0);
			// if(vSwsCtx)
				// cout << "像素格式尺寸轉換上下文創建或者獲取成功!" << endl;
			// else
			// 	cout << "像素格式尺寸轉換上下文創建或者獲取失敗!" << endl;
			if (vSwsCtx)
			{
				// RGB緩沖區分配內存,只第一次分配
				//(當然也可以創建pFrameRGB,用avpicture_fill初始化pFrameRGB來實現)
				if (!rgb) rgb = new unsigned char[frame->width * frame->height * 4];
				uint8_t* data[2] = { 0 };
				data[0] = rgb;
				int lines[2] = { 0 };
				lines[0] = frame->width * 4;
				// 類型轉換:YUV轉換成RGB
				nRet = sws_scale(vSwsCtx,
					frame->data,		// 輸入數據
					frame->linesize,	// 輸入行大小
					0,
					frame->height,		// 輸入高度
					data,				// 輸出數據和大小
					lines
				);
				cout << "sws_scale = " << nRet << endl;

				// 將數據以二進制的形式寫入文件中
				fwrite(data[0], frame->width* frame->height * 4, 1, outFileRgb);
			}
		}
		else // 音頻
		{
			// 創建音頻采樣緩沖區
			uint8_t* data[2] = { 0 };
			if (!pcm) pcm = new uint8_t[frame->nb_samples * 2 * 2];
			data[0] = pcm;
			// 類型轉換:轉換成PCM
			nRet = swr_convert(actx,
				data, frame->nb_samples,		// 輸出
				(const uint8_t**)frame->data, frame->nb_samples	// 輸入
			);
			cout << "swr_convert = " << nRet << endl;

			// 獲取緩沖區實際存儲大小
			int out_buffer_size = av_samples_get_buffer_size(NULL, out_nb_channels, frame->nb_samples,
				AV_SAMPLE_FMT_S16, 1);
			// 將數據以二進制的形式寫入文件中
			fwrite(data[0], 1, out_buffer_size, outFilePcm);
		}
	}
}
步驟6:內存釋放
//===================6、內存釋放===================
fclose(outFileRgb);
fclose(outFilePcm);
av_frame_free(&frame);
av_packet_free(&pkt);
if (pFormatCtx)
{
    // 釋放封裝上下文,並且把ic置0
    avformat_close_input(&pFormatCtx);
}
五、打印音視頻流信息
如果是使用傳統安裝方法,在運行前要將 bin 目錄下的 dll 文件拷貝到編譯生成的 exe 所在的目錄下,否則會提示:程序異常結束,無法運行。原因是缺少庫文件。編譯時,提前設置好庫路徑即可,但運行時的路徑和編譯時的路徑往往不一樣,這樣就導致運行時找不到庫文件,需要將庫文件拷貝至運行路徑下才行。
打印出的音頻流和視頻流信息如下:
open dove_640x360.mp4 success!
totalMs = 15060
Input #0, mov,mp4,m4a,3gp,3g2,mj2, from 'dove_640x360.mp4':
  Metadata:
    major_brand     : isom
    minor_version   : 1
    compatible_brands: isom
    creation_time   : 2015-06-30T08:50:41.000000Z
    copyright       :
    copyright-eng   :
  Duration: 00:00:15.06, start: 0.000000, bitrate: 470 kb/s
    Stream #0:0(und): Video: h264 (Main) (avc1 / 0x31637661), yuv420p, 640x360 [SAR 1:1 DAR 16:9], 418 kb/s, 24 fps, 24 tbr, 24k tbn, 48 tbc (default)
    Metadata:
      creation_time   : 2015-06-30T08:50:40.000000Z
      handler_name    : TrackHandler
    Stream #0:1(und): Audio: aac (LC) (mp4a / 0x6134706D), 48000 Hz, stereo, fltp, 49 kb/s (default)
    Metadata:
      creation_time   : 2015-06-30T08:50:40.000000Z
      handler_name    : Sound Media Handler
=======================================================
VideoInfo: 0
codec_id = 28
format = 0
width=640
height=360
video fps = 24
video fps = 24
=======================================================
AudioInfo: 1
codec_id = 86018
format = 8
sample_rate = 48000
channels = 2
frame_size = 1024
find the AVCodec 28
video avcodec_open2 success!
find the AVCodec 86018
audio avcodec_open2 success!
pkt->size = 18908
pkt->pts = 0
pkt->pts ms = 0
pkt->dts = -2000
圖像
pkt->size = 73
pkt->pts = 1000
pkt->pts ms = 41.6667
pkt->dts = -1000
圖像
pkt->size = 5607
pkt->pts = 5000
pkt->pts ms = 208.333
pkt->dts = 0
// ...調試輸出信息太多,這里省略部分
音頻
recv frame 8 8192
swr_convert = 1024
pkt->size = 21
pkt->pts = 1024
pkt->pts ms = 21.3333
pkt->dts = 1024
音頻
recv frame 8 8192
swr_convert = 1024
pkt->size = 10
pkt->pts = 2048
pkt->pts ms = 42.6667
pkt->dts = 2048
// ...省略下方全部調試信息

E:\Learn\FFmpeg\XPlayer\XPlayer_1\bin\win32\XPlayer_1.exe (進程 13840)已退出,代碼為 0。
按任意鍵關閉此窗口. .
六、代碼下載
下載鏈接:https://github.com/confidentFeng/FFmpeg/tree/master/XPlayer/XPlayer_1
參考:
Qt與FFmpeg聯合開發指南(一)——解碼(1):功能實現