該系列文章是本人在學習 Spring 的過程中總結下來的,里面涉及到相關源碼,可能對讀者不太友好,請結合我的源碼注釋 Spring 源碼分析 GitHub 地址 進行閱讀
Spring 版本:5.1.14.RELEASE
開始閱讀這一系列文章之前,建議先查看《深入了解 Spring IoC(面試題)》這一篇文章
該系列其他文章請查看:《死磕 Spring 之 IoC 篇 - 文章導讀》
@Autowired 等注解的實現原理
在上一篇《Bean 的屬性填充階段》文章中講到,在創建一個 Bean 的實例對象后,會對這個 Bean 進行屬性填充。在屬性填充的過程中,獲取到已定義的屬性值,然后會通過 InstantiationAwareBeanPostProcessor 對該屬性值進行處理,最后通過反射機制將屬性值設置到這個 Bean 中。在 Spring 內部有以下兩個 InstantiationAwareBeanPostProcessor 處理器:
- AutowiredAnnotationBeanPostProcessor,解析 @Autowired 和 @Value 注解標注的屬性,獲取對應屬性值
- CommonAnnotationBeanPostProcessor,會解析 @Resource 注解標注的屬性,獲取對應的屬性值
本文將會分析這兩個處理器的實現,以及涉及到的相關對象
這兩個處理器在哪被注冊?
在前面的《解析自定義標簽(XML 文件)》 和 《BeanDefinition 的解析過程(面向注解)》文章中可以知道,在 XML 文件中的 <context:component-scan /> 標簽的處理過程中,會底層借助於 ClassPathBeanDefinitionScanner 掃描器,去掃描指定路徑下符合條件(@Component 注解)的 BeanDefinition 們,關於 @ComponentScan 注解的解析也是借助於這個掃描器實現的。掃描過程如下:
// ClassPathBeanDefinitionScanner.java
public int scan(String... basePackages) {
    // <1> 獲取掃描前的 BeanDefinition 數量
    int beanCountAtScanStart = this.registry.getBeanDefinitionCount();

    // <2> 進行掃描,將過濾出來的所有的 .class 文件生成對應的 BeanDefinition 並注冊
    doScan(basePackages);

    // Register annotation config processors, if necessary.
    // <3> 如果 `includeAnnotationConfig` 為 `true`(默認),則注冊幾個關於注解的 PostProcessor 處理器(關鍵)
    // 在其他地方也會注冊,內部會進行判斷,已注冊的處理器不會再注冊
    if (this.includeAnnotationConfig) {
        AnnotationConfigUtils.registerAnnotationConfigProcessors(this.registry);
    }

    // <4> 返回本次掃描注冊的 BeanDefinition 數量
    return (this.registry.getBeanDefinitionCount() - beanCountAtScanStart);
}
在第 <3> 步會調用 AnnotationConfigUtils 的 registerAnnotationConfigProcessors(BeanDefinitionRegistry) 方法,如下:
// AnnotationConfigUtils.java
public static void registerAnnotationConfigProcessors(BeanDefinitionRegistry registry) {
    registerAnnotationConfigProcessors(registry, null);
}

/**
 * Register all relevant annotation post processors in the given registry.
 * @param registry the registry to operate on
 * @param source the configuration source element (already extracted)
 * that this registration was triggered from. May be {@code null}.
 * @return a Set of BeanDefinitionHolders, containing all bean definitions
 * that have actually been registered by this call
 */
public static Set<BeanDefinitionHolder> registerAnnotationConfigProcessors(
        BeanDefinitionRegistry registry, @Nullable Object source) {

    DefaultListableBeanFactory beanFactory = unwrapDefaultListableBeanFactory(registry);
    if (beanFactory != null) {
        if (!(beanFactory.getDependencyComparator() instanceof AnnotationAwareOrderComparator)) {
            beanFactory.setDependencyComparator(AnnotationAwareOrderComparator.INSTANCE);
        }
        if (!(beanFactory.getAutowireCandidateResolver() instanceof ContextAnnotationAutowireCandidateResolver)) {
            beanFactory.setAutowireCandidateResolver(new ContextAnnotationAutowireCandidateResolver());
        }
    }

    Set<BeanDefinitionHolder> beanDefs = new LinkedHashSet<>(8);

    // 處理 Spring 應用上下文中的配置類
    if (!registry.containsBeanDefinition(CONFIGURATION_ANNOTATION_PROCESSOR_BEAN_NAME)) {
        RootBeanDefinition def = new RootBeanDefinition(ConfigurationClassPostProcessor.class);
        def.setSource(source);
        beanDefs.add(registerPostProcessor(registry, def, CONFIGURATION_ANNOTATION_PROCESSOR_BEAN_NAME));
    }

    // 處理 @Autowired 以及 @Value 注解
    if (!registry.containsBeanDefinition(AUTOWIRED_ANNOTATION_PROCESSOR_BEAN_NAME)) {
        RootBeanDefinition def = new RootBeanDefinition(AutowiredAnnotationBeanPostProcessor.class);
        def.setSource(source);
        beanDefs.add(registerPostProcessor(registry, def, AUTOWIRED_ANNOTATION_PROCESSOR_BEAN_NAME));
    }

    // (條件激活)處理 JSR-250 注解 @Resource,如 @PostConstruct、@PreDestroy 等
    // Check for JSR-250 support, and if present add the CommonAnnotationBeanPostProcessor.
    if (jsr250Present && !registry.containsBeanDefinition(COMMON_ANNOTATION_PROCESSOR_BEAN_NAME)) {
        RootBeanDefinition def = new RootBeanDefinition(CommonAnnotationBeanPostProcessor.class);
        def.setSource(source);
        beanDefs.add(registerPostProcessor(registry, def, COMMON_ANNOTATION_PROCESSOR_BEAN_NAME));
    }

    // Processor 對象(條件激活)處理 JPA 注解場景
    // Check for JPA support, and if present add the PersistenceAnnotationBeanPostProcessor.
    if (jpaPresent && !registry.containsBeanDefinition(PERSISTENCE_ANNOTATION_PROCESSOR_BEAN_NAME)) {
        RootBeanDefinition def = new RootBeanDefinition();
        try {
            def.setBeanClass(ClassUtils.forName(PERSISTENCE_ANNOTATION_PROCESSOR_CLASS_NAME,
                    AnnotationConfigUtils.class.getClassLoader()));
        }
        catch (ClassNotFoundException ex) {
            throw new IllegalStateException(
                    "Cannot load optional framework class: " + PERSISTENCE_ANNOTATION_PROCESSOR_CLASS_NAME, ex);
        }
        def.setSource(source);
        beanDefs.add(registerPostProcessor(registry, def, PERSISTENCE_ANNOTATION_PROCESSOR_BEAN_NAME));
    }

    // 處理標注 @EventListener 的 Spring 事件監聽方法
    if (!registry.containsBeanDefinition(EVENT_LISTENER_PROCESSOR_BEAN_NAME)) {
        RootBeanDefinition def = new RootBeanDefinition(EventListenerMethodProcessor.class);
        def.setSource(source);
        beanDefs.add(registerPostProcessor(registry, def, EVENT_LISTENER_PROCESSOR_BEAN_NAME));
    }

    // 用於 @EventListener 標注的事件監聽方法構建成 ApplicationListener 對象
    if (!registry.containsBeanDefinition(EVENT_LISTENER_FACTORY_BEAN_NAME)) {
        RootBeanDefinition def = new RootBeanDefinition(DefaultEventListenerFactory.class);
        def.setSource(source);
        beanDefs.add(registerPostProcessor(registry, def, EVENT_LISTENER_FACTORY_BEAN_NAME));
    }

    return beanDefs;
}
在這個方法中可以看到會注冊 AutowiredAnnotationBeanPostProcessor 和 CommonAnnotationBeanPostProcessor 兩個處理器,然后在 Spring 應用上下文刷新階段會將其初始化並添加至 AbstractBeanFactory 的 beanPostProcessors 集合中,那么接下來我們先來分析這兩個處理器
回顧 Bean 的創建過程
第一步:回到《Bean 的創建過程》文章中的“對 RootBeanDefinition 加工處理”小節,會調用這個方法:
// AbstractAutowireCapableBeanFactory.java
protected void applyMergedBeanDefinitionPostProcessors(RootBeanDefinition mbd, Class<?> beanType, String beanName) {
    for (BeanPostProcessor bp : getBeanPostProcessors()) {
        if (bp instanceof MergedBeanDefinitionPostProcessor) {
            MergedBeanDefinitionPostProcessor bdp = (MergedBeanDefinitionPostProcessor) bp;
            bdp.postProcessMergedBeanDefinition(mbd, beanType, beanName);
        }
    }
}
調用所有 MergedBeanDefinitionPostProcessor 的 postProcessMergedBeanDefinition 方法對 RootBeanDefinition 進行加工處理,例如:
- AutowiredAnnotationBeanPostProcessor,會先解析出
@Autowired和@Value注解標注的屬性的注入元信息,后續進行依賴注入 - CommonAnnotationBeanPostProcessor,會先解析出
@Resource注解標注的屬性的注入元信息,后續進行依賴注入,它也會找到@PostConstruct和@PreDestroy注解標注的方法,並構建一個 LifecycleMetadata 對象,用於后續生命周期中的初始化和銷毀
第二步:回到《Bean 的創建過程》文章中的“屬性填充”小節,該過程會進行下面的處理:
// <5> 通過 InstantiationAwareBeanPostProcessor 處理器(如果有)對 `pvs` 進行處理
    if (hasInstAwareBpps) {
        if (pvs == null) {
            pvs = mbd.getPropertyValues();
        }

        // <5.1> 遍歷所有的 BeanPostProcessor
        for (BeanPostProcessor bp : getBeanPostProcessors()) {
            // 如果為 InstantiationAwareBeanPostProcessor 類型
            if (bp instanceof InstantiationAwareBeanPostProcessor) {
                InstantiationAwareBeanPostProcessor ibp = (InstantiationAwareBeanPostProcessor) bp;
                // <5.2> 調用處理器的 `postProcessProperties(...)` 方法,對 `pvs` 進行后置處理
                PropertyValues pvsToUse = ibp.postProcessProperties(pvs, bw.getWrappedInstance(), beanName);
                // <5.3> 如果上一步的處理結果為空,可能是新版本導致的(Spring 5.1 之前沒有上面這個方法),則需要兼容老版本
                if (pvsToUse == null) {
                    // <5.3.1> 找到這個 Bean 的所有 `java.beans.PropertyDescriptor` 屬性描述器(包含這個屬性的所有信息)
                    if (filteredPds == null) {
                        filteredPds = filterPropertyDescriptorsForDependencyCheck(bw, mbd.allowCaching);
                    }
                    // <5.3.2> 調用處理器的 `postProcessPropertyValues(...)` 方法,對 `pvs` 進行后置處理
                    pvsToUse = ibp.postProcessPropertyValues(pvs, filteredPds, bw.getWrappedInstance(), beanName);
                    // <5.3.3> 如果處理后的 PropertyValues 對象為空,直接 `return`,則不會調用后面的 InstantiationAwareBeanPostProcessor 處理器,也不會進行接下來的屬性填充
                    if (pvsToUse == null) {
                        return;
                    }
                }
                // <5.4> 將處理后的 `pvsToUse` 復制給 `pvs`
                pvs = pvsToUse;
            }
        }
    }
這里不會調用所有 InstantiationAwareBeanPostProcessor 的 postProcessProperties 方法對 pvs(MutablePropertyValues)屬性值對象進行處理,例如:
- AutowiredAnnotationBeanPostProcessor,會根據前面解析出來的
@Autowired和@Value注解標注的屬性的注入元信息,進行依賴注入 - CommonAnnotationBeanPostProcessor,會根據前面解析出來的
@Resource注解標注的屬性的注入元信息,進行依賴注入
可以看到@Autowired、@Value 和 @Resource 注解的實現就是基於這兩個處理器實現的,接下來我們來看看這兩個處理器的具體實現
AutowiredAnnotationBeanPostProcessor
org.springframework.beans.factory.annotation.AutowiredAnnotationBeanPostProcessor,主要處理 @Autowired 和 @Value 注解進行依賴注入
體系結構
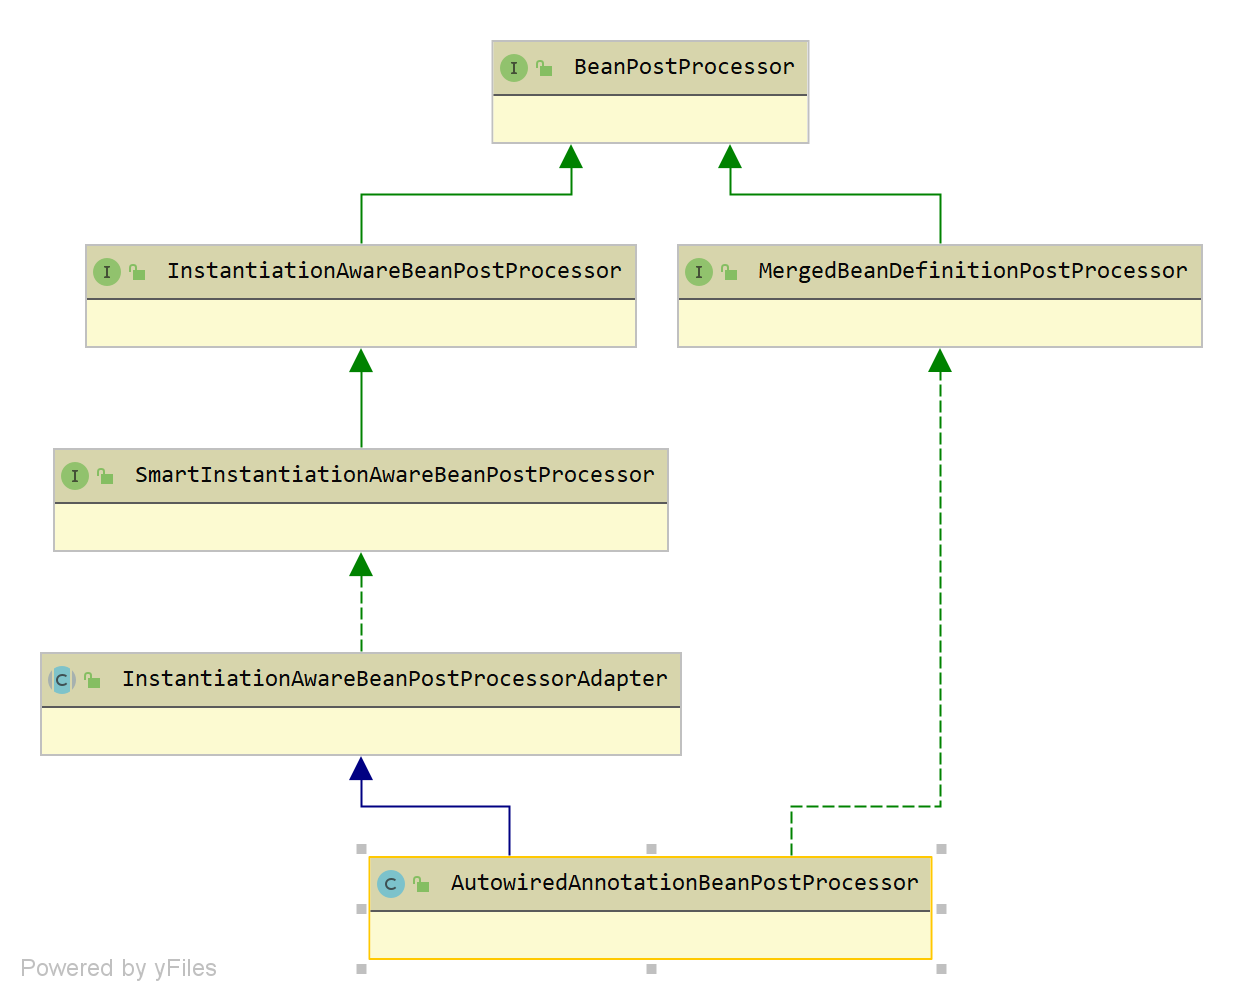
可以看到 AutowiredAnnotationBeanPostProcessor 實現了 MergedBeanDefinitionPostProcessor 和 InstantiationAwareBeanPostProcessor 兩個接口
構造方法
public class AutowiredAnnotationBeanPostProcessor extends InstantiationAwareBeanPostProcessorAdapter
      implements MergedBeanDefinitionPostProcessor, PriorityOrdered, BeanFactoryAware {

   /**
    * 保存需要處理的注解
    */
   private final Set<Class<? extends Annotation>> autowiredAnnotationTypes = new LinkedHashSet<>(4);

   private String requiredParameterName = "required";

   private boolean requiredParameterValue = true;

   private int order = Ordered.LOWEST_PRECEDENCE - 2;

   @Nullable
   private ConfigurableListableBeanFactory beanFactory;

   private final Set<String> lookupMethodsChecked = Collections.newSetFromMap(new ConcurrentHashMap<>(256));

   private final Map<Class<?>, Constructor<?>[]> candidateConstructorsCache = new ConcurrentHashMap<>(256);

   /**
	* 緩存需要注入的字段元信息
	*/
   private final Map<String, InjectionMetadata> injectionMetadataCache = new ConcurrentHashMap<>(256);

   /**
    * Create a new {@code AutowiredAnnotationBeanPostProcessor} for Spring's
    * standard {@link Autowired @Autowired} annotation.
    * <p>Also supports JSR-330's {@link javax.inject.Inject @Inject} annotation,
    * if available.
    */
   @SuppressWarnings("unchecked")
   public AutowiredAnnotationBeanPostProcessor() {
      this.autowiredAnnotationTypes.add(Autowired.class);
      this.autowiredAnnotationTypes.add(Value.class);
      try {
         this.autowiredAnnotationTypes.add((Class<? extends Annotation>)
               ClassUtils.forName("javax.inject.Inject", AutowiredAnnotationBeanPostProcessor.class.getClassLoader()));
         logger.trace("JSR-330 'javax.inject.Inject' annotation found and supported for autowiring");
      }
      catch (ClassNotFoundException ex) {
         // JSR-330 API not available - simply skip.
      }
   }
}
可以看到會添加 @Autowired 和 @Value 兩個注解,如果存在 JSR-330 的 javax.inject.Inject 注解,也是支持的
postProcessMergedBeanDefinition 方法
postProcessMergedBeanDefinition(RootBeanDefinition beanDefinition, Class<?> beanType, String beanName) 方法,找到 @Autowired 和 @Value 注解標注的字段(或方法)的元信息,如下:
@Override
public void postProcessMergedBeanDefinition(RootBeanDefinition beanDefinition, Class<?> beanType, String beanName) {
    // 找到這個 Bean 所有需要注入的屬性(@Autowired 或者 @Value 注解)
    InjectionMetadata metadata = findAutowiringMetadata(beanName, beanType, null);
    metadata.checkConfigMembers(beanDefinition);
}
直接調用 findAutowiringMetadata(...) 方法獲取這個 Bean 的注入元信息對象
1. findAutowiringMetadata 方法
private InjectionMetadata findAutowiringMetadata(String beanName, Class<?> clazz, @Nullable PropertyValues pvs) {
    // Fall back to class name as cache key, for backwards compatibility with custom callers.
    // 生成一個緩存 Key
    String cacheKey = (StringUtils.hasLength(beanName) ? beanName : clazz.getName());
    // Quick check on the concurrent map first, with minimal locking.
    // 先嘗試從緩存中獲取
    InjectionMetadata metadata = this.injectionMetadataCache.get(cacheKey);
    if (InjectionMetadata.needsRefresh(metadata, clazz)) { // 是否需要刷新,也就是判斷緩存是否命中
        synchronized (this.injectionMetadataCache) {
            metadata = this.injectionMetadataCache.get(cacheKey);
            if (InjectionMetadata.needsRefresh(metadata, clazz)) { // 加鎖,再判斷一次
                if (metadata != null) {
                    metadata.clear(pvs);
                }
                // 構建一個需要注入的元信息對象
                metadata = buildAutowiringMetadata(clazz);
                this.injectionMetadataCache.put(cacheKey, metadata);
            }
        }
    }
    return metadata;
}
首先嘗試從緩存中獲取這個 Bean 對應的注入元信息對象,沒有找到的話則調用 buildAutowiringMetadata(final Class<?> clazz) 構建一個,然后再放入緩存中
2. buildAutowiringMetadata 方法
private InjectionMetadata buildAutowiringMetadata(final Class<?> clazz) {
    List<InjectionMetadata.InjectedElement> elements = new ArrayList<>();
    Class<?> targetClass = clazz;

    do {
        // <1> 創建 `currElements` 集合,用於保存 @Autowired、@Value 注解標注的字段
        final List<InjectionMetadata.InjectedElement> currElements = new ArrayList<>();

        // <2> 遍歷這個 Class 對象的所有字段
        ReflectionUtils.doWithLocalFields(targetClass, field -> {
            // <2.1> 找到該字段的 @Autowired 或者 @Value 注解,返回 `ann` 對象,沒有的話返回空對象,則直接跳過不進行下面的操作
            AnnotationAttributes ann = findAutowiredAnnotation(field);
            if (ann != null) {
                // <2.2> 進行過濾,static 修飾的字段不進行注入
                if (Modifier.isStatic(field.getModifiers())) {
                    if (logger.isInfoEnabled()) {
                        logger.info("Autowired annotation is not supported on static fields: " + field);
                    }
                    return;
                }
                // <2.3> 獲取注解中的 `required` 配置
                boolean required = determineRequiredStatus(ann);
                // <2.4> 根據該字段和 `required` 構建一個 AutowiredFieldElement 對象,添加至 `currElements`
                currElements.add(new AutowiredFieldElement(field, required));
            }
        });

        // <3> 遍歷這個 Class 對象的所有方法
        ReflectionUtils.doWithLocalMethods(targetClass, method -> {
            // <3.1> 嘗試找到這個方法的橋接方法,沒有的話就是本身這個方法
            Method bridgedMethod = BridgeMethodResolver.findBridgedMethod(method);
            // <3.2> 如果是橋接方法則直接跳過
            if (!BridgeMethodResolver.isVisibilityBridgeMethodPair(method, bridgedMethod)) {
                return;
            }
            // <3.3> 找到該方法的 @Autowired 或者 @Value 注解,返回 `ann` 對象,沒有的話返回空對象,則直接跳過不進行下面的操作
            AnnotationAttributes ann = findAutowiredAnnotation(bridgedMethod);
            if (ann != null && method.equals(ClassUtils.getMostSpecificMethod(method, clazz))) {
                // <3.4> 進行過濾,static 修飾的方法不進行注入
                if (Modifier.isStatic(method.getModifiers())) {
                    if (logger.isInfoEnabled()) {
                        logger.info("Autowired annotation is not supported on static methods: " + method);
                    }
                    return;
                }
                if (method.getParameterCount() == 0) {
                    if (logger.isInfoEnabled()) {
                        logger.info("Autowired annotation should only be used on methods with parameters: " +
                                method);
                    }
                }
                // <3.5> 獲取注解中的 `required` 配置
                boolean required = determineRequiredStatus(ann);
                PropertyDescriptor pd = BeanUtils.findPropertyForMethod(bridgedMethod, clazz);
                // <3.6> 構建一個 AutowiredMethodElement 對象,添加至 `currElements`
                currElements.add(new AutowiredMethodElement(method, required, pd));
            }
        });

        elements.addAll(0, currElements);
        // <4> 找到父類,循環遍歷
        targetClass = targetClass.getSuperclass();
    }
    while (targetClass != null && targetClass != Object.class);

    // <5> 根據從這個 Bean 解析出來的所有 InjectedElement 對象生成一個 InjectionMetadata 注入元信息對象,並返回
    return new InjectionMetadata(clazz, elements);
}
過程如下:
- 創建
currElements集合,用於保存@Autowired、@Value注解標注的字段 - 遍歷這個 Class 對象的所有字段
- 找到該字段的
@Autowired或者@Value注解,返回ann對象,沒有的話返回空對象,則直接跳過不進行下面的操作 - 進行過濾,static 修飾的字段不進行注入
- 獲取注解中的
required配置 - 根據該字段和
required構建一個 AutowiredFieldElement 對象,添加至currElements
- 找到該字段的
- 遍歷這個 Class 對象的所有方法
- 嘗試找到這個方法的橋接方法,沒有的話就是本身這個方法
- 如果是橋接方法則直接跳過
- 找到該方法的
@Autowired或者@Value注解,返回ann對象,沒有的話返回空對象,則直接跳過不進行下面的操作 - 進行過濾,static 修飾的方法不進行注入
- 獲取注解中的
required配置 - 構建一個 AutowiredMethodElement 對象,添加至
currElements
- 找到父類,循環遍歷
- 根據從這個 Bean 解析出來的所有 InjectedElement 對象生成一個 InjectionMetadata 注入元信息對象,並返回
整個過程很簡單,就是解析出所有 @Autowired 或者 @Value 注解標注的方法或者字段,然后構建一個 InjectionMetadata 注入元信息對象
postProcessProperties 方法
postProcessProperties(PropertyValues pvs, Object bean, String beanName) 方法,根據 @Autowired 和 @Value 注解標注的字段(或方法)的元信息進行依賴注入,如下:
@Override
public PropertyValues postProcessProperties(PropertyValues pvs, Object bean, String beanName) {
    // 找到這個 Bean 的注入元信息對象
    InjectionMetadata metadata = findAutowiringMetadata(beanName, bean.getClass(), pvs);
    try {
        // 進行注入
        metadata.inject(bean, beanName, pvs);
    }
    catch (BeanCreationException ex) {
        throw ex;
    }
    catch (Throwable ex) {
        throw new BeanCreationException(beanName, "Injection of autowired dependencies failed", ex);
    }
    return pvs;
}
先找到這個 Bean 的注入元信息對象,上面已經講過了,然后調用其 inject(...) 方法,這里先來看到 InjectionMetadata 這個對象
InjectionMetadata 注入元信息對象
org.springframework.beans.factory.annotation.InjectionMetadata,某個 Bean 的注入元信息對象
public class InjectionMetadata {

	private static final Log logger = LogFactory.getLog(InjectionMetadata.class);

	private final Class<?> targetClass;

	/**
	 * 需要注入的字段(或方法)的元信息
	 */
	private final Collection<InjectedElement> injectedElements;

	@Nullable
	private volatile Set<InjectedElement> checkedElements;

	public InjectionMetadata(Class<?> targetClass, Collection<InjectedElement> elements) {
		this.targetClass = targetClass;
		this.injectedElements = elements;
	}

	public void inject(Object target, @Nullable String beanName, @Nullable PropertyValues pvs) throws Throwable {
		Collection<InjectedElement> checkedElements = this.checkedElements;
		Collection<InjectedElement> elementsToIterate =
				(checkedElements != null ? checkedElements : this.injectedElements);
		if (!elementsToIterate.isEmpty()) {
			for (InjectedElement element : elementsToIterate) {
				if (logger.isTraceEnabled()) {
					logger.trace("Processing injected element of bean '" + beanName + "': " + element);
				}
				element.inject(target, beanName, pvs);
			}
		}
	}
}
可以看到注入方法非常簡單,就是遍歷所有的 InjectedElement 對象,調用他們的 inject(Object bean, @Nullable String beanName, @Nullable PropertyValues pvs) 方法
AutowiredFieldElement
AutowiredAnnotationBeanPostProcessor 的私有內部類,注入字段對象,如下:
private class AutowiredFieldElement extends InjectionMetadata.InjectedElement {
    /** 是否必須 */
    private final boolean required;
    /** 是否緩存起來了 */
    private volatile boolean cached = false;
    /** 緩存的對象 */
    @Nullable
    private volatile Object cachedFieldValue;

    public AutowiredFieldElement(Field field, boolean required) {
        super(field, null);
        this.required = required;
    }

    @Override
    protected void inject(Object bean, @Nullable String beanName, @Nullable PropertyValues pvs) throws Throwable {
        // <1> 獲取 `field` 字段
        Field field = (Field) this.member;
        Object value;
        // <2> 如果進行緩存了,則嘗試從緩存中獲取
        if (this.cached) {
            value = resolvedCachedArgument(beanName, this.cachedFieldValue);
        }
        // <3> 否則,開始進行解析
        else {
            // <3.1> 創建一個依賴注入描述器 `desc`
            DependencyDescriptor desc = new DependencyDescriptor(field, this.required);
            desc.setContainingClass(bean.getClass());
            Set<String> autowiredBeanNames = new LinkedHashSet<>(1);
            Assert.state(beanFactory != null, "No BeanFactory available");
            TypeConverter typeConverter = beanFactory.getTypeConverter();
            try {
                /**
                 * <3.2> 通過 {@link org.springframework.beans.factory.support.DefaultListableBeanFactory#resolveDependency} 方法
                 * 找到這個字段對應的 Bean(們)
                 */
                value = beanFactory.resolveDependency(desc, beanName, autowiredBeanNames, typeConverter);
            }
            catch (BeansException ex) {
                throw new UnsatisfiedDependencyException(null, beanName, new InjectionPoint(field), ex);
            }
            // <3.3> 和緩存相關,如果有必要則將本次找到的注入對象緩存起來,避免下次再進行解析
            synchronized (this) {
                if (!this.cached) {
                    if (value != null || this.required) {
                        this.cachedFieldValue = desc;
                        registerDependentBeans(beanName, autowiredBeanNames);
                        if (autowiredBeanNames.size() == 1) {
                            String autowiredBeanName = autowiredBeanNames.iterator().next();
                            if (beanFactory.containsBean(autowiredBeanName) &&
                                    beanFactory.isTypeMatch(autowiredBeanName, field.getType())) {
                                this.cachedFieldValue = new ShortcutDependencyDescriptor(
                                        desc, autowiredBeanName, field.getType());
                            }
                        }
                    }
                    else {
                        this.cachedFieldValue = null;
                    }
                    this.cached = true;
                }
            }
        }
        // <4> 如果獲取到該字段對應的對象,則進行屬性賦值(依賴注入)
        if (value != null) {
            ReflectionUtils.makeAccessible(field);
            field.set(bean, value);
        }
    }
}
直接看到 inject(...) 方法,注入的過程如下:
- 獲取
field字段 - 如果進行緩存了,則嘗試從緩存中獲取
- 否則,開始進行解析
- 創建一個依賴注入描述器
desc - 【核心】通過
DefaultListableBeanFactory#resolveDependency(...)方法,找到這個字段對應的 Bean(們) - 和緩存相關,如果有必要則將本次找到的注入對象緩存起來,避免下次再進行解析
- 創建一個依賴注入描述器
- 如果獲取到該字段對應的對象,則進行屬性賦值(依賴注入),底層就是通過反射機制為該字段賦值
可以看到整個的核心在於通過 DefaultListableBeanFactory#resolveDependency(...) 方法找到字段對應的 Bean,這里也許是一個集合對象,所以也可能找到的是多個 Bean,該方法在后面進行分析
AutowiredMethodElement
AutowiredAnnotationBeanPostProcessor 的私有內部類,注入方法對象,如下:
private class AutowiredMethodElement extends InjectionMetadata.InjectedElement {
    /** 是否必須 */
    private final boolean required;
    /** 是否緩存起來了 */
    private volatile boolean cached = false;
    /** 緩存的方法參數對象 */
    @Nullable
    private volatile Object[] cachedMethodArguments;

    public AutowiredMethodElement(Method method, boolean required, @Nullable PropertyDescriptor pd) {
        super(method, pd);
        this.required = required;
    }

    @Override
    protected void inject(Object bean, @Nullable String beanName, @Nullable PropertyValues pvs) throws Throwable {
        if (checkPropertySkipping(pvs)) {
            return;
        }
        // <1> 獲取 `method` 方法
        Method method = (Method) this.member;
        // <2> 如果進行緩存了,則嘗試從緩存中獲取方法參數對象
        Object[] arguments;
        if (this.cached) {
            // Shortcut for avoiding synchronization...
            arguments = resolveCachedArguments(beanName);
        }
        // <3> 否則,開始進行解析
        else {
            // <3.1> 獲取方法的參數類型集合 `paramTypes`,根據參數位置確定參數
            Class<?>[] paramTypes = method.getParameterTypes();
            arguments = new Object[paramTypes.length];
            // <3.2> 構建一個依賴注入描述器數組 `descriptors`,用於保存后續創建的對象
            DependencyDescriptor[] descriptors = new DependencyDescriptor[paramTypes.length];
            Set<String> autowiredBeans = new LinkedHashSet<>(paramTypes.length);
            Assert.state(beanFactory != null, "No BeanFactory available");
            TypeConverter typeConverter = beanFactory.getTypeConverter();
            // <3.3> 根據參數順序遍歷該方法的參數
            for (int i = 0; i < arguments.length; i++) {
                // <3.3.1> 為第 `i` 個方法參數創建一個 MethodParameter 對象
                MethodParameter methodParam = new MethodParameter(method, i);
                // <3.3.2> 創建依賴描述器 `currDesc`,並添加至 `descriptors` 數組
                DependencyDescriptor currDesc = new DependencyDescriptor(methodParam, this.required);
                currDesc.setContainingClass(bean.getClass());
                descriptors[i] = currDesc;
                try {
                    /**
                     * <3.3.3> 通過 {@link org.springframework.beans.factory.support.DefaultListableBeanFactory#resolveDependency} 方法
                     * 找到這個方法參數對應的 Bean(們)
                     */
                    Object arg = beanFactory.resolveDependency(currDesc, beanName, autowiredBeans, typeConverter);
                    if (arg == null && !this.required) {
                        arguments = null;
                        break;
                    }
                    arguments[i] = arg;
                }
                catch (BeansException ex) {
                    throw new UnsatisfiedDependencyException(null, beanName, new InjectionPoint(methodParam), ex);
                }
            }
            // <3.4> 和緩存相關,如果有必要則將本次找到的方法參數對象緩存起來,避免下次再進行解析
            synchronized (this) {
                if (!this.cached) {
                    if (arguments != null) {
                        Object[] cachedMethodArguments = new Object[paramTypes.length];
                        System.arraycopy(descriptors, 0, cachedMethodArguments, 0, arguments.length);
                        registerDependentBeans(beanName, autowiredBeans);
                        if (autowiredBeans.size() == paramTypes.length) {
                            Iterator<String> it = autowiredBeans.iterator();
                            for (int i = 0; i < paramTypes.length; i++) {
                                String autowiredBeanName = it.next();
                                if (beanFactory.containsBean(autowiredBeanName) &&
                                        beanFactory.isTypeMatch(autowiredBeanName, paramTypes[i])) {
                                    cachedMethodArguments[i] = new ShortcutDependencyDescriptor(
                                            descriptors[i], autowiredBeanName, paramTypes[i]);
                                }
                            }
                        }
                        this.cachedMethodArguments = cachedMethodArguments;
                    }
                    else {
                        this.cachedMethodArguments = null;
                    }
                    this.cached = true;
                }
            }
        }
        // <4> 如果找到該方法的參數(們),則進行屬性賦值(依賴注入)
        if (arguments != null) {
            try {
                ReflectionUtils.makeAccessible(method);
                // 通過反射機制調用該方法
                method.invoke(bean, arguments);
            }
            catch (InvocationTargetException ex) {
                throw ex.getTargetException();
            }
        }
    }
}
直接看到 inject(...) 方法,注入的過程如下:
- 獲取
method方法 - 如果進行緩存了,則嘗試從緩存中獲取方法參數對象
- 否則,開始進行解析
- 獲取方法的參數類型集合
paramTypes,根據參數位置確定參數 - 構建一個依賴注入描述器數組
descriptors,用於保存后續創建的對象 - 根據參數順序遍歷該方法的參數
- 為第
i個方法參數創建一個 MethodParameter 對象 - 創建依賴描述器
currDesc,並添加至descriptors數組 - 【核心】通過
DefaultListableBeanFactory#resolveDependency(...)方法,找到這個方法參數對應的 Bean(們) - 和緩存相關,如果有必要則將本次找到的方法參數對象緩存起來,避免下次再進行解析
- 為第
- 獲取方法的參數類型集合
- 如果找到該方法的參數(們),則進行屬性賦值(依賴注入),底層就是通過反射機制調用該方法
可以看到整個的核心也是通過 DefaultListableBeanFactory#resolveDependency(...) 方法找到方法參數對應的 Bean,該方法在后面進行分析
CommonAnnotationBeanPostProcessor
org.springframework.context.annotation.CommonAnnotationBeanPostProcessor,主要處理 @Resource 注解進行依賴注入,以及 @PostConstruct 和 @PreDestroy 生命周期注解的處理
體系結構
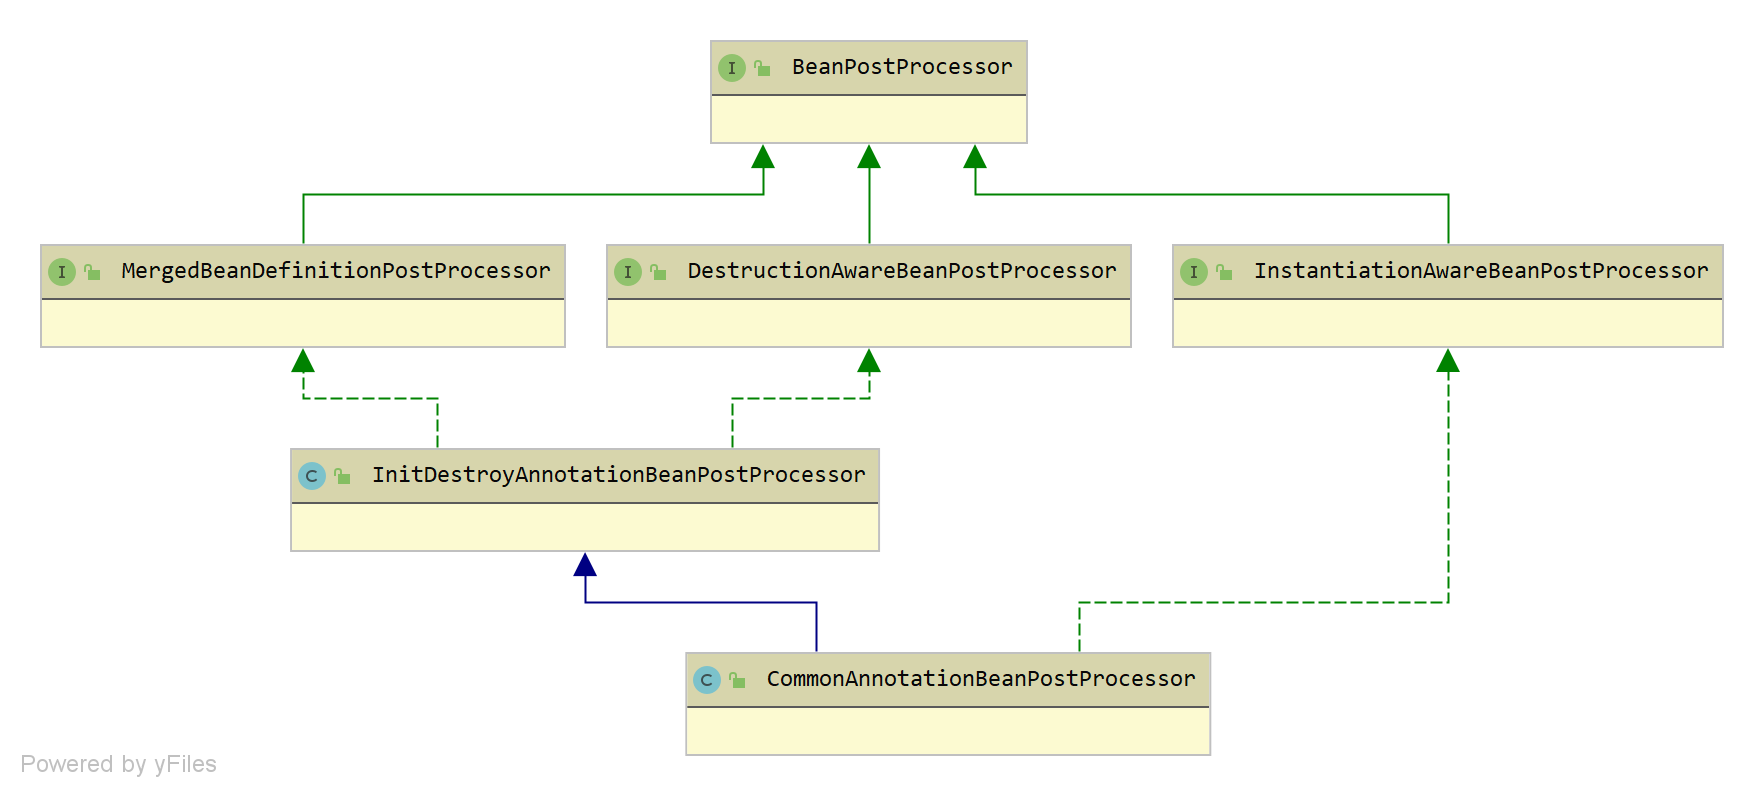
可以看到 CommonAnnotationBeanPostProcessor 實現了 MergedBeanDefinitionPostProcessor 和 InstantiationAwareBeanPostProcessor 兩個接口,還實現了 DestructionAwareBeanPostProcessor 接口,用於生命周期中的初始化和銷毀的處理
構造方法
public class CommonAnnotationBeanPostProcessor extends InitDestroyAnnotationBeanPostProcessor
		implements InstantiationAwareBeanPostProcessor, BeanFactoryAware, Serializable {

	@Nullable
	private static Class<? extends Annotation> webServiceRefClass;

	@Nullable
	private static Class<? extends Annotation> ejbRefClass;

	static {
		try {
			@SuppressWarnings("unchecked")
			Class<? extends Annotation> clazz = (Class<? extends Annotation>)
					ClassUtils.forName("javax.xml.ws.WebServiceRef", CommonAnnotationBeanPostProcessor.class.getClassLoader());
			webServiceRefClass = clazz;
		}
		catch (ClassNotFoundException ex) {
			webServiceRefClass = null;
		}
		try {
			@SuppressWarnings("unchecked")
			Class<? extends Annotation> clazz = (Class<? extends Annotation>)
					ClassUtils.forName("javax.ejb.EJB", CommonAnnotationBeanPostProcessor.class.getClassLoader());
			ejbRefClass = clazz;
		}
		catch (ClassNotFoundException ex) {
			ejbRefClass = null;
		}
	}

	/**
	 * Create a new CommonAnnotationBeanPostProcessor,
	 * with the init and destroy annotation types set to
	 * {@link javax.annotation.PostConstruct} and {@link javax.annotation.PreDestroy},
	 * respectively.
	 */
	public CommonAnnotationBeanPostProcessor() {
		setOrder(Ordered.LOWEST_PRECEDENCE - 3);
		setInitAnnotationType(PostConstruct.class);
		setDestroyAnnotationType(PreDestroy.class);
		ignoreResourceType("javax.xml.ws.WebServiceContext");
	}
}

public class InitDestroyAnnotationBeanPostProcessor
		implements DestructionAwareBeanPostProcessor, MergedBeanDefinitionPostProcessor, PriorityOrdered, Serializable {

	protected transient Log logger = LogFactory.getLog(getClass());

	/**
	 * 初始化注解,默認為 @PostConstruct
	 */
	@Nullable
	private Class<? extends Annotation> initAnnotationType;

	/**
	 * 銷毀注解,默認為 @PreDestroy
	 */
	@Nullable
	private Class<? extends Annotation> destroyAnnotationType;

	private int order = Ordered.LOWEST_PRECEDENCE;

	@Nullable
	private final transient Map<Class<?>, LifecycleMetadata> lifecycleMetadataCache = new ConcurrentHashMap<>(256);

	public void setInitAnnotationType(Class<? extends Annotation> initAnnotationType) {
		this.initAnnotationType = initAnnotationType;
	}

	public void setDestroyAnnotationType(Class<? extends Annotation> destroyAnnotationType) {
		this.destroyAnnotationType = destroyAnnotationType;
	}
}
可以看到會設置初始化注解為 @PostConstruct,銷毀注解為 @PreDestroy,這兩個注解都是 JSR-250 注解;另外如果存在 javax.xml.ws.WebServiceRef 和 javax.ejb.EJB 注解也是會進行設置的
postProcessMergedBeanDefinition 方法
postProcessMergedBeanDefinition(RootBeanDefinition beanDefinition, Class<?> beanType, String beanName) 方法,找到 @PostConstruct 和 @PreDestroy 注解標注的方法,並構建 LifecycleMetadata 對象,找到 @Resource 注解標注的字段(或方法)的元信息,如下:
// CommonAnnotationBeanPostProcessor.java
@Override
public void postProcessMergedBeanDefinition(RootBeanDefinition beanDefinition, Class<?> beanType, String beanName) {
    // 先調用父類的方法,找到 @PostConstruct 和 @PreDestroy 注解標注的方法,並構建 LifecycleMetadata 對象
    super.postProcessMergedBeanDefinition(beanDefinition, beanType, beanName);
    // 找到 @Resource 注解標注的字段(或方法),構建一個 InjectionMetadata 對象,用於后續的屬性注入
    InjectionMetadata metadata = findResourceMetadata(beanName, beanType, null);
    metadata.checkConfigMembers(beanDefinition);
}
整個的過程原理和 AutowiredAnnotationBeanPostProcessor 差不多,先從緩存中獲取,未命中則調用對應的方法進行構建,下面先來看看父類中的方法
buildLifecycleMetadata 方法
// InitDestroyAnnotationBeanPostProcessor.java
private LifecycleMetadata buildLifecycleMetadata(final Class<?> clazz) {
    List<LifecycleElement> initMethods = new ArrayList<>();
    List<LifecycleElement> destroyMethods = new ArrayList<>();
    Class<?> targetClass = clazz;

    do {
        final List<LifecycleElement> currInitMethods = new ArrayList<>();
        final List<LifecycleElement> currDestroyMethods = new ArrayList<>();

        ReflectionUtils.doWithLocalMethods(targetClass, method -> {
            if (this.initAnnotationType != null && method.isAnnotationPresent(this.initAnnotationType)) {
                LifecycleElement element = new LifecycleElement(method);
                currInitMethods.add(element);
                if (logger.isTraceEnabled()) {
                    logger.trace("Found init method on class [" + clazz.getName() + "]: " + method);
                }
            }
            if (this.destroyAnnotationType != null && method.isAnnotationPresent(this.destroyAnnotationType)) {
                currDestroyMethods.add(new LifecycleElement(method));
                if (logger.isTraceEnabled()) {
                    logger.trace("Found destroy method on class [" + clazz.getName() + "]: " + method);
                }
            }
        });

        initMethods.addAll(0, currInitMethods);
        destroyMethods.addAll(currDestroyMethods);
        targetClass = targetClass.getSuperclass();
    }
    while (targetClass != null && targetClass != Object.class);

    return new LifecycleMetadata(clazz, initMethods, destroyMethods);
}
整個過程比較簡單,找到這個 Bean 中 @PostConstruct 和 @PreDestroy 注解標注的方法,然后構建一個 LifecycleMetadata 生命周期元信息對象
buildResourceMetadata 方法
// CommonAnnotationBeanPostProcessor.java
private InjectionMetadata buildResourceMetadata(final Class<?> clazz) {
    List<InjectionMetadata.InjectedElement> elements = new ArrayList<>();
    Class<?> targetClass = clazz;

    do {
        final List<InjectionMetadata.InjectedElement> currElements = new ArrayList<>();

        ReflectionUtils.doWithLocalFields(targetClass, field -> {
            if (webServiceRefClass != null && field.isAnnotationPresent(webServiceRefClass)) {
                if (Modifier.isStatic(field.getModifiers())) {
                    throw new IllegalStateException("@WebServiceRef annotation is not supported on static fields");
                }
                currElements.add(new WebServiceRefElement(field, field, null));
            }
            else if (ejbRefClass != null && field.isAnnotationPresent(ejbRefClass)) {
                if (Modifier.isStatic(field.getModifiers())) {
                    throw new IllegalStateException("@EJB annotation is not supported on static fields");
                }
                currElements.add(new EjbRefElement(field, field, null));
            }
            else if (field.isAnnotationPresent(Resource.class)) {
                if (Modifier.isStatic(field.getModifiers())) {
                    throw new IllegalStateException("@Resource annotation is not supported on static fields");
                }
                if (!this.ignoredResourceTypes.contains(field.getType().getName())) {
                    currElements.add(new ResourceElement(field, field, null));
                }
            }
        });

        ReflectionUtils.doWithLocalMethods(targetClass, method -> {
            Method bridgedMethod = BridgeMethodResolver.findBridgedMethod(method);
            if (!BridgeMethodResolver.isVisibilityBridgeMethodPair(method, bridgedMethod)) {
                return;
            }
            if (method.equals(ClassUtils.getMostSpecificMethod(method, clazz))) {
                if (webServiceRefClass != null && bridgedMethod.isAnnotationPresent(webServiceRefClass)) {
                    if (Modifier.isStatic(method.getModifiers())) {
                        throw new IllegalStateException("@WebServiceRef annotation is not supported on static methods");
                    }
                    if (method.getParameterCount() != 1) {
                        throw new IllegalStateException("@WebServiceRef annotation requires a single-arg method: " + method);
                    }
                    PropertyDescriptor pd = BeanUtils.findPropertyForMethod(bridgedMethod, clazz);
                    currElements.add(new WebServiceRefElement(method, bridgedMethod, pd));
                }
                else if (ejbRefClass != null && bridgedMethod.isAnnotationPresent(ejbRefClass)) {
                    if (Modifier.isStatic(method.getModifiers())) {
                        throw new IllegalStateException("@EJB annotation is not supported on static methods");
                    }
                    if (method.getParameterCount() != 1) {
                        throw new IllegalStateException("@EJB annotation requires a single-arg method: " + method);
                    }
                    PropertyDescriptor pd = BeanUtils.findPropertyForMethod(bridgedMethod, clazz);
                    currElements.add(new EjbRefElement(method, bridgedMethod, pd));
                }
                else if (bridgedMethod.isAnnotationPresent(Resource.class)) {
                    if (Modifier.isStatic(method.getModifiers())) {
                        throw new IllegalStateException("@Resource annotation is not supported on static methods");
                    }
                    Class<?>[] paramTypes = method.getParameterTypes();
                    if (paramTypes.length != 1) {
                        throw new IllegalStateException("@Resource annotation requires a single-arg method: " + method);
                    }
                    if (!this.ignoredResourceTypes.contains(paramTypes[0].getName())) {
                        PropertyDescriptor pd = BeanUtils.findPropertyForMethod(bridgedMethod, clazz);
                        currElements.add(new ResourceElement(method, bridgedMethod, pd));
                    }
                }
            }
        });

        elements.addAll(0, currElements);
        targetClass = targetClass.getSuperclass();
    }
    while (targetClass != null && targetClass != Object.class);

    return new InjectionMetadata(clazz, elements);
}
整個過程也比較簡單,解析出這個 Bean 帶有 @Resource 注解的所有字段(或方法),構建成對應的 ResourceElement 對象,然后再構建成一個 InjectionMetadata 注入元信息對象
postProcessProperties 方法
postProcessProperties(PropertyValues pvs, Object bean, String beanName) 方法,根據 @Resource 注解標注的字段(或方法)的元信息進行依賴注入,如下:
public PropertyValues postProcessProperties(PropertyValues pvs, Object bean, String beanName) {
    InjectionMetadata metadata = findResourceMetadata(beanName, bean.getClass(), pvs);
    try {
        // 進行注入
        metadata.inject(bean, beanName, pvs);
    }
    catch (Throwable ex) {
        throw new BeanCreationException(beanName, "Injection of resource dependencies failed", ex);
    }
    return pvs;
}
先找到這個 Bean 的注入元信息對象,上面已經講過了,然后調用其 inject(...) 方法,該對象上面已經講過了,實際就是調用其內部 InjectedElement 的 inject(...) 方法
postProcessBeforeInitialization 方法
初始化 Bean 的時候會先執行 @PostConstruct 標注的初始化方法
// InitDestroyAnnotationBeanPostProcessor.java
@Override
public Object postProcessBeforeInitialization(Object bean, String beanName) throws BeansException {
    // 找到 @PostConstruct 和 @PreDestroy 注解標注的方法們所對應的 LifecycleMetadata 對象
    LifecycleMetadata metadata = findLifecycleMetadata(bean.getClass());
    try {
        // 執行 @PostConstruct 標注的初始化方法
        metadata.invokeInitMethods(bean, beanName);
    }
    catch (InvocationTargetException ex) {
        throw new BeanCreationException(beanName, "Invocation of init method failed", ex.getTargetException());
    }
    catch (Throwable ex) {
        throw new BeanCreationException(beanName, "Failed to invoke init method", ex);
    }
    return bean;
}
// InitDestroyAnnotationBeanPostProcessor.LifecycleMetadata
public void invokeInitMethods(Object target, String beanName) throws Throwable {
    Collection<LifecycleElement> checkedInitMethods = this.checkedInitMethods;
    Collection<LifecycleElement> initMethodsToIterate =
            (checkedInitMethods != null ? checkedInitMethods : this.initMethods);
    if (!initMethodsToIterate.isEmpty()) {
        for (LifecycleElement element : initMethodsToIterate) {
            if (logger.isTraceEnabled()) {
                logger.trace("Invoking init method on bean '" + beanName + "': " + element.getMethod());
            }
            element.invoke(target);
        }
    }
}
postProcessBeforeDestruction 方法
銷毀 Bean 的時候先執行 @PreDestroy 注解標注的銷毀方法
// InitDestroyAnnotationBeanPostProcessor.java
@Override
public void postProcessBeforeDestruction(Object bean, String beanName) throws BeansException {
    // 找到 @PostConstruct 和 @PreDestroy 注解標注的方法們所對應的 LifecycleMetadata 對象
    LifecycleMetadata metadata = findLifecycleMetadata(bean.getClass());
    try {
        // 執行 @PreDestroy 標注的銷毀方法
        metadata.invokeDestroyMethods(bean, beanName);
    }
    catch (InvocationTargetException ex) {
        String msg = "Destroy method on bean with name '" + beanName + "' threw an exception";
        if (logger.isDebugEnabled()) {
            logger.warn(msg, ex.getTargetException());
        }
        else {
            logger.warn(msg + ": " + ex.getTargetException());
        }
    }
    catch (Throwable ex) {
        logger.warn("Failed to invoke destroy method on bean with name '" + beanName + "'", ex);
    }
}
// InitDestroyAnnotationBeanPostProcessor.LifecycleMetadata
public void invokeDestroyMethods(Object target, String beanName) throws Throwable {
    Collection<LifecycleElement> checkedDestroyMethods = this.checkedDestroyMethods;
    Collection<LifecycleElement> destroyMethodsToUse =
            (checkedDestroyMethods != null ? checkedDestroyMethods : this.destroyMethods);
    if (!destroyMethodsToUse.isEmpty()) {
        for (LifecycleElement element : destroyMethodsToUse) {
            if (logger.isTraceEnabled()) {
                logger.trace("Invoking destroy method on bean '" + beanName + "': " + element.getMethod());
            }
            element.invoke(target);
        }
    }
}
ResourceElement
CommonAnnotationBeanPostProcessor 的私有內部類,@Resource 注入字段(或方法)對象
構造方法
protected abstract class LookupElement extends InjectionMetadata.InjectedElement {

    /** Bean 的名稱 */
    protected String name = "";
	/** 是否為默認的名稱(通過注解定義的) */
    protected boolean isDefaultName = false;
	/** Bean 的類型 */
    protected Class<?> lookupType = Object.class;

    @Nullable
    protected String mappedName;

    public LookupElement(Member member, @Nullable PropertyDescriptor pd) {
        super(member, pd);
    }

    public final DependencyDescriptor getDependencyDescriptor() {
        if (this.isField) {
            return new LookupDependencyDescriptor((Field) this.member, this.lookupType);
        }
        else {
            return new LookupDependencyDescriptor((Method) this.member, this.lookupType);
        }
    }
}

private class ResourceElement extends LookupElement {
	/** 是否延遲加載 */
    private final boolean lazyLookup;

    public ResourceElement(Member member, AnnotatedElement ae, @Nullable PropertyDescriptor pd) {
        super(member, pd);
        Resource resource = ae.getAnnotation(Resource.class);
        String resourceName = resource.name();
        Class<?> resourceType = resource.type();
        this.isDefaultName = !StringUtils.hasLength(resourceName);
        if (this.isDefaultName) {
            resourceName = this.member.getName();
            if (this.member instanceof Method && resourceName.startsWith("set") && resourceName.length() > 3) {
                resourceName = Introspector.decapitalize(resourceName.substring(3));
            }
        }
        else if (embeddedValueResolver != null) {
            resourceName = embeddedValueResolver.resolveStringValue(resourceName);
        }
        if (Object.class != resourceType) {
            checkResourceType(resourceType);
        }
        else {
            // No resource type specified... check field/method.
            resourceType = getResourceType();
        }
        this.name = (resourceName != null ? resourceName : "");
        this.lookupType = resourceType;
        String lookupValue = resource.lookup();
        this.mappedName = (StringUtils.hasLength(lookupValue) ? lookupValue : resource.mappedName());
        Lazy lazy = ae.getAnnotation(Lazy.class);
        this.lazyLookup = (lazy != null && lazy.value());
    }
}
ResourceElement 的構造方法會通過 @Resource 注解和該字段(或方法)解析出基本信息
可以看到還繼承了 InjectionMetadata 的靜態內部類 InjectedElement,我們先來看到這個類的 inject(...) 方法
inject 方法
public abstract static class InjectedElement {

    protected final Member member;

    protected final boolean isField;

    protected void inject(Object target, @Nullable String requestingBeanName, @Nullable PropertyValues pvs)
            throws Throwable {
        if (this.isField) {
            Field field = (Field) this.member;
            ReflectionUtils.makeAccessible(field);
            field.set(target, getResourceToInject(target, requestingBeanName));
        } else {
            if (checkPropertySkipping(pvs)) {
                return;
            }
            try {
                Method method = (Method) this.member;
                ReflectionUtils.makeAccessible(method);
                method.invoke(target, getResourceToInject(target, requestingBeanName));
            }
            catch (InvocationTargetException ex) {
                throw ex.getTargetException();
            }
        }
    }

    @Nullable
	protected Object getResourceToInject(Object target, @Nullable String requestingBeanName) {
		return null;
	}
}
不管是字段還是方法,底層都是通過反射機制進行賦值或者調用,都會調用 getResourceToInject(...) 方法獲取到字段值或者方法參數
getResourceToInject 方法
@Override
protected Object getResourceToInject(Object target, @Nullable String requestingBeanName) {
    return (this.lazyLookup ? buildLazyResourceProxy(this, requestingBeanName) :
            getResource(this, requestingBeanName));
}
如果是延遲加載,則調用 buildLazyResourceProxy(...) 方法返回一個代理對象,如下:
protected Object buildLazyResourceProxy(final LookupElement element, final @Nullable String requestingBeanName) {
    TargetSource ts = new TargetSource() {
        @Override
        public Class<?> getTargetClass() {
            return element.lookupType;
        }
        @Override
        public boolean isStatic() {
            return false;
        }
        @Override
        public Object getTarget() {
            return getResource(element, requestingBeanName);
        }
        @Override
        public void releaseTarget(Object target) {
        }
    };
    ProxyFactory pf = new ProxyFactory();
    pf.setTargetSource(ts);
    if (element.lookupType.isInterface()) {
        pf.addInterface(element.lookupType);
    }
    ClassLoader classLoader = (this.beanFactory instanceof ConfigurableBeanFactory ?
            ((ConfigurableBeanFactory) this.beanFactory).getBeanClassLoader() : null);
    return pf.getProxy(classLoader);
}
否則,調用 getResource(...) 方法獲取注入對象
getResource 方法
protected Object getResource(LookupElement element, @Nullable String requestingBeanName)
        throws NoSuchBeanDefinitionException {

    if (StringUtils.hasLength(element.mappedName)) {
        return this.jndiFactory.getBean(element.mappedName, element.lookupType);
    }
    if (this.alwaysUseJndiLookup) {
        return this.jndiFactory.getBean(element.name, element.lookupType);
    }
    if (this.resourceFactory == null) {
        throw new NoSuchBeanDefinitionException(element.lookupType,
                "No resource factory configured - specify the 'resourceFactory' property");
    }
    return autowireResource(this.resourceFactory, element, requestingBeanName);
}
前面的判斷忽略掉,直接看到最后會調用 autowireResource(...) 方法,並返回注入信息
autowireResource 方法
protected Object autowireResource(BeanFactory factory, LookupElement element, @Nullable String requestingBeanName)
        throws NoSuchBeanDefinitionException {

    Object resource;
    Set<String> autowiredBeanNames;
    String name = element.name;

    if (factory instanceof AutowireCapableBeanFactory) {
        AutowireCapableBeanFactory beanFactory = (AutowireCapableBeanFactory) factory;
        DependencyDescriptor descriptor = element.getDependencyDescriptor();
        if (this.fallbackToDefaultTypeMatch && element.isDefaultName && !factory.containsBean(name)) {
            autowiredBeanNames = new LinkedHashSet<>();
            resource = beanFactory.resolveDependency(descriptor, requestingBeanName, autowiredBeanNames, null);
            if (resource == null) {
                throw new NoSuchBeanDefinitionException(element.getLookupType(), "No resolvable resource object");
            }
        }
        else {
            resource = beanFactory.resolveBeanByName(name, descriptor);
            autowiredBeanNames = Collections.singleton(name);
        }
    }
    else {
        resource = factory.getBean(name, element.lookupType);
        autowiredBeanNames = Collections.singleton(name);
    }

    if (factory instanceof ConfigurableBeanFactory) {
        ConfigurableBeanFactory beanFactory = (ConfigurableBeanFactory) factory;
        for (String autowiredBeanName : autowiredBeanNames) {
            if (requestingBeanName != null && beanFactory.containsBean(autowiredBeanName)) {
                beanFactory.registerDependentBean(autowiredBeanName, requestingBeanName);
            }
        }
    }

    return resource;
}
@Resource 注解相比於 @Autowired 注解的處理更加復雜點,可以如果 @Resource 指定了名稱,則直接通過依賴查找獲取該名稱的 Bean,否則,和 @Autowired 一樣去調用 DefaultListableBeanFactory#resolveDependency(...) 方法,找到對應的注入對象,該方法在后面進行分析
1. resolveDependency 處理依賴方法
resolveDependency(DependencyDescriptor descriptor, String requestingBeanName, Set<String> autowiredBeanNames, TypeConverter typeConverter) 方法,找到對應的依賴 Bean,該方法在《Bean 的創建過程》中也提到了,獲取 Bean 的實例對象時,構造器注入的參數也是通過該方法獲取的,本文的依賴注入底層也是通過該方法實現的,這里我們對該方法一探究竟
// DefaultListableBeanFactory.java
@Override
@Nullable
public Object resolveDependency(DependencyDescriptor descriptor, @Nullable String requestingBeanName,
        @Nullable Set<String> autowiredBeanNames, @Nullable TypeConverter typeConverter) throws BeansException {

    // <1> 設置參數名稱探測器,例如通過它獲取方法參數的名稱
    descriptor.initParameterNameDiscovery(getParameterNameDiscoverer());
    // <2> 如果依賴類型為 Optional 類型
    if (Optional.class == descriptor.getDependencyType()) {
        // 調用 `createOptionalDependency(...)` 方法,先將 `descriptor` 注入表述器封裝成 NestedDependencyDescriptor 對象
        // 底層處理和下面的 `5.2` 相同
        return createOptionalDependency(descriptor, requestingBeanName);
    }
    // <3> 否則,如果依賴類型為 ObjectFactory 或 ObjectProvider 類型
    else if (ObjectFactory.class == descriptor.getDependencyType() || ObjectProvider.class == descriptor.getDependencyType()) {
        // 返回一個 DependencyObjectProvider 私有內部類對象,並沒有獲取到實例的 Bean,需要調用其 getObject() 方法獲取目標對象
        return new DependencyObjectProvider(descriptor, requestingBeanName);
    }
    // <4> 否則,如果依賴類型為 javax.inject.Provider 類型
    else if (javaxInjectProviderClass == descriptor.getDependencyType()) {
        // 返回一個 Jsr330Provider 私有內部類對象,該對象也繼承 DependencyObjectProvider
        return new Jsr330Factory().createDependencyProvider(descriptor, requestingBeanName);
    }
    // <5> 否則,通用的處理邏輯
    else {
        // <5.1> 先通過 AutowireCandidateResolver 嘗試獲取一個代理對象,延遲依賴注入則會返回一個代理對象
        Object result = getAutowireCandidateResolver().getLazyResolutionProxyIfNecessary(descriptor, requestingBeanName);
        // <5.2> 如果上面沒有返回代理對象,則進行處理,調用 `doResolveDependency(...)` 方法
        if (result == null) {
            result = doResolveDependency(descriptor, requestingBeanName, autowiredBeanNames, typeConverter);
        }
        return result;
    }
}
過程如下:
- 設置參數名稱探測器,例如通過它獲取方法參數的名稱
- 如果依賴類型為 Optional 類型,則調用
createOptionalDependency(...)方法,先將descriptor注入表述器封裝成 NestedDependencyDescriptor 對象,底層處理和下面的5.2相同 - 否則,如果依賴類型為 ObjectFactory 或 ObjectProvider 類型,直接返回一個
DependencyObjectProvider私有內部類對象,並沒有獲取到實例的 Bean,需要調用其 getObject() 方法獲取目標對象 - 否則,如果依賴類型為 javax.inject.Provider 類型,直接返回一個
Jsr330Provider私有內部類對象,該對象也繼承 DependencyObjectProvider - 否則,通用的處理邏輯
- 先通過 AutowireCandidateResolver 嘗試獲取一個代理對象,延遲依賴注入則會返回一個代理對象
- 如果上面沒有返回代理對象,則進行處理,調用
doResolveDependency(...)方法
我們需要關注的是上面的第 5.2 步所調用 doResolveDependency(...) 方法,這一步是底層實現
2. doResolveDependency 底層處理依賴方法
// DefaultListableBeanFactory.java
@Nullable
public Object doResolveDependency(DependencyDescriptor descriptor, @Nullable String beanName,
        @Nullable Set<String> autowiredBeanNames, @Nullable TypeConverter typeConverter) throws BeansException {

    // 設置當前線程的注入點,並返回上次的注入點,屬於嵌套注入的一個保護點
    InjectionPoint previousInjectionPoint = ConstructorResolver.setCurrentInjectionPoint(descriptor);
    try {
        // <1> 針對給定的工廠給定一個快捷實現的方式,暫時忽略
        // 例如考慮一些預先解析的信息,在進入所有 Bean 的常規類型匹配算法之前,解析算法將首先嘗試通過此方法解析快捷方式
        Object shortcut = descriptor.resolveShortcut(this);
        if (shortcut != null) {
            // 返回快捷的解析信息
            return shortcut;
        }

        // 依賴的類型
        Class<?> type = descriptor.getDependencyType();
        // <2> 獲取注解中的 value 對應的值,例如 @Value、@Qualifier 注解配置的 value 屬性值,注意 @Autowired 沒有 value 屬性配置
        Object value = getAutowireCandidateResolver().getSuggestedValue(descriptor);
        if (value != null) {
            if (value instanceof String) {
                // <2.1> 解析注解中的 value,因為可能是占位符,需要獲取到相應的數據
                String strVal = resolveEmbeddedValue((String) value);
                BeanDefinition bd = (beanName != null && containsBean(beanName) ?
                        getMergedBeanDefinition(beanName) : null);
                value = evaluateBeanDefinitionString(strVal, bd);
            }
            TypeConverter converter = (typeConverter != null ? typeConverter : getTypeConverter());
            try {
                // <2.2> 進行類型轉換,並返回
                return converter.convertIfNecessary(value, type, descriptor.getTypeDescriptor());
            }
            catch (UnsupportedOperationException ex) {
                // A custom TypeConverter which does not support TypeDescriptor resolution...
                return (descriptor.getField() != null ?
                        converter.convertIfNecessary(value, type, descriptor.getField()) :
                        converter.convertIfNecessary(value, type, descriptor.getMethodParameter()));
            }
        }

        // <3> 解析復合的依賴對象(Array、Collection、Map 類型),獲取該屬性元素類型的 Bean 們
        // 底層和第 `4` 原理一樣,這里會將 `descriptor` 封裝成 MultiElementDescriptor 類型
        Object multipleBeans = resolveMultipleBeans(descriptor, beanName, autowiredBeanNames, typeConverter);
        if (multipleBeans != null) {
            return multipleBeans;
        }

        // <4> 查找與類型相匹配的 Bean 們
        // 返回結果:key -> beanName;value -> 對應的 Bean
        Map<String, Object> matchingBeans = findAutowireCandidates(beanName, type, descriptor);
        // <5> 如果一個都沒找到
        if (matchingBeans.isEmpty()) {
            // <5.1> 如果 @Autowired 配置的 required 為 true,表示必須,則拋出異常
            if (isRequired(descriptor)) {
                raiseNoMatchingBeanFound(type, descriptor.getResolvableType(), descriptor);
            }
            // <5.2> 否則,返回一個空對象
            return null;
        }

        String autowiredBeanName;
        Object instanceCandidate;

        // <6> 如果匹配的 Bean 有多個,則需要找出最優先的那個
        if (matchingBeans.size() > 1) {
            // <6.1> 找到最匹配的那個 Bean,通過 @Primary 或者 @Priority 來決定,或者通過名稱決定
            autowiredBeanName = determineAutowireCandidate(matchingBeans, descriptor);
            if (autowiredBeanName == null) {
                if (isRequired(descriptor) || !indicatesMultipleBeans(type)) {
                    // <6.2> 如果沒有找到最匹配的 Bean,則拋出 NoUniqueBeanDefinitionException 異常
                    return descriptor.resolveNotUnique(descriptor.getResolvableType(), matchingBeans);
                }
                else {
                    // In case of an optional Collection/Map, silently ignore a non-unique case:
                    // possibly it was meant to be an empty collection of multiple regular beans
                    // (before 4.3 in particular when we didn't even look for collection beans).
                    return null;
                }
            }
            // <6.3> 獲取到最匹配的 Bean,傳值引用給 `instanceCandidate`
            instanceCandidate = matchingBeans.get(autowiredBeanName);
        }
        // <7> 否則,只有一個 Bean,則直接使用其作為最匹配的 Bean
        else {
            // We have exactly one match.
            Map.Entry<String, Object> entry = matchingBeans.entrySet().iterator().next();
            autowiredBeanName = entry.getKey();
            instanceCandidate = entry.getValue();
        }

        // <8> 將依賴注入的 Bean 的名稱添加至方法入參 `autowiredBeanNames` 集合,里面保存依賴注入的 beanName
        if (autowiredBeanNames != null) {
            autowiredBeanNames.add(autowiredBeanName);
        }
        // <9> 如果匹配的 Bean 是 Class 對象,則根據其 beanName 依賴查找到對應的 Bean
        if (instanceCandidate instanceof Class) {
            instanceCandidate = descriptor.resolveCandidate(autowiredBeanName, type, this);
        }
        Object result = instanceCandidate;
        if (result instanceof NullBean) {
            if (isRequired(descriptor)) {
                raiseNoMatchingBeanFound(type, descriptor.getResolvableType(), descriptor);
            }
            result = null;
        }
        if (!ClassUtils.isAssignableValue(type, result)) {
            throw new BeanNotOfRequiredTypeException(autowiredBeanName, type, instanceCandidate.getClass());
        }
        // <10> 返回依賴注入的 Bean
        return result;
    }
    finally {
        // 設置當前線程的注入點為上一次的注入點,因為本次注入結束了
        ConstructorResolver.setCurrentInjectionPoint(previousInjectionPoint);
    }
}
依賴處理的過程稍微有點復雜,如下:
-
針對給定的工廠給定一個快捷實現的方式,暫時忽略
例如考慮一些預先解析的信息,在進入所有 Bean 的常規類型匹配算法之前,解析算法將首先嘗試通過此方法解析快捷方式
-
獲取注解中的 value 對應的值,例如
@Value、@Qualifier注解配置的 value 屬性值,注意 @Autowired 沒有 value 屬性配置- 解析注解中的 value,因為可能是占位符,需要獲取到相應的數據
- 進行類型轉換,並返回
-
解析復合的依賴對象(Array、Collection、Map 類型),獲取該屬性元素類型的 Bean 們,調用
resolveMultipleBeans(...)方法底層和下面第
4步原理一樣,這里會將descriptor封裝成 MultiElementDescriptor 類型,如果找到了則直接返回 -
查找與類型相匹配的 Bean 們,調用
findAutowireCandidates(...)方法返回結果:key -> beanName;value -> 對應的 Bean
-
如果一個都沒找到
- 如果
@Autowired配置的 required 為 true,表示必須,則拋出異常 - 否則,返回一個空對象
- 如果
-
如果匹配的 Bean 有多個,則需要找出最優先的那個
- 找到最匹配的那個 Bean,通過
@Primary或者@Priority來決定,或者通過名稱決定,調用determineAutowireCandidate(...)方法 - 如果沒有找到最匹配的 Bean,則拋出 NoUniqueBeanDefinitionException 異常
- 獲取到最匹配的 Bean,傳值引用給
instanceCandidate
- 找到最匹配的那個 Bean,通過
-
否則,只有一個 Bean,則直接使用其作為最匹配的 Bean
-
將依賴注入的 Bean 的名稱添加至方法入參
autowiredBeanNames集合,里面保存依賴注入的 beanName -
如果匹配的 Bean 是 Class 對象,則根據其 beanName 依賴查找到對應的 Bean
-
返回依賴注入的 Bean
關於上面第 3 步對於符合依賴對象的處理這里不做詳細分析,因為底層和第 4 步一樣,接下來分析上面第 4 、6 步所調用的方法
findAutowireCandidates 方法
findAutowireCandidates(@Nullable String beanName, Class<?> requiredType, DependencyDescriptor descriptor) 方法,找到符合條件的依賴注入的 Bean 們,如下:
// DefaultListableBeanFactory.java
protected Map<String, Object> findAutowireCandidates(
        @Nullable String beanName, Class<?> requiredType, DependencyDescriptor descriptor) {

    // <1> 從當前上下文找到該類型的 Bean 們(根據類型)
    String[] candidateNames = BeanFactoryUtils.beanNamesForTypeIncludingAncestors(
            this, requiredType, true, descriptor.isEager());
    // <2> 定義一個 Map 對象 `result`,用於保存符合條件的 Bean
    Map<String, Object> result = new LinkedHashMap<>(candidateNames.length);
    /**
     * <3> 遍歷 Spring 內部已處理的依賴對象集合,可以跳到 AbstractApplicationContext#prepareBeanFactory 方法中看看
     * 會有一下幾個內置處理對象:
     * BeanFactory 類型 -> 返回 DefaultListableBeanFactory
     * ResourceLoader、ApplicationEventPublisher、ApplicationContext 類型 ->  返回 ApplicationContext 對象
     */
    for (Map.Entry<Class<?>, Object> classObjectEntry : this.resolvableDependencies.entrySet()) {
        Class<?> autowiringType = classObjectEntry.getKey();
        if (autowiringType.isAssignableFrom(requiredType)) {
            Object autowiringValue = classObjectEntry.getValue();
            autowiringValue = AutowireUtils.resolveAutowiringValue(autowiringValue, requiredType);
            if (requiredType.isInstance(autowiringValue)) {
                result.put(ObjectUtils.identityToString(autowiringValue), autowiringValue);
                break;
            }
        }
    }

    // <4> 遍歷第 `1` 步找到的 Bean 的名稱們
    for (String candidate : candidateNames) {
        // <4.1> 如果滿足下面兩個條件,則添加至 `result` 集合中
        if (!isSelfReference(beanName, candidate) // 如果不是自引用(這個 Bean 不是在需要依賴它的 Bean 的內部定義的)
                && isAutowireCandidate(candidate, descriptor)) { // 符合注入的條件
            addCandidateEntry(result, candidate, descriptor, requiredType);
        }
    }
    // <5> 如果沒有找到符合條件的 Bean,則再嘗試獲取
    if (result.isEmpty()) {
        boolean multiple = indicatesMultipleBeans(requiredType);
        // Consider fallback matches if the first pass failed to find anything...
        DependencyDescriptor fallbackDescriptor = descriptor.forFallbackMatch();
        // <5.1> 再次遍歷第 `1` 步找到的 Bean 的名稱們
        for (String candidate : candidateNames) {
            // <5.2> 如果滿足下面三個條件,則添加至 `result` 集合中
            if (!isSelfReference(beanName, candidate) // 如果不是自引用(這個 Bean 不是在需要依賴它的 Bean 的內部定義的)
                    && isAutowireCandidate(candidate, fallbackDescriptor) // 符合注入的條件
                    && (!multiple || getAutowireCandidateResolver().hasQualifier(descriptor))) { // 不是復合類型,或者有 @Qualifier 注解
                addCandidateEntry(result, candidate, descriptor, requiredType);
            }
        }
        // <6> 如果還沒有找到符合條件的 Bean,則再嘗試獲取
        // 和上面第 `5` 步的區別在於必須是自引用(這個 Bean 不是在需要依賴它的 Bean 的內部定義的)
        if (result.isEmpty() && !multiple) {
            // Consider self references as a final pass...
            // but in the case of a dependency collection, not the very same bean itself.
            for (String candidate : candidateNames) {
                if (isSelfReference(beanName, candidate)
                        && (!(descriptor instanceof MultiElementDescriptor) || !beanName.equals(candidate))
                        && isAutowireCandidate(candidate, fallbackDescriptor)) {
                    addCandidateEntry(result, candidate, descriptor, requiredType);
                }
            }
        }
    }
    // <7> 返回 `result`,符合條件的 Bean
    return result;
}
過程大致如下:
-
從當前上下文找到該類型的 Bean 們(根據類型)
-
定義一個 Map 對象
result,用於保存符合條件的 Bean -
遍歷 Spring 內部已處理的依賴對象集合,例如你依賴注入 BeanFactory 類型的對象,則拿到的是 DefaultListableBeanFactory 對象,依賴注入 ResourceLoader、ApplicationEventPublisher、ApplicationContext 類型的對象, 拿到的就是當前 Spring 上下文 ApplicationContext 對象
-
遍歷第
1步找到的 Bean 的名稱們-
如果滿足下面兩個條件,則添加至
result集合中如果不是自引用(這個 Bean 不是在需要依賴它的 Bean 的內部定義的)、符合注入的條件
-
-
如果沒有找到符合條件的 Bean,則再嘗試獲取
-
再次遍歷第
1步找到的 Bean 的名稱們 -
如果滿足下面三個條件,則添加至
result集合中如果不是自引用(這個 Bean 不是在需要依賴它的 Bean 的內部定義的)、符合注入的條件、不是復合類型,或者有
@Qualifier注解
-
-
如果還沒有找到符合條件的 Bean,則再嘗試獲取,和上面第
5步的區別在於必須是自引用(這個 Bean 是在需要依賴它的 Bean 的內部定義的) -
返回
result,符合條件的 Bean
總結下來:從當前上下文找到所有該類型的依賴注入對象然后返回,注意,如果你依賴注入的對象就是本身這個 Bean 內部定義的對象有特殊處理。
例如注入一個集合對象,元素類型的 Bean 有一個是定義在本身這個 Bean 的內部,如果僅有這個 Bean 則會注入進行;如果除了本身這個 Bean 內部定義了,其他地方也定義了,那么本身這個 Bean 內部定義的 Bean 是不會被注入的;因為是自引用的 Bean 不會優先考慮,除非一個都沒找到,才會嘗試獲取自引用的 Bean
determineAutowireCandidate 方法
determineAutowireCandidate(Map<String, Object> candidates, DependencyDescriptor descriptor) 方法,找到最匹配的那個依賴注入對象,如下:
@Nullable
protected String determineAutowireCandidate(Map<String, Object> candidates, DependencyDescriptor descriptor) {
    Class<?> requiredType = descriptor.getDependencyType();
    // <1> 嘗試獲取一個 @Primary 注解標注的 Bean,如果有找到多個則會拋出異常
    String primaryCandidate = determinePrimaryCandidate(candidates, requiredType);
    // <2> 如果第 `1` 步找到了則直接返回
    if (primaryCandidate != null) {
        return primaryCandidate;
    }
    // <3> 嘗試找到 @Priority 注解優先級最高的那個 Bean,如果存在相同的優先級則會拋出異常
    String priorityCandidate = determineHighestPriorityCandidate(candidates, requiredType);
    // <4> 如果第 `3` 步找到了則直接返回
    if (priorityCandidate != null) {
        return priorityCandidate;
    }
    // Fallback
    // <5> 兜底方法,遍歷所有的 Bean
    for (Map.Entry<String, Object> entry : candidates.entrySet()) {
        String candidateName = entry.getKey();
        Object beanInstance = entry.getValue();
        // <5.1> 如果滿足下面其中一個條件則直接返回
        if ((beanInstance != null
            && this.resolvableDependencies.containsValue(beanInstance)) // 該 Bean 為 Spring 內部可處理的 Bean,例如 ApplicationContext
            || matchesBeanName(candidateName, descriptor.getDependencyName())) { // 名稱相匹配
            return candidateName;
        }
    }
    // <6> 上面都沒選出來則返回一個空對象
    return null;
}
如果找到了多個匹配的依賴注入對象,則需要找到最匹配的那個 Bean,過程大致如下:
- 嘗試獲取一個
@Primary注解標注的 Bean,如果有找到多個則會拋出異常 - 如果第
1步找到了則直接返回 - 嘗試找到
@Priority注解優先級最高的那個 Bean,如果存在相同的優先級則會拋出異常 - 如果第
3步找到了則直接返回 - 兜底方法,遍歷所有的 Bean
- 如果滿足下面其中一個條件則直接返回:該 Bean 為 Spring 內部可處理的 Bean(例如 ApplicationContext、BeanFactory)、名稱相匹配
- 上面都沒選出來則返回一個空對象
總結
@Autowired 和 @Resource 兩個注解的區別:
- 前者是 Spring 注解,后者是 JSR 注解
- 兩個注解都可以通過類型注入 Bean,而后者還可以通過指定名稱,通過名稱注入對應的 Bean
- 前者可以通過設置
required為false以支持找不到依賴對象的時候不進行注入,而后者必須找到依賴對象進行注入,找不到則會拋出異常
本文講述了 @Autowired、@Value 和 @Resource 等注解的實現原理,在《Bean 的創建過程》中我們可以了解到,在 Spring Bean 生命周期的很多階段都可以通過相應的 BeanPostProcessor 處理器進行擴展,其中《Bean 的屬性填充階段》會通過 InstantiationAwareBeanPostProcessor 對 Bean 進行處理,有以下兩個處理器:
- AutowiredAnnotationBeanPostProcessor,主要處理
@Autowired和@Value注解進行依賴注入 - CommonAnnotationBeanPostProcessor,主要處理
@Resource注解進行依賴注入,以及@PostConstruct和@PreDestroy生命周期注解的處理
原理就是找到注解標注的字段(或方法),創建對應的注入元信息對象,然后根據該元信息對象進行注入(反射機制),底層都會通過 DefaultListableBeanFactory#resolveDependency 方法實現的,找到符合條件的 Bean(根據類型),然后篩選出最匹配的那個依賴注入對象。
疑問:@Bean 等注解的實現原理又是怎樣的呢?別急,在后續文章進行分析