Manjaro 安裝
實驗室 Linux Server 安裝深度學習環境記錄
默認全部安裝到 SATA 移動硬盤,沒有分區,因為 500G 的空間裝系統足夠,還有一塊 2 T 硬盤用來存儲數據。
更改 pacman 國內源
sudo pacman-mirrors -c China -m rank
選擇一塊延遲最低或者更新時間最新的,也可以全選
刷新緩存
sudo pacman -Syy
ArchlinuxCN 源
修改 /etc/pacman.conf
sudo nano /etc/pacman.conf
在最后加入
[archlinuxcn]
SigLevel = Optional TrustedOnly
Server = https://mirrors.ustc.edu.cn/archlinuxcn/$arch
同步
sudo pacman -Syy
導入 GPU key
sudo pacman -S archlinuxcn-keyring
ZSH 終端
安裝 zsh
sudo pacman -S zsh
配置 oh-my-zsh
sh -c "$(curl -fsSL https://raw.github.com/ohmyzsh/ohmyzsh/master/tools/install.sh)"
更換默認的 shell 為 zsh
chsh -s /bin/zsh
重啟,就可以愉快的使用 zsh 了
reboot
自動補全插件 zsh-autosuggestions
git clone https://github.com/zsh-users/zsh-autosuggestions $ZSH_CUSTOM/plugins/zsh-autosuggestions
語法高亮插件 zsh-syntax-highlighting
git clone https://github.com/zsh-users/zsh-syntax-highlighting.git $ZSH_CUSTOM/plugins/zsh-syntax-highlighting
安裝 powerline 字體
pacman -S powerline
pacman -S powerline-fonts
pacman -S powerline-vim
修改 .zshrc 如下
ZSH_THEME  = "agnoster"			# 主題
plugins=(
		 git
         zsh-autosuggestions
         zsh-syntax-highlighting
)
使 .zshrc 生效
source ~/.zshrc
顯卡驅動
開始菜單 > 設置 > 所有設置 > Manjaro-Settings Manager 選擇最新的閉源驅動。
如果驅動沒有正確安裝,可以用以下命令來安裝:
sudo mhwd -a pci nonfree 0300
安裝 CUDA 和 cuDNN
sudo pacman -S cuda cudnn
測試 CUDA 是否安裝成功,cd 到 opt/cuda/ssamples目錄下
cd 1_Utilities/deviceQuery
sudo make
./deviceQuery	# 返回 pass,則通過
查看 CUDA 版本,默認安裝的是最新版的 cuda
nvcc -V # 當前安裝的 cuda 版本為 10.2
ssh 遠程連接
服務機
先更新系統,再安裝 openssh ,否則安裝完可能無法啟動
sudo pacman -Syu
sudo pacman -S openssh
啟動/開機自啟/重啟服務
systemctl start sshd.service
systemctl enable sshd.service
systemctl restart sshd.service
終端機
ssh username@IP地址
Python 環境
安裝 Anaconda
一鍵安裝
sudo pacman -S anaconda
根據提示,激活 conda 環境,打開 ~/.zshrc
sudo nano ~/.zshrc
將以下代碼添加到 .zshrc最后一行
source /opt/anaconda/bin/activate root
使修改立即生效
source ~/.zshrc
修改 conda 源
打開 ~/.condarc
sudo nano ~/.condarc
修改文件內容如下
channels:
  - defaults
show_channel_urls: true
channel_alias: https://mirrors.tuna.tsinghua.edu.cn/anaconda
default_channels:
  - https://mirrors.tuna.tsinghua.edu.cn/anaconda/pkgs/main
  - https://mirrors.tuna.tsinghua.edu.cn/anaconda/pkgs/free
  - https://mirrors.tuna.tsinghua.edu.cn/anaconda/pkgs/r
  - https://mirrors.tuna.tsinghua.edu.cn/anaconda/pkgs/pro
  - https://mirrors.tuna.tsinghua.edu.cn/anaconda/pkgs/msys2
custom_channels:
  conda-forge: https://mirrors.tuna.tsinghua.edu.cn/anaconda/cloud
  msys2: https://mirrors.tuna.tsinghua.edu.cn/anaconda/cloud
  bioconda: https://mirrors.tuna.tsinghua.edu.cn/anaconda/cloud
  menpo: https://mirrors.tuna.tsinghua.edu.cn/anaconda/cloud
  pytorch: https://mirrors.tuna.tsinghua.edu.cn/anaconda/cloud
  simpleitk: https://mirrors.tuna.tsinghua.edu.cn/anaconda/cloud
運行 conda clean -i 清除索引緩存,保證用的是清華鏡像站提供的索引
修改 pip 源
改用國內的pypi源。執行該步驟前關閉conda的虛擬環境,可在終端中執行conda deactivate以退回到系統自帶的Python環境。執行以下命令:
sudo pip install --upgrade pip
pip config set global.index-url https://pypi.tuna.tsinghua.edu.cn/simple
創建虛擬環境並安裝 Pytorch
新建一個名為torch 的 Python 3.7 的環境
conda create -n torch python=3.7
激活該環境
conda activate torch
安裝常用庫
pip install numpy scripy matplotlib pylint
安裝 Pytorch
pip install torch torchvision
打開 Python 交互模式,測試 Pytorch 是否安裝成功
python
import torch
print(torch.__version__)	# 1.5.1
print(torch.cuda.is_available())
結果返回 True 即可
創建虛擬環境並安裝 TensorFlow
新建一個名為 tf22 的 Python 環境
conda create -n tf22
激活該環境
conda activate tf22
安裝 tensorflow-gpu==2.2.0
conda install tensorflow-gpu==2.2.0
打開 Python 交互模式,測試 Tensorflow 是否安裝成功
python
import tensorflow as tf
print(tf.__version__)	# 2.2.0
print(tf.test.is_gpu_available())
結果返回 True 即可
Jupyter 多內核
想要在 jupyter notebook 或者 jupyter lab 中直接切換虛擬環境中的內核,而不是在多個虛擬環境中分別安裝多個 jupyter lab
在前邊新建的 tf22 虛擬環境中安裝 jupyter kernel
conda install ipykernel
python -m ipykernel install --name tf22 --display-name "tf22" --user
上面命令中第一個 tf22 是虛擬環境的名稱,第二個tf22 是你想在 jupyter 中展示的名稱
在 torch 虛擬環境中同樣運行上面兩條命令
conda install ipykernel
python -m ipykernel install --name torch15 --display-name "torch15" --user
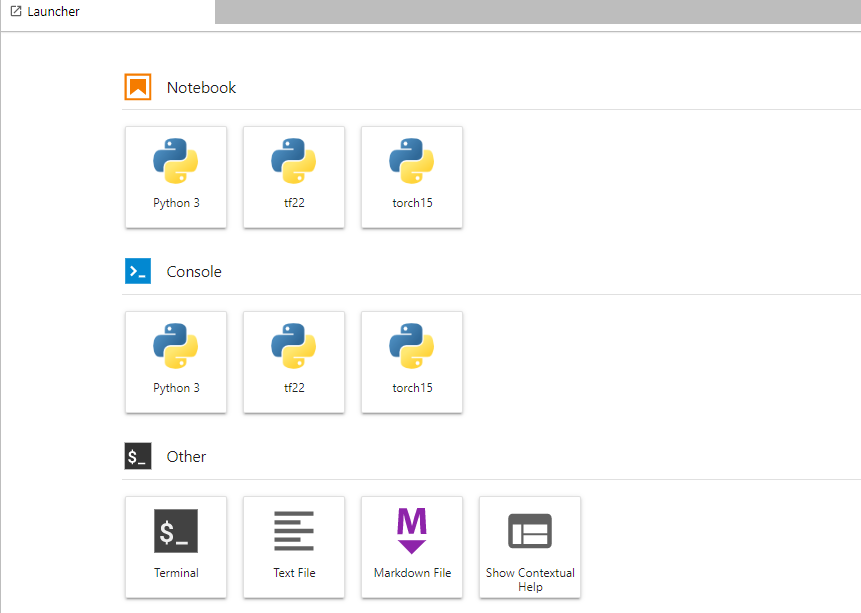
結果圖如下,可以看到 jupyter lab 中已經有了三個不同的 kernel
Jupyter lab 遠程訪問
服務器端
生成配置文件
jupyter notebook --generate-config
設置密碼並生成密鑰
jupyter notebook password
Enter password:  ****
Verify password: ****
[NotebookPasswordApp] Wrote hashed password to /Users/b504/.jupyter/jupyter_notebook_config.json
查看密鑰
sudo cat /Users/b504/.jupyter/jupyter_notebook_config.json
修改配置文件
nano ~/.jupyter/jupyter_notebook_config.py
找到下面的代碼行,分別修改為
c.NotebookApp.ip='*'
c.NotebookApp.password = u'sha:ce...剛才復制的那個密文'
c.NotebookApp.open_browser = False
c.NotebookApp.port =8888 									# 可隨便指定一個端口
c.NotebookApp.allow_remote_access = True
c.NotebookApp.notebook_dir = '/home/b504/桌面/data' 		   # 修改默認文件路徑為桌面上的 data 文件夾
在 base 環境中打開 jupyter lab
本地端
網頁輸入 http://b504-server:8888
其中 b504-server 為工作站的 ip 地址
后台運行
nohup 命令:如果你正在運行一個進程,而且你覺得在退出帳戶時該進程還不會結束,那么可以使用nohup命令
該命令可以在你 退出帳戶/關閉終端 之后繼續運行相應的進程。nohup就是不掛起的意思( no hang up)
nohup jupyter lab > /dev/null 2>&1 &
命令解釋:
/dev/null,或稱空設備,是一個特殊的設備文件,它丟棄一切寫入其中的數據(但報告寫入操作成功),通常用於丟棄不需要的數據輸出。
command >out.file是將command的輸出重定向到out.file文件,即輸出內容不打印到屏幕上,而是輸出到out.file文件中。2>&1是將標准出錯重定向到標准輸出,這里的標准輸出已經重定向到了out.file文件,即將標准出錯也輸出到out.file文件中。最后一個&, 是讓該命令在后台執行。
只要服務器不關機,jupyter lab 的服務會一直處於運行狀態,局域網內打開ip:port 隨時可以使用
pacman 使用說明
sudo pacman -S 軟件名 		# 安裝
sudo pacman -R 軟件名 		# 刪除單個軟件包,保留其全部已經安裝的依賴關系
sudo pacman -Rs 軟件名 	 # 除指定軟件包,及其所有沒有被其他已安裝軟件包使用的依賴關系
sudo pacman -Ss 軟件名  	 # 查找軟件
sudo pacman -Sc 		   # 清空並且下載新數據
sudo pacman -Syu 		  # 升級所有軟件包
sudo pacman -Qs			   # 搜索已安裝的包