在 Qt Quick 中有兩套與布局管理相關的類庫,一套叫作 Item Positioner(定位器),一套叫作 Item Layout(布局)。
-
定位器包括 Row(行定位器)、Column(列定位器)、Grid(表格定位器)、Flow(流式定位器)。
-
布局管理器包括行布局(RowLayout)、列布局(ColumnLayout)、表格布局(GridLayout)。
另外還有一種錨布局,這里我們先介紹這個。
一、錨布局
anchors 提供了一種方式,讓你可以通過指定一個元素與其他元素的關系來確定元素在界面中的位置。
你可以想象一下,每個 Item 都有 7 條不可見的鋪線:左(left)、水平中心(horizontalCenter)、 上(top)、下(bottom)、右(right)、垂直中心(verticalCenter)、基線(baseline)。如下圖所示:
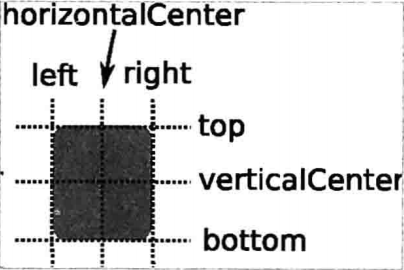
上圖中,沒有標注基線,基線是用於定位文本的,你可以想象一行文字端坐基線的 情景。對於沒有文本的圖元,baseline 和 top —致。
使用 anchors 布局時,除了對齊錨線,還可以指定上(topMargin)、下(bottomMargin)、 左(leftMargin)、右(rightMargin)四個邊的留白。如下圖所示。
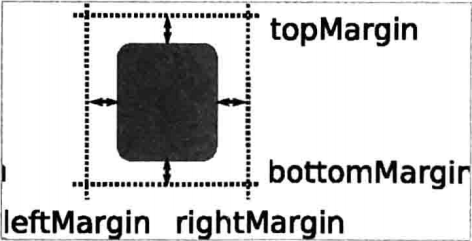
而如果你想懶省事兒,也可以使用margins屬性將四個邊的留白置成一樣。示例程序如下:
import QtQuick 2.0

Rectangle {
    width: 300
    height: 200

    Rectangle {
        id: rect1
        anchors.left: parent.left
        anchors.leftMargin: 20
        anchors.top: parent.top
        anchors.topMargin: 20
        width: 100
        height: 100
        color: "red"
    }

    Rectangle {
        anchors.left: rect1.right
        anchors.leftMargin: 20
        anchors.top: rect1.top
        width: 100
        height: 100
        color: "blue"
    }
}
程序效果如下所示:
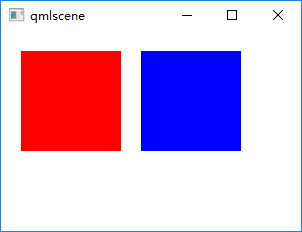
Item 的 anchors 屬性,除了上面介紹的,還有一些,如 centerln 表示將一個 Item 居中放置到一個 Item內;fill 表示充滿某個 Item……更多的請參考 Item 類的文檔。
錨布局是最靈活的一種 Qt Quick 布局方式,使用它你可以隨意擺布界面上那些可見元素,不過,如果你的界面元素很多,它也將是代碼量最大的一種布局方式。
二、定位器
定位器是一種容器元素,專門用來管理界面中的其他元素,與傳統的 Qt Widgets 中的布局管理器類似。使用定位器,你可以很方便地把眾多的元素組織在一起,形成非常規則的界面效果。不過有一點需要的是,定位器不會改變它管理的元素的大小,與你使用 Qt Widgets 中的布局管理器的經驗不同,不過如果你希望使用 “自動根據界面尺寸變化調整孩子們的尺寸” 這種特性,可以使用 Qt Quick 中的布局管理器。
定位器包括 Row(行定位器)、Column(列定位器)、Grid(表格定位器)、Flow(流式定位器)。
2.1 Row(行定位器)
Row 沿着一行安置它的孩子們,在你需要水平放置一系列的 Item 時,它比錨布局更加方便。一旦你把一個 Item 交給 Row 來管理,那就不要再使用 Item 的 x 、 y 、 anchors 等屬性了, Row 會安排得妥妥的。
在一個 Row 內的 item ,可以使用 Positioner 附加屬性來獲知自己在 Row 中的更多位置信息。 Positioner 有 index 、 isFirstItem 、 isLastItem 三個屬性。
看我們的示例 row_layout.qml :
import QtQuick 2.0
import QtQuick.Controls 1.1

Rectangle {
    width: 360;
    height: 240;
    color: "#EEEEEE";
    id: rootItem;

    Text {
        id: centerText;
        text: "A Single Text.";
        anchors.centerIn: parent;
        font.pixelSize: 24;
        font.bold: true;
    }

    function setTextColor(clr){
        centerText.color = clr;
    }

    Row {
        anchors.left: parent.left;
        anchors.leftMargin: 4;
        anchors.bottom: parent.bottom;
        anchors.bottomMargin: 4;
        spacing: 4;

        Rectangle {
            width: 50;
            height: 30;
            color: Qt.rgba(Math.random(), Math.random(), Math.random(), 1.0);
        }

        Rectangle {
            width: 50;
            height: 30;
            color: Qt.rgba(Math.random(), Math.random(), Math.random(), 1.0);
        }

        Rectangle {
            width: 50;
            height: 30;
            color: Qt.rgba(Math.random(), Math.random(), Math.random(), 1.0);
        }
    }
}
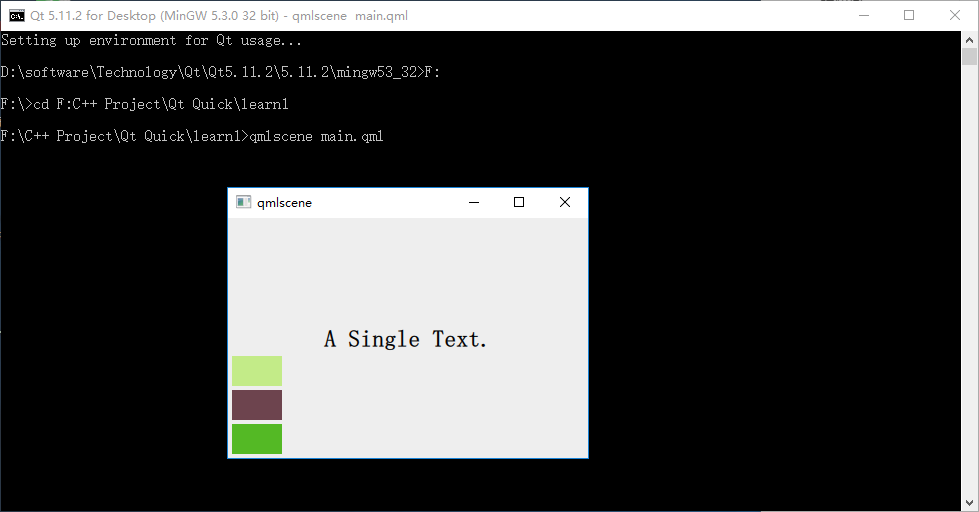
執行命令 qmlscene row_layout.qml,效果如下圖所示:
因為 Row 本身是一個 Item ,所以你可以使用錨布局來定位一個 Row ,示例中這么做了,把 Row 放在界面的左下角。
Row 有一個 spacing 屬性,用來指定它管理的 Item 之間的間隔。還有一個 layoutDirection 屬性,可以指定布局方向,取值為 Qt.LeftToRight 時從左到右放置 Item ,這是默認行為,取值為 Qt.RightToLeft 時從右向左放置 Item 。還有其它的一些屬性,請參看 Qt SDK。
2.2 Column(列定位器)
Column 與 Row 類似,不過是在垂直方向上安排它的子 Items 。Column 本身也是一個 Item ,可以使用 anchors 布局來決定它在父 Item 中的位置。 Column 的 spacing 屬性描述子 Item 之間的間隔。
看示例 column_layout.qml :
import QtQuick 2.0
import QtQuick.Controls 1.1

Rectangle {
    width: 360;
    height: 240;
    color: "#EEEEEE";
    id: rootItem;

    Text {
        id: centerText;
        text: "A Single Text.";
        anchors.centerIn: parent;
        font.pixelSize: 24;
        font.bold: true;
    }

    function setTextColor(clr){
        centerText.color = clr;
    }

    Column {
        anchors.left: parent.left;
        anchors.leftMargin: 4;
        anchors.bottom: parent.bottom;
        anchors.bottomMargin: 4;
        spacing: 4;

        Rectangle {
            width: 50;
            height: 30;
            color: Qt.rgba(Math.random(), Math.random(), Math.random(), 1.0);
        }

        Rectangle {
            width: 50;
            height: 30;
            color: Qt.rgba(Math.random(), Math.random(), Math.random(), 1.0);
        }

        Rectangle {
            width: 50;
            height: 30;
            color: Qt.rgba(Math.random(), Math.random(), Math.random(), 1.0);
        }
    }
}
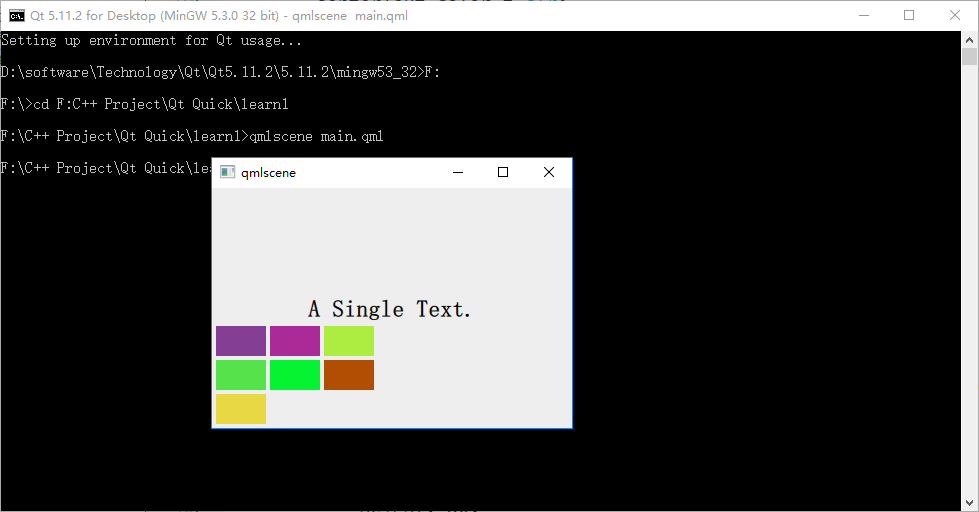
代碼與 row_layout.qml 類似, 不用解釋了,下圖是執行 qmlscene column_layout.qml 后的效果:
2.3 Grid(表格定位器)
Grid 在一個網格上安置它的子 Items ,它會創建一個擁有很多單元格的網格,足夠容納它所有的子 Items 。Grid 會從左到右、從上到下把它的子 items 一個一個塞到單元格里。 item 默認會被放在一個單元格左上角,(0,0) 位置。
你可以通過 rows 和 columns 屬性設定表格的行、列數。如果你不設置,默認只有四列,而行數則會根據實際的 item 數量自動計算。rowSpacing 和 columnSpacing 指定行、列間距,單位是像素。
Grid 的 flow 屬性描述表格的流模式,可以取值 Grid.LeftToRight ,這是默認模式,從左到右一個挨一個放置 item ,一行放滿再放下一行;取值為 Grid.TopToBottom 時,從上到下一個挨一個放置 item ,一列放滿再放下一列。
horizontalItemAlignment 和 verticalItemAlignment 指定單元格對齊方式。默認的單元格對齊方式和 layoutDirection 以及 flow 有關。
先看個簡單的例子, grid_layout.qml :
import QtQuick 2.0
import QtQuick.Controls 1.1

Rectangle {
    width: 360;
    height: 240;
    color: "#EEEEEE";
    id: rootItem;

    Text {
        id: centerText;
        text: "A Single Text.";
        anchors.centerIn: parent;
        font.pixelSize: 24;
        font.bold: true;
    }

    function setTextColor(clr){
        centerText.color = clr;
    }

    Grid {
        anchors.left: parent.left;
        anchors.leftMargin: 4;
        anchors.bottom: parent.bottom;
        anchors.bottomMargin: 4;
        rows: 3;
        columns: 3;
        rowSpacing: 4;
        columnSpacing: 4;

        Rectangle {
            width: 50;
            height: 30;
            color: Qt.rgba(Math.random(), Math.random(), Math.random(), 1.0);
        }

        Rectangle {
            width: 50;
            height: 30;
            color: Qt.rgba(Math.random(), Math.random(), Math.random(), 1.0);
        }

        Rectangle {
            width: 50;
            height: 30;
            color: Qt.rgba(Math.random(), Math.random(), Math.random(), 1.0);
        }

        Rectangle {
            width: 50;
            height: 30;
            color: Qt.rgba(Math.random(), Math.random(), Math.random(), 1.0);
        }

        Rectangle {
            width: 50;
            height: 30;
            color: Qt.rgba(Math.random(), Math.random(), Math.random(), 1.0);
        }

        Rectangle {
            width: 50;
            height: 30;
            color: Qt.rgba(Math.random(), Math.random(), Math.random(), 1.0);
        }

        Rectangle {
            width: 50;
            height: 30;
            color: Qt.rgba(Math.random(), Math.random(), Math.random(), 1.0);
        }
    }
}
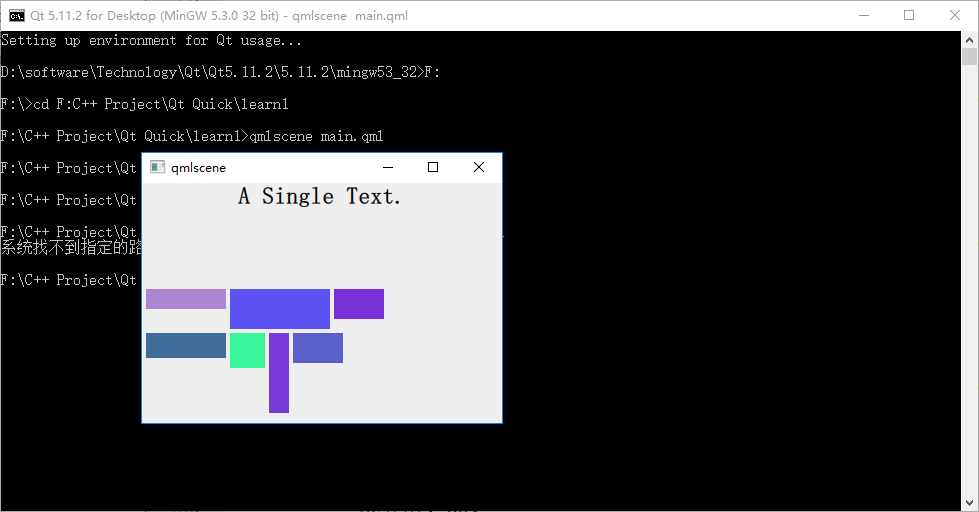
為了看出 flow 取值不同時的效果,我特意將行列數都設置為 3 ,創建了 7 個 Rectangle 實例。下圖是效果:
2.4 Flow(流式定位器)
Flow 其實和 Grid 類似,不同之處是它沒有顯式的行、列數,它會計算自身尺寸和子 item 尺寸來根據需要折行。它的 flow 屬性,默認取值 Flow.LeftToRight ,從左到右安排 item ,直到 Flow 本身的寬度被超出時折行;當 flow 取值 Flow.TopToBottom 時,從上到下安排 item ,直到 Flow 本身的高度被超出時開始在下一列上安排 item 。
spacing 屬性描述 item 之間的間隔。
看個示例, flow_layout.qml :
import QtQuick 2.0
import QtQuick.Controls 1.1

Rectangle {
    width: 360;
    height: 240;
    color: "#EEEEEE";
    id: rootItem;

    Text {
        id: centerText;
        text: "A Single Text.";
        anchors.horizontalCenter: parent.horizontalCenter;
        anchors.top: parent.top;
        font.pixelSize: 24;
        font.bold: true;
    }

    function setTextColor(clr){
        centerText.color = clr;
    }

    Flow {
        anchors.left: parent.left;
        anchors.leftMargin: 4;
        anchors.bottom: parent.bottom;
        anchors.bottomMargin: 4;
        width: 280;
        height: 130;
        spacing: 4;

        Rectangle {
            width: 80;
            height: 20;
            color: Qt.rgba(Math.random(), Math.random(), Math.random(), 1.0);
        }

        Rectangle {
            width: 100;
            height: 40;
            color: Qt.rgba(Math.random(), Math.random(), Math.random(), 1.0);
        }

        Rectangle {
            width: 50;
            height: 30;
            color: Qt.rgba(Math.random(), Math.random(), Math.random(), 1.0);
        }

        Rectangle {
            width: 80;
            height: 25;
            color: Qt.rgba(Math.random(), Math.random(), Math.random(), 1.0);
        }

        Rectangle {
            width: 35;
            height: 35;
            color: Qt.rgba(Math.random(), Math.random(), Math.random(), 1.0);
        }

        Rectangle {
            width: 20;
            height: 80;
            color: Qt.rgba(Math.random(), Math.random(), Math.random(), 1.0);
        }

        Rectangle {
            width: 50;
            height: 30;
            color: Qt.rgba(Math.random(), Math.random(), Math.random(), 1.0);
        }
    }
}
我改變了 Rectangle 實例的大小,以便觀察 Flow 布局的特點:根據自身寬高是否被 item 超出而自動折行。下圖是 flow 為 LeftToRight (代碼中未設置 flow 屬性,默認值是 LeftToRight)時的效果:
修改下代碼,在 Flow 對象生命內添加 "flow: Flow.TopToBottom;" 這行代碼,再次執行 qmlscene flow_layout.qml ,效果如下圖所示:
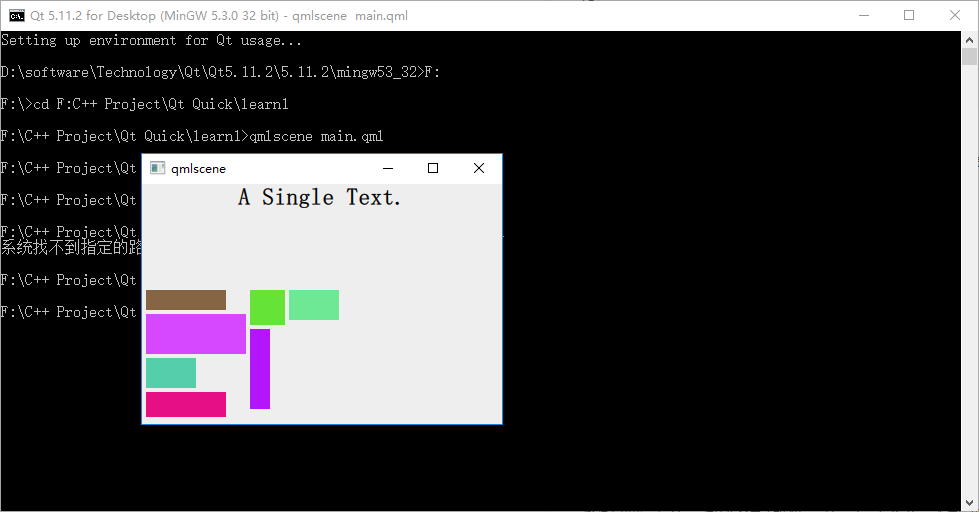
如你所見,效果大大不同。其實可以把流布局想象成英文文字排版系統,一個 item 對應一個單詞,橫版模式時,從左到右,一行一行安排單詞的位置,當接近一行的寬度時,如果下一個單詞擺上去就會超出行寬,那就把這個單詞放到下一行上,繼續排排排……;豎版模式也是類似的……也許你看過豎版書,很容易理解這件事情。
2.5 定位器嵌套
Qt Quick 中定位器元素是可以嵌套的,比如 Row 和 Column 可以相互嵌套來實現 Grid 的效果。
看下 nested_layout.qml :
import QtQuick 2.0
import QtQuick.Controls 1.1

Rectangle {
    width: 360;
    height: 240;
    color: "#EEEEEE";
    id: rootItem;

    Text {
        id: centerText;
        text: "A Single Text.";
        anchors.centerIn: parent;
        font.pixelSize: 24;
        font.bold: true;
    }

    function setTextColor(clr){
        centerText.color = clr;
    }

    Row {
        anchors.left: parent.left;
        anchors.leftMargin: 4;
        anchors.bottom: parent.bottom;
        anchors.bottomMargin: 4;
        spacing: 4;

        Column {
            spacing: 4;
            Rectangle {
                width: 50;
                height: 30;
                color: Qt.rgba(Math.random(), Math.random(), Math.random(), 1.0);
            }

            Rectangle {
                width: 50;
                height: 30;
                color: Qt.rgba(Math.random(), Math.random(), Math.random(), 1.0);
            }
        }

        //Column {
        //    spacing: 4;
            Rectangle {
                width: 50;
                height: 30;
                color: Qt.rgba(Math.random(), Math.random(), Math.random(), 1.0);
            }

            Rectangle {
                width: 50;
                height: 30;
                color: Qt.rgba(Math.random(), Math.random(), Math.random(), 1.0);
            }
       // }
    }
}
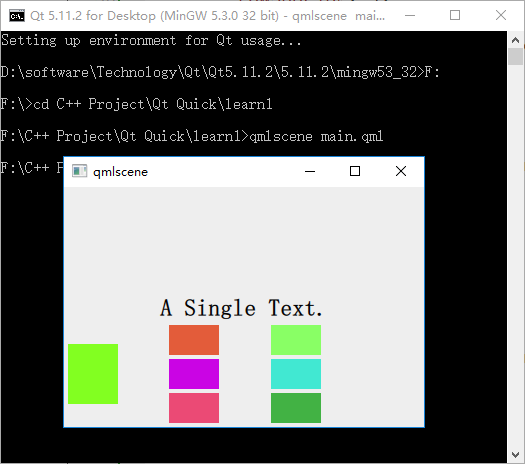
我在一個 Row 內嵌套了 3 個 Column ,實現了 2x3 的表格布局。執行 qmlscene nested_layout.qml ,可以看到下圖:

三、布局管理器
Qt Quick 中的布局管理器與 Qt Widgets 中的相似,它與定位器的不同之處在於:布局管理器會自動調整子 Item 的尺寸來適應界面大小的變化。
要適應布局管理器,需要引入 Layouts 模塊,這樣:
import QtQuick.Layouts 1.1
3.1 GridLayout
由於篇幅原因,我們這里只介紹 Qt Quick 布局管理器中最復雜的 GridLayout 吧,因為 RowLayout 和 ColumnLayout 實際上可以看是 GridLayout 的兩個特例,這里不再贅述。
GridLayout 與 Qt C++ 中的 QGridLayout 功能類似,它在一個表格中安排它管理的 Item,如果用戶調整界面尺寸,GridLayout 會自動重新調整 Item 的位置。
GridLayout 會根據 flow 屬性來排列元素,這與 Grid 定位器類似,flow 屬性的默認值是 GridLayout.LeftToRight,從左到右安排元素,一行結束再另起一行。而判定行結束的一個條件是 columns 屬性,它指定一個 GridLayout 的列數。如果 flow 取值 GridLayout.TopToBottom,GridLayout 則從上到下安排元素,一列結束再另起一列。rows 屬性指定 GridLayout 的行數, 它將決定何時新開一列來排布剩余的元素。
下面看一個示例:
import QtQuick 2.2
import QtQuick.Layouts 1.1

Rectangle {
    width: 360;
    height: 240;
    color: "#EEEEEE";
    id: rootItem;

    Text {
        id: centerText;
        text: "A Single Text.";
        anchors.centerIn: parent;
        font.pixelSize: 24;
        font.bold: true;
    }

    function setTextColor(clr){
        centerText.color = clr;
    }

    GridLayout {
        anchors.left: parent.left;
        anchors.leftMargin: 4;
        anchors.bottom: parent.bottom;
        anchors.bottomMargin: 4;
        width: 300;
        rows: 3;
        columns: 3;
        rowSpacing: 4;
        columnSpacing: 4;
        flow: GridLayout.TopToBottom;

        Rectangle {
            width: 50;
            height: 60;
            color: Qt.rgba(Math.random(), Math.random(), Math.random(), 1.0);
            Layout.columnSpan: 3;
            Layout.rowSpan: 3;
        }

        Rectangle {
            width: 50;
            height: 30;
            color: Qt.rgba(Math.random(), Math.random(), Math.random(), 1.0);
        }

        Rectangle {
            width: 50;
            height: 30;
            color: Qt.rgba(Math.random(), Math.random(), Math.random(), 1.0);
        }

        Rectangle {
            width: 50;
            height: 30;
            color: Qt.rgba(Math.random(), Math.random(), Math.random(), 1.0);
        }

        Rectangle {
            width: 50;
            height: 30;
            color: Qt.rgba(Math.random(), Math.random(), Math.random(), 1.0);
        }

        Rectangle {
            width: 50;
            height: 30;
            color: Qt.rgba(Math.random(), Math.random(), Math.random(), 1.0);
        }

        Rectangle {
            width: 50;
            height: 30;
            color: Qt.rgba(Math.random(), Math.random(), Math.random(), 1.0);
        }
    }
}
執行后的效果圖如下所示:
參考:
《Qt Quick核心編程》第8章