前言
QGridLayout:柵格布局,也被稱作網格布局(多行多列)。
柵格布局將位於其中的窗口部件放入一個網狀的柵格之中。QGridLayout 需要將提供給它的空間划分成的行和列,並把每個窗口部件插入並管理到正確的單元格。 柵格布局是這樣工作的:
它計算了位於其中的空間,然后將它們合理的划分成若干個行(row)和列(column),並把每個由它管理的窗口部件放置在合適的單元之中,這里所指的單元(cell)即是指由行和列交叉所划分出來的空間。
在柵格布局中,每個列(以及行)都有一個最小寬度以及一個伸縮因子。最小寬度指的是位於該列中的窗口部件的最小的寬度,而伸縮因子決定了該列內的窗口部件能夠獲得多少空間。
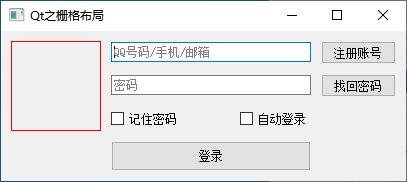
效果
下面我們以 QQ 登陸窗口為例,來講解如何使用 QGridLayout。先看下效果:
源碼
#include <QApplication>
#include <QGridLayout>
#include <QLabel>
#include <QLineEdit>
#include <QCheckBox>
#include <QPushButton>

int main(int argc, char *argv[])
{
    QApplication a(argc, argv);

    // 創建widget
    QWidget *pWidget = new QWidget();
    pWidget->setWindowTitle(QObject::tr("Qt之柵格布局"));

    // 構建控件 頭像框、用戶名、密碼輸入框等
    QLabel *pImageLabel = new QLabel();
    QLineEdit *pUserLineEdit = new QLineEdit();
    QLineEdit *pPasswordLineEdit = new QLineEdit();
    QCheckBox *pRememberCheckBox = new QCheckBox();
    QCheckBox *pAutoLoginCheckBox = new QCheckBox();
    QPushButton *pLoginButton = new QPushButton();
    QPushButton *pRegisterButton = new QPushButton();
    QPushButton *pForgotButton = new QPushButton();

    pLoginButton->setFixedHeight(30);
    pUserLineEdit->setFixedWidth(200);

    // 設置頭像框
    pImageLabel->setFixedSize(90, 90);
    pImageLabel->setStyleSheet("border:1px solid red;");

    // 設置文本
    pUserLineEdit->setPlaceholderText(QStringLiteral("QQ號碼/手機/郵箱"));
    pPasswordLineEdit->setPlaceholderText(QStringLiteral("密碼"));
    pPasswordLineEdit->setEchoMode(QLineEdit::Password);
    pRememberCheckBox->setText(QStringLiteral("記住密碼"));
    pAutoLoginCheckBox->setText(QStringLiteral("自動登錄"));
    pLoginButton->setText(QStringLiteral("登錄"));
    pRegisterButton->setText(QStringLiteral("注冊賬號"));
    pForgotButton->setText(QStringLiteral("找回密碼"));

    // 創建柵格布局
    QGridLayout *pLayout = new QGridLayout(pWidget);
    // 頭像框 第0行,第0列開始,占3行1列
    pLayout->addWidget(pImageLabel, 0, 0, 3, 1);
    // 用戶名輸入框 第0行,第1列開始,占1行2列
    pLayout->addWidget(pUserLineEdit, 0, 1, 1, 2);
    pLayout->addWidget(pRegisterButton, 0, 4);
    // 密碼輸入框 第1行,第1列開始,占1行2列
    pLayout->addWidget(pPasswordLineEdit, 1, 1, 1, 2);
    pLayout->addWidget(pForgotButton, 1, 4);
    // 記住密碼 第2行,第1列開始,占1行1列 水平居左 垂直居中
    pLayout->addWidget(pRememberCheckBox, 2, 1, 1, 1, Qt::AlignLeft | Qt::AlignVCenter);
    // 自動登錄 第2行,第2列開始,占1行1列 水平居右 垂直居中
    pLayout->addWidget(pAutoLoginCheckBox, 2, 2, 1, 1, Qt::AlignRight | Qt::AlignVCenter);
    // 登錄按鈕 第3行,第1列開始,占1行2列
    pLayout->addWidget(pLoginButton, 3, 1, 1, 2);
    // 設置水平間距
    pLayout->setHorizontalSpacing(10);
    // 設置垂直間距
    pLayout->setVerticalSpacing(10);
    // 設置外間距
    pLayout->setContentsMargins(10, 10, 10, 10);

    // 顯示widget
    pWidget->show();

    return a.exec();
}
常用接口
void addWidget(QWidget *, int row, int column, int rowSpan, int columnSpan, Qt::Alignment = 0)
一般情況下我們都是把某個窗口部件放進柵格布局的一個單元中,但窗口部件有時也可能會需要占用多個單元,這時就需要用到 addWidget() 方法的這個重載版本。
這個單元將從 row 和 column 開始,擴展到 rowSpan 和 columnSpan 指定的倍數的行和列。如果 rowSpan 或 columnSpan 的值為 -1,則窗口部件將擴展到布局的底部或者右邊邊緣處。
setRowStretch(int row, int stretch)
setColumnStretch(int column, int stretch)
設置行/列的伸縮空間,和 QBoxLayout 的 addStretch 功能類似。
setSpacing(int spacing)
setHorizontalSpacing(int spacing)
setVerticalSpacing(int spacing)
setSpacing() 可以同時設置水平、垂直間距,設置之后,水平、垂直間距相同。setHorizontalSpacing()、setVerticalSpacing() 可以分別設置水平間距、垂直間距。
setRowMinimumHeight(int row, int minSize)
setColumnMinimumWidth(int column, int minSize)
設置行最小高度和列最小寬度。
columnCount()

rowCount()
獲取列數和行數。
總結
當界面元素較為復雜時,應毫不猶豫的盡量使用柵格布局,而不是使用水平和垂直布局的組合或者嵌套的形式,因為在多數情況下,后者往往會使 “局勢” 更加復雜而難以控制。柵格布局賦予了界面設計器更大的自由度來排列組合界面元素,而僅僅帶來了微小的復雜度開銷。
當要設計的界面是一種類似於兩列和若干行組成的形式時,使用表單布局要比柵格布局更為方便些。
參考: