在單頁應用上,前端路由並不陌生。很多前端框架也會有獨立開發或推薦配套使用的路由系統。那么,當我們在談前端路由的時候,還可以談些什么?本文將簡要分析並實現一個的前端路由,並對 react-router 進行分析。
1. 一個極簡前端路由實現
說一下前端路由實現的簡要原理,以 hash 形式(也可以使用 History API 來處理)為例,當 url 的 hash 發生變化時,觸發 hashchange 注冊的回調,回調中去進行不同的操作,進行不同的內容的展示。直接看代碼或許更直觀。
function Router() {
    this.routes = {};
    this.currentUrl = '';
}
Router.prototype.route = function(path, callback) {
    this.routes[path] = callback || function(){};
};
Router.prototype.refresh = function() {
    this.currentUrl = location.hash.slice(1) || '/';
    this.routes[this.currentUrl]();
};
Router.prototype.init = function() {
    window.addEventListener('load', this.refresh.bind(this), false);
    window.addEventListener('hashchange', this.refresh.bind(this), false);
}
window.Router = new Router();
window.Router.init();
上面路由系統 Router 對象實現,主要提供三個方法
- init 監聽瀏覽器 url hash 更新事件
- route 存儲路由更新時的回調到回調數組routes中,回調函數將負責對頁面的更新
- refresh 執行當前url對應的回調函數,更新頁面
Router 調用方式以及呈現效果如下:點擊觸發 url 的 hash 改變,並對應地更新內容(這里為 body 背景色)
<ul>
    <li><a href="#/">turn white</a></li>
    <li><a href="#/blue">turn blue</a></li>
    <li><a href="#/green">turn green</a></li>
</ul>
var content = document.querySelector('body');
// change Page anything
function changeBgColor(color) {
    content.style.backgroundColor = color;
}
Router.route('/', function() {
    changeBgColor('white');
});
Router.route('/blue', function() {
    changeBgColor('blue');
});
Router.route('/green', function() {
    changeBgColor('green');
});
 以上為一個前端路由的簡單實現,點擊查看完整代碼,雖然簡單,但實際上很多路由系統的根基都立於此,其他路由系統主要是對自身使用的框架機制的進行配套及優化,如與 react 配套的 react-router。
2. react-router 分析
2.1. react-router 與 history 結合形式
react-router 是基於 history 模塊提供的 api 進行開發的,結合的形式本文記為 包裝方式。所以在開始對其分析之前,先舉一個簡單的例子來說明如何進行對象的包裝。
// 原對象
var historyModule = {
    listener: [],
    listen: function (listener) {
        this.listener.push(listener);
        console.log('historyModule listen..')
    },
    updateLocation: function(){
        this.listener.forEach(function(listener){
            listener('new localtion');
        })
    }
}
// Router 將使用 historyModule 對象,並對其包裝
var Router = {
    source: {},
    init: function(source){
        this.source = source;
    },
    // 對 historyModule的listen進行了一層包裝
    listen: function(listener) {
        return this.source.listen(function(location){
            console.log('Router listen tirgger.');
            listener(location);
        })
    }
}
// 將 historyModule 注入進 Router 中
Router.init(historyModule);
// Router 注冊監聽
Router.listen(function(location){
    console.log(location + '-> Router setState.');
})
// historyModule 觸發回調
historyModule.updateLocation();
返回: 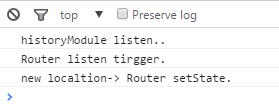
可看到 historyModule 中含有機制:historyModule.updateLocation() -> listener( ),Router 通過對其進行包裝開發,針對 historyModule 的機制對 Router 也起到了作用,即historyModule.updateLocation() 將觸發 Router.listen 中的回調函數 。點擊查看完整代碼 這種包裝形式能夠充分利用原對象(historyModule )的內部機制,減少開發成本,也更好的分離包裝函數(Router)的邏輯,減少對原對象的影響。
2.2. react-router 使用方式
react-router 以 react component 的組件方式提供 API, 包含 Router,Route,Redirect,Link 等等,這樣能夠充分利用 react component 提供的生命周期特性,同時也讓定義路由跟寫 react component 達到統一,如下
render((
  <Router history={browserHistory}>
    <Route path="/" component={App}>
      <Route path="about" component={About}/>
      <Route path="users" component={Users}>
        <Route path="/user/:userId" component={User}/>
      </Route>
      <Route path="*" component={NoMatch}/>
    </Route>
  </Router>
), document.body)
就這樣,聲明了一份含有 path to component 的各個映射的路由表。 react-router 還提供的 Link 組件(如下),作為提供更新 url 的途徑,觸發 Link 后最終將通過如上面定義的路由表進行匹配,並拿到對應的 component 及 state 進行 render 渲染頁面。
<Link to={`/user/89757`}>'joey'</Link>
這里不細講 react-router 的使用,詳情可見:https://github.com/reactjs/react-router
3. 從點擊 Link 到 render 對應 component ,路由中發生了什么
3.1. 為何能夠觸發 render component ?
主要是因為觸發了 react setState 的方法從而能夠觸發 render component。 從頂層組件 Router 出發(下面代碼從 react-router/Router 中摘取),可看到 Router 在 react component 生命周期之組件被掛載前 componentWillMount 中使用 this.history.listen 去注冊了 url 更新的回調函數。回調函數將在 url 更新時觸發,回調中的 setState 起到 render 了新的 component 的作用。
Router.prototype.componentWillMount = function componentWillMount() {
    // .. 省略其他
    var createHistory = this.props.history;

    this.history = _useRoutes2['default'](createHistory)({
      routes: _RouteUtils.createRoutes(routes || children),
      parseQueryString: parseQueryString,
      stringifyQuery: stringifyQuery
    });

    this._unlisten = this.history.listen(function (error, state) {
        _this.setState(state, _this.props.onUpdate);
    });
  };
上面的 _useRoutes2 對 history 操作便是對其做一層包裝,所以調用的 this.history 實際為包裝以后的對象,該對象含有 _useRoutes2 中的 listen 方法,如下

function listen(listener) {
      return history.listen(function (location) {
          // .. 省略其他
          match(location, function (error, redirectLocation, nextState) {
            listener(null, nextState);
          });
      });
}
可看到,上面代碼中,主要分為兩部分
- 使用了 history 模塊的 listen 注冊了一個含有 setState 的回調函數(這樣就能使用 history 模塊中的機制)
- 回調中的 match 方法為 react-router 所特有,match 函數根據當前 location 以及前面寫的 Route 路由表匹配出對應的路由子集得到新的路由狀態值 state,具體實現可見 react-router/matchRoutes ,再根據 state 得到對應的 component ,最終執行了 match 中的回調 listener(null, nextState) ,即執行了 Router 中的監聽回調(setState),從而更新了展示。
以上,為起始注冊的監聽,及回調的作用。
3.2. 如何觸發監聽的回調函數的執行?
這里還得從如何更新 url 說起。一般來說,url 更新主要有兩種方式:簡單的 hash 更新或使用 history api 進行地址更新。在 react-router 中,其提供了 Link 組件,該組件能在 render 中使用,最終會表現為 a 標簽,並將 Link 中的各個參數組合放它的 href 屬性中。可以從 react-router/ Link 中看到,對該組件的點擊事件進行了阻止了瀏覽器的默認跳轉行為,而改用 history 模塊的 pushState 方法去觸發 url 更新。
Link.prototype.render = function render() {
    // .. 省略其他
    props.onClick = function (e) {
      return _this.handleClick(e);
    };
    if (history) {
     // .. 省略其他
      props.href = history.createHref(to, query);
    }
    return _react2['default'].createElement('a', props);
};

Link.prototype.handleClick = function handleClick(event) {
    // .. 省略其他
    event.preventDefault();
    this.context.history.pushState(this.props.state, this.props.to, this.props.query);
};
對 history 模塊的 pushState 方法對 url 的更新形式,同樣分為兩種,分別在 history/createBrowserHistory 及 history/createHashHistory 各自的 finishTransition 中,如 history/createBrowserHistory 中使用的是 window.history.replaceState(historyState, null, path); 而 history/createHashHistory 則使用 window.location.hash = url,調用哪個是根據我們一開始創建 history 的方式。
更新 url 的顯示是一部分,另一部分是根據 url 去更新展示,也就是觸發前面的監聽。這是在前面 finishTransition 更新 url 之后實現的,調用的是 history/createHistory 中的 updateLocation 方法,changeListeners 中為 history/createHistory 中的 listen 中所添加的,如下
function updateLocation(newLocation) {
   // 示意代碼
    location = newLocation;
    changeListeners.forEach(function (listener) {
      listener(location);
    });
}
function listen(listener) {
     // 示意代碼
    changeListeners.push(listener);
}
4. 總結
可以將以上 react-router 的整個包裝閉環總結為
- 回調函數:含有能夠更新 react UI 的 react setState 方法。
- 注冊回調:在 Router componentWillMount 中使用 history.listen 注冊的回調函數,最終放在 history 模塊的 回調函數數組 changeListeners 中。
- 觸發回調:Link 點擊觸發 history 中回調函數數組 changeListeners 的執行,從而觸發原來 listen 中的 setState 方法,更新了頁面
至於前進與后退的實現,是通過監聽 popstate 以及 hashchange 的事件,當前進或后退 url 更新時,觸發這兩個事件的回調函數,回調的執行方式 Link 大致相同,最終同樣更新了 UI ,這里就不再說明。
react-router 主要是利用底層 history 模塊的機制,通過結合 react 的架構機制做一層包裝,實際自身的內容並不多,但其包裝的思想筆者認為很值得學習,有興趣的建議閱讀下源碼,相信會有其他收獲。
前端路由的兩種實現原理
早期的路由都是后端實現的,直接根據 url 來 reload 頁面,頁面變得越來越復雜服務器端壓力變大,隨着 ajax 的出現,頁面實現非 reload 就能刷新數據,也給前端路由的出現奠定了基礎。我們可以通過記錄 url 來記錄 ajax 的變化,從而實現前端路由。
本文主要講兩種主流方式實現前端路由。
5. History API
這里不細說每一個 API 的用法,大家可以看 MDN 的文檔:https://developer.mozilla.org...
重點說其中的兩個新增的API history.pushState 和 history.replaceState
這兩個 API 都接收三個參數,分別是
- 狀態對象(state object) — 一個JavaScript對象,與用pushState()方法創建的新歷史記錄條目關聯。無論何時用戶導航到新創建的狀態,popstate事件都會被觸發,並且事件對象的state屬性都包含歷史記錄條目的狀態對象的拷貝。
- 標題(title) — FireFox瀏覽器目前會忽略該參數,雖然以后可能會用上。考慮到未來可能會對該方法進行修改,傳一個空字符串會比較安全。或者,你也可以傳入一個簡短的標題,標明將要進入的狀態。
- 地址(URL) — 新的歷史記錄條目的地址。瀏覽器不會在調用pushState()方法后加載該地址,但之后,可能會試圖加載,例如用戶重啟瀏覽器。新的URL不一定是絕對路徑;如果是相對路徑,它將以當前URL為基准;傳入的URL與當前URL應該是同源的,否則,pushState()會拋出異常。該參數是可選的;不指定的話則為文檔當前URL。
相同之處是兩個 API 都會操作瀏覽器的歷史記錄,而不會引起頁面的刷新。
不同之處在於,pushState會增加一條新的歷史記錄,而replaceState則會替換當前的歷史記錄。
我們拿大百度的控制台舉例子(具體說是我的瀏覽器在百度首頁打開控制台。。。)
我們在控制台輸入
window.history.pushState(null, null, "https://www.baidu.com/?name=orange"); 好,我們觀察此時的 url 變成了這樣
我們這里不一一測試,直接給出其它用法,大家自行嘗試
window.history.pushState(null, null, "https://www.baidu.com/name/orange");
//url: https://www.baidu.com/name/orange

window.history.pushState(null, null, "?name=orange");
//url: https://www.baidu.com?name=orange

window.history.pushState(null, null, "name=orange");
//url: https://www.baidu.com/name=orange

window.history.pushState(null, null, "/name/orange");
//url: https://www.baidu.com/name/orange

window.history.pushState(null, null, "name/orange");
//url: https://www.baidu.com/name/orange
注意:這里的 url 不支持跨域,當我們把
www.baidu.com換成baidu.com時就會報錯。
Uncaught DOMException: Failed to execute 'pushState' on 'History': A history state object with URL 'https://baidu.com/?name=orange' cannot be created in a document with origin 'https://www.baidu.com'and URL 'https://www.baidu.com/?name=orange'. 回到上面例子中,每次改變 url 頁面並沒有刷新,同樣根據上文所述,瀏覽器會產生歷史記錄
這就是實現頁面無刷新情況下改變 url 的前提,下面我們說下第一個參數 狀態對象
如果運行 history.pushState() 方法,歷史棧對應的紀錄就會存入 狀態對象,我們可以隨時主動調用歷史條目
此處引用 mozilla 的例子
<!DOCTYPE HTML>
<!-- this starts off as http://example.com/line?x=5 -->
<title>Line Game - 5</title>
<p>You are at coordinate <span id="coord">5</span> on the line.</p>
<p>
 <a href="?x=6" onclick="go(1); return false;">Advance to 6</a> or
 <a href="?x=4" onclick="go(-1); return false;">retreat to 4</a>?
</p>
<script>
 var currentPage = 5; // prefilled by server!!!!
 function go(d) {
     setupPage(currentPage + d);
     history.pushState(currentPage, document.title, '?x=' + currentPage);
 }
 onpopstate = function(event) {
     setupPage(event.state);
 }
 function setupPage(page) {
     currentPage = page;
     document.title = 'Line Game - ' + currentPage;
     document.getElementById('coord').textContent = currentPage;
     document.links[0].href = '?x=' + (currentPage+1);
     document.links[0].textContent = 'Advance to ' + (currentPage+1);
     document.links[1].href = '?x=' + (currentPage-1);
     document.links[1].textContent = 'retreat to ' + (currentPage-1);
 }
</script>
我們點擊Advance to ?對應的 url 與模版都會 +1,反之點擊retreat to ?就會都 -1,這就滿足了 url 與模版視圖同時變化的需求
實際當中我們不需要去模擬 onpopstate 事件,官方文檔提供了 popstate 事件,當我們在歷史記錄中切換時就會產生 popstate 事件。對於觸發 popstate 事件的方式,各瀏覽器實現也有差異,我們可以根據不同瀏覽器做兼容處理。
6. hash
我們經常在 url 中看到 #,這個 # 有兩種情況,一個是我們所謂的錨點,比如典型的回到頂部按鈕原理、Github 上各個標題之間的跳轉等,路由里的 # 不叫錨點,我們稱之為 hash,大型框架的路由系統大多都是哈希實現的。
同樣我們需要一個根據監聽哈希變化觸發的事件 —— hashchange 事件
我們用 window.location 處理哈希的改變時不會重新渲染頁面,而是當作新頁面加到歷史記錄中,這樣我們跳轉頁面就可以在 hashchange 事件中注冊 ajax 從而改變頁面內容。
http://codepen.io/orangexc/pe...
hashchange 在低版本 IE 需要通過輪詢監聽 url 變化來實現,我們可以模擬如下
(function(window) {

  // 如果瀏覽器不支持原生實現的事件,則開始模擬,否則退出。
  if ( "onhashchange" in window.document.body ) { return; }

  var location = window.location,
  oldURL = location.href,
  oldHash = location.hash;

  // 每隔100ms檢查hash是否發生變化
  setInterval(function() {
    var newURL = location.href,
    newHash = location.hash;

    // hash發生變化且全局注冊有onhashchange方法(這個名字是為了和模擬的事件名保持統一);
    if ( newHash != oldHash && typeof window.onhashchange === "function"  ) {
      // 執行方法
      window.onhashchange({
        type: "hashchange",
        oldURL: oldURL,
        newURL: newURL
      });

      oldURL = newURL;
      oldHash = newHash;
    }
  }, 100);
})(window);
大型框架的路由當然不會這么簡單,angular 1.x 的路由對哈希、模版、處理器進行關聯,大致如下
app.config(['$routeProvider', '$locationProvider', function ($routeProvider, $locationProvider) {
 $routeProvider
 .when('/article', {
   templateUrl: '/article.html',
   controller: 'ArticleController'
 }).otherwise({
   redirectTo: '/index'
 });
 $locationProvider.html5Mode(true);
}])
這套路由方案默認是以 # 開頭的哈希方式,如果不考慮低版本瀏覽器,就可以直接調用 $locationProvider.html5Mode(true) 利用 H5 的方案而不用哈希方案。
7. 總結
兩種方案我推薦 hash 方案,因為照顧到低級瀏覽器,就是不美觀(多了一個 #),兩者兼顧也不是不可,只能判斷瀏覽器給出對應方案啦,不過也只支持 IE8+,更低版本兼容見上文!
這個鏈接的 demo 含有判斷方法:http://sandbox.runjs.cn/show/... 。同時給出 Github 倉庫地址: minrouter,推薦大家讀下源碼,僅僅 117 行,精辟!
如果在上面鏈接測試時你的 url 里多了一個 #,說明你的瀏覽器該更新啦。
文章出自 orange 的 個人博客 http://orangexc.xyz/