這是「使用Python進行並發編程」系列的最后一篇。我特意地把它安排在了16年最后一天,先祝各位元旦快樂。
重新實驗上篇的效率對比的實現
在第一篇我們曾經對比並發執行的效率,但是請求的是httpbin.org這個網站。很容易受到網絡狀態和其服務質量的影響。所以我考慮啟用一個本地的eb服務。那接下來選方案吧。
我用sanic提供的不同方案的例子,對tornado、aiohttp+ujson+uvloop、sanic+uvloop三種方案,在最新的Python 3.6下,使用wrk進行了性能測試。
先解釋下上面提到的幾個關鍵詞:
- aiohttp。一個實現了PEP3156的HTTP的服務器,且包含客戶端相關功能。最早出現,應該最知名。
- sanic。后起之秀,基於Flask語法的異步Web框架。
- uvloop。用Cython編寫的、用來替代asyncio事件循環。作者說「它在速度上至少比Node.js、gevent以及其它任何Python異步框架快2倍」。
- ujson。比標准庫json及其社區版的simplejson都要快的JSON編解碼庫。
使用的測試命令是:
|
1
|
wrk
-d20s -t10 -c200 http://127.0.0.1:8000
|
表示使用10個線程、並發200、持續20秒。
在我個人Mac上獲得的結果是:
| 方案 | tornado | aiohttp + ujson + uvloop | sanic + uvloop |
|---|---|---|---|
| 平均延時 | 122.58ms | 35.49ms | 11.03ms |
| 請求數/秒 | 162.94 | 566.87 | 2.02k |
所以簡單的返回json數據,看起來sanic + uvloop是最快的。首先我對市面的各種Benchmark的對比是非常反感的,不能用hello world這種級別的例子的結果就片面的認為某種方案效率是最好的,一定要根據你實際的生產環境,再不行影響線上服務的前提下,對一部分有代表性的接口進程流量鏡像之類的方式去進行效率的對比。而我認可上述的結果是因為正好滿足我接下來測試用到的功能而已。
寫一個能GET某參數返回這個參數的sanic+uvloop的版本的例子:
|
1
2
3
4
5
6
7
8
9
10
11
12
13
14
|
from sanic import Sanic
from sanic.response import json
app = Sanic(__name__)
async def test(request):
a = request.args.get(
'a')
return json({'args': {'a': a}})
if __name__ == '__main__':
app.run(host=
'127.0.0.1', port=8000)
|
然后把之前的效率對比的代碼改造一下,需要變化如下幾步:
- 替換請求地址,也就是把httpbin.org改成了localhost:8000
- 增加要爬取的頁面數量,由於sanic太快了(無奈臉),12個頁面秒完,所以改成
NUMBERS = range(240) - 由於頁面數量大幅增加,不能在終端都打印出來。而且之前已經驗證過正確性。去掉那些print
看下效果:
|
1
2
3
4
5
|
❯ python3 scraper_thread.py
Use requests+ThreadPoolExecutor cost: 0.9809930324554443
Use asyncio+requests+ThreadPoolExecutor cost: 0.9977471828460693
Use asyncio+aiohttp cost: 0.25928187370300293
Use asyncio+aiohttp+ThreadPoolExecutor cost: 0.278397798538208
|
可以感受到asyncio+aiohttp依然是最快的。隨便挺一下Sanic,准備有機會在實際工作中用一下。
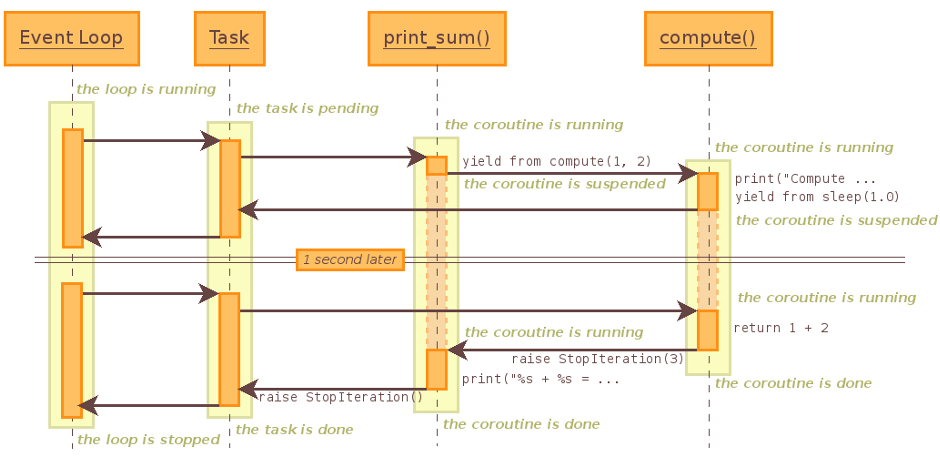
asyncio在背后怎么運行的呢?
在Asynchronous Python這篇文章里面我找到一個表達的不錯的asyncio運行的序列圖。例子我改編如下:
|
1
2
3
4
5
6
7
8
9
10
11
12
13
14
15
16
|
import asyncio
async def compute(x, y):
print(
'Compute {} + {} ...'.format(x, y))
await asyncio.sleep(1.0)
return x + y
async def print_sum(x, y):
result =
await compute(x, y)
print(
'{} + {} = {}'.format(x, y, result))
loop = asyncio.get_event_loop()
loop.run_until_complete(print_sum(
1, 2))
loop.close()
|
運行的過程是這樣的:
如何把同步的代碼改成異步的
之前有位訂閱我的公眾號的同學問過這個問題,我想了一個例子來讓事情變的清楚。
首先看一個同步的例子:
|
1
2
3
4
5
6
|
def handle(id):
subject = get_subject_from_db(id)
buyinfo = get_buyinfo(id)
change = process(subject, buyinfo)
notify_change(change)
flush_cache(id)
|
可以看到,需要獲取subject和buyinfo之后才能執行process,然后才能執行notify_change和flush_cache。
如果使用asyncio,就是這樣寫:
|
1
2
3
4
5
6
7
8
9
10
|
import asyncio
async def handle(id):
subject = asyncio.ensure_future(get_subject_from_db(id))
buyinfo = asyncio.ensure_future(get_buyinfo(id))
results =
await asyncio.gather(subject, buyinfo)
change =
await process(results)
await notify_change(change)
loop.call_soon(flush_cache, id)
|
原則上無非是讓能一起協同的函數異步化(subject和buyinfo已經是Future對象了),然后通過gather獲取到這些函數執行的結果;有順序的就用call_soon來保證。
繼續深入,現在詳細了解下一步還有什么其他解決方案以及其應用場景:
- 包裝成Future對象。上面使用了ensure_future來做,上篇也說過,也可以用loop.create_task。如果你看的是老文章可能會出現asyncio.async這種用法,它現在已經被棄用了。如果你已經非常熟悉,你也可以直接使用asyncio.Task(get_subject_from_db(id))這樣的方式。
-
回調。上面用到了call_soon這種回調。除此之外還有如下兩種:
- loop.call_later(delay, func, *args)。延遲delay秒之后再執行。
- loop.call_at(when, func, *args)。 某個時刻才執行。
其實套路就是這些罷了。
爬蟲分析
可能你已經聽過開源程序架構系列書了。今天我們將介紹第四本500 Lines or Less中的爬蟲項目。順便說一下,這個項目里面每章都是由不同領域非常知名的專家而寫,代碼不超過500行。目前包含web服務器、決策采樣器、Python解釋器、爬蟲、模板引擎、OCR持續集成系統、分布式系統、靜態檢查等內容。值得大家好好學習下。
我們看的這個例子,是實現一個高性能網絡爬蟲,它能夠抓取你指定的網站的全部地址。它是由MongoDB的C和Python驅動的主要開發者ajdavis以及Python之父Guido van Rossum一起完成的。BTW, 我是ajdavis粉兒!
如果你想看了解這篇爬蟲教程可以訪問: A Web Crawler With asyncio Coroutines,這篇和教程關系不大,是一篇分析文章。
我們首先下載並安裝對應的依賴:
|
1
2
3
|
❯ git clone https://github.com/aosabook/
500lines
❯ cd
500lines
❯ python3 -m pip install -r requirements.txt
|
運行一下,看看效果:
|
1
2
3
4
5
6
7
8
9
10
11
12
13
14
15
16
17
18
19
|
❯ python3 crawler/code/crawl.py -q python-cn.org --exclude github
...
http://python-cn.org:80/user/zuoshou/topics 200 text/html utf-8 13212 0/22
http://python-cn.org:80/users 200 text/html utf-8 34156 24/41
http://python-cn.org:80/users/online 200 text/html utf-8 11614 0/17
http://python-cn.org:80/users/sort-posts 200 text/html utf-8 34642 0/41
http://python-cn.org:80/users/sort-reputation 200 text/html utf-8 34721 15/41
Finished 2365 urls in 47.868 secs (max_tasks=100) (0.494 urls/sec/task)
4 error
36 error_bytes
2068 html
42735445 html_bytes
98 other
937394 other_bytes
195 redirect
4 status_404
Todo: 0
Done: 2365
Date: Fri Dec 30 22:03:50 2016 local time
|
可以看到 http://python-cn.org 有2365個頁面,花費了47.868秒,並發為100。
這個項目有如下一些文件:
|
1
2
3
4
5
6
7
8
9
|
❯ tree crawler/code -L 1
crawler/code
├── Makefile
├── crawl.py
├── crawling.py
├── reporting.py
├── requirements.txt
├── supplemental
└── test.py
|
其中主要有如下三個程序:
- crawl.py是主程序,其中包含了參數解析,以及事件循環。
- crawling.py抓取程序,crawl.py中的異步函數就是其中的Crawler類的crawl方法。
- reporting.py顧名思義,生成抓取結果的程序。
本文主要看crawling.py部分。雖然它已經很小(加上空行才275行),但是為了讓爬蟲的核心更直觀,我把其中的兼容性、日志功能以及異常的處理去掉,並將處理成Python 3.5新的async/await語法。
首先列一下這個爬蟲實現什么功能:
- 輸入一個根鏈接,讓爬蟲自動幫助我們爬完所有能找到的鏈接
- 把全部的抓取結果存到一個列表中
- 可以排除包含某些關鍵詞鏈接的抓取
- 可以控制並發數
- 可以抓取自動重定向的頁面,且可以限制重定向的次數
- 抓取失敗可重試
目前對一個復雜的結果結構常定義一個namedtuple,首先把抓取的結果定義成一個FetchStatistic:
|
1
2
3
4
5
6
7
8
9
10
|
FetchStatistic = namedtuple(
'FetchStatistic',
[
'url',
'next_url',
'status',
'exception',
'size',
'content_type',
'encoding',
'num_urls',
'num_new_urls'])
|
其中包含了url,文件類型,狀態碼等用得到的信息。
然后實現抓取類Crawler,首先是初始化方法:
|
1
2
3
4
5
6
7
8
9
10
11
12
13
14
15
16
17
18
19
20
21
22
23
24
25
26
27
28
29
30
31
32
33
34
|
class Crawler:
def __init__(self, roots,
exclude=None, strict=True, # What to crawl.
max_redirect=
10, max_tries=4, # Per-url limits.
max_tasks=
10, *, loop=None):
self.loop = loop
or asyncio.get_event_loop()
self.roots = roots
self.exclude = exclude
self.strict = strict
self.max_redirect = max_redirect
self.max_tries = max_tries
self.max_tasks = max_tasks
self.q = Queue(loop=self.loop)
self.seen_urls = set()
self.done = []
self.session = aiohttp.ClientSession(loop=self.loop)
self.root_domains = set()
for root in roots:
parts = urllib.parse.urlparse(root)
host, port = urllib.parse.splitport(parts.netloc)
if not host:
continue
if re.match(r'\A[\d\.]*\Z', host):
self.root_domains.add(host)
else:
host = host.lower()
if self.strict:
self.root_domains.add(host)
else:
self.root_domains.add(lenient_host(host))
for root in roots:
self.add_url(root)
self.t0 = time.time()
self.t1 =
None
|
信息量比較大,我拿出重要的解釋下:
- 第7行,self.roots就是待抓取的網站地址,是一個列表。
- 第13行,self.q這個隊列就存儲了待抓取的url
- 第14行,self.seen_urls會保證不重復與抓取已經抓取過的url
- 第16行,使用requests或者aiphttp,都是推薦使用一個會話完成全部工作,要不然有些需要登陸之后的操作就做不了了。
- 第18-30行,這個for循環會解析self.roots中的域名,這是為了只抓取指定的網站,其它網站的鏈接會基於這個集合過濾掉
- 第31-32行,觸發抓取,把url放入self.q的隊列,就可以被worker執行了
- 第33-34行,t0和t1是為了記錄抓取的時間戳,最后可以計算抓取的總耗時
接着我們看add_url的實現:
|
1
2
3
4
5
|
def add_url(self, url, max_redirect=None):
if max_redirect is None:
max_redirect = self.max_redirect
self.seen_urls.add(url)
self.q.put_nowait((url, max_redirect))
|
其中q.put_nowait相當於非阻塞的q.put,還可以看到這個url被放入了self.seen_urls
現在我們從事件循環會用到的crawl方法開始往回溯:
|
1
2
3
4
5
6
7
8
|
async def crawl(self):
workers = [asyncio.Task(self.work(), loop=self.loop)
for _ in range(self.max_tasks)]
self.t0 = time.time()
await self.q.join()
self.t1 = time.time()
for w in workers:
w.cancel()
|
類中的方法可以直接用async關鍵詞的。worker就是self.work,這些worker會在后台運行,但是會阻塞在join上,直到初始化時候放入self.q的url都完成。最后需要讓worker都取消掉。
然后看self.work:
|
1
2
3
4
5
6
7
8
9
|
async def work(self):
try:
while True:
url, max_redirect =
await self.q.get()
assert url in self.seen_urls
await self.fetch(url, max_redirect)
self.q.task_done()
except asyncio.CancelledError:
pass
|
當執行worker.cancel方法就會引起asyncio.CancelledError,然后while 1的循環就結束了。執行完fetch方法,需要標記get的這個url執行完成,也就是要執行self.q.task_done,要不然最后join是永遠結束不了的。
接下來就是self.fetch,這個方法比較長:
|
1
2
3
4
5
6
7
8
9
10
11
12
13
14
15
16
17
18
19
20
21
22
23
24
25
26
27
28
29
30
31
32
33
34
35
36
37
38
39
40
41
42
43
44
45
46
47
48
49
50
51
52
53
|
async def fetch(self, url, max_redirect):
tries =
0
exception =
None
while tries < self.max_tries:
try:
response =
await self.session.get(
url, allow_redirects=
False)
break
except aiohttp.ClientError as client_error:
exception = client_error
tries +=
1
else:
self.record_statistic(FetchStatistic(url=url,
next_url=
None,
status=
None,
exception=exception,
size=
0,
content_type=
None,
encoding=
None,
num_urls=
0,
num_new_urls=
0))
return
try:
if is_redirect(response):
location = response.headers[
'location']
next_url = urllib.parse.urljoin(url, location)
self.record_statistic(FetchStatistic(url=url,
next_url=next_url,
status=response.status,
exception=
None,
size=
0,
content_type=
None,
encoding=
None,
num_urls=
0,
num_new_urls=
0))
if next_url in self.seen_urls:
return
if max_redirect > 0:
self.add_url(next_url, max_redirect -
1)
else:
print(
'redirect limit reached for %r from %r',
next_url, url)
else:
stat, links =
await self.parse_links(response)
self.record_statistic(stat)
for link in links.difference(self.seen_urls):
self.q.put_nowait((link, self.max_redirect))
self.seen_urls.update(links)
finally:
await response.release()
|
簡單的說,fetch就是去請求url,獲得響應。然后把結果組織成一個FetchStatistic,通過self.record_statistic放進self.done這個列表,然后對結果進行解析,通過self.parse_links(response)或者這個頁面的結果包含的其他鏈接,和現在已經抓取的鏈接集合對比,把還沒有抓的放入self.q。
如果這個url被重定向,就把重定向的鏈接放進self.q,待worker拿走執行。
然后我們看parse_links的實現,也比較長:
|
1
2
3
4
5
6
7
8
9
10
11
12
13
14
15
16
17
18
19
20
21
22
23
24
25
26
27
28
29
30
31
32
33
34
35
36
37
38
|
async def parse_links(self, response):
links = set()
content_type =
None
encoding =
None
body =
await response.read()
if response.status == 200:
content_type = response.headers.get(
'content-type')
pdict = {}
if content_type:
content_type, pdict = cgi.parse_header(content_type)
encoding = pdict.get(
'charset', 'utf-8')
if content_type in ('text/html', 'application/xml'):
text =
await response.text()
urls = set(re.findall(
r'''(?i)href=["']([^\s"'<>]+)''',
text))
for url in urls:
normalized = urllib.parse.urljoin(response.url, url)
defragmented, frag = urllib.parse.urldefrag(normalized)
if self.url_allowed(defragmented):
links.add(defragmented)
stat = FetchStatistic(
url=response.url,
next_url=
None,
status=response.status,
exception=
None,
size=len(body),
content_type=content_type,
encoding=encoding,
num_urls=len(links),
num_new_urls=len(links - self.seen_urls))
return stat, links
`
|
其實就是用re.findall(r'''(?i)href=["']([^\s"'<>]+)''', text)找到鏈接,然后進行必要的過濾,就拿到全部鏈接了。
這就是一個爬蟲,是不是很簡單。但是寫的算是「最佳實踐」。最后,我們看一下怎么調用Crawler:
|
1
2
3
4
5
6
7
8
|
loop = asyncio.get_event_loop()
crawler = Crawler([
'http://python-cn.org'], max_tasks=100)
loop.run_until_complete(crawler.crawl())
print(
'Finished {0} urls in {1:.3f} secs'.format(len(crawler.done),
crawler.t1 - crawler.t0))
crawler.close()
loop.close()
|
希望對大家的爬蟲技藝有提高!
最后祝大家元旦快樂
PS:本文全部代碼可以在微信公眾號文章代碼庫項目中找到。