每個人的曾經都很苦逼。我知道我很卑微,但我不曾放慢腳步,在這條路上至死不悔。願與你同行。
UISegmentControl
-
概述
- UISegmentControl 是系統的段選擇控件,具有簡潔大方的外觀,但是通常不能滿足產品設計的需求。用戶( developer )對 UISegmentControl 的外觀的可控性是比較差的,為了滿足我們
完美的產品設計需求,我們通常需要絞盡腦汁的思考如何去改變 UISegmentControl 的外觀,但結果卻不那么令人滿意。最終你會發現 UISegmentControl 滿足需求需要花費很多的時間(或者說初學者根本無法完成需求)。在此,首先簡單敘述 UISegmentControl 的實現原理,和事件處理;然后,詳細介紹如何自定義 IDSegmentControl,並與 UISegmentControl 對比。 大家在能使用系統控件的情況下,盡量使用系統控件。本 Blog 自定義 IDSegmentControl 只是向大家提供一種解決問題的方式。
- UISegmentControl 是系統的段選擇控件,具有簡潔大方的外觀,但是通常不能滿足產品設計的需求。用戶( developer )對 UISegmentControl 的外觀的可控性是比較差的,為了滿足我們
-
效果圖

注: 上邊的是 UISegmentControl 實現的效果,下邊是 IDSegmentControl 實現的效果 -
UISegmentControl(下面以 UISegmentControl 的示例,來敘述其使用細節)
-
初始化 UISegmentControl 實例,並設置標題(默認狀態下,UISegmentControl不選中任何一個 segment)
self.segmentControl = [[UISegmentedControl alloc] initWithItems:@[@"全部分類", @"智能排序"]];-
效果

-
-
設置標題的字體和顏色(選中第一個 segment,此時的背景色為藍色)
NSMutableDictionary *dictionary = [NSMutableDictionary dictionary]; dictionary[NSForegroundColorAttributeName] = [UIColor blackColor]; dictionary[NSFontAttributeName] = [UIFont systemFontOfSize:18]; [self.segmentControl setTitleTextAttributes:dictionary forState:UIControlStateNormal];-
效果

-
-
設置 segment 三個狀態(不要問那三個狀態哦)下的圖片
[self.segmentControl setBackgroundImage:[UIImage imageNamed:@"unselected"] forState:UIControlStateNormal barMetrics:UIBarMetricsDefault];
[self.segmentControl setBackgroundImage:[UIImage imageNamed:@"selected"] forState:UIControlStateSelected barMetrics:UIBarMetricsDefault];
[self.segmentControl setBackgroundImage:[UIImage imageNamed:@"unselected"] forState:UIControlStateHighlighted barMetrics:UIBarMetricsDefault];
```- 效果 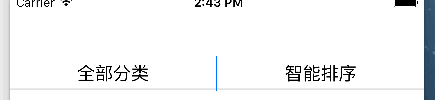 注:此時我們會看到,當選中 segment 時,文字會被遮擋(你可以讓美工給你切個圖哦,如果美工說:“你長的太丑了,不給切”。那你可以聯系我,我會告訴你怎么做。`代碼能解決的問題,就不用去找美工嘍`)。-
改變分割線
-
使用 tintColor
[self.segmentControl setTintColor:[UIColor whiteColor]];-
效果

-
-
使用 dividerImage(設置一張圖片即可)
- (void)setDividerImage:(nullable UIImage *)dividerImage forLeftSegmentState:(UIControlState)leftState rightSegmentState:(UIControlState)rightState barMetrics:(UIBarMetrics)barMetrics
-
-
默認選中第一個 segment
self.segmentControl.selectedSegmentIndex = 0;-
效果

-
-
為 UISegmentControl 添加事件
[self.segmentControl addTarget:self action:@selector(segmentControlselectedSegmentIndexChange:) forControlEvents:UIControlEventValueChanged]; -
至此,UISegmentControl 的使用已經簡單介紹到此。接下來,會介紹如何實現自己的 segmentControl,如:IDSegmentControl。若你覺得沒有必要,那就可以不要往下看了,你不會損失很多。但還是建議你看一下,因為我相信你會收獲很多。
-
IDSegmentControl
-
概述
- 之所以自定義 IDSegmentControl,是為了增加其可控性,使其用起來更得心應手。同時也是一種技術的積淀。
-
設計思路
-
使用 UIView 的子類來實現 IDSegmentControl,每個 Item 是一個 Button,通過控制 Button 來控制 segment 的外觀和事件
-
使用代理模式來實現 IDSegmentControl 的事件處理(
繼承自 UIControl 的版本,會使用 addTarget 實現)注:
或許你的自定控件,通常是繼承自 UIView,但是你是否想過讓它繼承自 UIControl 呢!!!若你有興趣,那么請聯系我,感謝您的支持
-
-
具體實現
-
設計接口
-
設置 IDSegmentControl 的 items 的 title(
IDSegmentControl 中 item 和 indicator 的布局需要基於 items 的 count)/** 所有segment的標題 */ @property (nonatomic, strong) NSArray *titlesOfSegments; #pragma mark - overided setter, update the appreance of the segmentControl - (void)setTitlesOfSegments:(NSArray *)titlesOfSegments { _titlesOfSegments = titlesOfSegments; // 根據 _titlesOfSegments 向 IDSegmentControl 中添加 items(button) for (NSInteger i = 0; i < _titlesOfSegments.count; i++) { UIButton *segmentButton = [[UIButton alloc] init]; [segmentButton.titleLabel setFont:[UIFont systemFontOfSize:18]]; [segmentButton setTitleColor:[UIColor blackColor] forState:UIControlStateNormal]; [segmentButton setTitle:_titlesOfSegments[i] forState:UIControlStateNormal]; [segmentButton addTarget:self action:@selector(segmentButtonClick:) forControlEvents:UIControlEventTouchUpInside]; [self.segmentArray addObject:segmentButton]; [self addSubview:segmentButton]; } }
-
-
搭建 IDSegmentControl 的界面
-
添加分割線和指示器
#pragma mark - initializer - (instancetype)initWithFrame:(CGRect)frame { if (self = [super initWithFrame:frame]) { [self addSubview:self.seperatorView]; [self addSubview:self.indicatorView]; } return self; } -
布局所有的子控件(為什么在 layoutSubviews 布局子控件,原因想必大家都知道的)
/** 布局所有的子控件 */
- (void)layoutSubviews {
    [super layoutSubviews];
    // 底部的分割線
    self.seperatorView.frame = CGRectMake(0, self.bounds.size.height - SeperatorHeight, self.bounds.size.width, SeperatorHeight);
    // 指示器
    self.indicatorView.frame = CGRectMake(0, self.bounds.size.height - SeperatorHeight, self.bounds.size.width / (CGFloat)self.titlesOfSegments.count, SeperatorHeight);
    // 所有的 segment
    CGFloat segmentWith = self.bounds.size.width / (CGFloat)self.titlesOfSegments.count;
    CGFloat segmentHeight = self.bounds.size.height;
    for (NSInteger i = 0; i < self.segmentArray.count; i++) {
        self.segmentArray[i].frame = CGRectMake(i * segmentWith, 0, segmentWith, segmentHeight - 1);
    }
}
-
-
為 IDSegmentControl 添加協議
@protocol IDSegementControlDelegate <NSObject> @optional - (void)segmentControlDidSelectItem:(UIButton *)selectedItem atIndex:(NSInteger)selectedIndex; @end -
為 IDSegmentControl 添加接口
/** 代理 */ @property (nonatomic, weak) id<ZBSegementControlDelegate> delegate; /** 選中的segment的索引 */ @property (nonatomic, assign) NSInteger selectedIndex; /** 指示器的偏移量 */ @property (nonatomic, assign) CGFloat indicatorOffsetX; -
處理按鈕事件
#pragma mark - 按鈕點擊事件 - (void)segmentButtonClick:(UIButton *)segmentButton { // 處理選中 segment 的邏輯 if (![self.lastSegmentButton isEqual:segmentButton]) { self.lastSegmentButton.selected = NO; } segmentButton.selected = !segmentButton.selected; // 改變 indicator 的位置 CGFloat segmentWidth = self.bounds.size.width / (CGFloat)self.titlesOfSegments.count; // 同樣是 segmentButton,你知道為什么可以找到對應的 segmentButton 嗎? NSInteger selectedIndex = [self.segmentArray indexOfObject:segmentButton]; [UIView animateWithDuration:0.25 animations:^{ [self setIndicatorOffsetX:selectedIndex * segmentWidth]; }]; // 通知代理,選中的 segment 已經改變 if ([self.delegate respondsToSelector:@selector(segmentControlDidSelectItem:atIndex:)]) { [self.delegate segmentControlDidSelectItem:segmentButton atIndex:selectedIndex]; } // 更新上一次選中的 segment(當前的 segment 是下一次選中新的 segment 時的 lastSegmentButton。好好理解吧) if (self.lastSegmentButton == nil) { self.lastSegmentButton = segmentButton; } else { if (![self.lastSegmentButton isEqual:segmentButton]) { self.lastSegmentButton = segmentButton; } } } -
viewController 使用示例
-
添加 segmentControl
/** UISegmentedControl */ - (void)setupSystemSegmentControl { // titles self.segmentControl = [[UISegmentedControl alloc] initWithItems:@[@"全部分類", @"智能排序"]]; // titleAttributes NSMutableDictionary *dictionary = [NSMutableDictionary dictionary]; dictionary[NSForegroundColorAttributeName] = [UIColor blackColor]; dictionary[NSFontAttributeName] = [UIFont systemFontOfSize:18]; [self.segmentControl setTitleTextAttributes:dictionary forState:UIControlStateNormal]; // backgroundImage [self.segmentControl setBackgroundImage:[UIImage imageNamed:@"unselected"] forState:UIControlStateHighlighted barMetrics:UIBarMetricsDefault]; [self.segmentControl setBackgroundImage:[UIImage imageNamed:@"unselected"] forState:UIControlStateNormal barMetrics:UIBarMetricsDefault]; [self.segmentControl setBackgroundImage:[UIImage imageNamed:@"selected"] forState:UIControlStateSelected barMetrics:UIBarMetricsDefault]; // tintColor [self.segmentControl setTintColor:[UIColor whiteColor]]; // 選中第一個 segment self.segmentControl.selectedSegmentIndex = 0; // action [self.segmentControl addTarget:self action:@selector(systemSegmentControlselectedSegmentIndexChange:) forControlEvents:UIControlEventValueChanged]; [self.view addSubview:self.segmentControl]; } /** IDSegmentControl */ - (void)setupIDSegmentControl { self.customSegmentControl = [[IDSegmentControl alloc] init]; self.customSegmentControl.delegate = self; self.customSegmentControl.titlesOfSegments = @[@"全部分類", @"智能排序"]; [self.view addSubview:self.customSegmentControl]; } -
布局子控件
- (void)viewDidLayoutSubviews { [super viewDidLayoutSubviews]; self.segmentControl.frame = CGRectMake(0, 64, self.view.bounds.size.width, 35); self.customSegmentControl.frame = CGRectMake(0, 104, self.view.bounds.size.width, 35); } -
處理 segmentControl 事件
// UISegmentControl
- (void)systemSegmentControlselectedSegmentIndexChange:(UISegmentedControl *)segmentControl {
    NSLog(@"%zd", segmentControl.selectedSegmentIndex);
}
// IDSegmentControl
- (void)segmentControlDidSelectItem:(UIButton *)selectedItem atIndex:(NSInteger)selectedIndex {
    NSLog(@"%zd", selectedIndex);
}
-
聲明:若你需要工程文件,請@我嘍。若您覺得 Blog 還可以,那么請點贊嘍。非常感謝您的支持 -