AOP:面向切片編程
簡介
AOP解決的問題:將核心業務代碼與外圍業務(日志記錄、權限校驗、異常處理、事務控制)代碼分離出來,提高模塊化,降低代碼耦合度,使職責更單一。
AOP應用場景:
日志記錄、權限校驗、異常處理、事務控制等
相關概念
joinPoint:連接點。在spring中只支持方法連接點,連接點指的是可以使用advice(增強)的地方,例如一個類中有5個方法,那么這5個方法,那么這5個方法都可以是連接點。
pointcut:切點。可理解為實實在在的連接點,即切入advice(增強)的點。例如一個類中有5個方法,其中有3個方法(連接點)需要織入advice(增強),那么這3個需要織入advice的連接點就是切點。
advice:增強。實際中想要添加的功能,如日志、權限校驗。
before:前置增強,目標方法執行前之前執行。
after:后置增強,目標方法執行后執行。
around:環繞增強,在目標方法執行時執行,可控制目標方法是否執行。
after throwing:異常增強,目標方法拋出異常時執行。
weaving:織入,即對方法的增強,將切面的代碼織入(應用)到目標函數的過程。
introduction advice:引入增強。即對類的增強。
advisor:切面。由切點和增強相結合而成,定義增強應用到哪些切點上。
AOP的兩種實現:基於代理的AOP實現&&Aspectj Spring AOP
Spring aop
基於代理(jdk動態代理、cglib動態代理)實現的aop
Spring aop使用了兩種代理機制。一種是jdk動態代理,另一種是cglib動態代理。
Jdk動態代理只支持接口代理,cglib支持類的代理。
編程式實現
<?xml version="1.0" encoding="UTF-8"?>

<project xmlns="http://maven.apache.org/POM/4.0.0"
         xmlns:xsi="http://www.w3.org/2001/XMLSchema-instance"
         xsi:schemaLocation="http://maven.apache.org/POM/4.0.0 http://maven.apache.org/xsd/maven-4.0.0.xsd">

<modelVersion>4.0.0</modelVersion>
<groupId>org.example</groupId>
<artifactId>springboot-practice-2021-9-5</artifactId>
<version>1.0-SNAPSHOT</version>


<properties>
    <spring.version>4.1.7.RELEASE</spring.version>
</properties>

<dependencies>
    <dependency>
        <groupId>cglib</groupId>
        <artifactId>cglib</artifactId>
        <version>3.2.0</version>
    </dependency>

    <dependency>
        <groupId>org.springframework</groupId>
        <artifactId>spring-aop</artifactId>
        <version>${spring.version}</version>
    </dependency>

    <dependency>
        <groupId>org.springframework</groupId>
        <artifactId>spring-aspects</artifactId>
        <version>${spring.version}</version>
    </dependency>

    <dependency>
        <groupId>org.springframework</groupId>
        <artifactId>spring-beans</artifactId>
        <version>${spring.version}</version>
    </dependency>

    <dependency>
        <groupId>org.springframework</groupId>
        <artifactId>spring-context</artifactId>
        <version>${spring.version}</version>
    </dependency>

    <dependency>
        <groupId>org.springframework</groupId>
        <artifactId>spring-context-support</artifactId>
        <version>${spring.version}</version>
    </dependency>

    <dependency>
        <groupId>org.springframework</groupId>
        <artifactId>spring-core</artifactId>
        <version>${spring.version}</version>
    </dependency>

</dependencies>

</project>
編程式
前置增強 before advice
前置增強:實現MethodBeforeAdvice接口,執行目標方法前執行before方法
import org.springframework.aop.MethodBeforeAdvice;
import java.lang.reflect.Method;

public class UserBeforeAdvice implements MethodBeforeAdvice {

    public void before(Method method, Object[] args, Object target) throws Throwable {
        System.out.println("Before");
    }

}
后置增強 after advice
后置增強:實現AfterReturningAdvice接口,執行目標方法后執行afterReturning方法
import org.springframework.aop.AfterReturningAdvice;
import java.lang.reflect.Method;

public class UserAfterAdvice implements AfterReturningAdvice {
    public void afterReturning(Object returnValue, Method method, Object[] args, Object target) throws Throwable {
        System.out.println("After");
    }
}
環繞增強 around advice
環繞增強:實現MethodInterceptor接口,執行目標方法前后執行invoke方法
import org.aopalliance.intercept.MethodInterceptor;
import org.aopalliance.intercept.MethodInvocation;

public class UserAroundAdvice implements MethodInterceptor {
    public Object invoke(MethodInvocation invocation) throws Throwable {
        System.out.println("Before");
        Object result = invocation.proceed();
        System.out.println("After");
        return result;
    }
}
用戶服務接口類:
public interface UserService {
    void queryAll();
}
用戶服務接口實現類:
public class UserServiceImpl implements UserService {
    public void queryAll() {
        System.out.println("查詢全部用戶並返回");
    }
}
測試類
import com.liuermeng.aop.advice.UserAfterAdvice;
import com.liuermeng.aop.advice.UserAroundAdvice;
import com.liuermeng.aop.advice.UserBeforeAdvice;
import com.liuermeng.aop.service.IUserService;
import com.liuermeng.aop.service.impl.UserServiceImpl;
import org.springframework.aop.framework.ProxyFactory;

public class Test {
    public static void main(String[] args) {
        /**
         * 測試前置增強和后置增強
         */
        ProxyFactory proxyFactory = new ProxyFactory();//創建代理工廠
        proxyFactory.setTarget(new UserServiceImpl());//射入目標類對象
        proxyFactory.addAdvice(new UserBeforeAdvice());//添加前置增強
        proxyFactory.addAdvice(new UserAfterAdvice());//添加后置增強
        IUserService userService = (IUserService) proxyFactory.getProxy();//從代理工廠獲取代理
        userService.queryAll();//調用代理的方法

        /**
         * 測試環繞增強
         */
        ProxyFactory proxyFactory2 = new ProxyFactory();//創建代理工廠
        proxyFactory2.setTarget(new UserServiceImpl());//射入目標類對象
        proxyFactory2.addAdvice(new UserAroundAdvice());//添加環繞增強
        IUserService userService2 = (IUserService) proxyFactory2.getProxy();//從代理工廠獲取代理
        userService2.queryAll();//調用代理的方法

    }
}
結果
Before
查詢全部用戶並返回
After
Before
查詢全部用戶並返回
After
聲明式(基於xml)
環繞增強 around advice
spring-aop.xml配置文件如下:
<?xml version="1.0" encoding="UTF-8"?>
<beans xmlns="http://www.springframework.org/schema/beans"
       xmlns:xsi="http://www.w3.org/2001/XMLSchema-instance"
       xmlns:context="http://www.springframework.org/schema/context"
       xsi:schemaLocation="http://www.springframework.org/schema/beans
      http://www.springframework.org/schema/beans/spring-beans.xsd
      http://www.springframework.org/schema/context
      http://www.springframework.org/schema/context/spring-context.xsd">

    <!--掃描指定包-->
    <context:component-scan base-package="com.liuermeng.aop"/>

    <!--配置代理-->
    <bean id="userServiceProxy" class="org.springframework.aop.framework.ProxyFactoryBean">
        <!--需要代理的接口-->
        <property name="interfaces" value="com.liuermeng.aop.service.IUserService"/>
        <!--接口實現類-->
        <property name="target" ref="userServiceImpl"/>
        <!--攔截器名稱(即增強類名稱)-->
        <property name="interceptorNames">
            <list>
                <value>userAroundAdvice</value>
            </list>
        </property>

    </bean>

</beans>
其他的代碼除了測試類以外與上面相同,另外在aroundAdvice類上面加上@Component標簽
測試環繞增強代碼:
import com.liuermeng.aop.service.IUserService;
import org.springframework.context.ApplicationContext;
import org.springframework.context.support.ClassPathXmlApplicationContext;

public class Test {

    public static void main(String[] args) {
        // 獲取spring context
        ApplicationContext applicationContext = new ClassPathXmlApplicationContext("aop2.xml");
        // 從context中獲取id為userServiceProxy的代理對象
        IUserService userServiceProxy = (IUserService) applicationContext.getBean("userServiceProxy");
        // 調用代理的方法
        userServiceProxy.queryAll();

    }
}
結果
Before
查詢全部用戶並返回
After
拋出增強 throws advice
拋出增強:實現ThrowsAdvice接口。當執行目標方法出現異常會執行拋出增強中的afterThrowing方法。
/**
 * 拋出增強
 */
@Component
public class UserThrowAdvice implements ThrowsAdvice {

    public void afterThrowing(Method method, Object[] args, Object target, Exception e) {
        System.out.println("Throw exception:");
        System.out.println("Target class name:" + target.getClass().getName());
        System.out.println("Method name: " + method.getName());
        System.out.println("Exception message:" + e.getMessage());
    }
}
.xml配置文件修改如下:
<?xml version="1.0" encoding="UTF-8"?>
<beans xmlns="http://www.springframework.org/schema/beans"
       xmlns:xsi="http://www.w3.org/2001/XMLSchema-instance"
       xmlns:context="http://www.springframework.org/schema/context"
       xsi:schemaLocation="http://www.springframework.org/schema/beans
      http://www.springframework.org/schema/beans/spring-beans.xsd
      http://www.springframework.org/schema/context
      http://www.springframework.org/schema/context/spring-context.xsd">

    <!--掃描指定包-->
    <context:component-scan base-package="com.liuermeng.aop"/>

    <!--配置代理-->
    <bean id="userServiceProxy" class="org.springframework.aop.framework.ProxyFactoryBean">
        <!--需要代理的接口-->
        <property name="interfaces" value="com.liuermeng.aop.service.IUserService"/>
        <!--接口實現類-->
        <property name="target" ref="userServiceImpl"/>
        <!--攔截器名稱(即增強類名稱)-->
        <property name="interceptorNames">
            <list>
<!--                <value>userAroundAdvice</value>-->
                <value>userThrowAdvice</value>
            </list>
        </property>

    </bean>

</beans>
測試代碼同上
結果
查詢全部用戶並返回
Throw exception:
Target class name:com.liuermeng.aop.service.impl.UserServiceImpl
Method name: queryAll
Exception message:Error哈哈哈哈
Exception in thread "main" java.lang.RuntimeException: Error哈哈哈哈
	at com.liuermeng.aop.service.impl.UserServiceImpl.queryAll(UserServiceImpl.java:10)
	at sun.reflect.NativeMethodAccessorImpl.invoke0(Native Method)
	at sun.reflect.NativeMethodAccessorImpl.invoke(NativeMethodAccessorImpl.java:62)
	at sun.reflect.DelegatingMethodAccessorImpl.invoke(DelegatingMethodAccessorImpl.java:43)
	at java.lang.reflect.Method.invoke(Method.java:498)
	at org.springframework.aop.support.AopUtils.invokeJoinpointUsingReflection(AopUtils.java:317)
	at org.springframework.aop.framework.ReflectiveMethodInvocation.invokeJoinpoint(ReflectiveMethodInvocation.java:190)
	at org.springframework.aop.framework.ReflectiveMethodInvocation.proceed(ReflectiveMethodInvocation.java:157)
	at org.springframework.aop.framework.adapter.ThrowsAdviceInterceptor.invoke(ThrowsAdviceInterceptor.java:125)
	at org.springframework.aop.framework.ReflectiveMethodInvocation.proceed(ReflectiveMethodInvocation.java:179)
	at org.springframework.aop.framework.JdkDynamicAopProxy.invoke(JdkDynamicAopProxy.java:207)
	at com.sun.proxy.$Proxy6.queryAll(Unknown Source)
	at com.liuermeng.aop.Test.main(Test.java:15)
切面 advisor
advisor(切面)封裝了advice(增強)和pointcut(切點)
在UserService接口中添加兩個方法query、save.
UserService代碼如下:
public interface IUserService {

    void queryAll();

    void query();

    void save();

}
UserServiceImpl代碼如下:
@Component

public class UserServiceImpl implements UserService {

    @Override

    public void queryAll() {

        System.out.println("查詢全部用戶並返回");

    }


    @Override

    public void query() {

        System.out.println("根據條件查詢用戶");

    }


    @Override

    public void save() {

        System.out.println("新增用戶");

    }


}
.xml配置文件如下:
<?xml version="1.0" encoding="UTF-8"?>
<beans xmlns="http://www.springframework.org/schema/beans"
       xmlns:xsi="http://www.w3.org/2001/XMLSchema-instance"
       xmlns:context="http://www.springframework.org/schema/context"
       xsi:schemaLocation="http://www.springframework.org/schema/beans
      http://www.springframework.org/schema/beans/spring-beans.xsd
      http://www.springframework.org/schema/context
      http://www.springframework.org/schema/context/spring-context.xsd">

    <!--掃描指定包-->
    <context:component-scan base-package="com.liuermeng.aop"/>

    <!-- 配置一個切面 -->
    <bean id="userServiceAdvisor" class="org.springframework.aop.support.RegexpMethodPointcutAdvisor">
        <!-- 增強 -->
        <property name="advice" ref="userAroundAdvice"/>
        <!-- 切點 -->
        <property name="pattern" value="com.liuermeng.aop.service.impl.UserServiceImpl.query.*"/>

    </bean>

    <!--配置代理-->
    <bean id="userServiceProxy" class="org.springframework.aop.framework.ProxyFactoryBean">
        <!--需要代理的接口-->
        <property name="interfaces" value="com.liuermeng.aop.service.IUserService"/>
        <!--接口實現類-->
        <property name="target" ref="userServiceImpl"/>
        <!-- qiemian -->
        <property name="interceptorNames" value="userServiceAdvisor"/>
        <!-- 代理目標類 -->
        <property name="proxyTargetClass" value="true"/>

    </bean>

</beans>
測試代碼:
public class Test {


    public static void main(String[] args) {

        // 獲取spring context

        ApplicationContext applicationContext = new ClassPathXmlApplicationContext("spring-aop.xml");

        // 從context中獲取id為userServiceProxy的代理對象

        UserService userServiceProxy = (UserService) applicationContext.getBean("userServiceProxy");

        // 調用代理的方法

        userServiceProxy.queryAll();

        userServiceProxy.query();

        userServiceProxy.save();


    }

}
結果如下:
Before
查詢全部用戶並返回
After
Before
根據條件查詢用戶
After
新增用戶
可以看出UserService中的queryAll、query方法被攔截,執行這兩個方法前后執行了環繞增強代碼。而save方法沒有被攔截。
基於Aspect Spring AOP開發
Spring AOP 與ApectJ 的目的一致,都是為了統一處理橫切業務,但與AspectJ不同的是,Spring AOP 並不嘗試提供完整的AOP功能(即使它完全可以實現),Spring AOP 更注重的是與Spring IOC容器的結合,並結合該優勢來解決橫切業務的問題,因此在AOP的功能完善方面,相對來說AspectJ具有更大的優勢,同時,Spring注意到AspectJ在AOP的實現方式上依賴於特殊編譯器(ajc編譯器),因此Spring很機智回避了這點,轉向采用動態代理技術的實現原理來構建Spring AOP的內部機制(動態織入),這是與AspectJ(靜態織入)最根本的區別。在AspectJ 1.5后,引入@Aspect形式的注解風格的開發,Spring也非常快地跟進了這種方式,因此Spring 2.0后便使用了與AspectJ一樣的注解。請注意,Spring 只是使用了與 AspectJ 5 一樣的注解,但仍然沒有使用 AspectJ 的編譯器,底層依是動態代理技術的實現,因此並不依賴於 AspectJ 的編譯器。下面我們先通過一個簡單的案例來演示Spring AOP的入門程序
基於注解
簡單案例
pom中增加了Spring與junit相關的依賴
aspect注解定義的切面類UserAdvisor
import org.aspectj.lang.ProceedingJoinPoint;
import org.aspectj.lang.annotation.*;
import org.springframework.stereotype.Component;

@Component
@Aspect
public class UserAdvisor {
    /**
     * 環繞通知
     * @param joinPoint 可用於執行切點的類
     * @return
     * @throws Throwable
     */
    @Around("execution(* com.liuermeng.aop.service.impl.UserServiceImpl.*(..))")
    public Object arount(ProceedingJoinPoint joinPoint) throws Throwable {
        System.out.println("環繞通知前....");
        Object obj= (Object) joinPoint.proceed();
        System.out.println("環繞通知后....");
        return obj;
    }

    /**
     * 前置通知
     */
    @Before("execution(* com.liuermeng.aop.service.impl.UserServiceImpl.*(..))")
    public void before() {
        System.out.println("前置通知");
    }

    /**
     * 后置通知
     * @param returnVal
     */
    @AfterReturning(value = "execution(* com.liuermeng.aop.service.impl.UserServiceImpl.*(..))",returning = "returnVal")
    public void adterReturn(Object returnVal){
        System.out.println("后置通知...."+returnVal);
    }

    /**
     * 最終通知
     */
    @After("execution(* com.liuermeng.aop.service.impl.UserServiceImpl.*(..))")
    public void after() {
        System.out.println("最終通知");
    }
    /**
     * 拋出通知
     * @param e
     */
    @AfterThrowing(value="execution(* com.liuermeng.aop.service.impl.UserServiceImpl.*(..))",throwing = "e")
    public void afterThrowable(Throwable e){
        System.out.println("出現異常:msg="+e.getMessage());
    }

}
IUserService
public interface IUserService {
    int queryAll();
    void query();

    void save();
}
實現類
import com.liuermeng.aop.service.IUserService;
import org.springframework.stereotype.Service;

@Service
public class UserServiceImpl implements IUserService {
    public int queryAll() {
        System.out.println("查詢全部用戶並返回");
//        throw new RuntimeException("Error哈哈哈哈");
        return 666;
    }
    public void query() {

        System.out.println("根據條件查詢用戶");

    }

    public void save() {

        System.out.println("新增用戶");

    }
}
配置文件.xml
<?xml version="1.0" encoding="UTF-8"?>
<beans xmlns="http://www.springframework.org/schema/beans"
       xmlns:xsi="http://www.w3.org/2001/XMLSchema-instance"
       xmlns:context="http://www.springframework.org/schema/context"
       xmlns:aop="http://www.springframework.org/schema/aop"
       xsi:schemaLocation="http://www.springframework.org/schema/beans
      http://www.springframework.org/schema/beans/spring-beans.xsd
      http://www.springframework.org/schema/context
      http://www.springframework.org/schema/context/spring-context.xsd http://www.springframework.org/schema/aop http://www.springframework.org/schema/aop/spring-aop.xsd">
    <context:component-scan base-package="com.liuermeng.aop"/>
    <!-- 啟動@aspectj的自動代理支持-->
    <aop:aspectj-autoproxy />
</beans>
測試類
import com.liuermeng.aop.service.IUserService;
import org.junit.runner.RunWith;
import org.springframework.beans.factory.annotation.Autowired;
import org.springframework.test.context.ContextConfiguration;
import org.springframework.test.context.junit4.SpringJUnit4ClassRunner;

@RunWith(SpringJUnit4ClassRunner.class)
@ContextConfiguration(locations= "classpath:aop3.xml")
public class Test {
    @Autowired
    IUserService userService ;
    @org.junit.Test
    public void test(){
        userService.queryAll();

    }
}
結果
環繞通知前....
前置通知
查詢全部用戶並返回
環繞通知后....
最終通知
后置通知....666
利用Spring2.0引入的aspect注解開發功能定義aspect類即UserAdvisor,在該aspect類中,編寫了5種注解類型的通知函數,分別是前置通知@Before、后置通知@AfterReturning、環繞通知@Around、異常通知@AfterThrowing、最終通知@After,這5種通知與AspectJ的通知類型幾乎是一樣的,並在注解通知上使用execution關鍵字定義的切點表達式,即指明該通知要應用的目標函數,當只有一個execution參數時,value屬性可以省略,當含兩個以上的參數,value必須注明,如存在返回值時。當然除了把切點表達式直接傳遞給通知注解類型外,還可以使用@pointcut來定義切點匹配表達式,這個與AspectJ使用關鍵字pointcut是一樣的,后面分析。目標類和aspect類定義完成后,最后需要在xml配置文件中進行配置,注意,使用Spring AOP 的aspectJ功能時,需要使用以下代碼啟動aspect的注解功能支持:
<aop:aspectj-autoproxy />
定義切入點表達式
在上面的案例中是采用直接在注解中使用“execution”定義表達式作為值傳遞給通知類型的,如下:
 /**
     * 前置通知
     */
    @Before("execution(* com.liuermeng.aop.service.impl.UserServiceImpl.*(..))")
    public void before() {
        System.out.println("前置通知");
    }
除了上述方式外,還可采用與ApectJ中使用pointcut關鍵字類似的方式定義切入點表達式如下,使用@Pointcut注解:
/**
 * 使用Pointcut定義切點
 */
@Pointcut("execution(* com.liuermeng.aop.service.impl.UserServiceImpl.*(..))")
public void myPointcut(){}
 /**
  * 前置通知
  */
@Before("myPointcut()")
public void before() {
    System.out.println("前置通知");
}
切入點指示符
為了方法通知應用到相應過濾的目標方法上,SpringAOP提供了匹配表達式,這些表達式也叫切入點指示符,在前面的案例中,它們已多次出現。
通配符
在定義匹配表達式時,通配符幾乎隨處可見,如*、.. 、+ ,它們的含義如下:
.. :匹配方法定義中的任意數量的參數,此外還匹配類定義中的任意數量包
//任意返回值,任意名稱,任意參數的公共方法
execution(public * *(..))
//匹配com.zejian.dao包及其子包中所有類中的所有方法
within(com.zejian.dao..*)
+ :匹配給定類的任意子類
//匹配實現了DaoUser接口的所有子類的方法
within(com.zejian.dao.DaoUser+)
* :匹配任意數量的字符
//匹配com.zejian.service包及其子包中所有類的所有方法
within(com.zejian.service..*)
//匹配以set開頭,參數為int類型,任意返回值的方法
execution(* set*(int))
類型簽名表達式
為了方便類型(如接口、類名、包名)過濾方法,Spring AOP 提供了within關鍵字。其語法格式如下:
within(<type name>)
type name 則使用包名或者類名替換即可,來點案例吧。
//匹配com.zejian.dao包及其子包中所有類中的所有方法
@Pointcut("within(com.zejian.dao..*)")

//匹配UserDaoImpl類中所有方法
@Pointcut("within(com.zejian.dao.UserDaoImpl)")

//匹配UserDaoImpl類及其子類中所有方法
@Pointcut("within(com.zejian.dao.UserDaoImpl+)")

//匹配所有實現UserDao接口的類的所有方法
@Pointcut("within(com.zejian.dao.UserDao+)")
方法簽名表達式
如果想根據方法簽名進行過濾,關鍵字execution可以幫到我們,語法表達式如下
//scope :方法作用域,如public,private,protect
//returnt-type:方法返回值類型
//fully-qualified-class-name:方法所在類的完全限定名稱
//parameters 方法參數
execution(<scope> <return-type> <fully-qualified-class-name>.*(parameters))
對於給定的作用域、返回值類型、完全限定類名以及參數匹配的方法將會應用切點函數指定的通知,這里給出模型案例:
//匹配UserDaoImpl類中的所有方法
@Pointcut("execution(* com.zejian.dao.UserDaoImpl.*(..))")

//匹配UserDaoImpl類中的所有公共的方法
@Pointcut("execution(public * com.zejian.dao.UserDaoImpl.*(..))")

//匹配UserDaoImpl類中的所有公共方法並且返回值為int類型
@Pointcut("execution(public int com.zejian.dao.UserDaoImpl.*(..))")

//匹配UserDaoImpl類中第一個參數為int類型的所有公共的方法
@Pointcut("execution(public * com.zejian.dao.UserDaoImpl.*(int , ..))")
其他指示符
bean:Spring AOP擴展的,AspectJ沒有對於指示符,用於匹配特定名稱的Bean對象的執行方法;
//匹配名稱中帶有后綴Service的Bean。
@Pointcut("bean(*Service)")
private void myPointcut1(){}
this :用於匹配當前AOP代理對象類型的執行方法;請注意是AOP代理對象的類型匹配,這樣就可能包括引入接口也類型匹配
//匹配了任意實現了UserDao接口的代理對象的方法進行過濾
@Pointcut("this(com.zejian.spring.springAop.dao.UserDao)")
private void myPointcut2(){}
target :用於匹配當前目標對象類型的執行方法;
//匹配了任意實現了UserDao接口的目標對象的方法進行過濾
@Pointcut("target(com.zejian.spring.springAop.dao.UserDao)")
private void myPointcut3(){}
@within:用於匹配所以持有指定注解類型內的方法;請注意與within是有區別的, within是用於匹配指定類型內的方法執行;
//匹配使用了MarkerAnnotation注解的類(注意是類)
@Pointcut("@within(com.zejian.spring.annotation.MarkerAnnotation)")
private void myPointcut4(){}
@annotation(com.zejian.spring.MarkerMethodAnnotation) : 根據所應用的注解進行方法過濾
//匹配使用了MarkerAnnotation注解的方法(注意是方法)
@Pointcut("@annotation(com.zejian.spring.annotation.MarkerAnnotation)")
private void myPointcut5(){}
ok~,關於表達式指示符就介紹到這,我們主要關心前面幾個常用的即可,不常用過印象即可。這里最后說明一點,切點指示符可以使用運算符語法進行表達式的混編,如and、or、not(或者&&、||、!),如下一個簡單例子:
//匹配了任意實現了UserDao接口的目標對象的方法並且該接口不在com.zejian.dao包及其子包下
@Pointcut("target(com.zejian.spring.springAop.dao.UserDao) !within(com.zejian.dao..*)")
private void myPointcut6(){}
//匹配了任意實現了UserDao接口的目標對象的方法並且該方法名稱為addUser
@Pointcut("target(com.zejian.spring.springAop.dao.UserDao)&&execution(* com.zejian.spring.springAop.dao.UserDao.addUser(..))")
private void myPointcut7(){}
通知函數以及傳遞參數
在Spring中與AspectJ一樣,通知主要分5種類型,分別是前置通知、后置通知、異常通知、最終通知以及環繞通知,下面分別介紹。
-
前置通知@Before
前置通知通過@Before注解進行標注,並可直接傳入切點表達式的值,該通知在目標函數執行前執行,注意JoinPoint,是Spring提供的靜態變量,通過joinPoint 參數,可以獲取目標對象的信息,如類名稱,方法參數,方法名稱等,該參數是可選的。
/**
 * 前置通知
 */
@Before("myPointcut()")
public void before(JoinPoint joinPoint) {
    System.out.println("前置通知");
}
-
后置通知@AfterReturning
通過@AfterReturning注解進行標注,該函數在目標函數執行完成后執行,並可以獲取到目標函數最終的返回值returnVal,當目標函數沒有返回值時,returnVal將返回null,必須通過returning = “returnVal”注明參數的名稱而且必須與通知函數的參數名稱相同。請注意,在任何通知中這些參數都是可選的,需要使用時直接填寫即可,不需要使用時,可以完成不用聲明出來。如下
/**
* 后置通知,不需要參數時可以不提供
*/
@AfterReturning("myPointcut()")
public void AfterReturning(){
   System.out.println("我是后置通知...");
}
/**
* 后置通知
* returnVal,切點方法執行后的返回值
*/
@AfterReturning(value="myPointcut()",returning = "returnVal")
public void AfterReturning(JoinPoint joinPoint,Object returnVal){
   System.out.println("我是后置通知...returnVal+"+returnVal);
}
-
異常通知 @AfterThrowing
該通知只有在異常時才會被觸發,並由throwing來聲明一個接收異常信息的變量,同樣異常通知也用於Joinpoint參數,需要時加上即可,如下:
/**
* 拋出通知
* @param e 拋出異常的信息
*/
@AfterThrowing(value="myPointcut()",throwing = "e")
public void afterThrowable(Throwable e){
  System.out.println("出現異常:msg="+e.getMessage());
}
-
最終通知 @After
該通知有點類似於finally代碼塊,只要應用了無論什么情況下都會執行。
/**
 * 無論什么情況下都會執行的方法
 * joinPoint 參數
 */
@After("myPointcut()")
public void after(JoinPoint joinPoint) {
    System.out.println("最終通知....");
}
-
環繞通知@Around
環繞通知既可以在目標方法前執行也可在目標方法之后執行,更重要的是環繞通知可以控制目標方法是否執行,但即使如此,我們應該盡量以最簡單的方式滿足需求,在僅需在目標方法前執行時,應該采用前置通知而非環繞通知。案例代碼如下第一個參數必須是ProceedingJoinPoint,通過該對象的proceed()方法來執行目標函數,proceed()的返回值就是環繞通知的返回值。同樣的,ProceedingJoinPoint對象也是可以獲取目標對象的信息,如類名稱,方法參數,方法名稱等等。
@Around("myPointcut()")
public Object around(ProceedingJoinPoint joinPoint) throws Throwable {
    System.out.println("我是環繞通知前....");
    //執行目標函數
    Object obj= (Object) joinPoint.proceed();
    System.out.println("我是環繞通知后....");
    return obj;
}
通知傳遞參數
在Spring AOP中,除了execution和bean指示符不能傳遞參數給通知方法,其他指示符都可以將匹配的方法相應參數或對象自動傳遞給通知方法。獲取到匹配的方法參數后通過”argNames”屬性指定參數名。如下,需要注意的是args(指示符)、argNames的參數名與before()方法中參數名 必須保持一致即param。
@Before(value="args(param)", argNames="param") //明確指定了
public void before(int param) {
    System.out.println("param:" + param);
}
當然也可以直接使用args指示符不帶argNames聲明參數,如下:
@Before("execution(public * com.zejian..*.addUser(..)) && args(userId,..)")
public void before(int userId) {
    //調用addUser的方法時如果與addUser的參數匹配則會傳遞進來會傳遞進來
    System.out.println("userId:" + userId);
}
args(userId,..)該表達式會保證只匹配那些至少接收一個參數而且傳入的類型必須與userId一致的方法,記住傳遞的參數可以簡單類型或者對象,而且只有參數和目標方法也匹配時才有會有值傳遞進來。
Aspect優先級
在不同的切面中,如果有多個通知需要在同一個切點函數指定的過濾目標方法上執行,那些在目標方法前執行(”進入”)的通知函數,最高優先級的通知將會先執行,在執行在目標方法后執行(“退出”)的通知函數,最高優先級會最后執行。而對於在同一個切面定義的通知函數將會根據在類中的聲明順序執行。如下:
import org.aspectj.lang.JoinPoint;
import org.aspectj.lang.annotation.AfterReturning;
import org.aspectj.lang.annotation.Aspect;
import org.aspectj.lang.annotation.Before;
import org.aspectj.lang.annotation.Pointcut;
import org.springframework.stereotype.Component;

@Aspect
@Component
public class AspectOne {
    /**
     * 使用Pointcut定義切點
     */
    @Pointcut("execution(* com.liuermeng.aop.service.impl.UserServiceImpl.*(..))")
    public void myPointcut(){}
    /**
     * 前置通知
     */
    @Before("myPointcut()")
    public void beforeone(JoinPoint joinPoint) {
        System.out.println("前置通知1......");
    }
    @Before("myPointcut()")
    public void beforetwo(JoinPoint joinPoint) {
        System.out.println("前置通知2......");
    }

    /**
     * 后置通知
     * @param
     */
    @AfterReturning(value = "myPointcut()")
    public void adterReturnthree(){
        System.out.println("后置通知3....");
    }
    @AfterReturning(value = "myPointcut()")
    public void adterReturnfour(){
        System.out.println("后置通知4....");
    }
}
結果
前置通知1......
前置通知2......
查詢全部用戶並返回
后置通知4....
后置通知3....
如果在不同的切面中定義多個通知響應同一個切點,進入時則優先級高的切面類中的通知函數優先執行,退出時則最后執行,如下定義AspectOne類和AspectTwo類並實現org.springframework.core.Ordered 接口,該接口用於控制切面類的優先級,同時重寫getOrder方法,定制返回值,返回值(int 類型)越小優先級越大。其中AspectOne返回值為0,AspectTwo的返回值為3,顯然AspectOne優先級高於AspectTwo。
package com.liuermeng.aop.advisor;

import org.aspectj.lang.JoinPoint;
import org.aspectj.lang.annotation.AfterReturning;
import org.aspectj.lang.annotation.Aspect;
import org.aspectj.lang.annotation.Before;
import org.aspectj.lang.annotation.Pointcut;
import org.springframework.core.Ordered;
import org.springframework.stereotype.Component;

@Aspect
@Component
public class AspectOne implements Ordered {
    /**
     * 使用Pointcut定義切點
     */
    @Pointcut("execution(* com.liuermeng.aop.service.impl.UserServiceImpl.*(..))")
    public void myPointcut(){}
    /**
     * 前置通知
     */
    @Before("myPointcut()")
    public void beforeone(JoinPoint joinPoint) {
        System.out.println("AspectOne前置通知1......");
    }
    @Before("myPointcut()")
    public void beforetwo(JoinPoint joinPoint) {
        System.out.println("AspectOne前置通知2......");
    }

    /**
     * 后置通知
     * @param
     */
    @AfterReturning(value = "myPointcut()")
    public void adterReturnthree(){
        System.out.println("AspectOne后置通知3....");
    }
    @AfterReturning(value = "myPointcut()")
    public void adterReturnfour(){
        System.out.println("AspectOne后置通知4....");
    }

    public int getOrder() {
        return 0;
    }
}
package com.liuermeng.aop.advisor;

import org.aspectj.lang.JoinPoint;
import org.aspectj.lang.annotation.AfterReturning;
import org.aspectj.lang.annotation.Aspect;
import org.aspectj.lang.annotation.Before;
import org.aspectj.lang.annotation.Pointcut;
import org.springframework.stereotype.Component;

@Aspect
@Component
public class AspectTow {
    /**
     * 使用Pointcut定義切點
     */
    @Pointcut("execution(* com.liuermeng.aop.service.impl.UserServiceImpl.*(..))")
    public void myPointcut(){}
    /**
     * 前置通知
     */
    @Before("myPointcut()")
    public void beforeone(JoinPoint joinPoint) {
        System.out.println("AspectTwo前置通知1......");
    }
    @Before("myPointcut()")
    public void beforetwo(JoinPoint joinPoint) {
        System.out.println("AspectTwo前置通知2......");
    }

    /**
     * 后置通知
     * @param
     */
    @AfterReturning(value = "myPointcut()")
    public void adterReturnthree(){
        System.out.println("AspectTwo后置通知3....");
    }
    @AfterReturning(value = "myPointcut()")
    public void adterReturnfour(){
        System.out.println("AspectTwo后置通知4....");
    }

    public int getOrder() {
        return 3;
    }
}
結果
AspectOne前置通知1......
AspectOne前置通知2......
AspectTwo前置通知1......
AspectTwo前置通知2......
查詢全部用戶並返回
AspectTwo后置通知4....
AspectTwo后置通知3....
AspectOne后置通知4....
AspectOne后置通知3....
基於XML
前面分析完基於注解支持的開發是日常應用中最常見的,即使如此我們還是有必要了解一下基於xml形式的Spring AOP開發,這里會以一個案例的形式對xml的開發形式進行簡要分析,定義一個切面類
package com.liuermeng.aop.advisor;

import org.aspectj.lang.ProceedingJoinPoint;

public class XmlAspect {
    public void before(){
        System.out.println("MyAspectXML====前置通知");
    }

    public void afterReturn(Object returnVal){
        System.out.println("后置通知-->返回值:"+returnVal);
    }

    public Object around(ProceedingJoinPoint joinPoint) throws Throwable {
        System.out.println("MyAspectXML=====環繞通知前");
        Object object= joinPoint.proceed();
        System.out.println("MyAspectXML=====環繞通知后");
        return object;
    }

    public void afterThrowing(Throwable throwable){
        System.out.println("MyAspectXML======異常通知:"+ throwable.getMessage());
    }

    public void after(){
        System.out.println("MyAspectXML=====最終通知..來了");
    }

}
.xml
<beans xmlns="http://www.springframework.org/schema/beans"
       xmlns:xsi="http://www.w3.org/2001/XMLSchema-instance"
       xmlns:aop="http://www.springframework.org/schema/aop"
       xmlns:context="http://www.springframework.org/schema/context"
       xsi:schemaLocation="http://www.springframework.org/schema/beans http://www.springframework.org/schema/beans/spring-beans.xsd
        http://www.springframework.org/schema/aop
        http://www.springframework.org/schema/aop/spring-aop.xsd http://www.springframework.org/schema/context http://www.springframework.org/schema/context/spring-context.xsd">
    <bean name="userService" class="com.liuermeng.aop.service.impl.UserServiceImpl"/>
    <!-- 定義切面 -->
    <bean name="xmlAspect" class="com.liuermeng.aop.advisor.XmlAspect"/>
    <!-- 配置AOP切面 -->
    <aop:config>
        <!-- 定義切點函數 -->
        <aop:pointcut id="pointCut" expression="execution(* com.liuermeng.aop.service.impl.UserServiceImpl.*(..))"/>
        <!-- 定義其他切點函數 -->
        <aop:pointcut id="pointCutSave" expression="execution(* com.liuermeng.aop.service.impl.UserServiceImpl.save(..))"/>
        <!-- 定義通知 order 定義優先級,值越小優先級越大-->
        <aop:aspect ref="xmlAspect" order="0">
            <!-- 定義通知
            method 指定通知方法名,必須與MyAspectXML中的相同
            pointcut 指定切點函數
            -->
            <aop:before method="before" pointcut-ref="pointCut"/>
            <!-- 后置通知  returning="returnVal" 定義返回值 必須與類中聲明的名稱一樣-->
            <aop:after-returning method="afterReturn" pointcut-ref="pointCut"  returning="returnVal" />
            <!-- 環繞通知 -->
            <aop:around method="around" pointcut-ref="pointCut"  />
            <!--異常通知 throwing="throwable" 指定異常通知錯誤信息變量,必須與類中聲明的名稱一樣-->
            <aop:after-throwing method="afterThrowing" pointcut-ref="pointCut" throwing="throwable"/>
            <!--
                 method : 通知的方法(最終通知)
                 pointcut-ref : 通知應用到的切點方法
                -->
            <aop:after method="after" pointcut-ref="pointCut"/>
        </aop:aspect>
    </aop:config>

</beans>
Test
import com.liuermeng.aop.service.IUserService;
import org.junit.runner.RunWith;
import org.springframework.beans.factory.annotation.Autowired;
import org.springframework.test.context.ContextConfiguration;
import org.springframework.test.context.junit4.SpringJUnit4ClassRunner;

@RunWith(SpringJUnit4ClassRunner.class)
@ContextConfiguration(locations= "classpath:aop.xml")
public class Test {
    @Autowired
    IUserService userService ;
    @org.junit.Test
    public void test(){
        userService.queryAll();

    }
}
結果
MyAspectXML====前置通知
MyAspectXML=====環繞通知前
查詢全部用戶並返回
MyAspectXML=====最終通知..來了
MyAspectXML=====環繞通知后
后置通知-->返回值:666
需要注意的是最終通知和后置通知的位置
簡單應用
模擬性能監控,計算方法執行耗時。
package com.liuermeng.aop.advisor;

import org.aspectj.lang.ProceedingJoinPoint;
import org.aspectj.lang.annotation.Around;
import org.aspectj.lang.annotation.Aspect;
import org.springframework.stereotype.Component;
/**
 * 性能監控切面
 */
@Aspect
@Component
public class MonitorAspect {
    @Around("execution(* com.liuermeng.aop.service.impl.UserServiceImpl.*(..))")
    public Object arount(ProceedingJoinPoint pjp) throws Throwable{
        // 目標類名稱
        String clazzName = pjp.getTarget().getClass().getName();
        // 目標類方法名稱
        String methodName = pjp.getSignature().getName();
        // 計時並調用目標函數
        long start = System.currentTimeMillis();
        Object result = pjp.proceed();
        long time = System.currentTimeMillis() - start;

        System.out.println("執行" + clazzName + "." + methodName + "方法耗時" + time + "毫秒");
        // 可在此處將監控信息存儲
        return result;
    }
}
package com.liuermeng.aop.service;

public interface IUserService {
    int queryAll();
    void query();
    void save();
}
package com.liuermeng.aop.service.impl;

import com.liuermeng.aop.service.IUserService;
import org.springframework.stereotype.Service;

@Service
public class UserServiceImpl implements IUserService {
    public int queryAll() {
        System.out.println("查詢全部用戶並返回");
//        throw new RuntimeException("Error哈哈哈哈");
        return 666;
    }
    public void query() {

        System.out.println("根據條件查詢用戶");

    }

    public void save() {

        System.out.println("新增用戶");

    }
}
.xml
<?xml version="1.0" encoding="UTF-8"?>
<beans xmlns="http://www.springframework.org/schema/beans"
       xmlns:xsi="http://www.w3.org/2001/XMLSchema-instance"
       xmlns:context="http://www.springframework.org/schema/context"
       xmlns:aop="http://www.springframework.org/schema/aop"
       xsi:schemaLocation="http://www.springframework.org/schema/beans
      http://www.springframework.org/schema/beans/spring-beans.xsd
      http://www.springframework.org/schema/context
      http://www.springframework.org/schema/context/spring-context.xsd
      http://www.springframework.org/schema/aop
      http://www.springframework.org/schema/aop/spring-aop.xsd">
    <!-- 掃描指定包 -->
    <context:component-scan base-package="com.liuermeng.aop"/>
    <!--默認為false,使用JDK動態代理 設置為true,啟用cglib動態代理-->
    <aop:aspectj-autoproxy proxy-target-class="true"/>
</beans>
測試
package com.liuermeng.aop.test;

import com.liuermeng.aop.service.IUserService;
import org.junit.runner.RunWith;
import org.springframework.beans.factory.annotation.Autowired;
import org.springframework.test.context.ContextConfiguration;
import org.springframework.test.context.junit4.SpringJUnit4ClassRunner;

@RunWith(SpringJUnit4ClassRunner.class)
@ContextConfiguration(locations = "classpath:aop.xml")
public class Test {
    @Autowired
    IUserService userService;//
    @org.junit.Test
    public void test(){
        userService.queryAll();
        userService.query();
        userService.save();
    }
}
注意:由於開啟了cglib動態代理,在測試類中可以不注入IUserService,而選擇直接注入UserServiceImpl,UserServiceImpl也可以不用實現接口IUserService
Spring AOP實現原理概要
前面的分析中,我們談到Spring AOP的實現原理是基於動態織入的動態代理技術,而AspectJ則是靜態織入,而動態代理技術又分為Java JDK動態代理和CGLIB動態代理,前者是基於反射技術的實現,后者是基於繼承的機制實現,下面通過一個簡單的例子來分析這兩種技術的代碼實現。
JDK動態代理
先看一個簡單的例子,聲明一個A類並實現ExInterface接口,利用JDK動態代理技術在execute()執行前后織入權限驗證和日志記錄,注意這里僅是演示代碼並不代表實際應用。
//自定義的接口類,JDK動態代理的實現必須有對應的接口類
public interface ExInterface {
    void execute();
}
//A類,實現了ExInterface接口類
public class A implements ExInterface {
    @Override
    public void execute() {
        System.out.println("執行A的execute方法...");
    }
}
package com.liuermeng.proxy.aop;

import java.lang.reflect.InvocationHandler;
import java.lang.reflect.Method;
import java.lang.reflect.Proxy;

//代理類的實現
public class JDKProxy implements InvocationHandler {
    /**
     * 要被代理的目標對象
     */
    private A target;
    public JDKProxy(A target){
        this.target=target;
    }
    /**
     * 創建代理類
     * @return
     */
    /**
     * 參數含義:
     * ClassLoader:和被代理對象使用相同的類加載器。
     * Interfaces:和被代理對象具有相同的行為。實現相同的接口。
     * InvocationHandler:如何代理。
     */
    public ExInterface createProxy(){
        return (ExInterface) Proxy.newProxyInstance(target.getClass().getClassLoader(),target.getClass().getInterfaces(),this);
    }
    /**
     * 調用被代理類(目標對象)的任意方法都會觸發invoke方法
     * @param proxy 代理類
     * @param method 被代理類的方法
     * @param args 被代理類的方法參數
     * @return
     * @throws Throwable
     */
    @Override
    public Object invoke(Object proxy, Method method, Object[] args) throws Throwable {
        //過濾不需要該業務的方法
        if("execute".equals(method.getName())) {
            //調用前驗證權限
            AuthCheck.authCheck();
            //調用目標對象的方法
            Object result = method.invoke(target, args);
            //記錄日志數據
            Report.recordLog();
            return result;
        }else if("delete".equals(method.getName())){
            //.....
        }
        //如果不需要增強直接執行原方法
        return method.invoke(target,args);
    }

    //測試驗證
    public static void main(String args[]){
        A a=new A();
        //創建JDK代理
        JDKProxy jdkProxy=new JDKProxy(a);
        //創建代理對象
        ExInterface proxy=jdkProxy.createProxy();
        //執行代理對象方法
        proxy.execute();
    }


}
結果
AuthCheck權限驗證
執行A的execute方法...
Report記錄日志並上傳
在A的execute方法里面並沒有調用任何權限和日志的代碼,也沒有直接操作a對象,相反地只是調用了proxy代理對象的方法,最終結果卻是預期的,這就是動態代理技術,是不是跟Spring AOP似曾相識?實際上動態代理的底層是通過反射技術來實現,只要拿到A類的class文件和A類的實現接口,很自然就可以生成相同接口的代理類並調用a對象的方法了,關於底層反射技術的實現,暫且不過多討論,請注意實現java的動態代理是有先決條件的,該條件是目標對象必須帶接口,如A類的接口是ExInterface,通過ExInterface接口動態代理技術便可以創建與A類類型相同的代理對象,如下代碼演示了創建並調用時利用多態生成的proxy對象:
A a=new A();
 //創建JDK代理類
 JDKProxy jdkProxy=new JDKProxy(a);
 //創建代理對象,代理對象也實現了ExInterface,通過Proxy實現
 ExInterface proxy=jdkProxy.createProxy();
 //執行代理對象方法
 proxy.execute();
代理對象的創建是通過Proxy類達到的,Proxy類由Java JDK提供,利用Proxy#newProxyInstance方法便可以動態生成代理對象(proxy),底層通過反射實現的,該方法需要3個參數
/**

* @param loader 類加載器,一般傳遞目標對象(A類即被代理的對象)的類加載器
* @param interfaces 目標對象(A)的實現接口
* @param h 回調處理句柄(后面會分析到)
  */
  public static Object newProxyInstance(ClassLoader loader,Class<?>[] interfaces,InvocationHandler h)
創建代理類proxy的代碼如下:
public ExInterface createProxy(){
   return (ExInterface) Proxy.newProxyInstance(target.getClass().getClassLoader(),target.getClass().getInterfaces(),this);
    }
到此並沒結束,因為有接口還是遠遠不夠,代理類(Demo中的JDKProxy)還需要實現InvocationHandler接口,也是由JDK提供,代理類必須實現的並重寫invoke方法,完全可以把InvocationHandler看成一個回調函數(Callback),Proxy方法創建代理對象proxy后,當調用execute方法(代理對象也實現ExInterface)時,將會回調InvocationHandler#invoke方法,因此我們可以在invoke方法中來控制被代理對象(目標對象)的方法執行,從而在該方法前后動態增加其他需要執行的業務,Demo中的代碼很好體現了這點:
@Override
public Object invoke(Object proxy, Method method, Object[] args) throws Throwable {
    //過濾不需要該業務的方法
    if("execute".equals(method.getName())) {
        //調用前驗證權限(動態添加其他要執行業務)
        AuthCheck.authCheck();

      //調用目標對象的方法(執行A對象即被代理對象的execute方法)
      Object result = method.invoke(target, args);

      //記錄日志數據(動態添加其他要執行業務)
      Report.recordLog();

      return result;
}eles if("delete".equals(method.getName())){
 //.....
 	return method.invoke(target, args);
}
//如果不需要增強直接執行原方法
	return method.invoke(target,args);
}
invoke方法有三個參數:
- Object proxy :生成的代理對象
- Method method:目標對象的方法,通過反射調用
- Object[] args:目標對象方法的參數
這就是Java JDK動態代理的代碼實現過程,小結一下,運用JDK動態代理,被代理類(目標對象,如A類),必須已有實現接口如(ExInterface),因為JDK提供的Proxy類將通過目標對象的類加載器ClassLoader和Interface,以及句柄(Callback)創建與A類擁有相同接口的代理對象proxy,該代理對象將擁有接口ExInterface中的所有方法,同時代理類必須實現一個類似回調函數的InvocationHandler接口並重寫該接口中的invoke方法,當調用proxy的每個方法(如案例中的proxy#execute())時,invoke方法將被調用,利用該特性,可以在invoke方法中對目標對象(被代理對象如A)方法執行的前后動態添加其他外圍業務操作,此時無需觸及目標對象的任何代碼,也就實現了外圍業務的操作與目標對象(被代理對象如A)完全解耦合的目的。當然缺點也很明顯需要擁有接口,這也就有了后來的CGLIB動態代理了
CGLIB動態代理
通過CGLIB動態代理實現上述功能並不要求目標對象擁有接口類,實際上CGLIB動態代理是通過繼承的方式實現的,因此可以減少沒必要的接口,下面直接通過簡單案例協助理解(CGLIB是一個開源項目,github網址是:https://github.com/cglib/cglib)。
先引入maven依賴
<dependency>
   <groupId>cglib</groupId>
   <artifactId>cglib</artifactId>
   <version>3.2.0</version>
</dependency>
//被代理的類即目標對象
public class A {
    public void execute(){
        System.out.println("執行A的execute方法...");
    }
}
package cglib1;


import net.sf.cglib.proxy.Enhancer;
import net.sf.cglib.proxy.MethodInterceptor;
import net.sf.cglib.proxy.MethodProxy;

import java.lang.reflect.Method;

//代理類
public class CGLibProxy implements MethodInterceptor {

    /**
     * 被代理的目標類
     */
    private A target;

    public CGLibProxy(A target) {
        super();
        this.target = target;
    }

    /**
     * 創建代理對象
     * @return
     */
    public A createProxy(){
        // 使用CGLIB生成代理:
        // 1.聲明增強類實例,用於生產代理類
        Enhancer enhancer = new Enhancer();
        // 2.設置被代理類字節碼,CGLIB根據字節碼生成被代理類的子類
        enhancer.setSuperclass(target.getClass());
        // 3.設置回調函數,即一個方法攔截
        enhancer.setCallback(this);
        // 4.創建代理:
        return (A) enhancer.create();
    }

    /**
     * 回調函數
     * @param proxy 代理對象
     * @param method 委托類方法
     * @param args 方法參數
     * @param methodProxy 每個被代理的方法都對應一個MethodProxy對象,
     *                    methodProxy.invokeSuper方法最終調用委托類(目標類)的原始方法
     * @return
     * @throws Throwable
     */

    public Object intercept(Object proxy, Method method, Object[] args, MethodProxy methodProxy) throws Throwable {
        //過濾不需要該業務的方法
        if("execute".equals(method.getName())) {
            //調用前驗證權限(動態添加其他要執行業務)
            AuthCheck.authCheck();

            //調用目標對象的方法(執行A對象即被代理對象的execute方法)
            Object result = methodProxy.invokeSuper(proxy, args);

            //記錄日志數據(動態添加其他要執行業務)
            Report.recordLog();

            return result;
        }else if("delete".equals(method.getName())){
            //.....
            return methodProxy.invokeSuper(proxy, args);
        }
        //如果不需要增強直接執行原方法
        return methodProxy.invokeSuper(proxy, args);

    }


    public static void main(String[] args) {
        A a=new A();
        CGLibProxy proxy=new CGLibProxy(a);
        A proxy1 = proxy.createProxy();
        proxy1.execute();
    }
}
結果
AuthCheck權限驗證
執行A的execute方法...
Report記錄日志並上傳
從代碼看被代理的類無需接口即可實現動態代理,而CGLibProxy代理類需要實現一個方法攔截器接口MethodInterceptor並重寫intercept方法,類似JDK動態代理的InvocationHandler接口,也是理解為回調函數,同理每次調用代理對象的方法時,intercept方法都會被調用,利用該方法便可以在運行時對方法執行前后進行動態增強。關於代理對象創建則通過Enhancer類來設置的,Enhancer是一個用於產生代理對象的類,作用類似JDK的Proxy類,因為CGLib底層是通過繼承實現的動態代理,因此需要傳遞目標對象(如A)的Class,同時需要設置一個回調函數對調用方法進行攔截並進行相應處理,最后通過create()創建目標對象(如A)的代理對象,運行結果與前面的JDK動態代理效果相同。
public A createProxy(){
    // 1.聲明增強類實例,用於生產代理類
    Enhancer enhancer = new Enhancer();
    // 2.設置被代理類字節碼,CGLIB根據字節碼生成被代理類的子類
    enhancer.setSuperclass(target.getClass());
    // 3.設置回調函數,即一個方法攔截
    enhancer.setCallback(this);
    // 4.創建代理:
    return (A) enhancer.create();
  }
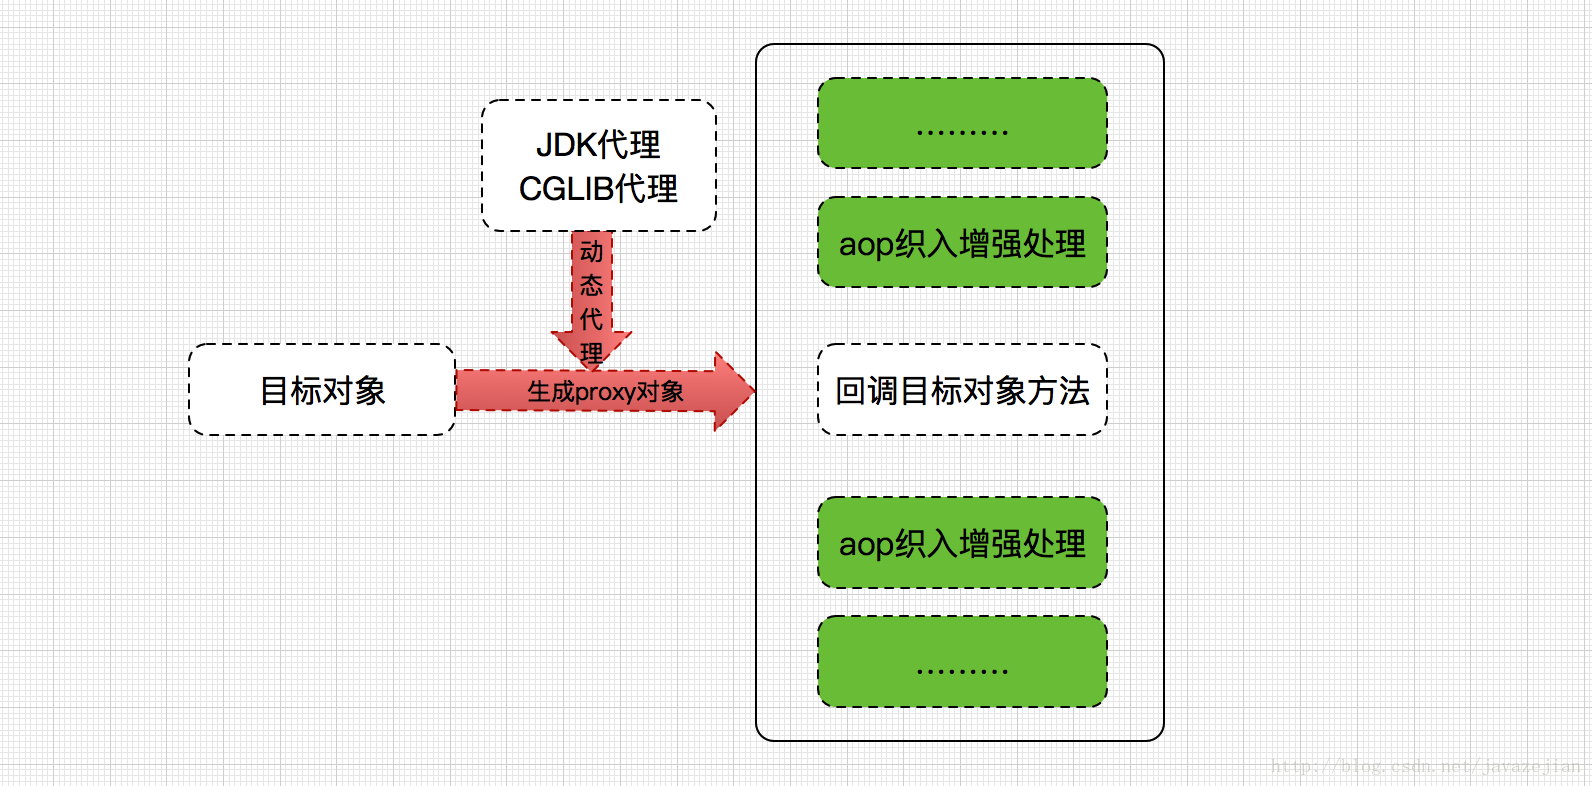
關於JDK代理技術 和 CGLIB代理技術到這就講完了,我們也應該明白 Spring AOP 確實是通過 CGLIB或者JDK代理 來動態地生成代理對象,這個代理對象指的就是 AOP 代理累,而 AOP 代理類的方法則通過在目標對象的切入點動態地織入增強處理,從而完成了對目標方法的增強。這里並沒有非常深入去分析這兩種技術,更傾向於向大家演示Spring AOP 底層實現的最簡化的模型代碼,Spring AOP內部已都實現了這兩種技術,Spring AOP 在使用時機上也進行自動化調整,當有接口時會自動選擇JDK動態代理技術,如果沒有則選擇CGLIB技術,當然Spring AOP的底層實現並沒有這么簡單,為更簡便生成代理對象,Spring AOP 內部實現了一個專注於生成代理對象的工廠類,這樣就避免了大量的手動編碼,這點也是十分人性化的,但最核心的還是動態代理技術。從性能上來說,Spring AOP 雖然無需特殊編譯器協助,但性能上並不優於AspectJ的靜態織入,這點了解一下即可。最后給出Spring AOP簡化的原理模型如下圖。