前言
度娘啊,你以為你把百度網盤取消限速了,我們就滿意了?當然不滿意,還有某度文庫呢!本來好好的文檔,非得不讓我們下載……今天,就教大家跟我一起寫某度文庫下載器Weeker,拒絕某庫,從我做起。
我們的下載器是一個GUI程序,具體架構是,先寫核心文件(get.py),再寫命令行解析文件(weeker.py),接着使用Fire生成命令行,最后用Gooey把CLI轉換為GUI。
准備
安裝
- 安裝Python 3.8;
- 安裝依賴(依賴的作用下文會詳解):pip install requests docx beautifulsoup4 Gooey
目錄
初始化項目(下面的腳本是在Unix或Linux上運行的):
```
當然在學習Python的道路上肯定會困難,沒有好的學習資料,怎么去學習呢?
學習Python中有不明白推薦加入交流Q群號:928946953
群里有志同道合的小伙伴,互幫互助, 群里有不錯的視頻學習教程和PDF!
還有大牛解答!
```
復制代碼 隱藏代碼
cd /path/to/project
mkdir Weeker
touch get.py weeker.py
爬蟲核心
第一步,打開get.py,先引入類庫:
 復制代碼 隱藏代碼
from os import getcwd, system
from re import sub

import requests
import docx
from bs4 import BeautifulSoup
每個模塊的作用如下:
由於保存文件時我們需要判斷路徑,定義一個pwd常量,用來存儲“當前路徑:
 復制代碼 隱藏代碼
pwd = getcwd()
再聲明一個get
url:ua:path:output:convert方法,來實現我們的爬蟲函數,其中:
編寫get:::::函數
獲取html&解析
把光標移到get:::::函數。首先照例我們要用requests,並且祭上bs4一條龍解析:
 復制代碼 隱藏代碼
headers = { 'User-Agent': ua }
result = requests.get(url, headers=headers)
soup = BeautifulSoup(res.text, "html.parser")

# 為了方便管理文本,我們定義一個數組用來存儲文檔的每一行
everyline = []
添加標題
我們給文檔先添上標題,也就是網頁的標題。
 復制代碼 隱藏代碼
everyline.append(soup.title.string)
但是這樣會有一個問題,添加出來的標題都是“xxxxxxx_百度文庫”,很不雅觀。所以抬上re.sub作替換,改成:
 復制代碼 隱藏代碼
everyline.append(re.sub('_百度文庫', '', soup.title.string, 1))
獲取正文
通過觀察網頁,我們發現,bd doc-reader這個class有重大嫌疑,這個class里的東西都是正文內容:
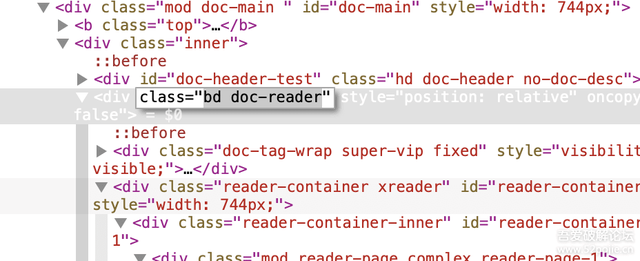
我們通過bs4解析它,發現內容中有很多\n、\x0c和空格,\n是換行符,我們把它分割到數組中,而后兩者分別刪除即可:
 復制代碼 隱藏代碼
for doc in soup.find_all('div', attrs={"class": "bd doc-reader"}):
    everyline.extend(doc.get_text().split('\n')) # 擴展數組
    everyline = [i.replace(' ', '') for i in everyline]
    everyline = [i.replace('\x0c', '') for i in everyline]
保存文件
接下來就是保存文件。我的思路是,先按照txt格式保存,然后再判斷convert參數,如果填寫了docx,再將txt加后綴並修改為docx。
 復制代碼 隱藏代碼
final_path = path
# 如果是相對路徑,連接pwd改成絕對路徑,否則python不支持。
if not path.startswith('/'):
    final_path = pwd + '/' + final_path

try:
    file = open(final_path + '/' + output, 'w', encoding='utf-8')
    for line in everyline:
        file.write(line)
        file.write('\n')
    file.close()
except FileNotFoundError as err:
    print("wenku: error: Output directory does not exist. Quitting.")
    exit(1)

# 如果有convert請求
if convert == 'docx':
    with open(final_path + '/' + output) as f:
        docu = docx.Document() # 創建對象
        docu.add_paragraph(f.read()) # 添加段落
        docu.save(final_path + '/' + output + '.' + convert) # 保存文檔,文件名為xxx.xxx.docx
        system('rm ' + final_path + '/' + output) # 刪除try中保存的文件
創建GUI
打開weeker.py。
首先是兩句 import,其中Gooey可以用類似argparse的語法將CLI轉換為GUI。
 復制代碼 隱藏代碼
from gooey import Gooey, GooeyParser
import get
接着添加if __name__ == '__main__':
 復制代碼 隱藏代碼
if __name__ == '__main__':
    main()
我們來定義一下這個main():
 復制代碼 隱藏代碼
@Gooey(encoding='utf-8', program_name="Weeker ", language='chinese')
def main():
    parser = GooeyParser(description="百度文庫下載器,干杯!")
    parser.add_argument("url", metavar='文檔地址', widget="TextField")
    parser.add_argument("ua", metavar='用戶UA', widget="Dropdown", choices={"Googlebot": 1, 'Baiduspider': 2})
    parser.add_argument("path", metavar='保存路徑', widget="DirChooser")
    parser.add_argument("output", metavar='重命名', widget="TextField")
    parser.add_argument("convert", metavar='格式轉換', widget="Dropdown", choices={'docx': 1})
    args = parser.parse_args()

    get.get(args.url, ua=args.ua, path=args.path, output=args.output, convert=args.convert)
@Gooey是一個修飾器,可以把main()轉換為一個Gooey函數。在main中,我們寫下類似argparse的parser.add_argument函數,最終定義args = parser.parse_args(),從args的成員獲取每個參數的輸入,傳到get.py里。我們運行一下,神奇的一幕發生了:
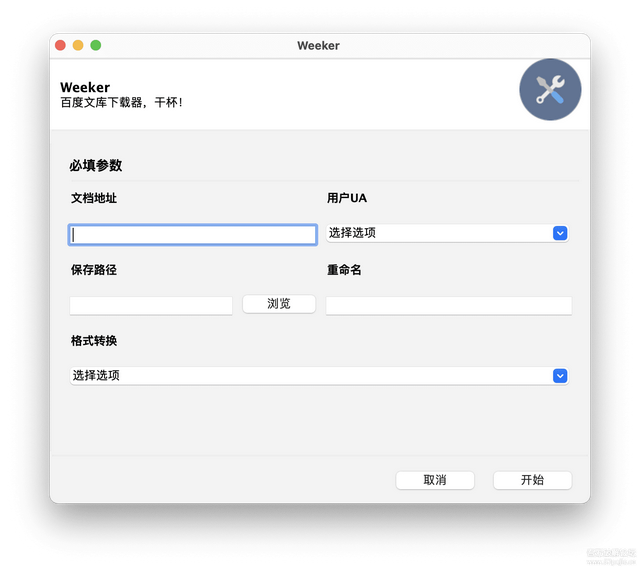
我們成功地把CLI轉換成了GUI!!!
注I:如果你喜歡命令行,可以GitHub搜python-fire,直接將函數和參數暴漏給CLI,效果更佳。
注II:因為電腦原因,打包不了成品,因此有需要者請自行編譯。
注III:附件里有兩個py文件。
注IV:我剛看見源碼里面有一句import寫錯了,如果你下載了源碼,請先照文中代碼核對一下。