xv6學習筆記(4) : 進程
xv6所有程序都是單進程、單線程程序。要明白這個概念才好繼續往下看
1. XV6中進程相關的數據結構
在XV6中,與進程有關的數據結構如下
// Per-process state
struct proc {
  uint sz;                     // Size of process memory (bytes)
  pde_t* pgdir;                // Page table
  char *kstack;                // Bottom of kernel stack for this process
  enum procstate state;        // Process state
  int pid;                     // Process ID
  struct proc *parent;         // Parent process
  struct trapframe *tf;        // Trap frame for current syscall
  struct context *context;     // swtch() here to run process
  void *chan;                  // If non-zero, sleeping on chan
  int killed;                  // If non-zero, have been killed
  struct file *ofile[NOFILE];  // Open files
  struct inode *cwd;           // Current directory
  char name[16];               // Process name (debugging)
};
與前述的兩類信息的對應關系如下
- 操作系統管理進程有關的信息:內核棧
kstack,進程的狀態state,進程的pid,進程的父進程parent,進程的中斷幀tf,進程的上下文context,與sleep和kill有關的chan和killed變量。 - 進程本身運行所需要的全部環境:虛擬內存信息
sz和pgdir,打開的文件ofile和當前目錄cwd。
額外地,proc中還有一條用於調試的進程名字name。
在操作系統中,所有的進程信息struct proc都存儲在ptable中,ptable的定義如下
下面是proc結構體保存的一些重要數據結構
-
首先是保存了用戶空間線程寄存器的trapframe字段
-
其次是保存了內核線程寄存器的context字段
-
還有保存了當前進程的內核棧的kstack字段,這是進程在內核中執行時保存函數調用的位置
-
state字段保存了當前進程狀態,要么是RUNNING,要么是RUNABLE,要么是SLEEPING等等
-
lock字段保護了很多數據,目前來說至少保護了對於state字段的更新。舉個例子,因為有鎖的保護,兩個CPU的調度器線程不會同時拉取同一個RUNABLE進程並運行它
struct {
  struct spinlock lock;
  struct proc proc[NPROC];
} ptable;
除了互斥鎖lock之外,一個值得注意的一點是XV6系統中允許同時存在的進程數量是有上限的。在這里NPROC為64,所以XV6最多只允許同時存在64個進程。
要注意操作系統的資源分配的單位是進程,處理機調度的單位是線程;
2. 第一個用戶進程
1. userinit函數
在 main 初始化了一些設備和子系統后,它通過調用 userinit建立了第一個進程。
userinit 首先調用 allocproc。allocproc的工作是在頁表中分配一個槽(即結構體 struct proc),並初始化進程的狀態,為其內核線程的運行做准備。注意一點:userinit 僅僅在創建第一個進程時被調用,而 allocproc 創建每個進程時都會被調用。allocproc 會在 proc 的表中找到一個標記為 UNUSED的槽位。當它找到這樣一個未被使用的槽位后,allocproc 將其狀態設置為 EMBRYO,使其被標記為被使用的並給這個進程一個獨有的 pid(2201-2219)。接下來,它嘗試為進程的內核線程分配內核棧。如果分配失敗了,allocproc 會把這個槽位的狀態恢復為 UNUSED 並返回0以標記失敗。
// Set up first user process.
void
userinit(void)
{
  struct proc *p;
  extern char _binary_initcode_start[], _binary_initcode_size[];

  p = allocproc();

  initproc = p;
  if((p->pgdir = setupkvm()) == 0)
    panic("userinit: out of memory?");
  inituvm(p->pgdir, _binary_initcode_start, (int)_binary_initcode_size);
  p->sz = PGSIZE;
  memset(p->tf, 0, sizeof(*p->tf));
  p->tf->cs = (SEG_UCODE << 3) | DPL_USER;
  p->tf->ds = (SEG_UDATA << 3) | DPL_USER;
  p->tf->es = p->tf->ds;
  p->tf->ss = p->tf->ds;
  p->tf->eflags = FL_IF;
  p->tf->esp = PGSIZE;
  p->tf->eip = 0;  // beginning of initcode.S

  safestrcpy(p->name, "initcode", sizeof(p->name));
  p->cwd = namei("/");

  // this assignment to p->state lets other cores
  // run this process. the acquire forces the above
  // writes to be visible, and the lock is also needed
  // because the assignment might not be atomic.
  acquire(&ptable.lock);

  p->state = RUNNABLE;

  release(&ptable.lock);
}
2. allocproc函數
- 在ptable中找到一個沒有被占用的槽位
- 找到之后分配pid然后把他的狀態設置為
EMBRYO
static struct proc*
allocproc(void)
{
  struct proc *p;
  char *sp;

  acquire(&ptable.lock);

  for(p = ptable.proc; p < &ptable.proc[NPROC]; p++)
    if(p->state == UNUSED)
      goto found;

  release(&ptable.lock);
  return 0;

found:
  p->state = EMBRYO;
  p->pid = nextpid++;

  release(&ptable.lock);

  // Allocate kernel stack.
  if((p->kstack = kalloc()) == 0){
    p->state = UNUSED;
    return 0;
  }
  sp = p->kstack + KSTACKSIZE;

  // Leave room for trap frame.
  sp -= sizeof *p->tf;
  p->tf = (struct trapframe*)sp;

  // Set up new context to start executing at forkret,
  // which returns to trapret.
  sp -= 4;
  *(uint*)sp = (uint)trapret;

  sp -= sizeof *p->context;
  p->context = (struct context*)sp;
  memset(p->context, 0, sizeof *p->context);
  p->context->eip = (uint)forkret;

  return p;
}
這里進行調用完之后得到的狀態如下圖所示

3. mpmain函數
// Common CPU setup code.
static void
mpmain(void)
{
  cprintf("cpu%d: starting %d\n", cpuid(), cpuid());
  idtinit();       // load idt register
  xchg(&(mycpu()->started), 1); // tell startothers() we're up
  scheduler();     // start running processes
}
1. scheduler()函數
這個函數是非常重要的,進行進程之間的調度,在上面我們創建了第一個用戶進程但是還沒有進行執行。
void
scheduler(void)
{
  struct proc *p;
  struct cpu *c = mycpu();
  c->proc = 0;

  for(;;){
    // Enable interrupts on this processor.
    sti();

    // Loop over process table looking for process to run.
    acquire(&ptable.lock);
    for(p = ptable.proc; p < &ptable.proc[NPROC]; p++){
      if(p->state != RUNNABLE)
        continue;

      // Switch to chosen process.  It is the process's job
      // to release ptable.lock and then reacquire it
      // before jumping back to us.
      c->proc = p;
      switchuvm(p);
      p->state = RUNNING;

      swtch(&(c->scheduler), p->context);
      switchkvm();

      // Process is done running for now.
      // It should have changed its p->state before coming back.
      c->proc = 0;
    }
    release(&ptable.lock);

  }
}
2. switchuvm函數
- 這里要設置當前cpu的taskstate。關於taskstate的知識補充
taskstate的知識補充
- 對於cpu而言是沒有進程或者線程的概念,對於cpu只有任務的概念
- 對於ss0是存儲的0環的棧段選擇子
- 對於
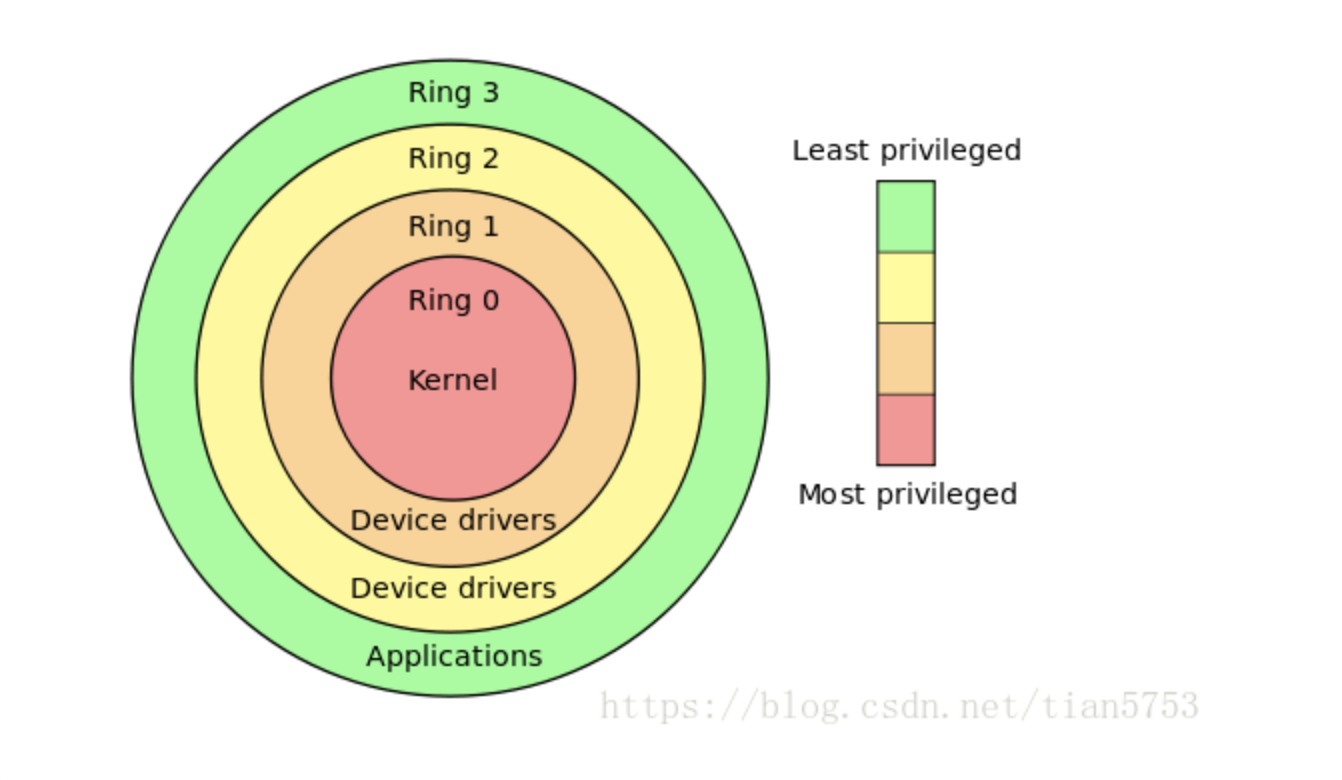
esp是存儲的0環的棧指針 - 而對於ring的概念也就是環的概念這里可以簡單理解成特權集參考博客
// Switch TSS and h/w page table to correspond to process p.
void
switchuvm(struct proc *p)
{
  if(p == 0)
    panic("switchuvm: no process");
  if(p->kstack == 0)
    panic("switchuvm: no kstack");
  if(p->pgdir == 0)
    panic("switchuvm: no pgdir");

  pushcli();
  mycpu()->gdt[SEG_TSS] = SEG16(STS_T32A, &mycpu()->ts,
                                sizeof(mycpu()->ts)-1, 0);
  mycpu()->gdt[SEG_TSS].s = 0;
  mycpu()->ts.ss0 = SEG_KDATA << 3;
  mycpu()->ts.esp0 = (uint)p->kstack + KSTACKSIZE;
  // setting IOPL=0 in eflags *and* iomb beyond the tss segment limit
  // forbids I/O instructions (e.g., inb and outb) from user space
  mycpu()->ts.iomb = (ushort) 0xFFFF;
  ltr(SEG_TSS << 3);
  lcr3(V2P(p->pgdir));  // switch to process's address space
  popcli();
}
3. 第一個程序Initcode.S
第一個程序會在虛擬地址[0-pagesize]這一段
# exec(init, argv)
.globl start
start:
  pushl $argv
  pushl $init
  pushl $0  // where caller pc would be
  movl $SYS_exec, %eax
  int $T_SYSCALL

# for(;;) exit();
exit:
  movl $SYS_exit, %eax
  int $T_SYSCALL
  jmp exit

# char init[] = "/init\0";
init:
  .string "/init\0"

# char *argv[] = { init, 0 };
.p2align 2
argv:
  .long init
  .long 0
這里是調用了exec執行init函數
這個其實更像什么,更像shell終端的啟動
int
main(void)
{
  int pid, wpid;

  if(open("console", O_RDWR) < 0){
    mknod("console", 1, 1);
    open("console", O_RDWR);
  }
  dup(0);  // stdout
  dup(0);  // stderr

  for(;;){
    printf(1, "init: starting sh\n");
    pid = fork();
    if(pid < 0){
      printf(1, "init: fork failed\n");
      exit();
    }
    if(pid == 0){
      exec("sh", argv);
      printf(1, "init: exec sh failed\n");
      exit();
    }
    while((wpid=wait()) >= 0 && wpid != pid)
      printf(1, "zombie!\n");
  }
}
4. 進程切換
進程切換解決之后,對於xv6的進程調度就會有一個比較清晰的分析了

這里有幾個重要的概念就是
-
每一個進程都有一個對應的內核線程(也就是scheduler thread)線程。
-
在xv6中想要從一個進程(當然這里叫線程也是無所謂的)切換到另一個線程中,必須要先從當前進程-->當前進程的內核線程-->目的線程的內核線程-->目的線程的用戶進程。這樣一個過程才能完成調度
1. 先從yied和sched開始
其實yield函數並沒有干很多事情,關於🔒的操作后面會單獨來講一下,這里就先跳過去
這個函數就是當前進程要讓出cpu。所以把當前proc()的狀態設置成RUNNABLE
最后調用sched()
// Give up the CPU for one scheduling round.
void
yield(void)
{
  acquire(&ptable.lock);  //DOC: yieldlock
  myproc()->state = RUNNABLE;
  sched();
  release(&ptable.lock);
}
這里先進行一些狀態判斷,如果出問題就會panic。
2. 隨后調用swtch函數
其實這個函數就是switch這里為了不與c語言中的庫函數同名
void
sched(void)
{
  int intena;
  struct proc *p = myproc();

  if(!holding(&ptable.lock))
    panic("sched ptable.lock");
  if(mycpu()->ncli != 1)
    panic("sched locks");
  if(p->state == RUNNING)
    panic("sched running");
  if(readeflags()&FL_IF)
    panic("sched interruptible");
  intena = mycpu()->intena;
  swtch(&p->context, mycpu()->scheduler);
  mycpu()->intena = intena;
}
swtch函數就是傳說中的上下文切換。只不過和之前說的用戶狀態的上下文切換不一樣
這里是把當前cpu的內核線程的寄存器保存到p->context中
這里的(esp + 4)存儲的就是edi寄存器的值。而(esp + 8)存儲的就是esi寄存器的值,也就是第一個參數和第二個參數
.globl swtch
swtch:
  movl 4(%esp), %eax
  movl 8(%esp), %edx

  # Save old callee-saved registers
  pushl %ebp
  pushl %ebx
  pushl %esi
  pushl %edi

  # Switch stacks
  movl %esp, (%eax)
  movl %edx, %esp

  # Load new callee-saved registers
  popl %edi
  popl %esi
  popl %ebx
  popl %ebp
  ret

所以這里最后就會把mycpu()->scheduler中保存的context信息彈出到寄存器中。同時把esp寄存器更換成mycpu()->scheduler那里。所以這里的ret的返回地址就是mycpu()->scheduler保存的eip的值。也就會返回到
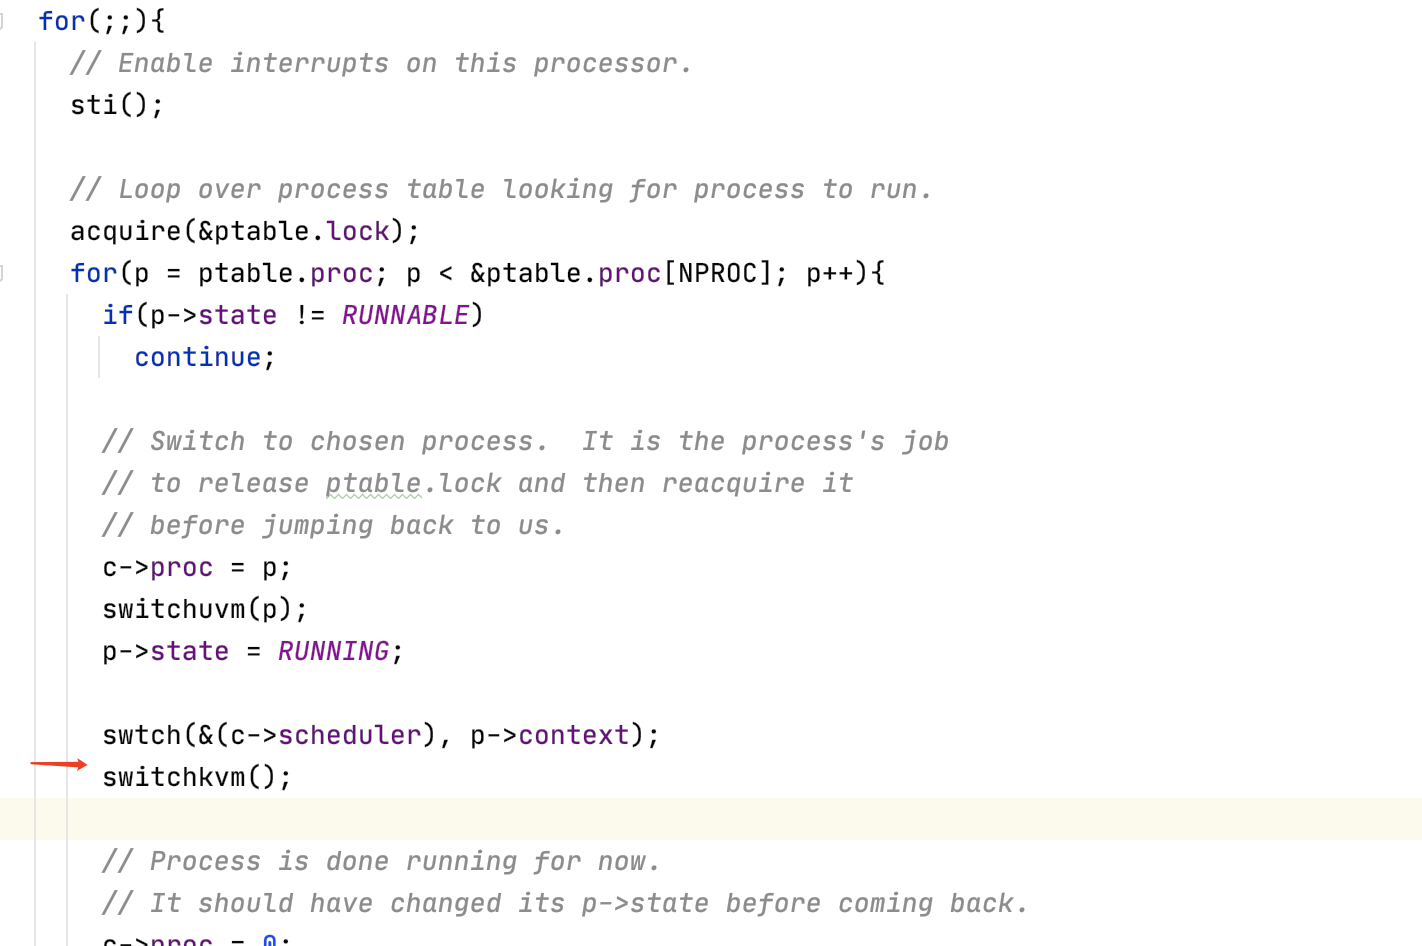
紅色箭頭所指向的一行。
3. 回到scheduler函數
現在我們在scheduler函數的循環中,代碼會檢查所有的進程並找到一個來運行。隨后再來調用swtch函數
又調用了swtch函數來保存調度器線程的寄存器,並恢復目標進程的寄存器(注,實際上恢復的是目標進程的內核線程)
這里有件事情需要注意,調度器線程調用了swtch函數,但是我們從swtch函數返回時,實際上是返回到了對於switch的另一個調用,而不是調度器線程中的調用。我們返回到的是pid為目的進程的進程在很久之前對於switch的調用。這里可能會有點讓人困惑,但是這就是線程切換的核心。
4. 回到用戶空間
最后的返回是利用了trapret
# Return falls through to trapret...
.globl trapret
trapret:
  popal
  popl %gs
  popl %fs
  popl %es
  popl %ds
  addl $0x8, %esp  # trapno and errcode
  iret
這個函數把保存的trapframe恢復。最后通過iret恢復到用戶空間
5. 看一下fork、wait、exit函數
1. fork函數
- 創建一個進程
- 把父進程的頁表copy過來(這里還不是cow方式的)
- 這里比較重要的點是先加鎖。然后把子進程的狀態設置成runnable。如果在解鎖之前子進程就被調度的話。那返回值就是利用tf->eax來獲取
- 否則的話解鎖return父進程的pid,表示從父進程返回
// Create a new process copying p as the parent.
// Sets up stack to return as if from system call.
// Caller must set state of returned proc to RUNNABLE.
int
fork(void)
{
  int i, pid;
  struct proc *np;
  struct proc *curproc = myproc();

  // Allocate process.
  if((np = allocproc()) == 0){
    return -1;
  }

  // Copy process state from proc.
  if((np->pgdir = copyuvm(curproc->pgdir, curproc->sz)) == 0){
    kfree(np->kstack);
    np->kstack = 0;
    np->state = UNUSED;
    return -1;
  }
  np->sz = curproc->sz;
  np->parent = curproc;
  *np->tf = *curproc->tf;

  // Clear %eax so that fork returns 0 in the child.
  np->tf->eax = 0;

  for(i = 0; i < NOFILE; i++)
    if(curproc->ofile[i])
      np->ofile[i] = filedup(curproc->ofile[i]);
  np->cwd = idup(curproc->cwd);

  safestrcpy(np->name, curproc->name, sizeof(curproc->name));

  pid = np->pid;

  acquire(&ptable.lock);

  np->state = RUNNABLE;

  release(&ptable.lock);

  return pid;
}
2. wait函數
- 如果找到了處於
ZOMBIE狀態子進程會把他釋放掉。(分別釋放對於的pid、內核棧、頁表) - 否則如果沒有子進程則return -1
- 否則調用slepp函數等待
// Wait for a child process to exit and return its pid.
// Return -1 if this process has no children.
int
wait(void)
{
  struct proc *p;
  int havekids, pid;
  struct proc *curproc = myproc();

  acquire(&ptable.lock);
  for(;;){
    // Scan through table looking for exited children.
    havekids = 0;
    for(p = ptable.proc; p < &ptable.proc[NPROC]; p++){
      if(p->parent != curproc)
        continue;
      havekids = 1;
      if(p->state == ZOMBIE){
        // Found one.
        pid = p->pid;
        kfree(p->kstack);
        p->kstack = 0;
        freevm(p->pgdir);
        p->pid = 0;
        p->parent = 0;
        p->name[0] = 0;
        p->killed = 0;
        p->state = UNUSED;
        release(&ptable.lock);
        return pid;
      }
    }

    // No point waiting if we don't have any children.
    if(!havekids || curproc->killed){
      release(&ptable.lock);
      return -1;
    }

    // Wait for children to exit.  (See wakeup1 call in proc_exit.)
    sleep(curproc, &ptable.lock);  //DOC: wait-sleep
  }
}
sleep函數會在后面講鎖的時候去看
3. exit函數
- 首先exit函數關閉了所有已打開的文件。這里可能會很復雜,因為關閉文件系統中的文件涉及到引用計數,雖然我們還沒學到但是這里需要大量的工作。不管怎樣,一個進程調用exit系統調用時,會關閉所有自己擁有的文件。
- 進程有一個對於當前目錄的記錄,這個記錄會隨着你執行cd指令而改變。在exit過程中也需要將對這個目錄的引用釋放給文件系統。
- 如果這個想要退出的進程,它又有自己的子進程,接下來需要設置這些子進程的父進程為init進程。我們接下來會看到,每一個正在exit的進程,都有一個父進程中的對應的wait系統調用。父進程中的wait系統調用會完成進程退出最后的幾個步驟。所以如果父進程退出了,那么子進程就不再有父進程,當它們要退出時就沒有對應的父進程的wait。所以在exit函數中,會為即將exit進程的子進程重新指定父進程為init進程,也就是PID為1的進程。
- 最后把要exit的進程狀態設置成
ZOMBIE - 執行
sched函數重新回到內核線程。。。找新的線程去執行
void
exit(void)
{
  struct proc *curproc = myproc();
  struct proc *p;
  int fd;

  if(curproc == initproc)
    panic("init exiting");

  // Close all open files.
  for(fd = 0; fd < NOFILE; fd++){
    if(curproc->ofile[fd]){
      fileclose(curproc->ofile[fd]);
      curproc->ofile[fd] = 0;
    }
  }
  begin_op();
  iput(curproc->cwd);
  end_op();
  curproc->cwd = 0;

  acquire(&ptable.lock);

  // Parent might be sleeping in wait().
  wakeup1(curproc->parent);

  // Pass abandoned children to init.
  for(p = ptable.proc; p < &ptable.proc[NPROC]; p++){
    if(p->parent == curproc){
      p->parent = initproc;
      if(p->state == ZOMBIE)
        wakeup1(initproc);
    }
  }

  // Jump into the scheduler, never to return.
  curproc->state = ZOMBIE;
  sched();
  panic("zombie exit");
}
4. kill函數
最后我想看的是kill系統調用。Unix中的一個進程可以將另一個進程的ID傳遞給kill系統調用,並讓另一個進程停止運行。如果我們不夠小心的話,kill一個還在內核執行代碼的進程,會有風險,比如我們想要殺掉的進程的內核線程還在更新一些數據,比如說更新文件系統,創建一個文件。如果這樣的話,我們不能就這樣殺掉進程,因為這樣會使得一些需要多步完成的操作只執行了一部分。所以kill系統調用不能就直接停止目標進程的運行。實際上,在XV6和其他的Unix系統中,kill系統調用基本上不做任何事情。
// Kill the process with the given pid.
// Process won't exit until it returns
// to user space (see trap in trap.c).
int
kill(int pid)
{
  struct proc *p;

  acquire(&ptable.lock);
  for(p = ptable.proc; p < &ptable.proc[NPROC]; p++){
    if(p->pid == pid){
      p->killed = 1;
      // Wake process from sleep if necessary.
      if(p->state == SLEEPING)
        p->state = RUNNABLE;
      release(&ptable.lock);
      return 0;
    }
  }
  release(&ptable.lock);
  return -1;
}