前言
看了Bloc源碼后,心情有點復雜呀。。。

說點積極的...
用過Bloc的靚仔們,肯定能感受到,Bloc框架對開發頁面,做了很清晰划分,框架強行定了倆種開發模式
- Bloc模式:該模式划分四層結構
- bloc:邏輯層
- state:數據層
- event:所有的交互事件
- view:頁面
- Cubit模式:該模式划分了三層結構
- cubit:邏輯層
- state:數據層
- view:頁面
作者在層次的划分上還是很老道的,state層是直接寫死在框架內部,這層必須要單獨分出來;我感覺如果不是被大型項目的克蘇魯代碼山坑過,應該不會有這么深的執念
這個state層加的,我覺得相當有必要,因為某個頁面一旦維護的狀態很多,將狀態變量和邏輯方法混在一起,后期維護會非常頭痛。
說點批判的...
-
大家可能在群里,經常看到一些老哥說:Bloc是將Provider封裝了一層。
- 這里我證實下:這是真的,Bloc確實將Provider封了一層
- 但是僅僅只用到Provider中子節點查詢最近父節點InheritedElement數據和頂層Widget並列布局功能,Provider最經典的刷新機制,完全沒用到!
-
我覺得Bloc作者,對Provider的刷新機制可能有點迷糊
- 哪怕bloc框架在build widget里用到了一行: Provider.of
(context, listen: true) 或者去掉e.markNeedsNotifyDependents() ,我都不會說這話。。。 - Bloc框架做了一些讓我非常疑惑的操作,_startListening方法中的回調中調用了 e.markNeedsNotifyDependents() ,完全沒用!因為沒使用Provider.of
(context, listen: true) 向 InheritedElement 添加子Element,所以是刷新了個寂寞!為了驗證我的想法,我debug了 framework層的notifyClients方法,調用emit或yield刷新的時候, _dependents的map一直為空,哎。。。
- 哪怕bloc框架在build widget里用到了一行: Provider.of
-
我上面吐槽了很多,並非我對bloc有什么意見
- Bloc我也用了較長的時間,深度使用過程,對其用法做了一些優化,還為其寫了一個代碼生成插件,為它也算付出了一些時間和精力
- 但是:代碼是不會說謊的,所有好的或不好的都在其中,用心體悟就能感受到。
為啥說心情復雜呢?
之前在看Provider源碼的時候,看的有些頭痛,內部邏輯確實有些復雜,但是總流程理通,刷新邏輯清晰之后,那是一種酣暢淋漓的感覺!痛苦之后便是一種巨大的滿足感,並對Provider熟練運用Framework層各種api,然后實現了精彩的刷新機制,感到贊嘆!
然后,上面也講了,我在Bloc上面確實花了一些精力,優化它的使用,然后看了他的源碼,再想想之前看的Provider源碼,突然有種巨大的落差感。
在我看來,這樣大名鼎鼎的開源庫,上面這點疙瘩完全可以避免;也許是這種莫名的高期待,讓我產生了這種落差。。。
對了,說不定是Bloc作者,故意留了一個Provider刷新機制在Bloc中,把這個作為一個彩蛋!
突然感覺這點疙瘩沒了!
使用
這邊介紹下使用,對官方的用法做了一些調整
調整心路的歷程,可參照:flutter_bloc使用解析---騷年,你還在手搭bloc嗎!
下面就直接寫出調整后寫法了
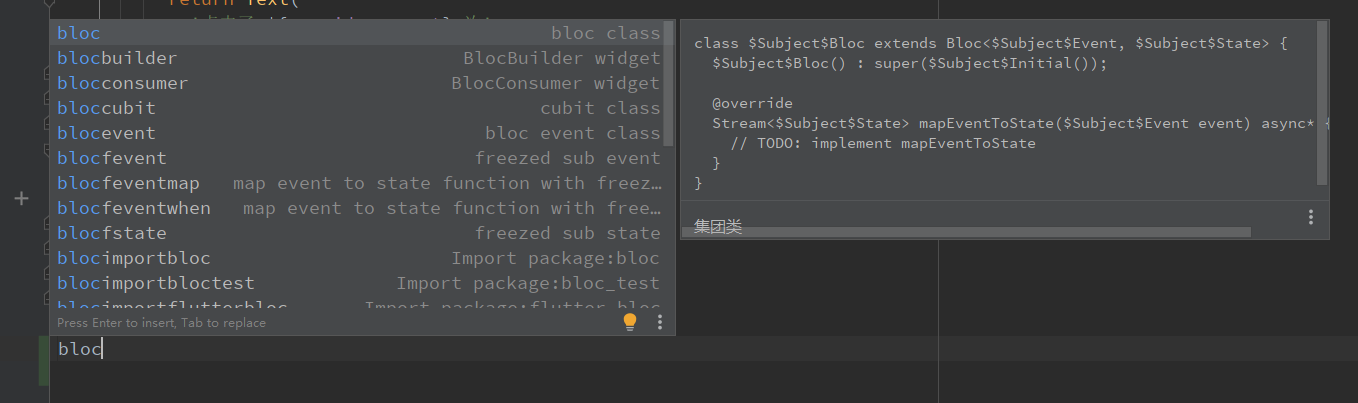
插件
因為官方插件生成的寫法,和調整后寫法差距有點大,而且官方插件不支持生成view層和相關設置,此處我就擼了一個插件,完善了相關功能
請注意,Wrap代碼和提示代碼片段,參靠了官方插件規則
Wrap Widget 規則來着:intellij_generator_plugin
快捷代碼生成規則來着: intellij_generator_plugin
- 在Android Studio里面搜索 flutter bloc

- 生成模板代碼
- 支持修改后綴
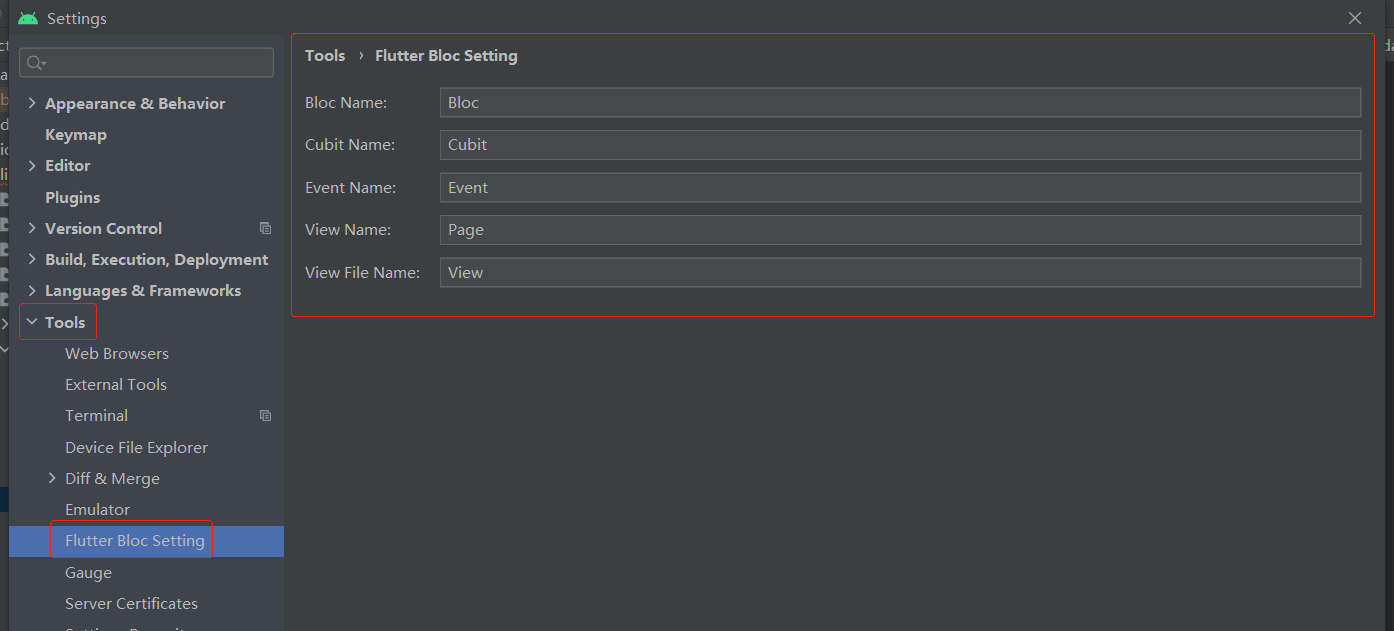
- Wrap Widget (alt + enter):RepositoryProvider,BlocConsumer,BlocBuilder,BlocProvider,BlocListener

- 輸入 bloc 可生成快捷代碼片段
用法
插件可生成倆種模式代碼:Bloc和Cubit;來看下
Cubit模式
- view
class CounterPage extends StatelessWidget {
  @override
  Widget build(BuildContext context) {
    return BlocProvider(
      create: (BuildContext context) => CounterCubit(),
      child: Builder(builder: (context) => _buildPage(context)),
    );
  }

  Widget _buildPage(BuildContext context) {
    final cubit = BlocProvider.of<CounterCubit>(context);

    return Container();
  }
}
- cubit
class CounterCubit extends Cubit<CounterState> {
  CounterCubit() : super(CounterState().init());
}
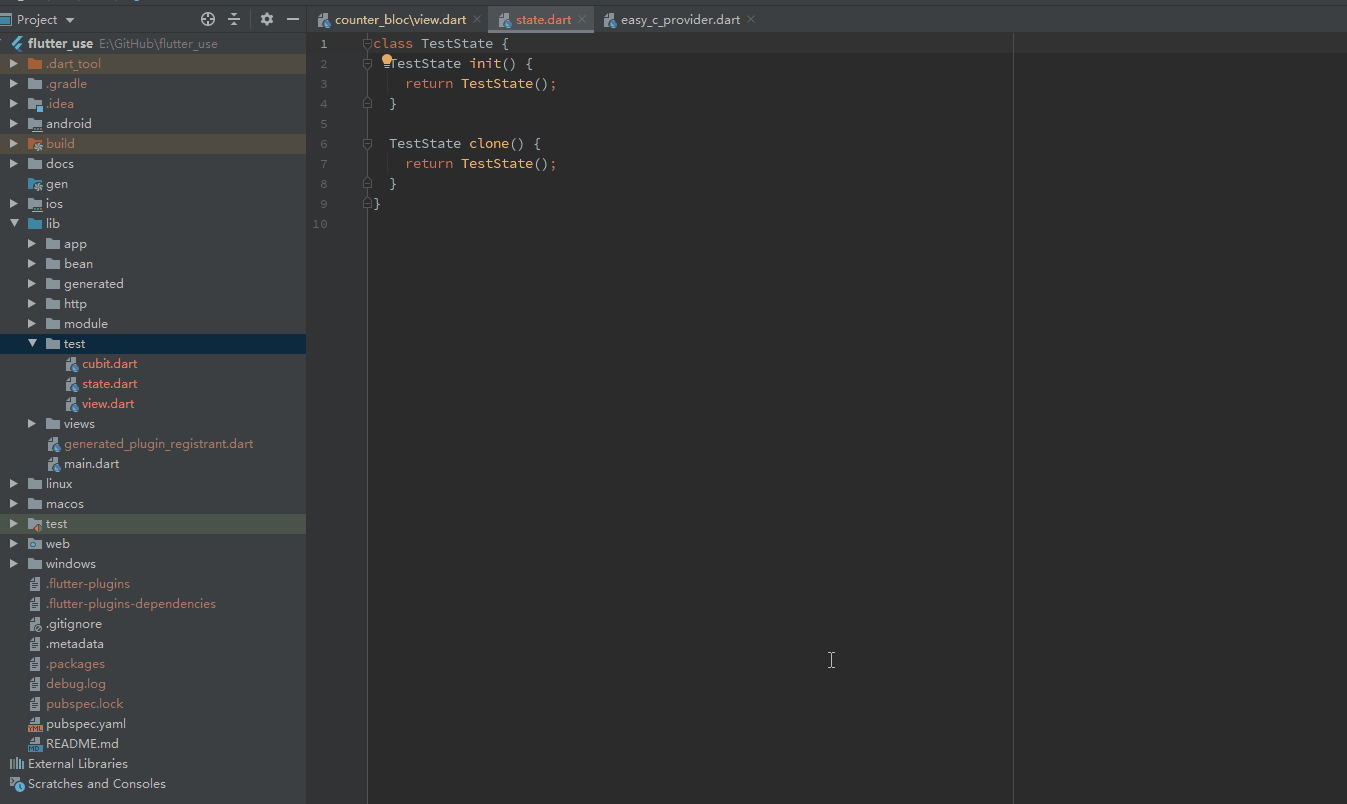
- state
class CounterState {
  CounterState init() {
    return CounterState();
  }

  CounterState clone() {
    return CounterState();
  }
}
Bloc模式
- view:默認添加了一個初始化事件
class CounterPage extends StatelessWidget {
  @override
  Widget build(BuildContext context) {
    return BlocProvider(
      create: (BuildContext context) => CounterBloc()..add(InitEvent()),
      child: Builder(builder: (context) => _buildPage(context)),
    );
  }

  Widget _buildPage(BuildContext context) {
    final bloc = BlocProvider.of<CounterBloc>(context);

    return Container();
  }
}
- bloc
class CounterBloc extends Bloc<CounterEvent, CounterState> {
  CounterBloc() : super(CounterState().init());

  @override
  Stream<CounterState> mapEventToState(CounterEvent event) async* {
    if (event is InitEvent) {
      yield await init();
    }
  }

  Future<CounterState> init() async {
    return state.clone();
  }
}
- event
abstract class CounterEvent {}

class InitEvent extends CounterEvent {}
- state
class CounterState {
  CounterState init() {
    return CounterState();
  }

  CounterState clone() {
    return CounterState();
  }
}
總結
Bloc和Cubit模式對於結構,划分的很清楚,因為有多層結構划分,務必會有相應的模板代碼和文件,沒有插件的幫助,每次都寫這些模板代碼,會非常難受;這邊為大家寫了這個插件,如果有什么BUG,麻煩及時反饋哈。。。
這里就不重復寫怎么使用了,使用明細可參照:flutter_bloc使用解析---騷年,你還在手搭bloc嗎!
前置知識
想弄懂Bloc原理,需要先了解下Stream的相關知識
StreamController、StreamBuilder:這倆者的搭配也可以輕松的實現刷新局部Widget,來看下使用
- view:Stream流必須要有關閉的操作,此處就需要使用StatefulWidget,需要它的dispose回調
class StreamPage extends StatefulWidget {
  const StreamPage({Key? key}) : super(key: key);

  @override
  _StreamPageState createState() => _StreamPageState();
}

class _StreamPageState extends State<StreamPage> {
  final logic = StreamLogic();

  @override
  Widget build(BuildContext context) {
    return Scaffold(
      appBar: AppBar(title: Text('Bloc-Bloc范例')),
      body: Center(
        child: StreamBuilder<StreamState>(
          initialData: logic.state,
          stream: logic.stream,
          builder: (context, snapshot) {
            return Text(
              '點擊了 ${snapshot.data!.count} 次',
              style: TextStyle(fontSize: 30.0),
            );
          },
        ),
      ),
      floatingActionButton: FloatingActionButton(
        onPressed: () => logic.increment(),
        child: Icon(Icons.add),
      ),
    );
  }

  @override
  void dispose() {
    logic.dispose();
    super.dispose();
  }
}
- logic:Stream數據源是泛型,可以直接使用基礎類型,此處使用實體,是為了后期可擴展更多數據
class StreamLogic {
  final state = StreamState();

  // 實例化流控制器
  final _controller = StreamController<StreamState>.broadcast();

  Stream<StreamState> get stream => _controller.stream;

  void increment() {
    _controller.add(state..count = ++state.count);
  }

  void dispose() {
    // 關閉流控制器,釋放資源
    _controller.close();
  }
}
- state
class StreamState {
  int count = 0;
}
- 效果圖
實際上,看了上述的使用,會發現有幾個很麻煩的地方
- 需要創建Stream的一系列對象
- Stream流必須要有關閉操作,所以要使用StatefulWidget
- StreamBuilder需要寫三個參數,很麻煩
Bloc作者借住Provider的InheritedProvider控件,將上面的痛點都解決了
刷新機制
Bloc的刷新機制很簡單,上面的Stream操作,基本闡明了其核心的刷新機制,但是Bloc作者做了一些封裝,我們來看看
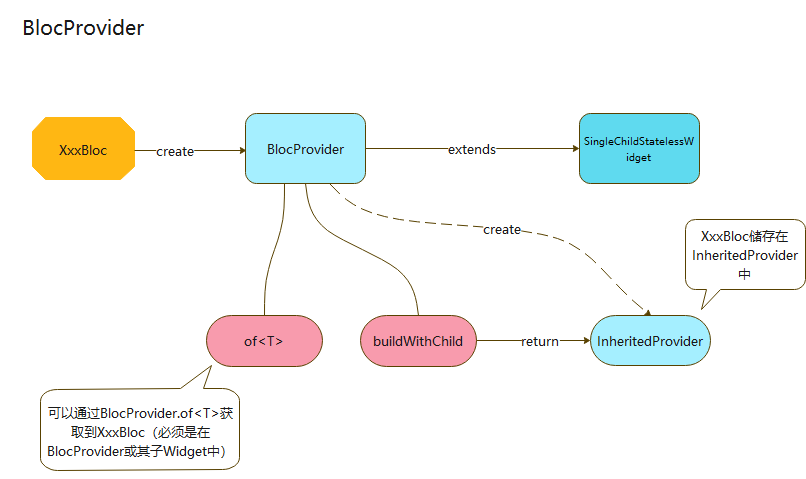
BlocProvider的魅力
BlocProvider是一個非常重要的控件,刷新參數的精簡和Stream流的關閉都和其有關,因為該封裝了一個Provider里面InheritedProvider;但是,但是在我看來,他依舊是一個很有魅力的控件
- BlocProvider:BlocProvider的源碼很簡單,下面就是這個類的源碼
class BlocProvider<T extends BlocBase<Object?>>
    extends SingleChildStatelessWidget with BlocProviderSingleChildWidget {
  /// {@macro bloc_provider}
  BlocProvider({
    Key? key,
    required Create<T> create,
    this.child,
    this.lazy,
  })  : _create = create,
        _value = null,
        super(key: key, child: child);

  BlocProvider.value({
    Key? key,
    required T value,
    this.child,
  })  : _value = value,
        _create = null,
        lazy = null,
        super(key: key, child: child);

  /// Widget which will have access to the [Bloc] or [Cubit].
  final Widget? child;

  final bool? lazy;

  final Create<T>? _create;

  final T? _value;

  static T of<T extends BlocBase<Object?>>(
    BuildContext context, {
    bool listen = false,
  }) {
    try {
      return Provider.of<T>(context, listen: listen);
    } on ProviderNotFoundException catch (e) {
      if (e.valueType != T) rethrow;
      throw FlutterError(
        '''
        BlocProvider.of() called with a context that does not contain a $T.
        No ancestor could be found starting from the context that was passed to BlocProvider.of<$T>().

        This can happen if the context you used comes from a widget above the BlocProvider.

        The context used was: $context
        ''',
      );
    }
  }

  @override
  Widget buildWithChild(BuildContext context, Widget? child) {
    final value = _value;
    return value != null
        ? InheritedProvider<T>.value(
            value: value,
            startListening: _startListening,
            lazy: lazy,
            child: child,
          )
        : InheritedProvider<T>(
            create: _create,
            dispose: (_, bloc) => bloc.close(),
            startListening: _startListening,
            child: child,
            lazy: lazy,
          );
  }

  static VoidCallback _startListening(
    InheritedContext<BlocBase> e,
    BlocBase value,
  ) {
    final subscription = value.stream.listen(
      (dynamic _) => e.markNeedsNotifyDependents(),
    );
    return subscription.cancel;
  }
}
-
BlocProvider和BlocProvider.value的區別
- 看上面源碼可知:BlocProvider.value沒有做Stream自動關閉操作
- 所以BlocProvider.value不應該在普通的單頁面使用,可用於全局Bloc實例
- 單頁面Bloc請使用BlocProvider去創建Bloc或Cubit
- 看上面源碼可知:BlocProvider.value沒有做Stream自動關閉操作
-
create是外部實例化的XxxBloc,最終傳入了InheritedProvider中
- create就是外部傳入的XxxBloc實例
- 該實例直接傳入了InheritedProvider中,這就是涉及到Provider中,最終是儲存在 _InheritedProviderScopeElement中, _startListening也是Provider的內容
- 這內部的原理是比較復雜且很重要的,感興趣請查看:源碼篇:Flutter Provider的另一面(萬字圖文+插件)
- 說真的 _startListening里面的邏輯沒什么卵用
- markNeedsNotifyDependents這個api是Provider作者專門為Provider子Element刷新做的,必須配套 Provider.of
(context, listen: true) 去注冊Widget控件才行 - 涉及邏輯太多,都在上面Provider源碼剖析文章中,感興趣的可以去看看
- markNeedsNotifyDependents這個api是Provider作者專門為Provider子Element刷新做的,必須配套 Provider.of
-
BlocProvider.of
- 作用:可以在BlocProvider包裹的子控件中,獲取到BlocProvider Create傳入的XxxBloc
- 請注意:如果使用BlocProvider父布局context是拿不到XxxBloc的,必須是BlocProvider的子布局
- 原理:源碼篇:Flutter Provider的另一面(萬字圖文+插件),還是在這篇文章里
- 我真的不是推廣這文章啊,BlocProvider這部分,Bloc用了太多Provider特性
- Provider文章,我花了九牛二虎之力將原理剖析完,在此處,就沒必要再做復讀機了
總結:來歸納下BlocProvider這個類的作用
- BlocProvider或會儲存外部傳入的XxxBloc實例,XxxBloc類必須繼承BlocBase
- BlocProvider存儲的XxxBloc實例,可以通過BlocProvider.of
獲取到(必須是在BlocProvider或其子Widget) - BlocProvider獲取的實例XxxBloc能夠自動釋放;BlocProvider.value命名構造函數實例的XxxBloc不會自動釋放
BlocProvider實現了上面這三個碉堡的功能,基本就可以把Stream使用模式徹底精簡了
- 圖示
基石BlocBase
毋庸置疑,BlocBase是很重要的一個抽象類
- BlocBase
abstract class BlocBase<State> {
  BlocBase(this._state) {
    Bloc.observer.onCreate(this);
  }

  StreamController<State>? __stateController;
  StreamController<State> get _stateController {
    return __stateController ??= StreamController<State>.broadcast();
  }

  State _state;

  bool _emitted = false;

  State get state => _state;

  Stream<State> get stream => _stateController.stream;

  @Deprecated(
    'Use stream.listen instead. Will be removed in v8.0.0',
  )
  StreamSubscription<State> listen(
    void Function(State)? onData, {
    Function? onError,
    void Function()? onDone,
    bool? cancelOnError,
  }) {
    return stream.listen(
      onData,
      onError: onError,
      onDone: onDone,
      cancelOnError: cancelOnError,
    );
  }

  void emit(State state) {
    if (_stateController.isClosed) return;
    if (state == _state && _emitted) return;
    onChange(Change<State>(currentState: this.state, nextState: state));
    _state = state;
    _stateController.add(_state);
    _emitted = true;
  }

  @mustCallSuper
  void onChange(Change<State> change) {
    Bloc.observer.onChange(this, change);
  }

  @mustCallSuper
  void addError(Object error, [StackTrace? stackTrace]) {
    onError(error, stackTrace ?? StackTrace.current);
  }

  @protected
  @mustCallSuper
  void onError(Object error, StackTrace stackTrace) {
    Bloc.observer.onError(this, error, stackTrace);
    assert(() {
      throw BlocUnhandledErrorException(this, error, stackTrace);
    }());
  }

  @mustCallSuper
  Future<void> close() async {
    Bloc.observer.onClose(this);
    await _stateController.close();
  }
}
上面的BlocBase做了幾件比較重要的事,來梳理下
Bloc.observer這個不重要,這是框架內部定義的一個類,這邊可以忽略掉,不太重要
- 儲存了傳入的state對象
- 每次使用emit刷新的時候,會將傳入state替換之前存儲state對象
- emit做了一個判斷,如果傳入state和存儲state對象相同,將不執行刷新操作(這就是我在State類里面,加clone方法的原因)
- 初始化了Stream一系列對象
- 封裝了關閉Stream流的操作
- 將上面的代碼精簡下
abstract class BlocBase<T> {
  BlocBase(this.state) : _stateController = StreamController<T>.broadcast();

  final StreamController<T> _stateController;

  T state;

  bool _emitted = false;

  Stream<T> get stream => _stateController.stream;

  void emit(T newState) {
    if (_stateController.isClosed) return;
    if (state == newState && _emitted) return;
    state = newState;
    _stateController.add(state);
    _emitted = true;
  }

  @mustCallSuper
  Future<void> close() async {
    await _stateController.close();
  }
}
BlocBuilder
BlocBuilder對StreamBuilder的用法做了很多精簡,來看下內部實現
- BlocBuilder
- 此處需要關注下builder參數; buildWhen是個判斷是否需要更新的參數
- build方法里面調用了builder,需要看下父類BlocBuilderBase
typedef BlocWidgetBuilder<S> = Widget Function(BuildContext context, S state);

class BlocBuilder<B extends BlocBase<S>, S> extends BlocBuilderBase<B, S> {
  const BlocBuilder({
    Key? key,
    required this.builder,
    B? bloc,
    BlocBuilderCondition<S>? buildWhen,
  }) : super(key: key, bloc: bloc, buildWhen: buildWhen);

  final BlocWidgetBuilder<S> builder;

  @override
  Widget build(BuildContext context, S state) => builder(context, state);
}
- BlocBuilderBase
- context.read< B>() 和 Provider.of
(this, listen: false)效果是一樣的,就是對后者的一個封裝 - 此處通過context.read< B>() 拿到了 我們在 BlocProvider中傳入的XxxBloc對象,賦值給了_BlocBuilderBaseState中的 _bloc變量
- BlocBuilderBase抽象了一個build方法,在 _BlocBuilderBaseState中賦值給了 BlocListener
- BlocBuilderBase還沒法看出刷新邏輯,幾個重要的參數:_bloc,listener,widget.build都傳給了BlocListener;需要看下BlocListener的實現
- context.read< B>() 和 Provider.of
abstract class BlocBuilderBase<B extends BlocBase<S>, S>
    extends StatefulWidget {
  const BlocBuilderBase({Key? key, this.bloc, this.buildWhen})
      : super(key: key);

  final B? bloc;

  final BlocBuilderCondition<S>? buildWhen;

  Widget build(BuildContext context, S state);

  @override
  State<BlocBuilderBase<B, S>> createState() => _BlocBuilderBaseState<B, S>();
}

class _BlocBuilderBaseState<B extends BlocBase<S>, S>
    extends State<BlocBuilderBase<B, S>> {
  late B _bloc;
  late S _state;

  @override
  void initState() {
    super.initState();
    _bloc = widget.bloc ?? context.read<B>();
    _state = _bloc.state;
  }

  ...

  @override
  Widget build(BuildContext context) {
    ...
    return BlocListener<B, S>(
      bloc: _bloc,
      listenWhen: widget.buildWhen,
      listener: (context, state) => setState(() => _state = state),
      child: widget.build(context, _state),
    );
  }
}
- BlocListener:參數傳給父類的構造函數了,需要看下父類BlocListenerBase的實現
class BlocListener<B extends BlocBase<S>, S> extends BlocListenerBase<B, S>
  const BlocListener({
    Key? key,
    required BlocWidgetListener<S> listener,
    B? bloc,
    BlocListenerCondition<S>? listenWhen,
    Widget? child,
  }) : super(
          key: key,
          child: child,
          listener: listener,
          bloc: bloc,
          listenWhen: listenWhen,
        );
}
- BlocListenerBase:精簡了一些邏輯代碼
abstract class BlocListenerBase<B extends BlocBase<S>, S>
    extends SingleChildStatefulWidget {
  const BlocListenerBase({
    Key? key,
    required this.listener,
    this.bloc,
    this.child,
    this.listenWhen,
  }) : super(key: key, child: child);

  final Widget? child;

  final B? bloc;

  final BlocWidgetListener<S> listener;

  final BlocListenerCondition<S>? listenWhen;

  @override
  SingleChildState<BlocListenerBase<B, S>> createState() =>
      _BlocListenerBaseState<B, S>();
}

class _BlocListenerBaseState<B extends BlocBase<S>, S>
    extends SingleChildState<BlocListenerBase<B, S>> {
  StreamSubscription<S>? _subscription;
  late B _bloc;
  late S _previousState;

  @override
  void initState() {
    super.initState();
    _bloc = widget.bloc ?? context.read<B>();
    _previousState = _bloc.state;
    _subscribe();
  }

  ...

  @override
  Widget buildWithChild(BuildContext context, Widget? child) {
    return child!;
  }

  @override
  void dispose() {
    _unsubscribe();
    super.dispose();
  }

  void _subscribe() {
    _subscription = _bloc.stream.listen((state) {
      if (widget.listenWhen?.call(_previousState, state) ?? true) {
        widget.listener(context, state);
      }
      _previousState = state;
    });
  }

  void _unsubscribe() {
    _subscription?.cancel();
    _subscription = null;
  }
}
終於找了關鍵的代碼了!
可以發現Bloc是通過 StreamController 和 listen配合實現刷新的
調用的 widget.listener(context, state),這個實現的方法是個setState,大家可以看看 _BlocBuilderBaseState這個類
_bloc.stream.listen(
  (state) {
    if (widget.listenWhen?.call(_previousState, state) ?? true) {
      widget.listener(context, state);
    }
    _previousState = state;
  },
);
精簡BlocBuild
上面的BlocBuild的實現邏輯還是太繞,封裝層級太多,下面寫個精簡版的BlocBuild
當然了,肯定會保留BlocBuild刷新的核心邏輯
class BlocEasyBuilder<T extends BlocBase<V>, V> extends StatefulWidget {
  const BlocEasyBuilder({
    Key? key,
    required this.builder,
  }) : super(key: key);

  final Function(BuildContext context, V state) builder;

  @override
  _BlocEasyBuilderState createState() => _BlocEasyBuilderState<T, V>();
}

class _BlocEasyBuilderState<T extends BlocBase<V>, V>
    extends State<BlocEasyBuilder<T, V>> {
  late T _bloc;
  late V _state;
  StreamSubscription<V>? _listen;

  @override
  void initState() {
    _bloc = BlocProvider.of<T>(context);
    _state = _bloc.state;

    //數據改變刷新Widget
    _listen = _bloc.stream.listen((event) {
      setState(() {});
    });
    super.initState();
  }

  @override
  Widget build(BuildContext context) {
    return widget.builder(context, _state);
  }

  @override
  void dispose() {
    _listen?.cancel();
    super.dispose();
  }
}
- 來看下效果圖:詳細的使用代碼,請查看:flutter_use
Event機制
如果使用Bloc模式開發,會多出一個Event層,該層是定義所有的事件交互
這邊提一下
- Bloc:省略了一些代碼
abstract class Bloc<Event, State> extends BlocBase<State> {
  /// {@macro bloc}
  Bloc(State initialState) : super(initialState) {
    _bindEventsToStates();
  }

  StreamSubscription<Transition<Event, State>>? _transitionSubscription;

  StreamController<Event>? __eventController;
  StreamController<Event> get _eventController {
    return __eventController ??= StreamController<Event>.broadcast();
  }

  void add(Event event) {
    if (_eventController.isClosed) return;
    try {
      onEvent(event);
      _eventController.add(event);
    } catch (error, stackTrace) {
      onError(error, stackTrace);
    }
  }

  Stream<Transition<Event, State>> transformEvents(
    Stream<Event> events,
    TransitionFunction<Event, State> transitionFn,
  ) {
    return events.asyncExpand(transitionFn);
  }

  @protected
  @visibleForTesting
  @override
  void emit(State state) => super.emit(state);

  Stream<State> mapEventToState(Event event);

  Stream<Transition<Event, State>> transformTransitions(
    Stream<Transition<Event, State>> transitions,
  ) {
    return transitions;
  }

  @override
  @mustCallSuper
  Future<void> close() async {
    await _eventController.close();
    await _transitionSubscription?.cancel();
    return super.close();
  }

  void _bindEventsToStates() {
    _transitionSubscription = transformTransitions(
      transformEvents(
        _eventController.stream,
        (event) => mapEventToState(event).map(
          (nextState) => Transition(
            currentState: state,
            event: event,
            nextState: nextState,
          ),
        ),
      ),
    ).listen(
      (transition) {
        if (transition.nextState == state && _emitted) return;
        try {
          emit(transition.nextState);
        } catch (error, stackTrace) {
          onError(error, stackTrace);
        }
      },
      onError: onError,
    );
  }
}
整體邏輯比較清晰,來理一下
- Bloc是抽象類
- 構造函數里面調用 _bindEventsToStates() 方法
- Bloc抽象了一個mapEventToState(Event event)方法,繼承Bloc抽象類,必須實現該方法
- Bloc類中,實例了Stream流對象,來做Event的事件觸發機制
- 添加Event事件時,會觸發 _bindEventsToStates() 方法中的listener回調
- _bindEventsToStates里面做了一些操作
- 被添加的Event事件:events.asyncExpand(transitionFn);先將自身Event參數傳入transitionFn方法中執行
- transitionFn的邏輯是:將Event參數傳入mapEventToState中,然后mapEventToState回傳State對象
- 然后觸發listen回調,listen中,將state傳emit中,然后觸發刷新控件重建
總結
上面幾個關鍵的類分析完,整個Bloc的運行機制,一下子就明朗了
BlocProvider
-
負責儲存 傳入XxxBloc加以儲存
-
提供的of方法,可以在BlocProvider或其子節點位置,獲取到儲存的XxxBloc
-
提供回收資源的回調(回收Stream流)
BlocBase
-
儲存了傳入的state對象
-
初始化了Stream一系列對象
-
封裝了關閉Stream流的操作
BlocBuilder
- 本質是StatefulWidget
- 通過BlocProvider獲取到XxxBloc,再通過其listener方法監聽數據改變
- 數據改變后,通過setState重建StatefulWidget,以達到局部刷新的效果
手搓一個狀態管理框架
Bloc的原理相對Provider而言,要簡單很多。。。
模仿Bloc的刷新機制,來手搓一個狀態管理框架!用EasyC來命名吧!

手搓
- EasyC:首先需要寫一個基類,處理Stream一系列的操作
abstract class EasyC<T> {
  EasyC(this.state) : _controller = StreamController<T>.broadcast();

  final StreamController<T> _controller;

  T state;

  bool _emitted = false;

  Stream<T> get stream => _controller.stream;

  void emit(T newState) {
    if (_controller.isClosed) return;
    if (state == newState && _emitted) return;
    state = newState;
    _controller.add(state);
    _emitted = true;
  }

  @mustCallSuper
  Future<void> close() async {
    await _controller.close();
  }
}
- EasyCProvider
- 這里就不使用Provider框架提供的InheritedProvider了
- 這邊我用InheritedWidget手搓了一個
- of方法和stream流的關閉都搞定了;不用手動關流,也不用寫StatefulWidget了!
class EasyCProvider<T extends EasyC> extends InheritedWidget {
  EasyCProvider({
    Key? key,
    Widget? child,
    required this.create,
  }) : super(key: key, child: child ?? Container());

  final T Function(BuildContext context) create;

  @override
  bool updateShouldNotify(InheritedWidget oldWidget) => false;

  @override
  InheritedElement createElement() => EasyCInheritedElement(this);

  static T of<T extends EasyC>(BuildContext context) {
    var inheritedElement =
        context.getElementForInheritedWidgetOfExactType<EasyCProvider<T>>()
            as EasyCInheritedElement<T>?;

    if (inheritedElement == null) {
      throw 'not found';
    }

    return inheritedElement.value;
  }
}

class EasyCInheritedElement<T extends EasyC> extends InheritedElement {
  EasyCInheritedElement(EasyCProvider<T> widget) : super(widget);

  bool _firstBuild = true;

  late T _value;

  T get value => _value;

  @override
  void performRebuild() {
    if (_firstBuild) {
      _firstBuild = false;
      _value = (widget as EasyCProvider<T>).create(this);
    }

    super.performRebuild();
  }

  @override
  void unmount() {
    _value.close();
    super.unmount();
  }
}
- EasyCBuilder:最后整一個定點刷新Widget
class EasyCBuilder<T extends EasyC<V>, V> extends StatefulWidget {
  const EasyCBuilder({
    Key? key,
    required this.builder,
  }) : super(key: key);

  final Function(BuildContext context, V state) builder;

  @override
  _EasyCBuilderState createState() => _EasyCBuilderState<T, V>();
}

class _EasyCBuilderState<T extends EasyC<V>, V>
    extends State<EasyCBuilder<T, V>> {
  late T _easyC;
  late V _state;
  StreamSubscription<V>? _listen;

  @override
  void initState() {
    _easyC = EasyCProvider.of<T>(context);
    _state = _easyC.state;

    //數據改變刷新Widget
    _listen = _easyC.stream.listen((event) {
      setState(() {});
    });
    super.initState();
  }

  @override
  Widget build(BuildContext context) {
    return widget.builder(context, _state);
  }

  @override
  void dispose() {
    _listen?.cancel();
    super.dispose();
  }
}
上面這三個文件,基本就把Bloc的刷新機制再現了
同時,也去掉了我心中的一個疙瘩,Bloc源碼對 Provider的 _startListening方法,莫名其妙的使用。。。
使用
使用基本和Bloc一摸一樣
我本來想把emit倆個新舊state對象對比的判斷去掉,但是想想Bloc作者對這個理念好像有很深的執念,在很多地方都做了處理;所以,這邊我也就保留了,也可以保留Bloc原汁原味的用法
- view
class CounterEasyCPage extends StatelessWidget {
  @override
  Widget build(BuildContext context) {
    return EasyCProvider(
      create: (BuildContext context) => CounterEasyC(),
      child: Builder(builder: (context) => _buildPage(context)),
    );
  }

  Widget _buildPage(BuildContext context) {
    final easyC = EasyCProvider.of<CounterEasyC>(context);

    return Scaffold(
      appBar: AppBar(title: Text('自定義狀態管理框架-EasyC范例')),
      body: Center(
        child: EasyCBuilder<CounterEasyC, CounterEasyCState>(
          builder: (context, state) {
            return Text(
              '點擊了 ${easyC.state.count} 次',
              style: TextStyle(fontSize: 30.0),
            );
          },
        ),
      ),
      floatingActionButton: FloatingActionButton(
        onPressed: () => easyC.increment(),
        child: Icon(Icons.add),
      ),
    );
  }
}
- logic
class CounterEasyC extends EasyC<CounterEasyCState> {
  CounterEasyC() : super(CounterEasyCState().init());

  ///自增
  void increment() => emit(state.clone()..count = ++state.count);
}
- state
class CounterEasyCState {
  late int count;

  CounterEasyCState init() {
    return CounterEasyCState()..count = 0;
  }

  CounterEasyCState clone() {
    return CounterEasyCState()..count = count;
  }
}
- 效果圖

全局也是可以的,和Provider沒什么不一樣,我這邊就不重復寫了
總結
這手搓的EasyC框架,保留Bloc刷新機制的精髓,同時,也做了大量的精簡
相信有緣人只要用心看看,一定能夠理解的
Bloc的源碼並不復雜,他是對Stream的使用,做了一個大大的精簡,基本使用痛點,全都封裝起來,內部處理了
最后
留言板
Provider和Bloc的源碼解析終於寫完了,就差最后一篇GetX了。。。

為了證明我寫的分析源碼是有作用且有效果的,在末尾,我都根據其狀態管理框架的刷新機制,手搓了一個全新的狀態管理框架
選擇狀態管理框架,應該是一件比較慎重的事;事先可以先看看其原理,理解了他的內部運轉機制,就完全可以去按需選擇了,因為你明白了它的內部運轉機制,就算使用過程中出現什么問題,你也能從容應對了;如果你怕作者棄坑或不滿意其功能,選擇你自己想要的刷新機制,自己去手搓一個!
Provider,Bloc,GetX這三個框架,我都寫了相應插件,如果你選擇的狀態管理框架是這個三者中任意一個,相信這些插件,都能幫你完成一些重復的工作量
相關地址
- 文章中Demo的Github地址:flutter_use
- Web效果:https://cnad666.github.io/flutter_use/web/index.html
- 如果相關功能按鈕沒看到,可能需要你清下瀏覽器緩存
- Windows:Windows平台安裝包
- 密碼:xdd666
系列文章