
基於LibTorch (Pytorch C++)的C++開源圖像分割神經網絡庫.
分享一個C++的圖像分割開源庫LibtorchSegmentation,支持C++訓練分割模型,可以訓練自己的數據集。支持FPN,UNet,PAN,LinkNet,DeepLabV3和DeepLabV3+,支持ResNet系列和ResNext系列的編碼器骨干網絡。這個庫具有以下優點:
- 高級的API (只需一行代碼就可創建網絡)
- 6 種模型架構可用於單類或者多類的分割任務 (包括Unet)
- 7 種編碼器網絡
- 所有的編碼器都有預訓練權重,可以更快更好地收斂
- 相比於python下的GPU前向推理速度具有2倍或以上的優勢, cpu下保持速度一致. (Unet測試於GTX 2070S).
📚 Libtorch教程 📚
如果你想對該開源項目有更多更詳細的了解,請前往本人另一個開源項目:Libtorch教程 .
📋 目錄
⏳ 快速開始
1. 用 Libtorch Segment 創建你的第一個分割網絡
分割模型是 LibTorch 的 torch::nn::Module的派生類, 可以很容易生成:
#include "Segmentor.h"
auto model = UNet(1, /*num of classes*/
                  "resnet34", /*encoder name, could be resnet50 or others*/
                  "path to resnet34.pt"/*weight path pretrained on ImageNet, it is produced by torchscript*/
                  );
2. 生成自己的預訓練權重
所有編碼器均具有預訓練的權重。加載預訓練權重,以相同的方式訓練數據,可能會獲得更好的結果(更高的指標得分和更快的收斂速度)。還可以在凍結主干的同時僅訓練解碼器和分割頭。
import torch
from torchvision import models

# resnet50 for example
model = models.resnet50(pretrained=True)
model.eval()
var=torch.ones((1,3,224,224))
traced_script_module = torch.jit.trace(model, var)
traced_script_module.save("resnet50.pt")
恭喜你! 大功告成! 現在,您可以使用自己喜歡的主干和分割框架來訓練模型了。
💡 例子
- 使用來自PASCAL VOC數據集的圖像進行人體分割數據訓練模型. "voc_person_seg" 目錄包含32個json標簽及其相應的jpeg圖像用於訓練,還有8個json標簽以及相應的圖像用於驗證。
Segmentor<FPN> segmentor;
segmentor.Initialize(0/*gpu id, -1 for cpu*/,
                    512/*resize width*/,
                    512/*resize height*/,
                    {"background","person"}/*class name dict, background included*/,
                    "resnet34"/*backbone name*/,
                    "your path to resnet34.pt");
segmentor.Train(0.0003/*initial leaning rate*/,
                300/*training epochs*/,
                4/*batch size*/,
                "your path to voc_person_seg",
                ".jpg"/*image type*/,
                "your path to save segmentor.pt");
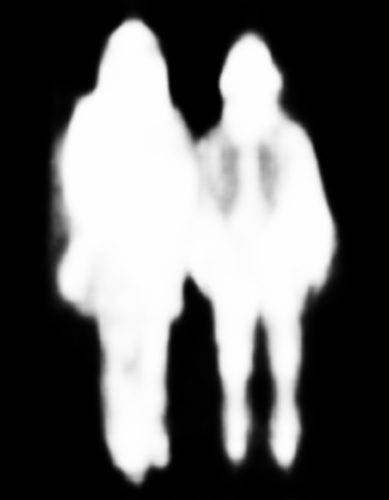
- 預測測試。項目中提供了以ResNet34為骨干網絡的FPN網絡,訓練了一些周期得到segmentor.pt文件。 您可以直接測試分割結果:
cv::Mat image = cv::imread("your path to voc_person_seg\\val\\2007_004000.jpg");
Segmentor<FPN> segmentor;
segmentor.Initialize(0,512,512,{"background","person"},
                      "resnet34","your path to resnet34.pt");
segmentor.LoadWeight("segmentor.pt"/*the saved .pt path*/);
segmentor.Predict(image,"person"/*class name for showing*/);
預測結果顯示如下:
🧑🚀 訓練自己的數據
- 創建自己的數據集. 使用"pip install"安裝labelme並標注你的圖像. 將輸出的json文件和圖像分成以下文件夾:
Dataset
├── train
│   ├── xxx.json
│   ├── xxx.jpg
│   └......
├── val
│   ├── xxxx.json
│   ├── xxxx.jpg
│   └......
- 訓練或測試。就像“ voc_person_seg”的示例一樣,用自己的數據集路徑替換“ voc_person_seg”。
📦 Models
Architectures
- [x] Unet [paper]
- [x] FPN [paper]
- [x] PAN [paper]
- [x] LinkNet [paper]
- [x] DeepLabV3 [paper]
- [x] DeepLabV3+ [paper]
- [ ] PSPNet [paper]
Encoders
- [x] ResNet
- [x] ResNext
- [ ] ResNest
以下是該項目中受支持的編碼器的列表。除resnest外,所有編碼器權重都可以通過torchvision生成。選擇適當的編碼器,然后單擊以展開表格,然后選擇特定的編碼器及其預訓練的權重。
ResNet
| Encoder | Weights | Params, M |
|---|---|---|
| resnet18 | imagenet | 11M |
| resnet34 | imagenet | 21M |
| resnet50 | imagenet | 23M |
| resnet101 | imagenet | 42M |
| resnet152 | imagenet | 58M |
ResNeXt
| Encoder | Weights | Params, M |
|---|---|---|
| resnext50_32x4d | imagenet | 22M |
| resnext101_32x8d | imagenet | 86M |
ResNeSt
| Encoder | Weights | Params, M |
|---|---|---|
| timm-resnest14d | imagenet | 8M |
| timm-resnest26d | imagenet | 15M |
| timm-resnest50d | imagenet | 25M |
| timm-resnest101e | imagenet | 46M |
| timm-resnest200e | imagenet | 68M |
| timm-resnest269e | imagenet | 108M |
| timm-resnest50d_4s2x40d | imagenet | 28M |
| timm-resnest50d_1s4x24d | imagenet | 23M |
🛠 安裝
Windows:
配置libtorch 開發環境. Visual studio 和 Qt Creator已經通過libtorch1.7x release的驗證.
Linux && MacOS:
按照官方提供的pytorch c++ 部署. 比Windows要簡單許多.
🤝 感謝
這個項目還在施工,以下是目前給予幫助的項目.
📝 引用
@misc{Chunyu:2021,
  Author = {Chunyu Dong},
  Title = {Libtorch Segment},
  Year = {2021},
  Publisher = {GitHub},
  Journal = {GitHub repository},
  Howpublished = {\url{https://github.com/AllentDan/SegmentationCpp}}
}
🛡️ 證書
該項目以 MIT License開源。