一、Redisson
1、入門配置
引入依賴
<dependency>
    <groupId>org.redisson</groupId>
    <artifactId>redisson</artifactId>
    <version>3.12.0</version>
</dependency>
配置文件
import org.redisson.Redisson;
import org.redisson.api.RedissonClient;
import org.redisson.config.Config;
import org.springframework.context.annotation.Bean;
import org.springframework.context.annotation.Configuration;

import java.io.IOException;

@Configuration
public class MyRedissonConfig {

    /**
     * 所有對Redisson的是用都是通過RedissonClient對象
     **/
    @Bean(destroyMethod="shutdown")
    public RedissonClient redisson() throws IOException {
        Config config = new Config();
        // redisson集群模式
//        config.useClusterServers()
//                .addNodeAddress("127.0.0.1:7004", "127.0.0.1:7001");
        // redisson單節點模式
        config.useSingleServer().setAddress("redis://192.168.56.10:6379");
        // 根據config創建出RedissonClient實例
        return Redisson.create(config);
    }

}
2、可重入鎖-看門狗
2.1 默認加鎖時間
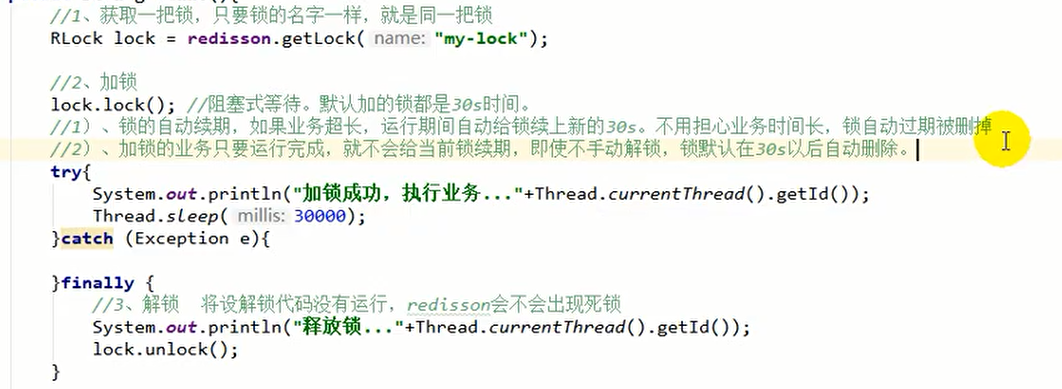
2.2 手動加鎖
lock.lock(10, TimeUnit.SECONDS); // 加鎖以后10秒鍾自動解鎖
手動加鎖時,不會自動續期,自動解鎖時間一定要大於業務的執行時間!!!
- 1、如果傳遞了鎖的超時時間,源碼中發送給redis一個執行腳本,進行占鎖,默認超時就是指定的時間
- 2、如果未指定鎖的超時時間,就是用30 * 1000【lockWatchdogTimeout看門狗的默認時間】;只要占鎖成功,就會啟動一個定時任務【重新給鎖設置多起事件,新的過期時間就是看門狗的默認時間】,每隔10s都會自動再次續期,續成30s滿時間。internalLockLeaseTime【看門狗時間】 / 3,10s

2.3 最佳實戰
盡量使用
lock.lock(30, TimeUnit.SECONDS);省掉了整個續期操作,手動解鎖。
超時時間設置30秒。如果業務操作30s還沒返回---說明業務已經完蛋了
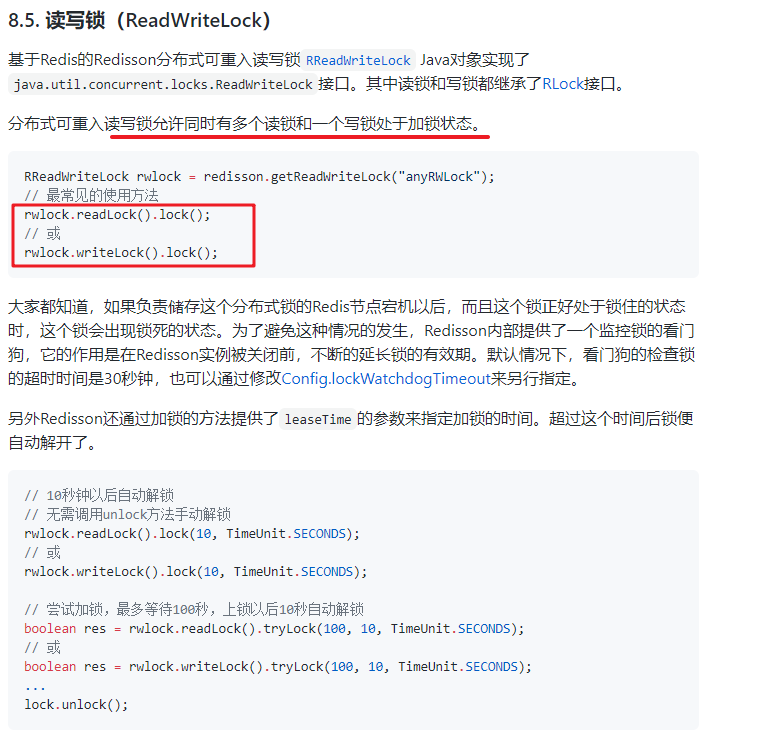
3、讀寫鎖
保證一定能讀到最新數據,修改期間,寫鎖是一個排他鎖(互斥鎖、獨享鎖)。讀鎖是一個共享鎖
寫鎖沒釋放讀就必須等待
寫 + 讀:等待寫鎖釋放
寫 + 寫:阻塞方式
讀 + 寫:寫鎖需要等待
讀 + 讀:相當於無鎖,並發讀,只會在redis中記錄好所有當前讀鎖。它們都會同時加鎖成功。!!!只要有寫的地方,都必須等待!!!
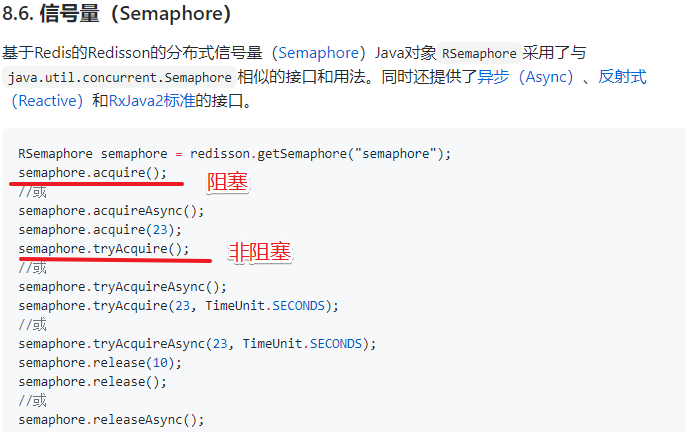
4、信號量
應用:停車位、限流
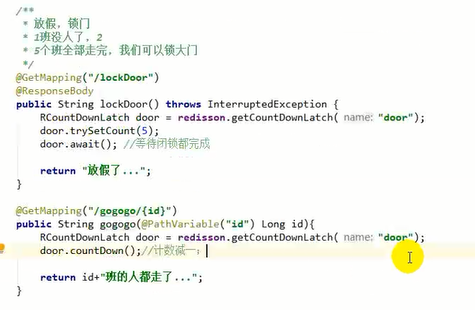
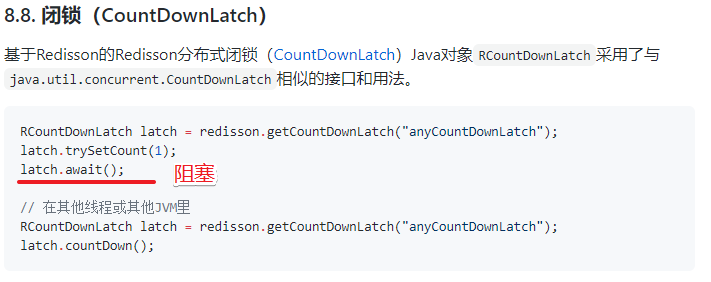
5、閉鎖
二、Spring Cache
1、簡介
- Spring從3.1開始定義了 org.springframework.cache.Cache 和 org.springframework.cache.CacheManager 接囗來統一不同的緩存技術;並支持使用JCache(JSR107)注解簡化我們開發;
- Cache接囗為緩存的組件規范定義,包含緩存的各種操作集合;
Cache接囗下 Spring 提供了各種 xxxCach的實現;如 RedisCache,EhCacheCache,ConcurrentMapCache等; - 每次調用需要緩存功能的方法時,Spring會檢查指定參數的指定的目標方法是否已經被調用過;如果有就直接從緩存中獲取方法調用后的結果,如果沒有就調用方法並緩存結果后返回給用戶。下次調用直接從緩存中獲取。
- 使用 Spring 緩存抽象時我們需要關注以下兩點;
1、確定方法需要被緩存以及他們的緩存策略
2、從緩存中讀取之前緩存存儲的數據
2、基礎概念
3、SpringBoot整合Cache
3.1 引入依賴
<dependency>
    <groupId>org.springframework.boot</groupId>
    <artifactId>spring-boot-starter-cache</artifactId>
</dependency>
<!-- 使用redis作為緩存的話也需要引入redis依賴 -->
3.2 配置
(1)自動配置
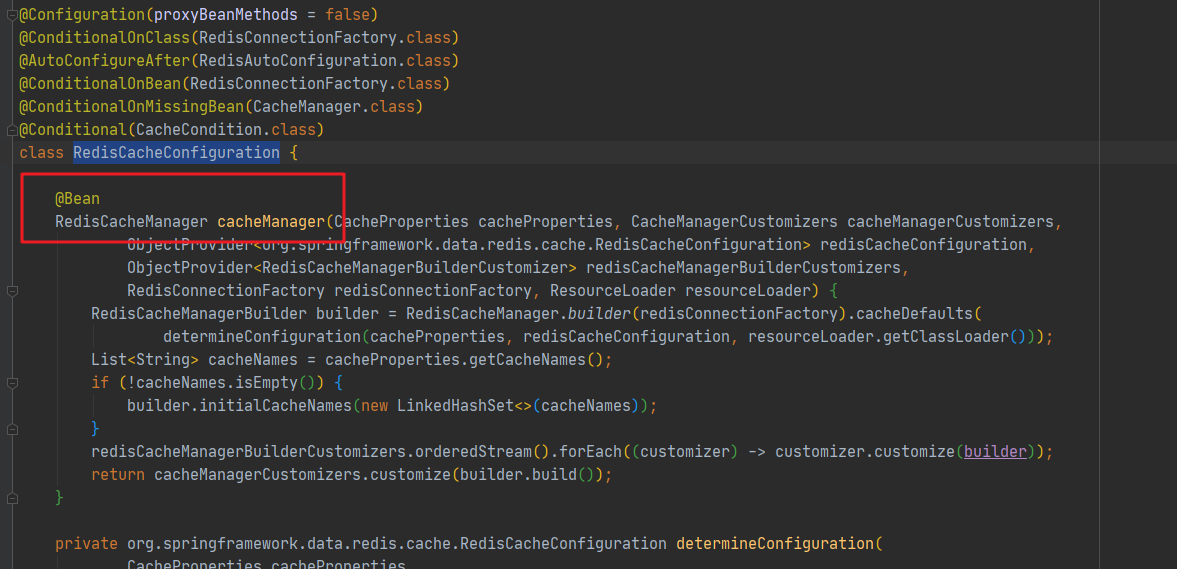
CacheAutoConfiguration會導入 RedisCacheConfiguration
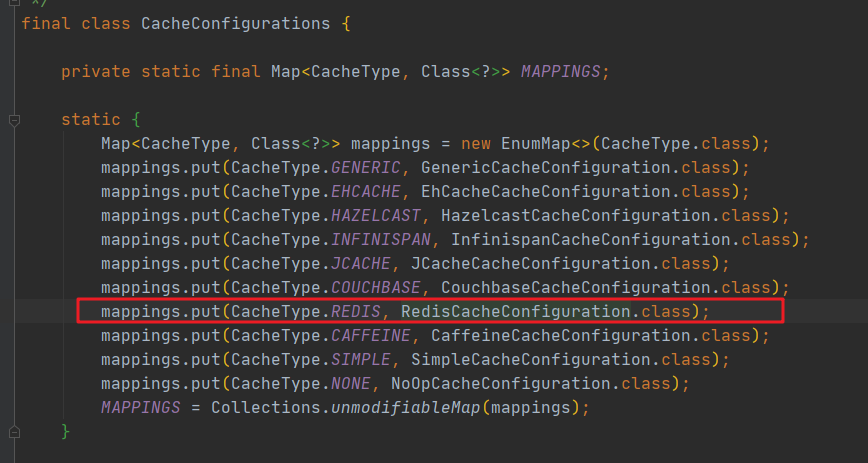
RedisCacheConfiguration 自動配置好了緩存管理器 RedisCacheManager
(2)手動配置
spring:
  cache:
    type: redis
#    cache-names: name1,name2,name3
3.3 開啟緩存功能
@EnableCaching
@SpringBootApplication
public class Application {
	...
4、緩存注解

4.1 @Cacheable
讀模式下設置緩存
// 簡單使用
@Cacheable({"name1","name2"})
public Object getData (){
    // 獲取業務數據
    return data;
}
1、每一個需要緩存的數據我們都需要指定放到哪個名字的緩存。【緩存分區(按業務類型分)】
2、@Cacheable代表當前方法的結果需要緩存
如果緩存中有,則不需要調用方法
如果緩存中沒有,會調用方法查詢結果並放入緩存
3、默認行為
1)、如果緩存中有,方法不調用
2)、key默認自動生成 【緩存名字】::SimpleKey[](自主生成的key值)
3)、緩存的value值,默認使用jdk序列化機制,將序列化的數據存到redis
4)、默認ttl時間 -1(即永不過期)
4.2 自定義緩存配置
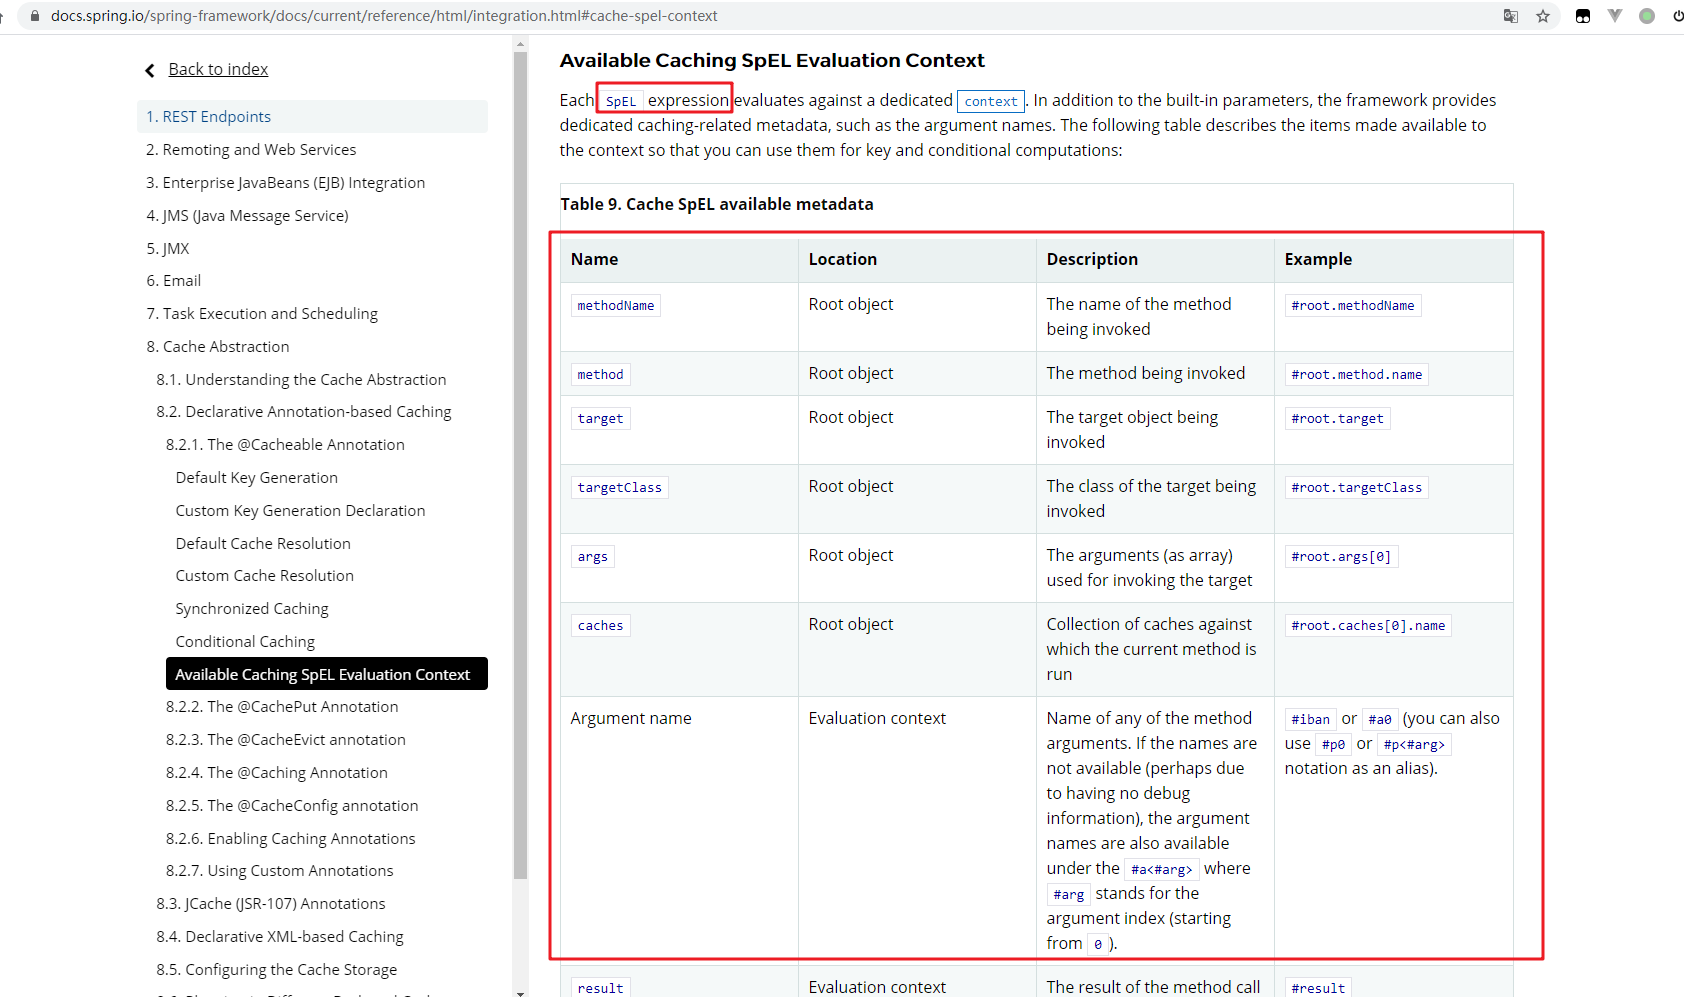
1、指定緩存使用的key
key屬性支持SpEL表達式,普通字符串記得加單引號
@Cacheable(value = {"name1"}, key = "'level1Categorys'")
2、指定緩存數據存活時間
spring:
  cache:
    redis:
      time-to-live: 1000  ## 毫秒為單位
      # 開啟緩存空值,防止緩存穿透
      cache-null-values: true
      # 開啟緩存前綴,不設置的情況下默認使用分區名為前綴
      use-key-prefix: true
3、數據保存為json格式
import org.springframework.boot.autoconfigure.cache.CacheProperties;
import org.springframework.boot.context.properties.EnableConfigurationProperties;
import org.springframework.cache.annotation.EnableCaching;
import org.springframework.context.annotation.Bean;
import org.springframework.context.annotation.Configuration;
import org.springframework.data.redis.cache.RedisCacheConfiguration;
import org.springframework.data.redis.serializer.GenericJackson2JsonRedisSerializer;
import org.springframework.data.redis.serializer.RedisSerializationContext;
import org.springframework.data.redis.serializer.StringRedisSerializer;

// 2、@ConfigurationProperties(prefix = "spring.cache") -> CacheProperties
// 原本配置文件綁定的配置類是上面這樣的。沒有放在容器中
// 開啟屬性綁定功能,綁定CacheProperties屬性類
// 這樣就能把綁定CacheProperties屬性類放進spring容器中
@EnableConfigurationProperties(CacheProperties.class)
@Configuration
@EnableCaching
public class MyCacheConfig {

    @Bean // 3、可以直接設置參數為spring容器中的bean,從而獲取CacheProperties.Redis
    RedisCacheConfiguration redisCacheConfiguration(CacheProperties cacheProperties) {
        // 1、使用自定義配置的話會無法獲取配置文件中的屬性
        RedisCacheConfiguration config = RedisCacheConfiguration.defaultCacheConfig();
        config.serializeKeysWith(RedisSerializationContext.SerializationPair.fromSerializer(new StringRedisSerializer()));
        config.serializeValuesWith(RedisSerializationContext.SerializationPair.fromSerializer(new GenericJackson2JsonRedisSerializer()));
        // 4、使配置文件中的屬性生效
        CacheProperties.Redis redisProperties = cacheProperties.getRedis();
        if (redisProperties.getTimeToLive() != null) {
            config = config.entryTtl(redisProperties.getTimeToLive());
        }
        if (redisProperties.getKeyPrefix() != null) {
            config = config.prefixKeysWith(redisProperties.getKeyPrefix());
        }
        if (!redisProperties.isCacheNullValues()) {
            config = config.disableCachingNullValues();
        }
        if (!redisProperties.isUseKeyPrefix()) {
            config = config.disableKeyPrefix();
        }
        return config;
    }
}
4.3 @CacheEvict
寫模式下的-->緩存失效模式
// 更新操作后刪除緩存
@CacheEvict(value = {"name1"}, key = "'level1Categorys'")
@Transaction
public void update(){
    // do something...
}

// 刪除某個分區下的所有數據
// 約定:存儲同一類型的數據,都可以指定成同一個分區,以后好刪除
@CacheEvict(value = {"name1"}, allEntries = true)
@Transaction
public void update(){
    // do something...
}
4.4 @Caching
同時操作多個緩存
@Caching(evict = {
        @CacheEvict(value = {"name1"}, key = "'Categorys-01'"),
        @CacheEvict(value = {"name1"}, key = "'Categorys-02'")
})
@Transaction
public void update(){
    // do something...
}
4.5 @CachePut
方法完成后將數據寫入緩存
適用於-緩存雙寫模式
5、Spring Cache原理與不足
5.1 原理
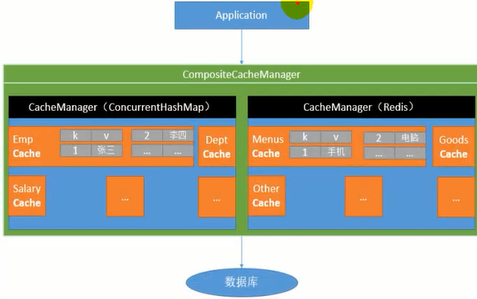
CacheManager(RedisCacheManager)->Cache(RedisCache)->Cache負責緩存的讀寫
5.2 讀模式
- 緩存穿透:大量查詢一個null的數據。解決:緩存空數據 cache-null-values: true
- 緩存擊穿:高並發同時查詢過期數據。解決:cache默認讀不加鎖,可以設置讀鎖 @Cacheable(value = "", sync = true)
- 緩存雪崩:大量key同時過期。解決:加隨機時間;其實只要加上過期時間就可以滿足要求 time-to-live: 1000
5.3 寫模式
- 讀寫加鎖。(讀多寫少)
- 引入Canal,感知到Mysql的更新去更新緩存
- 讀多寫多時,直接去數據庫查詢就行
5.4 總結
常規數據(讀多寫少,即時性、一致性要求不高的數據):完全可以使用Spring-Cache;寫模式(只要緩存的數據有過期時間就足夠了)
特殊數據:特殊設計