目標檢測中的數據增強方式
代碼放在github上了,需要參考的自取。
- 目標檢測中的數據增強需要做兩方面,首先是圖像本身的修改,另外需要修改標注文件中的標注框。所以自然而然的在進行數據增強時,就需要分兩種:
- 一種是只修改圖像而不需要修改其對應的標注信息,例如修改色調,加椒鹽噪聲,隨機擦除等等
- 一種是急需要修改圖像又需要修改標注信息,甚至生成新的標注信息,比如mosaic,旋轉,鏡像等等。
- 下面就講一下應用較為廣泛的數據增強方式及其python的實現。在講之前為了代碼的完整性,先將圖像數據和加載標注文件獲取標注框信息
數據加載
- 在實際場景下我們拿到的標注文件時各種各樣的,但標注文件必定包含了兩個方面的信息,一個是對應圖片中目標的類別。另外一個就是對應圖片中目標的左上角坐標和右下角坐標,我這次拿到的數據是使用
point的格式標注的,如果你的算法數據加載入口是標注的VOC格式(一般都是),那你就不得不在保存的時候保存成VOC格式。
數據封裝
-
在處理之前先對數據進行了封裝,這樣在處理的過程中比較方便,也可以使用字典進行簡單的封裝
-
class Data:
    """
    封裝圖像和其對應的標注信息
    """
    def __init__(self, name, boxes=None, img=None):
        if boxes is None:
            boxes = []
        self.name = name
        self.boxes = boxes
        self.img = img
        self.shape = img.shape


    def append_box(self, box):
        """
        向這個數據中添加標注框信息
        :param box:
        :return:
        """
        self.boxes.append(box)

    def set_name(self, name):
        self.name = name

    def set_img(self, img):
        self.img = img


class Box:
    """
    box類包含兩個字段,一個是這個box的類別,一個是這個box的坐標信息[xmin,ymin,xmax,ymax]
    """
    def __init__(self, label, cod):
        self.label = label
        self.cod = cod

    def get_label(self):
        return self.label

    def get_cod(self):
        return self.cod
加載標准的VOC格式數據集的代碼實現
-
def load_data(img_path, xml_path, flog_path, save_path): """ 加載所有的圖像和其標注,以標注文件為准,有的圖像並沒有標注,然后對其進行數據增強並保存 :param flog_path: 雲霧圖像所在目錄 :param save_path: 數據集保存的根目錄 :param img_path: 圖像文件路徑, tif格式 :param xml_path: 標注文件路徑,VOC格式 :return: """ annotations = os.listdir(xml_path) data_list = [] for annotation in annotations: xml_file = open(os.path.join(xml_path, annotation), 'br') # 如果是解析標准的VOC標注此處更換函數voc2data boxes = load_annotations(xml_file) name = annotation.split(".")[0] img = cv2.imread(os.path.join(img_path, name + ".tif")) data = Data(name=name, boxes=boxes, img=img) data_list.append(data) def load_annotations(xml_file): """ 解析標注文件中的信息,這個標注文件格式與標准的VOC不同,是我個人拿到的數據形式 :param xml_file:標注文件 :return: 標注文件中的坐標信息和所屬類別,對應的圖像名稱等等信息 """ boxes = [] # 解析文件 tree = ET.parse(xml_file) # 獲取根節點 root = tree.getroot() # 獲取目標節點 objects = root.find("objects") for obj in objects.iter("object"): # 找到這個標注框對應的標簽 label = obj.find("possibleresult").find("name").text x = [] y = [] # 找到這個框的坐標 for temp in obj.find("points").iter("point"): xy = temp.text.split(",") x.append(int(float(xy[0]))) y.append(int(float(xy[1]))) cod = [min(x), min(y), max(x), max(y)] box = Box(label=label, cod=cod) boxes.append(box) return boxes def voc2data(xml_file): """ 解析標准VOC格式的標注文件獲取其對應的box和所屬的類別 :param xml_file: :return: """ boxes = [] tree = ET.parse(xml_file) root = tree.getroot() for obj in root.iter("object"): label = obj.find("name").text bndbox = obj.find("bndbox") xmin = int(bndbox.find("xmin").text) ymin = int(bndbox.find("ymin").text) xmax = int(bndbox.find("xmax").text) ymax = int(bndbox.find("ymax").text) boxes.append(Box(label=label, cod=[xmin, ymin, xmax, ymax])) return boxes -
以上我們就完成了數據的封裝部分,后續就需要對這些封裝起來的信息進行操作。后面的所有函數中的參數都是以
data或者data的列表形式進行傳遞的 -
旋轉
-
對於矩形圖像,如果旋轉的度數不是90的倍數,就意味着需要將旋轉過后的圖像進行裁剪或者縮小后進行背景補充才行。旋轉的過程中標注文件也必須做相應的改動才能對應上。
-
def rot90(data): """ 將data中的圖像做一個旋轉90度的處理,將其對應的標注信息也做對應的處理 :param data: :return: """ img = data.img img_new = np.rot90(img) boxes_new = [] boxes = data.boxes for box in boxes: # 旋轉90度,現在的x_min就是原來的y_min cod = box.cod x_min = cod[1] # 現在的y_min就是圖像的寬減去原來的x_max y_min = data.shape[1] - cod[2] # 現在的x_max就是原來的y_max x_max = cod[3] # 現在的y_max就是圖像的寬減去原來的x_min y_max = data.shape[1] - cod[0] box_new = Box(box.label, [x_min, y_min, x_max, y_max]) boxes_new.append(box_new) data_new = Data(data.name + "_rot90", boxes_new, img_new) return data_new -
如果你想要實現逆時針選裝180度,可以嵌套使用上面的
rot90()函數 -
翻轉
-
翻轉是另外一種非常常用的數據增強方式,和上面的旋轉一樣,在實際應用場合中只是為了擴充后續更加復雜的數據增強方式的圖像基數。
-
以下的代碼實現了水平翻轉,和旋轉一樣,標注文件需要做出相應的改變。
-
def flip_vertical(data): """ 將data中的圖像水平旋轉 :param data: :return: """ img = data.img.copy() img_new = cv2.flip(img, 0) boxes = data.boxes boxes_new = [] for box in boxes: cod = box.cod y_min = data.shape[0] - cod[3] y_max = data.shape[0] - cod[1] x_min = cod[0] x_max = cod[2] cod_new = [x_min, y_min, x_max, y_max] box_new = Box(box.label, cod_new) boxes_new.append(box_new) data_new = Data(data.name + "_flip", boxes_new, img_new) return data_new -
復制小目標
-
復制小目標這種數據增強方式主要針對小目標檢測,通過將數據中面積較小的目標進行復制粘貼來達到使小目標數量增多的目的。理論依據出自論文《Augmentation for small object detection》
-
復制小目標首先要確認小目標,給什么樣 的目標是小目標定一個標准
-
def paste(data): """ 拷貝圖像中的小目標,根據長寬的統計,划定面積小於300*300的為小目標 :param data: :return: """ change = False img_new = data.img.copy() boxes = data.boxes.copy() for index, box in enumerate(data.boxes): cod = box.cod length = cod[3] - cod[1] width = cod[2] - cod[0] area = length * width if area < 20000: # 如果有需要復制的目標,保存新的標注文件和圖片 change = True # 判定為小目標,把目標部分截取出來 cropped_img = data.img[cod[1]:cod[3], cod[0]:cod[2]] # 獲取隨機位置 copy_cods = getRandomCod(data.shape, boxes, 5, width, length) for cod in copy_cods: img_new[cod[1]:cod[3], cod[0]:cod[2]] = cropped_img boxes.append(Box(box.label, cod)) if change: data_new = Data(name=data.name + "_small", img=img_new, boxes=boxes) return data_new else: return None -
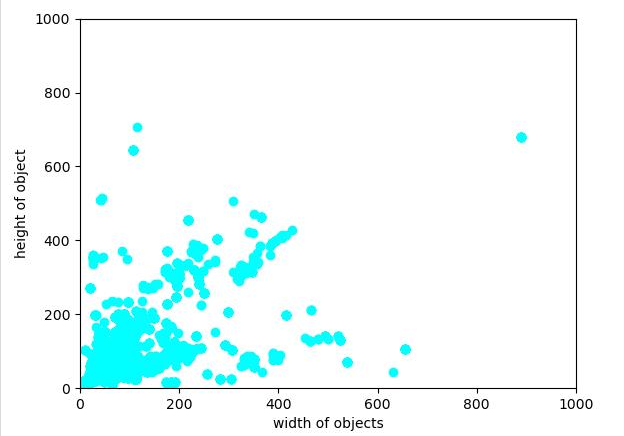
上面的代碼邏輯很簡單,首先是對圖中所有的目標進行一個分析,對面積小於20000的目標進行復制,這里用2000是因為我們的數據集圖像尺寸是一致的,並且事先對標注框尺寸分布做了統計,如下圖。
-
-
由論文中的思想,對於小目標的復制過程中,需要保證不與已經存在的標注框重合,所以需要
iou檢測。 -
def check_overlap(cod_1, cod_2): """ 判斷兩個標注框是否重疊 :param cod_1: :param cod_2: :return: true or false """ # 計算交集 x_min = max(cod_1[0], cod_2[0]) y_min = max(cod_1[1], cod_2[1]) x_max = min(cod_1[2], cod_2[2]) y_max = min(cod_1[3], cod_2[3]) x = max(0, x_max - x_min) y = max(0, y_max - y_min) if x * y > 0: return True else: return False -
然后對每個小目標都隨機取個位置進行粘貼,獲取他們的位置。
-
def getRandomCod(shape, boxes, num, width, height): """ 根據傳入的圖像尺寸和原始標注框的坐標信息來獲取num個隨機的標注框左上角坐標 :param height: :param width: :param num: 生成的隨機標注框個數 :param shape: 圖像本身的尺寸 :param boxes: 原始標注框的坐標信息 :return: 返回n個cod回去 """ ret = [] for i in range(num): while True: x = random.randint(0, shape[1]) y = random.randint(0, shape[0]) cod_tmp = [x, y, x + width, y + height] # 先檢驗是否越界 if check_overSize(cod_tmp, shape): # 如果越界了,就重新生成坐標 continue overlap = False for box in boxes: if check_overlap(box.cod, cod_tmp): # 如果相交的話,那么就直接break overlap = True break else: continue if not overlap and len(ret) != 0: for cod in ret: if check_overlap(cod, cod_tmp): overlap = True break if not overlap: ret.append(cod_tmp) break else: continue return ret -
高斯模糊
-
對數據進行增強有一個常見的方式就是添加各種各樣的噪聲,從而讓這些數據去訓練網絡的時候,能夠使網絡變得適應性更強,魯棒性更強,對真實情況的泛化能力也越強。通常使用的有椒鹽噪聲,高斯噪聲等等。但是這次由於數據集的獨特性,所以使用了高斯模糊進行數據增強,這個實現起來很簡單,使用
opencv中的高斯濾波函數即可實現圖像的效果,對應的標注文件位置不變。 -
def gaussian_blur(data): """ 高斯模糊 :param data: :return: """ img_new = data.img.copy() img_new = cv2.GaussianBlur(img_new, (11, 11), 0) data_new = Data(name=data.name + "_gaussian", boxes=data.boxes.copy(), img=img_new) return data_new -
添加雲霧
-
我們的數據是遙感圖像,所以在拍攝中會有很多的雲霧,為了模擬在這種情況下的網絡輸入,使用認為添加雲霧的方式來做數據增強。
-
我們事先采集了一些雲霧的圖像,這些圖像對比度較強,除了雲霧部分其余部分都是接近黑色的深色,這樣天空背景對圖像的影響比較小。
-
def add_flog(data, flog_list): """ :param data: :param flog_list:保存雲霧圖像的絕對路徑列表 :return: """ img_src = data.img.copy() img_flog = cv2.imread(random.choice(flog_list)) if random.randint(0, 10) > 5: img_flog = np.rot90(img_flog) img_flog = cv2.resize(img_flog, img_src.shape[:2][::-1]) img_new = cv2.addWeighted(img_src, 0.6, img_flog, 0.4, 0) data_new = Data(name=data.name + "_flog", boxes=data.boxes.copy(), img=img_new) return data_new -
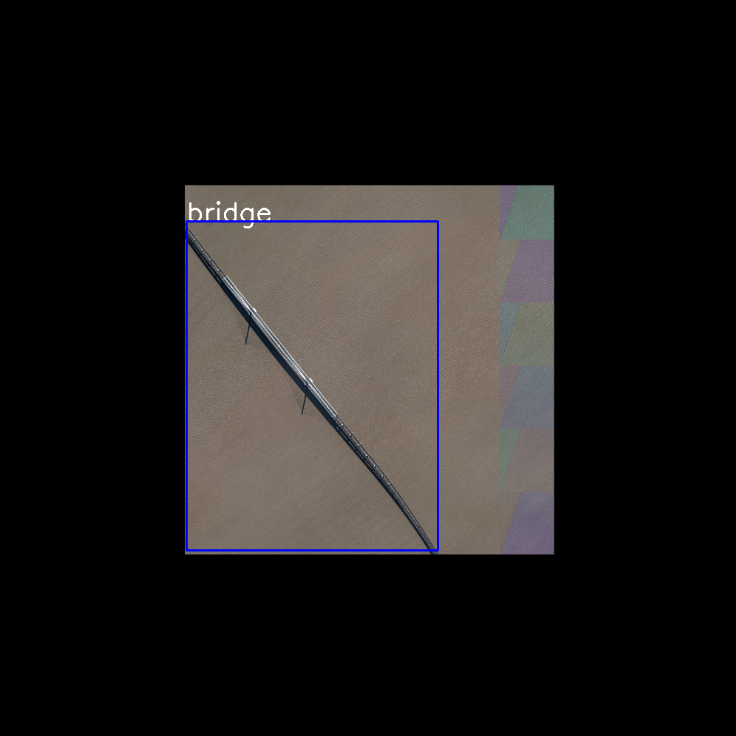
縮小大目標
-
為了進一步增加網絡對小目標的泛化能力,我們對數據集中僅有大目標的圖像進行了整體縮小,然后將邊緣使用黑色填充,這樣也是增加了小目標出現的頻率。
-
def shrink(data): """ 放大僅有小目標的圖像 :param data: :return: """ # num用於檢測整張圖像中是否僅有大目標,仍然是以20000為界 num = 0 for box in data.boxes: cod = box.cod area = (cod[3] - cod[1]) * (cod[2] - cod[0]) if area < 20000: num += 1 if num == 0: plate = np.zeros_like(data.img) data_new = resize(data, shape=(plate.shape[1] // 2, plate.shape[0] // 2)) # 確保縮小圖像在中間位置 shape = data_new.shape plate[shape[0] // 2 :shape[0] // 2 + shape[0], shape[1] // 2: shape[1] + shape[1] // 2] = data_new.img.copy() data_new.set_img(plate) data_new.set_name(data.name + "_shrink") return data_new else: return None -
馬賽克
-
mosaic技術是YOLOv4的技巧之一,也是一種用於增強網絡對小目標的泛化能力所使用的手段,見論文YOLOv4: Optimal Speed and Accuracy of Object Detection,思想就是隨機讀取四張圖像,然后將這些圖像隨機進行數據增強,如翻轉,旋轉等等,然后進行組合,原文中四張圖像的尺寸是不一致的。這里為了實現起來方便拼接,對四張圖像的尺寸都做了統一處理,處理為長寬皆為600,然后進行組合。 -
def mosaic(data_list): """ mosaic技術需要四張圖像才能做 :param data_list: :return: """ img_1 = np.vstack((data_list[0].img.copy(), data_list[1].img.copy())) img_2 = np.vstack((data_list[2].img.copy(), data_list[3].img.copy())) img_new = np.hstack((img_1, img_2)) boxes_new = data_list[0].boxes.copy() for box in data_list[2].boxes: cod = box.cod x_min = 600 + cod[0] y_min = cod[1] x_max = 600 + cod[2] y_max = cod[3] boxes_new.append(Box(label=box.label, cod=[x_min, y_min, x_max, y_max])) for box in data_list[1].boxes: cod = box.cod x_min = cod[0] y_min = cod[1] + 600 x_max = cod[2] y_max = cod[3] + 600 boxes_new.append(Box(label=box.label, cod=[x_min, y_min, x_max, y_max])) for box in data_list[3].boxes: cod = box.cod boxes_new.append(Box(label=box.label, cod=[x + 600 for x in cod])) data_new = Data(name=data_list[0].name + "_mosaic", img=img_new, boxes=boxes_new) return data_new -
為了減小內存的壓力,這里選擇每四張圖像做一次處理,而不是所有的數據都加載進內存進行處理
def do_mosaic(data_list, result): temp_list = [] data_list = random.sample(data_list, len(data_list)) for data in data_list: if len(temp_list) < 4: temp_list.append(resize(data)) if len(temp_list) == 4: new_data = mosaic(temp_list) result.append(new_data) temp_list = temp_list[-3:] return result -
resize()函數的實現,這是一個工具函數,多個處理都用到了這個函數 -
def resize(data, shape=None):
    """
    將圖像縮放至600 * 600,方便拼接,
    :param shape:
    :param data:
    :return:
    """
    if shape is None:
        shape = (600, 600)

    img_new = cv2.resize(data.img.copy(), shape)
    boxes = []
    for box in data.boxes:
        cod = box.cod
        x_min = int(shape[0] / data.shape[1] * cod[0])
        y_min = int(shape[0] / data.shape[0] * cod[1])
        x_max = int(shape[1] / data.shape[1] * cod[2])
        y_max = int(shape[1] / data.shape[1] * cod[3])
        box_tmp = Box(label=box.label, cod=[x_min, y_min, x_max, y_max])
        boxes.append(box_tmp)
    data_new = Data(name=data.name, boxes=boxes, img=img_new)

    return data_new

程序入口
-
當
load所有的數據之后,需要對這個列表進行處理, 以上的每個函數都是對data對象進行處理,但是實際要處理的是一個data的列表,為了少些for循環,所以用一個函數去對以上的每一種處理進行封裝。 -
def do(func, data_list, ret, ext=None): if ext is None: for data in data_list: new_data = func(data) if new_data is not None: ret.append(new_data) else: for data in data_list: new_data = func(data, ext) if new_data is not None: ret.append(new_data) -
為了節約時間使用多線程並行,因為每個線程間的讀寫都是不相互干擾的,所以不用使用鎖
-
    flog_list = os.listdir(flog_path)
    flog_list = [os.path.join(flog_path, x) for x in flog_list]
    ret = []
    # 旋轉,加霧,高斯模糊和反轉使用並行
    t1 = threading.Thread(target=do, args=(rot90, data_list, ret))
    t1.start()
    t1.join()
    t2 = threading.Thread(target=do, args=(flip_vertical, data_list, ret))
    t2.start()
    t2.join()
    t3 = threading.Thread(target=do, args=(gaussian_blur, data_list, ret))
    t3.start()
    t3.join()
    t4 = threading.Thread(target=do, args=(add_flog, data_list, ret, flog_list))
    t4.start()
    t4.join()
    # 小目標復制, 馬賽克和大目標放大並行
    data_list += ret
    ret = []
    print("processing 1")
    t5 = threading.Thread(target=do, args=(copy_small, data_list, ret))
    t5.start()
    t5.join()
    t6 = threading.Thread(target=do, args=(shrink, data_list, ret))
    t6.start()
    t6.join()
    t7 = threading.Thread(target=do_mosaic, args=(data_list,ret))
    t7.start()
    t7.join()
    data_list += ret
    save(data_list, save_path)
保存
-
有了經過處理之后的數據,這些數據目前還在內存中,需要將這些數據存到本地(也可以將這些代碼放到網絡處理數據數據輸入的部分也可以)
-
def save(data_list, save_path): annotation_path = os.path.join(save_path, "Annotations") img_path = os.path.join(save_path, "JPEGImages") if not os.path.exists(annotation_path): os.mkdir(annotation_path) if not os.path.exists(img_path): os.mkdir(img_path) for data in data_list: img = data.img name = os.path.join(img_path, data.name +".tif") cv2.imwrite(name, img) print("saving image %s to %s" %(data.name +".tif", img_path)) tree = data2xml(data) tree.write(os.path.join(annotation_path, data.name +".xml"), "utf-8", True) print("saving annotation %s to %s" % (data.name +".xml", annotation_path)) -
將data中的數據轉化成
xml的ElementTree對象 -
def data2xml(data):
    """
    將data中的數據解析成xml格式的tree
    :param data:
    :return:
    """
    root = ET.Element("annotation")
    folder = ET.SubElement(root, "folder")
    folder.text = "VOC"
    filename = ET.SubElement(root, "filename")
    filename.text = data.name + ".tif"
    size = ET.SubElement(root, "size")
    width = ET.SubElement(size, "width")
    height = ET.SubElement(size, "height")
    depth = ET.SubElement(size, "depth")
    width.text = str(data.shape[1])
    height.text = str(data.shape[0])
    depth.text = str(data.shape[2])
    source = ET.SubElement(root, "source")
    database = ET.SubElement(source, "database")
    database.text = "高分軟件大賽"
    for box in data.boxes:
        obj = ET.SubElement(root, "object")
        name = ET.SubElement(obj, "name")
        name.text = box.label
        bndbox = ET.SubElement(obj, "bndbox")
        xmin = ET.SubElement(bndbox, "xmin")
        ymin = ET.SubElement(bndbox, "ymin")
        xmax = ET.SubElement(bndbox, "xmax")
        ymax = ET.SubElement(bndbox, "ymax")
        xmin.text = str(box.cod[0])
        ymin.text = str(box.cod[1])
        xmax.text = str(box.cod[2])
        ymax.text = str(box.cod[3])
        truncated = ET.SubElement(obj, "truncated")
        truncated.text = '0'
        difficult = ET.SubElement(obj, "difficult")
        difficult.text = '0'

    pretty_xml(element=root, indent='\t', newline='\n')
    tree = ET.ElementTree(root)
    return tree
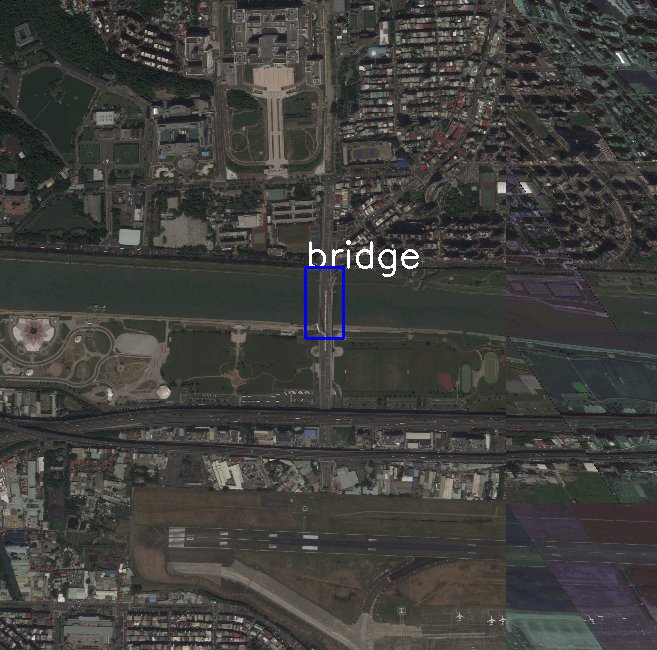
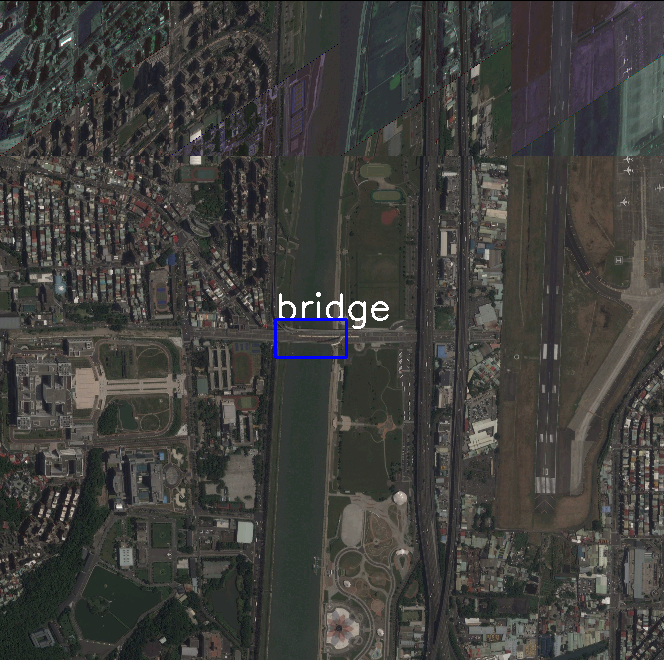
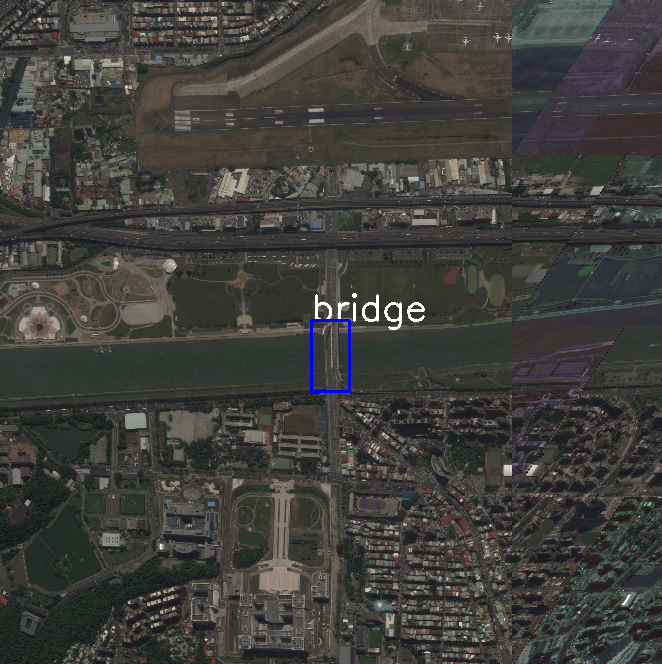
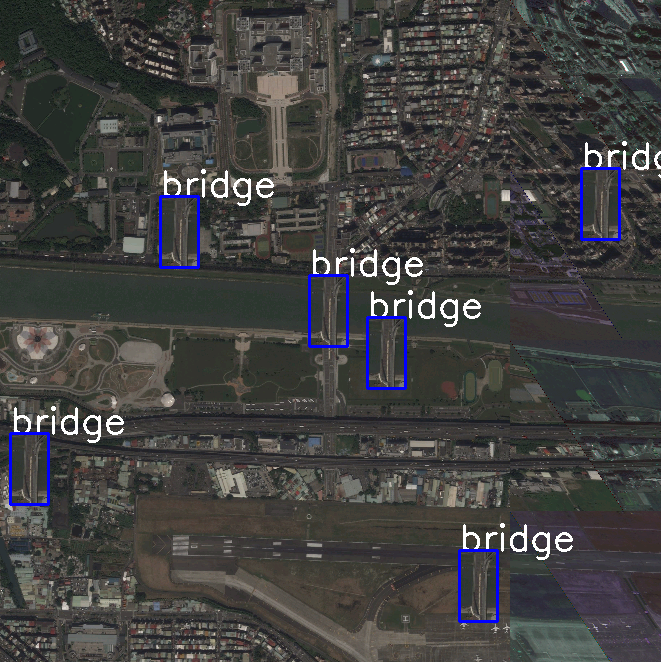
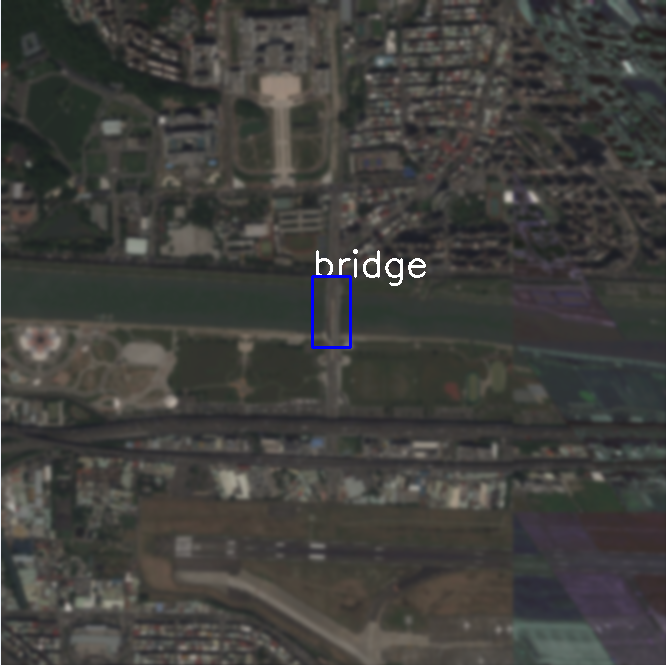
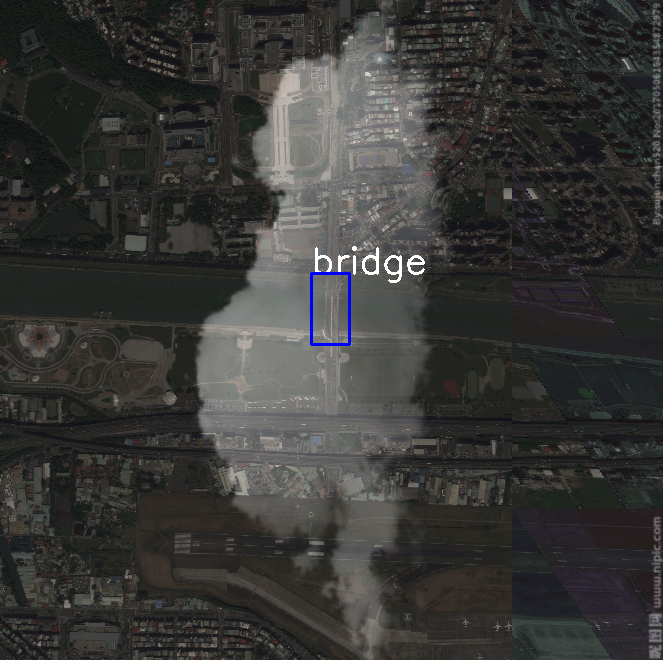
隨機檢測
-
對保存好的數據隨機選擇幾個做可視化
-
def random_check(save_path, num):
    """
    隨機可視化檢查save_path下num個樣本
    :param save_path:
    :param num:
    :return:
    """
    temp_path = os.path.join(save_path, "tmp")
    if not os.path.exists(temp_path):
        os.mkdir(temp_path)
    font = cv2.FONT_HERSHEY_SIMPLEX
    annotation_path = os.path.join(save_path, "Annotations")
    img_path = os.path.join(save_path, "JPEGImages")
    xml_list = os.listdir(annotation_path)
    xml_list = random.sample(xml_list, num)
    xml_list = [os.path.join(annotation_path, xml) for xml in xml_list]
    for xml in xml_list:
        tree = ET.parse(xml)
        root = tree.getroot()
        img = None
        img_name = ''
        try:
            img_name = root.find("filename").text
            img = cv2.imread(os.path.join(img_path, img_name))
        except IOError:
            RuntimeError("no such file")
        except TypeError:
            RuntimeError("xml tag error")
        for obj in root.iter("object"):
            name = obj.find("name").text
            box = obj.find("bndbox")
            xmin = int(box.find("xmin").text)
            ymin = int(box.find("ymin").text)
            xmax = int(box.find("xmax").text)
            ymax = int(box.find("ymax").text)
            img = cv2.putText(img, name, (xmin, ymin), font, 1.2, (255,255,255), 2)
            cv2.rectangle(img,(xmin, ymin), (xmax, ymax), (255,0,0),2)
        cv2.imwrite(os.path.join(temp_path, img_name), img)