前言
很多時候,我們生活中會有各種打卡的情況,比如 keep 的運動打卡、單詞的學習打卡和各種簽到打卡或者酒店的入住時間選擇,這時候就需要我們書寫一個日歷組件來處理我們這種需求。
但是更多時候,我們都是網上找一個插件直接套用了,有沒有想過自己實現一下呢?如果有,但是感覺不太會的話,接下來跟着我一起實現符合自己需求的日歷吧
准備工作
因為我們是小程序日歷嘛,所以必不可少的肯定是微信開發者工具啦。項目目錄結構如下:
|-- calendar
    |-- app.js
    |-- app.json
    |-- app.wxss
    |-- project.config.json
    |-- sitemap.json
    |-- components
    |   |-- calendar
    |       |-- index.js
    |       |-- index.json
    |       |-- index.wxml
    |       |-- index.wxss
    |-- pages
        |-- index
            |-- index.js
            |-- index.json
            |-- index.wxml
            |-- index.wxss
使用 git 下載空白模板:
git clone -b calendar https://gitee.com/gating/demo.git
ps: 下面步驟有點啰嗦,如果看目錄結構就能懂的話就不需要跟着步驟啦
-
新建一個名為
calendar的空文件夾 -
打卡
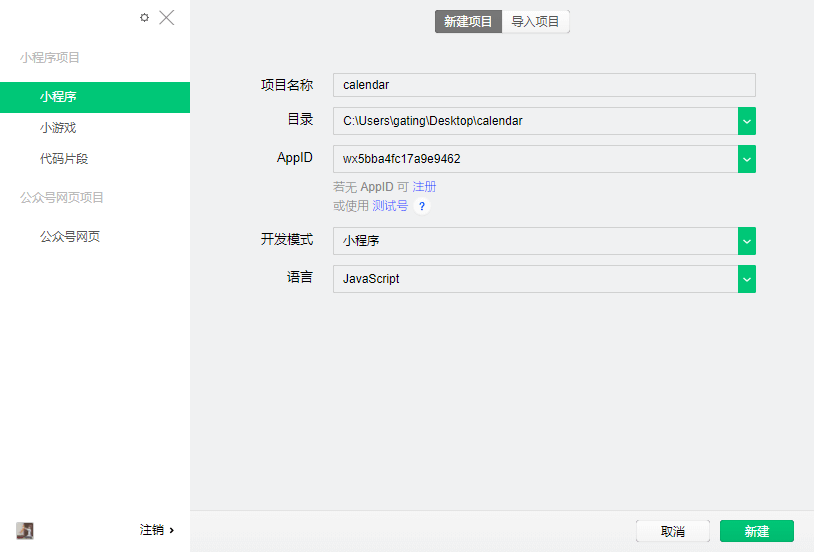
微信開發者工具,新增項目,選中剛剛創建的calendar文件夾,開發模式選中小程序,AppID 使用測試號即可,如圖所示:
-
創建完后,開發者工具會默認幫我們生成默認的代碼,我們在當前文件夾新增
components文件家,再在components文件夾中新增calendar文件夾,再從當前文件夾新增名為index的組件,如圖: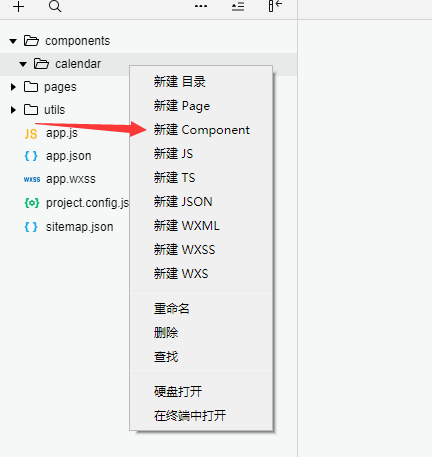
ps:因為開發者工具會默認生成初始代碼,所以直接使用他創建組件比較方便
- 刪除一些和本次博文無關的代碼,比如
app.js中的本地緩存能力,具體參考空白模板
編寫代碼
接下來編寫代碼部分我們直接在VSCode編寫,因為微信開發者工具實在太。。。- -所以還是使用VSCode編寫比較合適
思考一下
想要實現日歷,我們需要知道幾個小知識:
-
根據常識,我們知道一個月最少有 28 天,最多有 31 天,一周有 7 天,那么就可以有 5 排,但如果有一個月的第一天為星期六且當月有 31 天,那么他就會有 6 排格子才對。比如
2020年8月,如圖所示:
-
我們需要知道,當月的第一天是周幾
-
我們需要知道,當月有多少天
-
最重要的是小程序沒有 DOM 操作概念,所以我們不能動態往當月第一天插入格子,所以只能根據第一天是周幾循環插入格子
知道以上四點后,我們就可以編寫我們的代碼啦
首先,第二第三點是最簡單的,我先書寫第二第三點,怎么獲取當前是周幾呢?其實js的Date對象直接有現成的方法,我們直接拿來用就好了
console.log("今天是星期" + new Date().getDay());
我想有點小難度的是第三點,獲取當月有多少天,因為你想,其他的月份的天數是固定的,唯獨 2 月,在平年和閏年的不同年份中,2 月的天數也是不同的,那么有沒有簡單的方法獲取當月有多少天呢,其實也是有的,Date實例中的getDate就可以實現我們想要的效果了
// 獲取一個月有多少天
const getMonthDays = (year, month) => {
  let days = new Date(year, month + 1, 0).getDate();
  return days;
};
我們通過 Date 的第三個參數傳 0 就可以獲取上個月的最后一天,最后通過 getDate() 獲取它的日期就可以對應我們當月的天數,那么就不需要我們自己處理平年和閏年的 2 月有多少天了
是不是又學到了小知識點呢?
解決了 2.3 兩個問題,我們就可以往下書寫我們的日歷了。
眾所周知,小程序規定寬度為750rpx(尺寸單位),而我們的一周有 7 天,即 7 格,那么就是每個格子的寬度為107rpx,不建議使用小數,因為 rpx 計算的時候,遇到小數會存在少量偏差。這里我們使用flex布局解決。
所以接下來就可以寫我們的布局和生成我們的數據啦,從上面我們分析了,我們有 6 排格子,一排有 7 個,也就是一共 42 個格子。即需要遍歷 42 次
先定義一下我們所需要的數據,便於我們后續操作:
[
  {
    "dataStr": "2020/06/08",
    "day": "08",
    "month": "08",
    "otherMonth": false,
    "today": true,
    "year": 2020
  }
]
這里我只定義個幾個簡單的基本數據,如果有不同的業務場景可以自行添加基礎數據
小 tips
IOS 端的日期格式必須為/才可以轉化為日期格式,比如2018/07/08,而2018-07-08則返回Invalid Date,所以我們需要把-都替換為/。
不單單是小程序,微信公眾號,safari 都是一樣的。
正式開始編寫代碼
那么就可以寫我們的 js 代碼了,在 components -> calendar目錄下新建utils.js文件,書寫我們創建數據的基礎方法:
/**
 * 獲取當月有多少天
 * @param {String | Number} year => 年
 * @param {String | Number} month => 月
 */
const getMonthDays = (year, month) => {
  let days = new Date(year, month + 1, 0).getDate();
  return days;
};
/**
 * 補0
 * @param {String | Number} num
 */
const toDou = (num) => {
  return num > 9 ? num : "0" + num;
};

/**
 * 轉換為日期格式
 * @param {*} date
 */
const transformDate = (date) => {
  if (!(date instanceof Date)) {
    date = new Date(date);
  }
  return date;
};
/**
 * 獲取當前日期的年月日
 * @param {any} date => 日期對象
 */
const getDateObj = (date) => {
  date = transformDate(date);
  var year = date.getFullYear();
  var month = date.getMonth() + 1;
  var day = date.getDate();
  return {
    year,
    month,
    day,
    dataStr: `${year}/${toDou(month)}/${toDou(day)}`,
  };
};

/**
 * 獲取當月1號的時間戳
 * @param {Date} date => 日期對象
 */
const startOfMonth = (date) => {
  return date.setDate(1);
};

// 獲取今天,導出供組件作為默認值使用
const { dataStr } = getDateObj(new Date());

/**
 * 生成日歷數據
 * @param {Date} date => 日期對象
 */
const getDate = (date) => {
  date = transformDate(date);
  // 計算需要補的格子
  let dist;
  const { year, month } = getDateObj(date);
  // 獲取當月有多少天
  const days = getMonthDays(year, month - 1);
  // 獲取當前日期是星期幾
  let currentDate = new Date(startOfMonth(date)).getDay();
  // 眾所周知的原因,一周的第一天時星期天,而我們做的日歷星期天是放在最后的,所以我們這里需要改一下值
  if (currentDate == 0) {
    currentDate = 7;
  }
  dist = currentDate - 1;
  currentDate -= 2;
  const res = [];
  for (let i = 0; i < 42; i++) {
    // 是否不是當前月
    const otherMonth = i >= dist + days || i <= currentDate;
    const date = new Date(year, month - 1, -currentDate + i);
    const dateObj = getDateObj(date);
    res.push({
      ...dateObj,
      today: dataStr === dateObj.dataStr,
      otherMonth,
    });
  }
  return res;
};

module.exports = {
  getMonthDays,
  toDou,
  getDateObj,
  startOfMonth,
  getDate,
  dataStr,
  transformDate,
};
這里代碼都比較簡單,注釋也有寫,所以就不詳細解釋了,如有問題就評論,我看到會第一時間回復的。。。。
在 components -> calendar -> index.js 引入一下 utils.js 文件,然后在created這個生命周期打印一下我們的基礎數據,看是否符合預期:
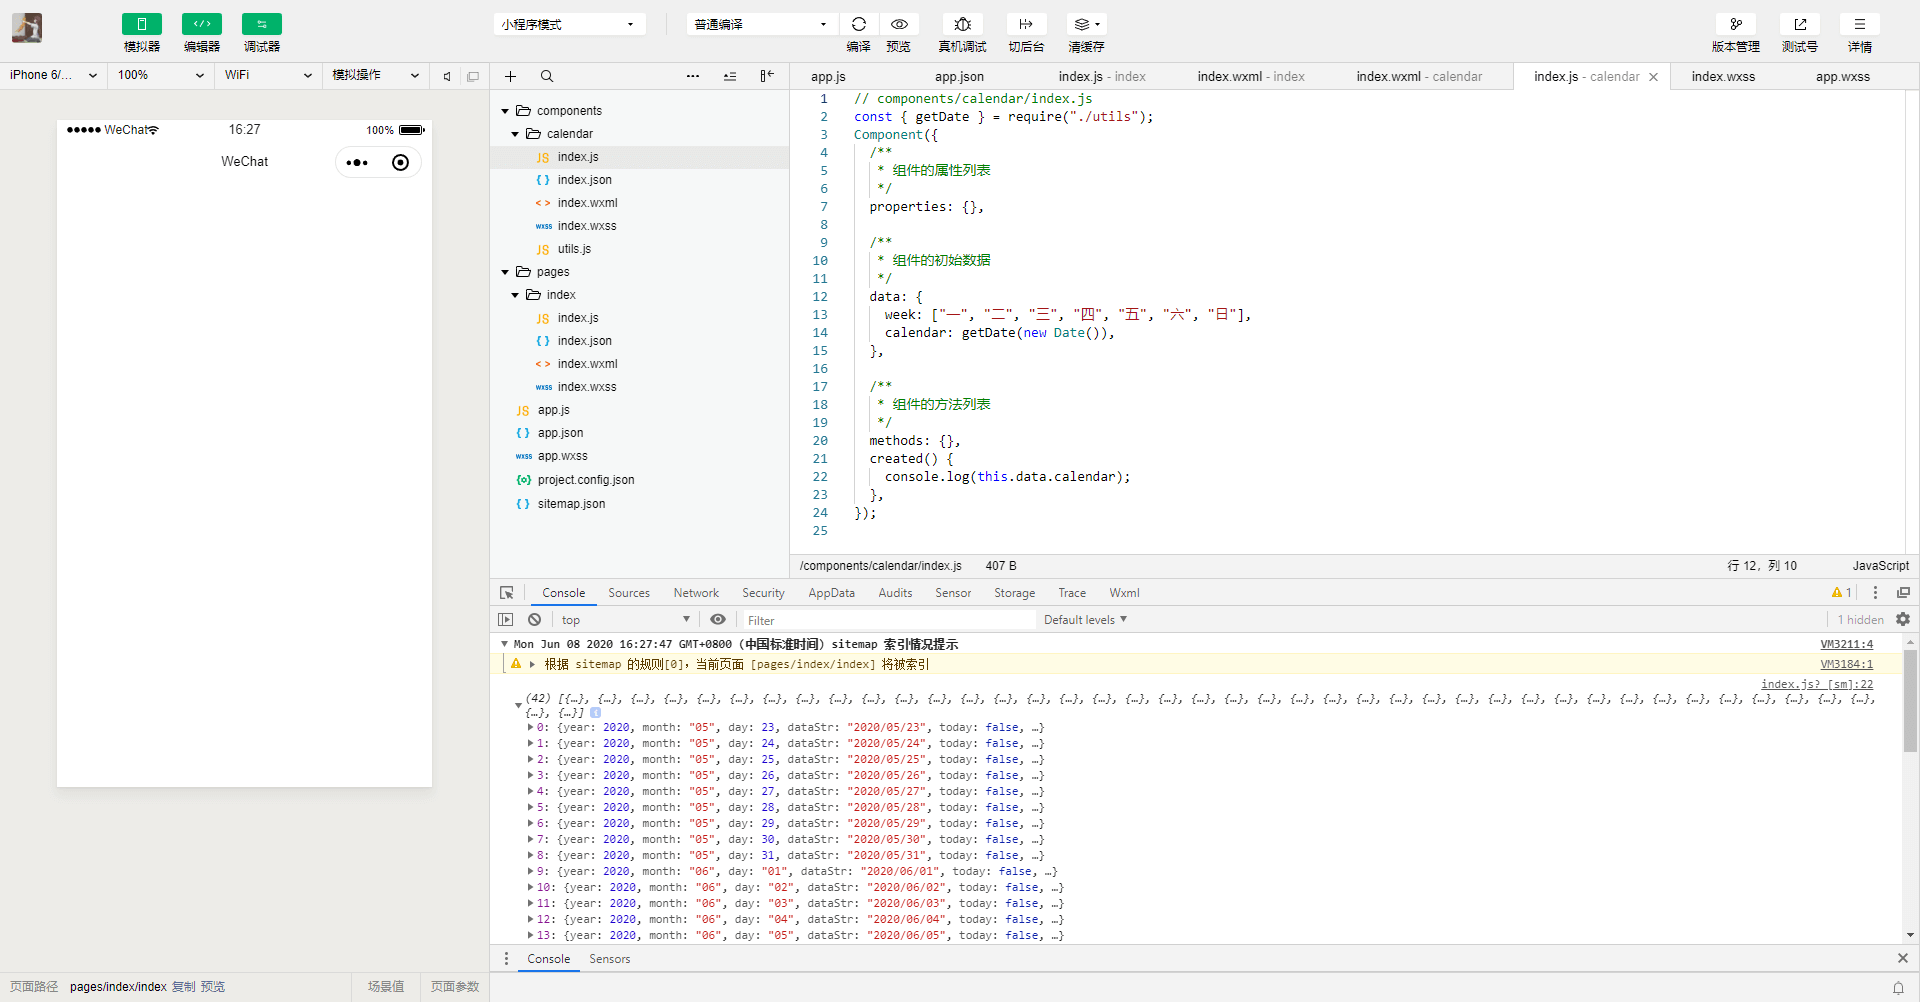
如果你打印的和我打印的一致,那么就可以愉快的寫我們組件的界面啦 😄
因為布局大多數都是樣式方面的問題,這里就不多講解啦,我想大家應該都會的,所以這里直接粘貼代碼啦,主要部分我就講解一下
index.wxml代碼如下:
<view class="calendar-wrapper">
  <view class="calendar-controller">
    <view class="calendar-picker">
      <text class="arrow left" bindtap="prevMonth"></text>
      <picker
        mode='date'
        fields='month'
        end="2999-12-31"
        start="1970-01-01"
        value="{{monthFormat}}"
        bindchange="dateChange"
      >
        <text class="month-format">{{monthFormat}}</text>
      </picker>
      <text class="arrow right" bindtap="nextMonth"></text>
    </view>
  </view>
  <view class="calendar-header">
    <view class="item" wx:for="{{week}}" wx:key="*this">{{item}}</view>
  </view>
  <view class="calendar-container">
    <view class="item {{item.today?'today':''}} {{item.otherMonth?'other-month':''}}" wx:for="{{calendar}}" wx:key="dataStr">
      <text>{{item.day}}</text>
    </view>
  </view>
</view>
index.wxss代碼如下:
.calendar-container,
.calendar-controller,
.calendar-header,
.calendar-picker,
.calendar-container .item,
.calendar-header .item {
  display: flex;
  align-items: center;
  line-height: normal;
}
.calendar-container,
.calendar-controller,
.calendar-header {
  justify-content: space-around;
  flex-wrap: wrap;
}
.calendar-container .item,
.calendar-header .item {
  justify-content: center;
  width: 107rpx;
  font-size: 28rpx;
  height: 80rpx;
}
.calendar-header .item {
  color: #666;
}
.calendar-container .item {
  color: #111;
}
.calendar-container .item.other-month {
  color: #999;
}
.calendar-container .item.today {
  color: #6190e8;
  font-weight: 600;
}
.calendar-picker {
  font-size: 30rpx;
  color: #111;
  padding: 20rpx 0;
}
.month-format {
  margin: 0 30rpx;
}
.arrow {
  display: flex;
  padding: 10rpx 15rpx;
  background: #f7f8fc;
}
.arrow::after {
  content: "";
  width: 14rpx;
  height: 14rpx;
  border-top: 4rpx solid #ccc;
  border-left: 4rpx solid #ccc;
}
.arrow.left::after {
  transform: rotateY(-45deg) rotate(-47deg) skew(5deg);
}
.arrow.right::after {
  transform: rotateY(-135deg) rotate(-47deg) skew(5deg);
}
index.js代碼如下:
// components/calendar/index.js
const { getDate, dataStr, getDateObj } = require("./utils");

const getDateStr = (dataStr) => dataStr.slice(0, -3).replace("/", "-");
Component({
  /**
   * 組件的屬性列表
   */
  properties: {},

  /**
   * 組件的初始數據
   */
  data: {
    week: ["一", "二", "三", "四", "五", "六", "日"],
    calendar: getDate(new Date()),
    monthFormat: getDateStr(dataStr),
  },

  /**
   * 組件的方法列表
   */
  methods: {
    dateChange(e) {
      const monthFormat = e.detail.value;
      this.setData({
        monthFormat,
      });
    },
    // 上個月日期
    prevMonth() {
      const [year, month] = this.data.monthFormat.split("-");
      const { dataStr } = getDateObj(
        new Date(year, month, 1).setMonth(month - 2)
      );
      this.setData({
        monthFormat: getDateStr(dataStr),
        calendar: getDate(new Date(dataStr)),
      });
    },
    // 下個月日期
    nextMonth() {
      const [year, month] = this.data.monthFormat.split("-");
      const { dataStr } = getDateObj(new Date(year, month, 1));
      this.setData({
        monthFormat: getDateStr(dataStr),
        calendar: getDate(new Date(dataStr)),
      });
    },
  },
  created() {},
});
這里的主要迷惑點就是月份,因為我們得到的月份是轉換后的(即月份+1),而
js中的月份是從 0 開始的,所以我們獲取上個月的時候月份就需要-2才能實現我們要的效果,而獲取下個月的時候,因為本身我們月份本身就+1了,所以不需要進行操作。
書寫完成布局后,大概會得出下面這個日歷:
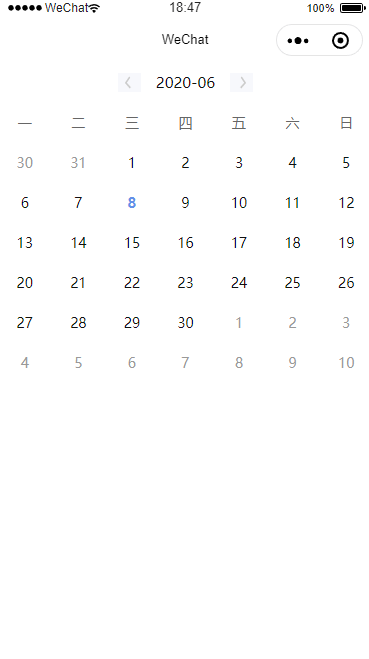
寫到這里,其實整個日歷的雛形已經出來了,我們可以通過picker換,可以通過點擊切換,也算一個相對可以使用的日歷組件啦 😝
但是其實還是遠遠不夠的,畢竟,我們連手勢左右滑動切換日歷這個功能都沒有,所以接下來就完善我們這個日歷吧
無縫滑動思考
你想,既然要做左右滑動切換了,肯定得無縫吧?既然得無縫,肯定不能生成多份吧?那么怎么才能用最少的 DOM 做到無縫呢?答案是我們只需要在我們可視范圍內生成 DOM 結構即可,即我們的可視范圍就是三份,如圖所示:

既然說到了左右滑動,肯定少不了我們強大的swiper組件啦,我們這次的日歷組件就是建立在swiper組件下實現的,既然用到了swiper,那么我們的布局肯定需要進行小改,數據結構也是,需要進行小改動。
剛才說了,我們的可是范圍是三份,所以我們的數據結構就變成了長度為三的數組,即:
{
  "calendarArr": [calendar, calendar, calendar]
}
界面也是,我們新增一個swiper組件,然后遍歷calendarArr這個數據,
<view class="calendar-wrapper">
    <view class="calendar-controller">
      <view class="calendar-picker">
        <text class="arrow left" bindtap="prevMonth"></text>
        <picker
          mode='date'
          fields='month'
          end="2999-12-31"
          start="1970-01-01"
          value="{{monthFormat}}"
          bindchange="dateChange"
        >
          <text class="month-format">{{monthFormat}}</text>
        </picker>
        <text class="arrow right" bindtap="nextMonth"></text>
      </view>
    </view>
    <view class="calendar-header">
      <view class="item" wx:for="{{week}}" wx:key="*this">{{item}}</view>
    </view>
    <swiper
      circular
      class="calendar-swiper"
      current="{{current}}"
      duration="{{duration}}"
      vertical="{{isVertical}}"
      skip-hidden-item-layout
      bindchange="swiperChange"
      bindanimationfinish="swiperAnimateFinish"
      bindtouchstart="swipeTouchStart"
      bindtouchend="swipeTouchEnd"
    >
      <block wx:for="{{calendarArr}}" wx:for-item="calendar" wx:key="index">
        <swiper-item>
          <view class="calendar-container">
            <view class="item {{item.today?'today':''}} {{item.otherMonth?'other-month':''}}" wx:for="{{calendar}}" wx:key="dataStr">
              <text>{{item.day}}</text>
            </view>
          </view>
        </swiper-item>
      </block>
    </swiper>
</view>
樣式的話,因為swiper組件有默認樣式,高度是150px,而我們這里6 * 80rpx,所以我們需要修改下它的默認樣式,即添加下面的 css 即可:
.calendar-swiper {
  height: 480rpx;
}
之后就是書寫我們的邏輯啦,從布局可以看到我們用了touchstart和touchend,本意其實就是判斷我們是向左滑還是向右滑(向上划還是向下滑),來切換我們的月份
如何區分左滑右滑(上滑下滑)
-
需要定兩個變量供我們區分是滑動的方向,一個是
swipeStartPoint,一個是isPrevMonth -
既然我們說到了無縫,那么肯定用戶就會滑動多次,那么我們也需要一個值來計算用戶滑動的次數,我們定義為
changeCount -
這點也是最重要的一點,我們需用通過當前我們滑動到第幾個
swiper-item,來修改我們的上個月和下個月的數據,因為我們知道,當前的swiper-item肯定是中間的那個月份,所以我們也需要一個變量來標記我們當前的是第幾個,我們定義為currentSwiperIndex,針對於這里的邏輯,我們舉個例子:
// 假設我們現在是6月,那么數據就是
let calendar = [5, 6, 7];
// 那么我們的 currentSwiperIndex 這時是等於1的
// 假設我滑動了五月,currentSwiperIndex 這時變成0了,我們的月份還是不變
// 但是我們的邏輯就發生改變了
// 這時候的上個月變成了7,下個月變成6,我們需要通過 currentSwiperIndex 的值來動態修改他,即
calendar = [5, 6, 7];
// 半偽代碼
const calendarArr = [];
const now = getDate(currentDate);
const prev = getDate(this.getPrevMonth(dataStr));
const next = getDate(this.getNextMonth(dataStr));
const prevIndex = currentSwiperIndex === 0 ? 2 : currentSwiperIndex - 1;
const nextIndex = currentSwiperIndex === 2 ? 0 : currentSwiperIndex + 1;
calendarArr[prevIndex] = prev;
calendarArr[nextIndex] = next;
calendarArr[currentSwiperIndex] = now;
理清楚上面所有的,基本上我們就可以開始重構我們的代碼了
正式書寫我們可滑動的日歷組件
先定義我們之前的所說的變量,和處理這些變量的方法
// 當前的索引值,必須從第一個開始,因為這樣我們才能實現視野內的無縫
let currentSwiperIndex = 1,
  generateDate = dataStr, // 當前時間
  swipeStartPoint = 0, // 滑動的坐標
  isPrevMonth = false, // 是否向右滑動
  changeCount = 0; // 滑動的次數

Component({
  // ...
  methods: {
    // 設置當前的索引值
    swiperChange(e) {
      const { current, source } = e.detail;
      if (source === "touch") {
        currentSwiperIndex = current;
        changeCount += 1;
      }
    },
    // 獲取手指剛按下的坐標
    swipeTouchStart(e) {
      const { clientY, clientX } = e.changedTouches[0];
      swipeStartPoint = this.data.isVertical ? clientY : clientX;
    },
    // 獲取手指松開時的坐標
    swipeTouchEnd(e) {
      const { clientY, clientX } = e.changedTouches[0];
      isPrevMonth = this.data.isVertical
        ? clientY - swipeStartPoint > 0
        : clientX - swipeStartPoint > 0;
    },
  },
  // ...
});
然后定義一個處理我們日歷數據的方法,因為我們日歷方法是每個時間都需要使用的,所以我們定義個公用的方法,
Component({
  // ...
  methods: {
    // 設置上個月的時間
    getPrevMonth(monthFormat) {
      const [year, month] = monthFormat.split(/\-|\//);
      const { dataStr } = getDateObj(
        new Date(year, month, 1).setMonth(month - 2)
      );
      return dataStr;
    },
    // 設置下個月的時間
    getNextMonth(monthFormat) {
      const [year, month] = monthFormat.split(/\-|\//);
      const { dataStr } = getDateObj(new Date(year, month, 1));
      return dataStr;
    },
    // 生成日歷數組
    generatorCalendar(date) {
      const calendarArr = [];
      // 轉換為 Date 實例
      const currentDate = transformDate(date);
      // 獲取當前時間的日歷數據
      const now = getDate(currentDate);
      // 獲取當前時間的字符串
      const { dataStr } = getDateObj(currentDate);
      // 獲取上個月的日歷數據
      const prev = getDate(this.getPrevMonth(dataStr));
      // 獲取下個月的日歷數據
      const next = getDate(this.getNextMonth(dataStr));
      // 設置日歷數據
      const prevIndex = currentSwiperIndex === 0 ? 2 : currentSwiperIndex - 1;
      const nextIndex = currentSwiperIndex === 2 ? 0 : currentSwiperIndex + 1;
      calendarArr[prevIndex] = prev;
      calendarArr[nextIndex] = next;
      calendarArr[currentSwiperIndex] = now;
      this.setData({
        calendarArr,
        monthFormat: getDateStr(dataStr),
      });
    },
  },
  // ...
});
ps: 因為這里上下月份也可以公用,所以單獨提取出來供其他方法使用
最后,我們只需要在動畫結束的時候設置日歷數據即可,即:
Component({
  // ...
  methods: {
    // 動畫結束后讓滑動的次數置0
    swiperAnimateFinish() {
      const { year, month } = getDateObj(generateDate);
      const monthDist = isPrevMonth ? -changeCount : changeCount;
      generateDate = new Date(year, month + monthDist - 1);
      // 清空滑動次數
      changeCount = 0;
      this.generatorCalendar(generateDate);
    },
  },
  // ...
});
整合起來就是:
// components/calendar/index.js
const { getDate, dataStr, getDateObj, transformDate } = require("./utils");
const getDateStr = (dataStr) => dataStr.slice(0, 7).replace("/", "-");
// 當前的索引值,必須從第一個開始,因為這樣我們才能實現視野內的無縫
let currentSwiperIndex = 1,
  generateDate = dataStr, // 當前時間
  swipeStartPoint = 0, // 滑動的坐標
  isPrevMonth = false, // 是否向右滑動
  changeCount = 0; // 滑動的次數
Component({
  /**
   * 組件的屬性列表
   */
  properties: {
    duration: {
      type: String,
      value: 500,
    },
    isVertical: {
      type: Boolean,
      value: false,
    },
  },

  /**
   * 組件的初始數據
   */
  data: {
    week: ["一", "二", "三", "四", "五", "六", "日"],
    current: 1,
    calendarArr: [],
    monthFormat: getDateStr(dataStr),
  },

  /**
   * 組件的方法列表
   */
  methods: {
    // 設置上個月的時間
    getPrevMonth(monthFormat) {
      const [year, month] = monthFormat.split(/\-|\//);
      const { dataStr } = getDateObj(
        new Date(year, month, 1).setMonth(month - 2)
      );
      return dataStr;
    },
    // 設置下個月的時間
    getNextMonth(monthFormat) {
      const [year, month] = monthFormat.split(/\-|\//);
      const { dataStr } = getDateObj(new Date(year, month, 1));
      return dataStr;
    },
    // 生成日歷數組
    generatorCalendar(date) {
      const calendarArr = [];
      // 轉換為 Date 實例
      const currentDate = transformDate(date);
      // 獲取當前時間的日歷數據
      const now = getDate(currentDate);
      // 獲取當前時間的字符串
      const { dataStr } = getDateObj(currentDate);
      // 獲取上個月的日歷數據
      const prev = getDate(this.getPrevMonth(dataStr));
      // 獲取下個月的日歷數據
      const next = getDate(this.getNextMonth(dataStr));
      // 設置日歷數據
      const prevIndex = currentSwiperIndex === 0 ? 2 : currentSwiperIndex - 1;
      const nextIndex = currentSwiperIndex === 2 ? 0 : currentSwiperIndex + 1;
      calendarArr[prevIndex] = prev;
      calendarArr[nextIndex] = next;
      calendarArr[currentSwiperIndex] = now;
      this.setData({
        calendarArr,
        monthFormat: getDateStr(dataStr),
      });
      // 通知父組件
      this.triggerEvent("change", this.data.monthFormat);
    },
    // 設置當前的索引值
    swiperChange(e) {
      const { current, source } = e.detail;
      if (source === "touch") {
        currentSwiperIndex = current;
        changeCount += 1;
      }
    },
    // 動畫結束后讓滑動的次數置0
    swiperAnimateFinish() {
      const { year, month } = getDateObj(generateDate);
      const monthDist = isPrevMonth ? -changeCount : changeCount;
      generateDate = new Date(year, month + monthDist - 1);
      // 清空滑動次數
      changeCount = 0;
      this.generatorCalendar(generateDate);
    },
    // 獲取手指剛按下的坐標
    swipeTouchStart(e) {
      const { clientY, clientX } = e.changedTouches[0];
      swipeStartPoint = this.data.isVertical ? clientY : clientX;
    },
    // 獲取手指松開時的坐標
    swipeTouchEnd(e) {
      const { clientY, clientX } = e.changedTouches[0];
      isPrevMonth = this.data.isVertical
        ? clientY - swipeStartPoint > 0
        : clientX - swipeStartPoint > 0;
    },

    dateChange(e) {
      const monthFormat = e.detail.value;
      this.setData({
        monthFormat,
      });
      generateDate = getDateStr(monthFormat);
      this.generatorCalendar(generateDate);
    },

    // 上個月日期
    prevMonth() {
      this.setData({
        monthFormat: this.getPrevMonth(this.data.monthFormat),
      });
      this.generatorCalendar(this.data.monthFormat);
    },
    // 下個月日期
    nextMonth() {
      this.setData({
        monthFormat: this.getNextMonth(this.data.monthFormat),
      });
      this.generatorCalendar(this.data.monthFormat);
    },
  },
  ready() {
    this.generatorCalendar(generateDate);
  },
});
頁面中使用,
<calendar bindchange="calendarChange"></calendar>
Page({
  calendarChange(e) {
    console.log(e.detail);
  },
});
寫到這里,其實基本上整個日歷就已經完成了,但也許你會說,其實還有很多功能沒有完善,比如:
-
跳轉到指定到時間
-
范圍選擇
-
點擊標記時間等等
-
...
其實我覺得多數是設置樣式問題,比如標記時間這個功能,其實有這個基礎的例子,我想大家往里面加功能應該都可以實現的,所以我就不一步一步的往里面寫了
如果后續有時間我會往這個項目多加一下新功能的
最后
感覺各位觀眾老爺的觀看,希望你能有所收獲 😁