什么是SignalR
ASP.NET Core SignalR 是一個開源庫,它簡化了向應用程序添加實時 web 功能的功能。 實時 Web 功能使服務器端代碼能夠即時將內容推送到客戶端。
ASP.NET Core SignalR 的一些功能:
- 自動管理連接
- 同時向所有連接的客戶端發送消息。 例如,聊天室
- 向特定客戶端或客戶端組發送消息
- 可縮放以處理不斷增加的流量
SignalR 支持以下用於處理實時通信的技術:
- WebSockets
- 服務器發送的事件
- 長輪詢
其中Web Socket僅支持比較現代的瀏覽器, Web服務器也不能太老.
而 Server Sent Events 情況可能好一點, 但是也存在同樣的問題.
所以SignalR采用了回落機制, SignalR有能力去協商支持的傳輸類型.
Web Socket是最好的最有效的傳輸方式, 如果瀏覽器或Web服務器不支持它的話, 就會降級使用SSE, 實在不行就用Long Polling.
一旦建立連接, SignalR就會開始發送keep alive消息, 來檢查連接是否還正常. 如果有問題, 就會拋出異常.
因為SignalR是抽象於三種傳輸方式的上層, 所以無論底層采用的哪種方式, SignalR的用法都是一樣的.
SignalR - 集線器(Hub)
SignalR中, 我們主要需要做的事情就是繼承Hub類, 來和客戶端互相發送消息; 可以察覺出, SignalR服務器是一個消息中心, 客戶端將消息發送給SignalR服務器, 然后有我們來處理這些消息, 可以將這些消息廣播出去, 也可以將某個客戶端發過來的消息轉發給另一個客戶端, 實現兩個客戶端之間的通信;
開始使用SignalR - CountHub
這里將完成一個簡單的使用SignalR服務端和客戶端實時通信的例子:
- 客戶端發起連接請求
- 服務器端接受請求, 並向該客戶端發出計數, 從0到10
- 當計數到10, 服務端調用客戶端Finished方法, 客戶端Finished關閉連接
服務端:
建立asp.net core項目, 選擇空模板
新建 CountService 類 和 CountHub 類
public class CountService
{
    private int _count;

    public int GetLastestCount() => _count++;
}
public class CountHub : Hub
{
    private readonly CountService _countService;

    public CountHub(CountService countService,
        ILoggerFactory loggerFactory)
    {
        _countService=countService;
    }

    public async Task GetLastestCount()
    {
        IClientProxy client = Clients.Caller;
        int count;
        do
        {
            count = _countService.GetLastestCount();

            await Task.Delay(1000);

            await client.SendAsync("ReceiveUpdate", $"ConnectionId: {Context.ConnectionId}, count: {count}");
        } while (count < 10);

        await client.SendAsync("Finished");
    }
}
在Startup類中注冊Service和配置Hub路由
services.AddScoped<countservice>();
services.AddSignalR();
endpoints.MapHub<counthub>("/countHub");
Startup
using Microsoft.AspNetCore.Builder;
using Microsoft.AspNetCore.Hosting;
using Microsoft.Extensions.DependencyInjection;
using Microsoft.Extensions.Hosting;
using SingleRStudy.Hubs;
using SingleRStudy.Services;
namespace SingleR
{
public class Startup
{
// This method gets called by the runtime. Use this method to add services to the container.
// For more information on how to configure your application, visit https://go.microsoft.com/fwlink/?LinkID=398940
public void ConfigureServices(IServiceCollection services)
{
services.AddScoped<countservice>();
services.AddSignalR();
services.AddCors(options =>
{
options.AddPolicy("NgClientPolicy", p =>
{
p.WithOrigins("http://localhost:4200")
.AllowAnyHeader()
.AllowAnyMethod()
.AllowCredentials();
});
});
}
// This method gets called by the runtime. Use this method to configure the HTTP request pipeline.
public void Configure(IApplicationBuilder app, IWebHostEnvironment env)
{
if (env.IsDevelopment())
{
app.UseDeveloperExceptionPage();
}
app.UseCors("NgClientPolicy");
app.UseRouting();
app.UseEndpoints(endpoints =>
{
endpoints.MapHub<counthub>("/countHub");
});
}
}
}
由於我這邊使用了Angular來作為客戶端, 所以在Startup中同時配置了跨域.
客戶端(Angular)
通過npm引入signalr: npm i @microsoft/signalr @types/node
導入signalr: import * as signalR from '@microsoft/signalr/'
完整的如下:
ChatComponent
import { Component, OnInit } from '@angular/core';
import * as signalR from '@microsoft/signalr/'

/**
 * 創建連接
 */
const connection = new signalR.HubConnectionBuilder()
  .withUrl('//localhost:5000/countHub')
  .build();

@Component({
  selector: 'app-chat',
  templateUrl: './chat.component.html',
  styleUrls: ['./chat.component.css']
})
export class ChatComponent implements OnInit {

  constructor() { }

  async ngOnInit() {
    connection.on('ReceiveUpdate', (message: string) => {
      console.log(message);
    });

    connection.on('Finished', () => {
      console.log('count finished');
      connection.stop();
    });

    connection.onclose(error => {
      console.error('signalR connection closed. error: ', error);
    });

    // 開始通信
    await connection.start().catch(error => {
      console.error(error);
    });
    if(connection.state === signalR.HubConnectionState.Connected)
      await connection.send('GetLastestCount', 'aaa');
  }

}
客戶端定義了ReceiveUpdate 和 Finished可以讓服務端調用的方法.
ReceiveUpdate方法, 將方法參數在控制台打印出來;
Finished方法則用來關閉連接.
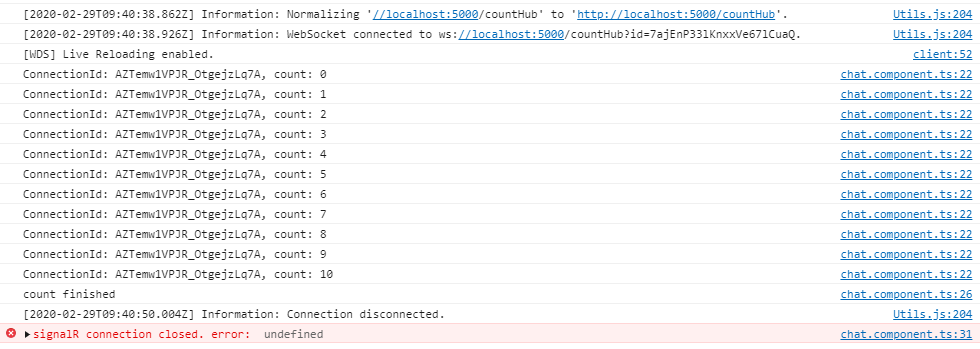
運行結果:
開始使用SignalR - ChatRoom
服務端:
建立 ChatHub 類
ChatHub
using Microsoft.AspNetCore.SignalR;

namespace SignalRStudy.Hubs
{
    public class ChatHub : Hub
    {
        public async void SendMessage(string username, string message)
        {
           await Clients.All.SendAsync("ReceiveMessage", username, message);
        }
    }
}
Startup中要配置一下:
app.UseEndpoints(endpoints =>
{
    ...
    endpoints.MapHub<chathub>("/chat");
});
服務端很簡單, 就是把收到的消息轉發給所有連接着的客戶端
客戶端(Angular):
ChatService
ChatService
import { Injectable, EventEmitter } from '@angular/core';
import * as signalr from '@microsoft/signalr'
import { Observable, of, Subscribable, Subscriber } from 'rxjs';
const connection = new signalr.HubConnectionBuilder()
.withUrl('http://localhost:5000/chat')
.build();
@Injectable()
export class ChatService {
receivedMessage$ = new Observable<any>(observer => {
connection.on('ReceiveMessage', (username: string, message: string) => {
observer.next({
username,
message
});
});
});
username: string = '匿名用戶';
constructor() {
// connection.on('ReceiveMessage', this.receiveMessage);
}
async startChat() {
await connection.start();
}
async sendMessage(message: string) {
// 等待連接或斷開連接操作完成
while(connection.state === signalr.HubConnectionState.Connecting
|| connection.state === signalr.HubConnectionState.Disconnecting);
// 如果未連接服務器, 則嘗試進行連接
if(connection.state === signalr.HubConnectionState.Disconnected) {
await connection.start().catch(err => console.error('signalr failed to connect to server.'));
}
if(connection.state === signalr.HubConnectionState.Connected) {
await connection.send('SendMessage', this.username, message);
}
}
}
ChatService中處理了SignalR交互的邏輯, 組件可以通過訂閱ReceivedMessage$來獲取最新的消息...
下面放一下相關組件的代碼:
chat.component.ts
import { Component, OnInit, ViewChild, ElementRef } from '@angular/core';
import { ChatService } from '../../services/chat.service';


@Component({
  selector: 'app-chat',
  templateUrl: './chat.component.html',
  styleUrls: ['./chat.component.css']
})
export class ChatComponent implements OnInit {
  messageToSend: string = '';
  receivedMessages: any[] = [];
  @ViewChild('messageBox', { static: true }) messageBox:ElementRef;

  constructor(
    private chatServ: ChatService
  ) {
  }

  async ngOnInit() {
    this.chatServ.username = 'laggage';

    await this.chatServ.startChat();
    this.chatServ.receivedMessage$.subscribe(r => {
      this.receivedMessages.push(r);
      // 滾動條滑動到最底部, 等待5ms是為了等待angular渲染完界面, 否則可能無法滾動到底部
      setTimeout(() => {
        let ele = this.messageBox.nativeElement as HTMLDivElement;
        ele.scrollTop = ele.scrollHeight;
      }, 5);
    });
  }

  get username() {
    return this.chatServ.username;
  }

  set username(value: string) {
    if(value != this.chatServ.username)
      this.chatServ.username = value;
  }

  sendMessage() {
    this.chatServ.sendMessage(this.messageToSend);
    this.messageToSend = '';
  }
}
chat.component.html
<div id="wrapper">
    <!-- chat works -->
    <div id="message-receive-area">
        <div class="px-3 py-2 overflow-auto" id="message-container" #messagebox="">
            <div class="message-item jumbotron p-0 px-3 py-2 mb-3" *ngfor="let message of receivedMessages">
                <span> {{message.username}}說: </span>
                <span class="d-block"> {{message.message}} </span>
            </div>
        </div>
    </div>

    <div class="container-fluid mx-0 row" id="message-send-area">
        <div class="col col-8 pl-0" id="write-message">
            <textarea name="message" class="h-100 w-100" [(ngmodel)]="messageToSend"></textarea>
        </div>
        <div class="col col-4 overflow-hidden pr-0">
            <div class="mb-3">
                <label for="">
                    用戶名
                    <input name="username" class="w-100" type="text" placeholder="用戶名" [(ngmodel)]="username">
                </label>
            </div>
            <div class="w-100"> <button class="w-100 overflow-hidden" (click)="sendMessage()">Send</button> </div>
        </div>
    </div>
</div>
chat.component.css
#message-receive-area {
    height: 60vh;
    padding: .6rem;
}

#message-container {
    border: 1px solid black;
    height: 100%;
}

#message-send-area {
    height: 40vh;
    padding: .6rem;
}
先這樣...