Yii2 JWT
這個擴展為Yii framework 2.0提供了JWT集成(需要PHP 5.6+)。它包括基本的HTTP身份驗證支持。
目錄
安裝
Package is available on Packagist,
you can install it using Composer.
composer require sizeg/yii2-jwt
依賴關系
- PHP 5.6+
- OpenSSL Extension
- lcobucci/jwt 3.3
基本用法
將 jwt 組件添加到配置文件中,
'components' => [
    'jwt' => [
      'class' => \sizeg\jwt\Jwt::class,
      'key'   => 'secret',
    ],
],
按如下方式配置 authenticator 行為。
namespace app\controllers;

class ExampleController extends \yii\rest\Controller
{

    /**
     * @inheritdoc
     */
    public function behaviors()
    {
        $behaviors = parent::behaviors();
        $behaviors['authenticator'] = [
            'class' => \sizeg\jwt\JwtHttpBearerAuth::class,
        ];

        return $behaviors;
    }
}
也可以將其與 CompositeAuth 參考文獻 一起用於文檔
創建
有些方法被標記為已棄用,並很快將從lcobucci/jwt 4.x回傳內容以創建升級路徑。
只需使用構建器創建一個新的JWT/JWS令牌:
$time = time();
$token = Yii::$app->jwt->getBuilder()
            ->issuedBy('http://example.com') // Configures the issuer (iss claim)
            ->permittedFor('http://example.org') // Configures the audience (aud claim)
            ->identifiedBy('4f1g23a12aa', true) // Configures the id (jti claim), replicating as a header item
            ->issuedAt($time) // Configures the time that the token was issue (iat claim)
            ->canOnlyBeUsedAfter($time + 60) // Configures the time that the token can be used (nbf claim)
            ->expiresAt($time + 3600) // Configures the expiration time of the token (exp claim)
            ->withClaim('uid', 1) // Configures a new claim, called "uid"
            ->getToken(); // Retrieves the generated token


$token->getHeaders(); // Retrieves the token headers
$token->getClaims(); // Retrieves the token claims

echo $token->getHeader('jti'); // will print "4f1g23a12aa"
echo $token->getClaim('iss'); // will print "http://example.com"
echo $token->getClaim('uid'); // will print "1"
echo $token; // The string representation of the object is a JWT string (pretty easy, right?)
從字符串分析
使用解析器從JWT字符串創建一個新的令牌(以前面的令牌為例):
$token = Yii::$app->jwt->getParser()->parse((string) $token); // Parses from a string
$token->getHeaders(); // Retrieves the token header
$token->getClaims(); // Retrieves the token claims

echo $token->getHeader('jti'); // will print "4f1g23a12aa"
echo $token->getClaim('iss'); // will print "http://example.com"
echo $token->getClaim('uid'); // will print "1"
驗證
我們可以很容易地驗證令牌是否有效(以前面的令牌為例):
$data = Yii::$app->jwt->getValidationData(); // It will use the current time to validate (iat, nbf and exp)
$data->setIssuer('http://example.com');
$data->setAudience('http://example.org');
$data->setId('4f1g23a12aa');

var_dump($token->validate($data)); // false, because we created a token that cannot be used before of `time() + 60`

$data->setCurrentTime(time() + 61); // changing the validation time to future

var_dump($token->validate($data)); // true, because validation information is equals to data contained on the token

$data->setCurrentTime(time() + 4000); // changing the validation time to future

var_dump($token->validate($data)); // false, because token is expired since current time is greater than exp
我們還可以使用$leeway參數來處理時鍾偏差(見下面的注釋)。
如果token的聲明時間無效,但與驗證時間之間的差異小於$leeway,
那么令牌仍然被認為是有效的
'components' => [
    'jwt' => [
        'class' => \sizeg\jwt\Jwt:class,
        'key'   => 'secret',
        'jwtValidationData' => [
            'class' => \sizeg\jwt\JwtValidationData::class,
             // configure leeway
            'leeway' => 20,
        ],
    ],
],
$dataWithLeeway = Yii::$app->jwt->getValidationData();
$dataWithLeeway->setIssuer('http://example.com');
$dataWithLeeway->setAudience('http://example.org');
$dataWithLeeway->setId('4f1g23a12aa');

var_dump($token->validate($dataWithLeeway)); // false, because token can't be used before now() + 60, not within leeway

$dataWithLeeway->setCurrentTime($time + 61); // changing the validation time to future

var_dump($token->validate($dataWithLeeway)); // true, because current time plus leeway is between "nbf" and "exp" claims

$dataWithLeeway->setCurrentTime($time + 3610); // changing the validation time to future but within leeway

var_dump($token->validate($dataWithLeeway)); // true, because current time - 20 seconds leeway is less than exp

$dataWithLeeway->setCurrentTime($time + 4000); // changing the validation time to future outside of leeway

var_dump($token->validate($dataWithLeeway)); // false, because token is expired since current time is greater than exp
重要提示
- 您必須配置'
ValidationData,通知所有要驗證令牌的聲明。 - 如果
ValidationData包含未在令牌中使用的聲明,或者令牌具有未在ValidationData中配置的聲明,則Token::validate()將忽略這些聲明。 exp,nbf和iat聲明默認在ValidationData::__construct()中使用當前 UNIX 時間 (time()).ValidationData的可選$leeway參數將導致我們在驗證基於時間的聲明時使用該長度的秒數,
假裝我們在未來的“發出時間”(iat) 和“不在之前”(nbf)索賠,假裝我們在過去的更遠
對於“過期時間”(exp)索賠。這允許在發出服務器的時鍾與時鍾的時間不同的情況下
驗證服務器,如RFC 7519第4.1節所述。
令牌簽名
我們可以使用簽名來驗證令牌在生成后是否未被修改。此擴展實現了Hmac、RSA和ECDSA簽名(使用256、384和512)。
重要提示
不允許發送到解析器的字符串指示要使用的簽名算法,否則您的應用程序將易受嚴重的JWT安全漏洞的攻擊。
下面的示例是安全的,因為Signer中的選項是硬編碼的,不受惡意用戶的影響。
Hmac
Hmac signatures are really simple to be used:
$jwt = Yii::$app->jwt;
$signer = $jwt->getSigner('HS256');
$key = $jwt->getKey();
$time = time();

$token = $jwt->getBuilder()
            ->issuedBy('http://example.com') // Configures the issuer (iss claim)
            ->permittedFor('http://example.org') // Configures the audience (aud claim)
            ->identifiedBy('4f1g23a12aa', true) // Configures the id (jti claim), replicating as a header item
            ->issuedAt($time) // Configures the time that the token was issue (iat claim)
            ->canOnlyBeUsedAfter($time + 60) // Configures the time that the token can be used (nbf claim)
            ->expiresAt($time + 3600) // Configures the expiration time of the token (exp claim)
            ->withClaim('uid', 1) // Configures a new claim, called "uid"
            ->getToken($signer, $key); // Retrieves the generated token

var_dump($token->verify($signer, 'testing 1')); // false, because the key is different
var_dump($token->verify($signer, 'testing')); // true, because the key is the same
RSA 和 ECDSA
RSA和ECDSA簽名基於公鑰和私鑰,因此您必須使用私鑰生成並使用公鑰驗證:
$jwt = Yii::$app->jwt;
$signer = $jwt->getSigner('RS256'); // you can use 'ES256' if you're using ECDSA keys
$privateKey = $jwt->getKey('file://{path to your private key}');
$time = time();

$token = $jwt->getBuilder()
            ->issuedBy('http://example.com') // Configures the issuer (iss claim)
            ->permittedFor('http://example.org') // Configures the audience (aud claim)
            ->identifiedBy('4f1g23a12aa', true) // Configures the id (jti claim), replicating as a header item
            ->issuedAt($time) // Configures the time that the token was issue (iat claim)
            ->canOnlyBeUsedAfter($time + 60) // Configures the time that the token can be used (nbf claim)
            ->expiresAt($time + 3600) // Configures the expiration time of the token (exp claim)
            ->withClaim('uid', 1) // Configures a new claim, called "uid"
            ->getToken($signer, $privateKey); // Retrieves the generated token

$publicKey = $jwt->getKey('file://{path to your public key}');

var_dump($token->verify($signer, $publicKey)); // true when the public key was generated by the private one =)
很重要的一點是,如果您使用的是RSA密鑰,則不應該調用ECDSA簽名者(反之亦然),否則sign()和verify()將引發異常!
Yii2基本模板示例
基本方案
- 客戶端發送憑據。例如,登錄+密碼
- 后端驗證它們
- 如果憑據是有效的客戶端接收令牌
- 未來請求的客戶端存儲令牌
分步使用示例
-
創建Yii2應用程序
在本例中,我們將使用基本模板,但您也可以使用高級模板。
composer create-project --prefer-dist --stability=dev yiisoft/yii2-app-basic yii2-jwt-test -
安裝組件
composer require sizeg/yii2-jwt -
在config/web.php中添加
components部分$config = [ 'components' => [ // other default components here.. 'jwt' => [ 'class' => \sizeg\jwt\Jwt::class, 'key' => 'secret', // You have to configure ValidationData informing all claims you want to validate the token. 'jwtValidationData' => \app\components\JwtValidationData::class, ], ], ]; -
創建JwtValidationData類。在這里,您必須配置ValidationData來通知您要驗證令牌的所有聲明。
<?php namespace app\components; class JwtValidationData extends \sizeg\jwt\JwtValidationData { /** * @inheritdoc */ public function init() { $this->validationData->setIssuer('http://example.com'); $this->validationData->setAudience('http://example.org'); $this->validationData->setId('4f1g23a12aa'); parent::init(); } } -
修改方法
app\models\User::findIdentityByAccessToken()/** * {@inheritdoc} * @param \Lcobucci\JWT\Token $token */ public static function findIdentityByAccessToken($token, $type = null) { foreach (self::$users as $user) { if ($user['id'] === (string) $token->getClaim('uid')) { return new static($user); } } return null; } -
新建控制器
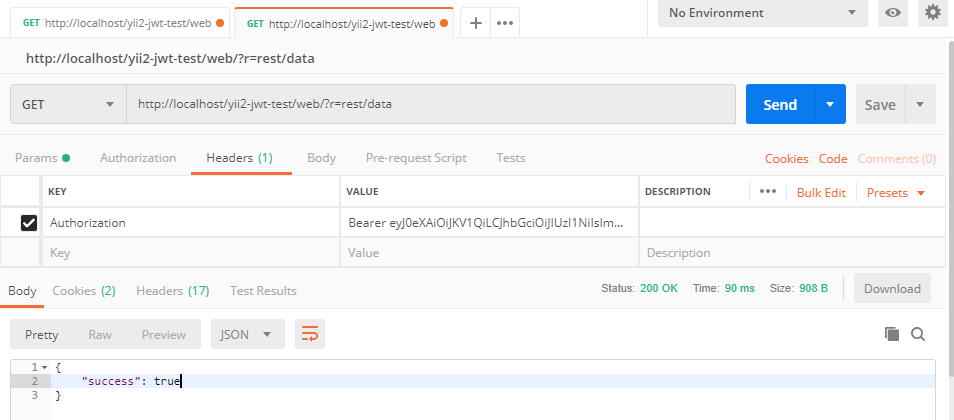
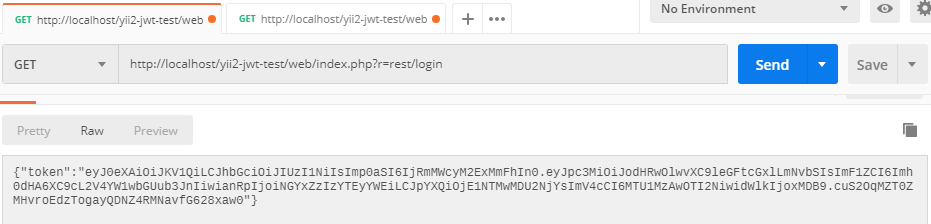
<?php namespace app\controllers; use sizeg\jwt\Jwt; use sizeg\jwt\JwtHttpBearerAuth; use Yii; use yii\rest\Controller; class RestController extends Controller { /** * @inheritdoc */ public function behaviors() { $behaviors = parent::behaviors(); $behaviors['authenticator'] = [ 'class' => JwtHttpBearerAuth::class, 'optional' => [ 'login', ], ]; return $behaviors; } /** * @return \yii\web\Response */ public function actionLogin() { $request = Yii::$app->getRequest(); $jwt = Yii::$app->jwt; $time = time(); $token = $jwt->getBuilder() ->issuedBy($request->getHostInfo()) ->permittedFor(isset($_SERVER['HTTP_ORIGIN']) ? $_SERVER['HTTP_ORIGIN'] : '') ->identifiedBy(Yii::$app->security->generateRandomString(10), true) //生成隨機的鹽值 ->issuedAt($time)// 設置生成token的時間 ->expiresAt($time + 3600)//設置token過期時間 ->withClaim('uid', 100)//配置一個名為uid的新聲明 ->getToken($jwt->getSigner('HS256'), $jwt->getKey()); // Previous implementation /* $token = $jwt->getBuilder() ->setIssuer('http://example.com')// Configures the issuer (iss claim) ->setAudience('http://example.org')// Configures the audience (aud claim) ->setId('4f1g23a12aa', true)// Configures the id (jti claim), replicating as a header item ->setIssuedAt(time())// Configures the time that the token was issue (iat claim) ->setExpiration(time() + 3600)// Configures the expiration time of the token (exp claim) ->set('uid', 100)// Configures a new claim, called "uid" ->sign($signer, $jwt->key)// creates a signature using [[Jwt::$key]] ->getToken(); // Retrieves the generated token // 示例 $jwt = Yii::$app->jwt; $signer = $jwt->getSigner('HS256'); $key = $jwt->getKey(); $time = time(); // Adoption for lcobucci/jwt ^4.0 version $token = $jwt->getBuilder() ->issuedBy('http://example.com')// Configures the issuer (iss claim) ->permittedFor('http://example.org')// Configures the audience (aud claim) ->identifiedBy('4f1g23a12aa', true)// Configures the id (jti claim), replicating as a header item ->issuedAt($time)// Configures the time that the token was issue (iat claim) ->expiresAt($time + 3600)// Configures the expiration time of the token (exp claim) ->withClaim('uid', 100)// Configures a new claim, called "uid" ->getToken($signer, $key); // Retrieves the generated token */ return $this->asJson([ 'token' => (string)$token, ]); } /** * @return \yii\web\Response */ public function actionData() { return $this->asJson([ 'success' => true, ]); } } -
發送簡單的登錄請求以獲取令牌。這里我們不發送任何憑證來簡化示例。正如我們在
authenticator行為操作login中將authenticator跳過該操作的身份驗證檢查指定為可選。
-
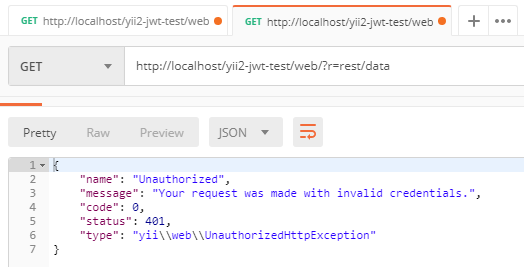
首先,我們嘗試向rest/data發送請求,但不帶令牌,並且獲取錯誤
Unauthorized
-
然后我們重試請求,但已經用令牌添加了
Authorization