代碼重構幾乎是每個程序員在軟件開發中必須要不斷去做的事情,以此來不斷提高代碼的質量。Android Stido(以下簡稱AS)以其強大的功能,成為當下Android開發工程師最受歡迎的開發工具,也是Android官方推薦使用的工具。如此優秀的工具,自然少不了要在代碼重構這件事情上好好表現一把了。本文將通過代碼演示,功能截圖來詳細介紹AS為代碼重構提供的各項功能。
在AS的主菜單欄中有一項“Refactor”下拉菜單,點擊該下拉菜單,會看到如下的界面,菜單中的每一項,都是為代碼重構提供的一項自動實現功能。這么多的功能項,可見AS在代碼重構功能上的強大,下面我們對這些功能項一一進行介紹。另外,還可以在編輯界面中點擊右鍵,在彈出的菜單中也可以找到“Refactor”。

1、Refactor This
作用:重構當前。操作此項,會顯示對當前光標選中處可行的重構方法。
示例:選擇了類名“RefactorTest”,操作“Refactor This”后,顯示了可執行的重構方法列表,可以通過選擇數字來執行對應的方法。

2、Rename
作用:對光標選中項進行重命名。不僅可以對類中的成員變量進行重命名,還能對文件名,包名等進行重命名,Module中與之相關聯的所有地方都會一起修改,而不用一一手動修改。
快捷鍵:Shift + F6
示例:在紅框中輸入修改后的名稱,並按Enter鍵即可。

3、Rename File
作用:修改當前編輯界面顯示的文件的文件名。就相當於鼠標選中該文件,並執行“Rename”方法。
示例:在顯示的對話框中輸入新文件名。可以在下方的選項框中選擇修改范圍,引用該文件的地方,注釋,字符串中都可以選擇一起修改。

4、Change Signature
作用:修改方法、類、構造函數的簽名,其實就是修改所選項的一些屬性。
快捷鍵:Ctr l+ F6
示例:如下展示了一個方法重構前,重構過程,以及重構后的情形(以修改一個方法簽名為例)。
重構前:
1 private void testChangeSignature(int first, int second) {
2 }
選中方法名后,執行該重構方法后,會彈出如下對話框,可以對該方法各種屬性進行修改,添加/刪除參數,調整參數順序,新增/刪除異常等。

重構后:
1 public void testChangeSignature(int second, int first, String third) throws NullPointerException {
2 }
5、Type Migration
作用:類型遷移,即對變量數據類型,或者方法的返回類型進行修改。前面介紹了對文件名,包名,變量名等進行修改,這里對類型進行修改。
快捷鍵:Ctrl + Shift + F6
重構前:
1 private int age = 10;
2 public RefactorTest(int age) {
3     this.age = age;
4 }
選中要修改的類型,執行該重構方法,會彈出對話框,根據需要編輯類型,選中作用范圍即可。指定范圍內,與該變量相關聯處都會被修改。

重構后(由於從int修改到String,所以還需要手動修改變量值):
1 private String age = "10";
2 public RefactorTest(String age) {
3     this.age = age;
4 }
6、Make Static
作用:給內部類或者方法添加static關鍵字。示例比較簡單,就不做演示了。
7、Convert To Instance Method
作用: 轉換為實例方法,即將靜態方法去掉static關鍵字。
8、Move
功能:移動文件到指定路徑
快捷鍵:F6

9、Copy
作用:在指定包中拷貝一份當前文件
快捷鍵:F5

10、Safe Detele
作用:安全刪除,可用於對方法/字段等進行快速刪除,會刪除掉與之相關聯的引用。
快捷鍵:Alt + Delete


11、Extract
(1)Variable
作用:提取變量。這一點在碰到比較長的表達式時經常用到,將看起來很長很復雜的表達式提取出來作為一個變量表示。
快捷鍵:Ctrl + Alt + V
重構前:我們常會看到這樣的代碼
1 public void testExtractVariable() {
2      Log.i("demo", "age=" + getAaaaaaaaaaaaaaaaaaaaaaaaaaaAge() + ";name=" + getNnnnnnnnnnnnnnnnnnnnnnname());
3  }
4  private int getAaaaaaaaaaaaaaaaaaaaaaaaaaaAge() {
5      return age;
6  }
7  private String getNnnnnnnnnnnnnnnnnnnnnnname() {
8      return name;
9  }
第二行的要打印的信息表達式太長了,希望單獨提取出來用一個變量表示。本示例中鼠標停留在第2行“getAaaaaaaaaaaaaaaaaaaaaaaaaaaAge”處,執行該重構方法,會彈出如下紅框部分對話框,顯示的是選中表達式相關的可提取部分,根據需要選擇要提取的部分即可。

重構后:
 1 public void testExtractVariable() {
 2     String msg = "age=" + getAaaaaaaaaaaaaaaaaaaaaaaaaaaAge() + ";name=" + getNnnnnnnnnnnnnnnnnnnnnnname();
 3     Log.i("demo", msg);
 4 }
 5 private int getAaaaaaaaaaaaaaaaaaaaaaaaaaaAge() {
 6     return age;
 7 }
 8 private String getNnnnnnnnnnnnnnnnnnnnnnname() {
 9     return name;
10 }
(2)Constant
作用:提取常量,將表達式中的值提取為常量。
快捷鍵:Ctrl + Alt +C
重構前:
1 public void testExtractConstant() {
2   String filename = "sdcard";
3 }

重構后:
1 public static final String SDCARD = "sdcard";
2 public void testExtractConstant() {
3   String filename = SDCARD;
4 }
(3)Filed
作用:提取字段,將局部變量提取為全局變量。
快捷鍵:Ctrl + Alt +F
重構前:
1 public void testExtractField() {
2    String name ="zhangsan";
3 }

重構后:
1 private final String string = "zhangsan";
2 public void testExtractField() {
3 }
(4)Parameter
作用:將局部變量提取為方法的參數。
快捷鍵:Ctrl + Alt +P
重構前:
1 public void testExtractParameter() {
2     printName();
3 }
4 private void printName(){
5     String name = "zhangsan";
6     Log.i("demo","My name is:"+name);
7 }

重構后:
1 public void testExtractParameter() {
2     printName("zhangsan");
3 }
4 private void printName(String name){
5     Log.i("demo","My name is:"+ name);
6 }
(5)Functional Parameter ( 函數式參數 ) Ctrl + Alt + Shift + P
(6)Parameter Object
作用:將參數提取為一個對象。該功能主要是針對參數比較多的時候,將這些參數提取出來作為一個Bean實例傳入。
重構前:
1 private void testExtractParamObject() {
2     String info = getInfo("zhangshan", 20, 180f);
3 }
4 private String getInfo(String name, int age, float height) {
5     return "name=" + name + ";age=" + age + ";height=" + height;
6 }

重構后:
 1 private void testExtractParamObject() {
 2     String info = getInfo(new Person("zhangshan", 20, 180f));
 3 }
 4 private String getInfo(Person person) {
 5     return "name=" + person.getName() + ";age=" + person.getAge() + ";height=" + person.getHeight();
 6 }
 7 private static class Person {
 8     private final String name;
 9     private final int age;
10     private final float height;
11     private Person(String name, int age, float height) {
12         this.name = name;
13         this.age = age;
14         this.height = height;
15     }
16     public String getName() {
17         return name;
18     }
19     public int getAge() {
20         return age;
21     }
22     public float getHeight() {
23         return height;
24     }
25 }
(7)Mehtod
作用:提取為方法
快捷鍵:Ctrl + Alt +M
重構前:
1 public void testExtractMethod() {
2     List<String> nameList = new ArrayList<>();
3     nameList.add("zhangshan");
4     nameList.add("lisi");
5     nameList.add("wangwu");
6     int size = nameList.size();
7 }
鼠標光標選中第2~5行后執行該重構方法

重構后:
 1 public void testExtractMethod() {
 2     List<String> nameList = getNameList();
 3     int size = nameList.size();
 4 }
 5 @NonNull
 6 private List<String> getNameList() {
 7     List<String> nameList = new ArrayList<>();
 8     nameList.add("zhangshan");
 9     nameList.add("lisi");
10     nameList.add("wangwu");
11     return nameList;
12 }
(8)Type Parameter
(9)Method Object
作用:將該選中的內容提取為一個方法,並提取到一個獨立的類中。和“Method”很類似,不同的是提取的方法最后放在哪里。
重構前:
1 public void testExtractMethod() {
2     List<String> nameList = new ArrayList<>();
3     nameList.add("zhangshan");
4     nameList.add("lisi");
5     nameList.add("wangwu");
6     int size = nameList.size();
7 }

重構后:
 1 public void testExtractMethod() {
 2     List<String> nameList = Utils.invoke();
 3     int size = nameList.size();
 4 }
 5 private static class Utils {
 6     private static List<String> invoke() {
 7         List<String> nameList = new ArrayList<>();
 8         nameList.add("zhangshan");
 9         nameList.add("lisi");
10         nameList.add("wangwu");
11         return nameList;
12     }
13 }
(10)Delegate
作用:提取為一個代理類。
重構前:
1 public class RefactorTest{
2
3     public void testExtractInterface() {
4         System.out.print("testExtractInterface");
5     }
6 }

重構后:
 1 public class RefactorTestDelegate {
 2     public RefactorTestDelegate() {
 3     }
 4
 5     public void testExtractInterface() {
 6         System.out.print("testExtractInterface");
 7     }
 8 }
 9
10 public class RefactorTest{
11
12     private final RefactorTestDelegate refactorTestDelegate = new RefactorTestDelegate();
13
14     public void testExtractInterface() {
15         refactorTestDelegate.testExtractInterface();
16     }
17 }
(11)Interrface
作用:提取為接口。
重構前:
1 public class RefactorTest {
2
3     public void testExtractInterface() {
4         System.out.print("testExtractInterface");
5     }
6 }
public修飾的方法才可以被提取到接口中。

重構后:
 1 interface IRefactorTest {
 2     void testExtractInterface();
 3 }
 4
 5 public class RefactorTest implements IRefactorTest {
 6
 7     @Override
 8     public void testExtractInterface() {
 9         System.out.print("testExtractInterface");
10     }
11 }
(12)Superclass
作用:將指定內容提取到父類中。
重構前:
1 private void testExtractSupperclass() {
2       testSuper();
3 }
4
5 public void testSuper() {
6      System.out.print("testSuper");
7 }

重構后:
 1 //=======RefactorTest extends RefactorTestBase=======
 2 private void testExtractSupperclass() {
 3     testSuper();
 4 }
 5
 6 class RefactorTestBase {
 7     public void testSuper() {
 8         System.out.print("testSuper");
 9     }
10 }
(13) Style
作用:將屬性提取為Style。該項只有當鼠標停留在布局文件中時才會出現。
重構前:
1 <Button
2     android:id="@+id/btn_handler_demo"
3     android:layout_width="wrap_content"
4     android:layout_height="wrap_content"
5     android:text="handler" />

重構后:
1 <Button
2     android:id="@+id/btn_handler_demo"
3     android:text="handler"
4     style="@style/testStyle" />
styles.xml
1 <?xml version="1.0" encoding="utf-8"?>
2 <resources>
3     <style name="testStyle">
4         <item name="android:layout_width">wrap_content</item>
5         <item name="android:layout_height">wrap_content</item>
6     </style>
7 </resources>
(14)Layout
作用:提取為布局文件。這一項也是需要在鼠標停留在布局文件中時才會出現。
 1 <LinearLayout
 2     android:layout_width="match_parent"
 3     android:layout_height="wrap_content"
 4     android:orientation="horizontal">
 5     <Button
 6         android:id="@+id/btn_handler_demo"
 7         android:layout_width="wrap_content"
 8         android:layout_height="wrap_content"
 9         android:text="handler" />
10     <Button
11         android:id="@+id/btn_broadcast_demo"
12         android:layout_width="wrap_content"
13         android:layout_height="wrap_content"
14         android:text="Broadcast" />
15     <Button
16         android:id="@+id/btn_bright_demo"
17         android:layout_width="wrap_content"
18         android:layout_height="wrap_content"
19         android:text="Bright" />
20     <Button
21         android:id="@+id/btn_service_demo"
22         android:layout_width="wrap_content"
23         android:layout_height="wrap_content"
24         android:text="Service" />
25 </LinearLayout>

重構后:
<include layout="@layout/testlayout" />
testlayout.xml
 1 <?xml version="1.0" encoding="utf-8"?>
 2 <LinearLayout xmlns:android="http://schemas.android.com/apk/res/android"
 3     xmlns:tools="http://schemas.android.com/tools"
 4     android:layout_width="match_parent"
 5     android:layout_height="wrap_content"
 6     android:orientation="horizontal"
 7     tools:showIn="@layout/activity_main">
 8
 9     <Button
10         android:id="@+id/btn_preference_demo"
11         android:layout_width="wrap_content"
12         android:layout_height="wrap_content"
13         android:text="Preference" />
14
15     <Button
16         android:id="@+id/btn_file_demo"
17         android:layout_width="wrap_content"
18         android:layout_height="wrap_content"
19         android:text="File" />
20
21     <Button
22         android:id="@+id/btn_anim_demo"
23         android:layout_width="wrap_content"
24         android:layout_height="wrap_content"
25         android:text="Anim" />
26
27     <Button
28         android:id="@+id/btn_customview_demo"
29         android:layout_width="wrap_content"
30         android:layout_height="wrap_content"
31         android:text="CustomView" />
32 </LinearLayout>
12、Inline
作用:轉換為內聯、方法鏈形式的調用。
快捷鍵:Ctrl + Alt +N
重構前:
1 private void testInline() {
2     int a = 100;
3     int b = 200;
4     System.out.print(add(a, b));
5 }
6 private int add(int a, int b) {
7     System.out.print("a=" + a + ";b=" + b);
8     return a*2 + b*3;
9 }

重構后:
1 private void testInline() {
2     int a = 100;
3     int b = 200;
4     System.out.print("a=" + a + ";b=" + b);
5     System.out.print(a * 2 + b * 3);
6 }
原先需要調用一個方法,重構后直接把該方法中的代碼給復制過來了。因為上面選中的是內聯所有的,並且刪除該方法,所以add方法也就被刪除了。
13、Find and Replace Code Duplicates
14、Invert Boolean
作用:轉換Boolean值,將當前false/true的值進行轉化為相反的值。
重構前:
1 private boolean isEmpty(String str) {
2     if (str != null && str.length() == 0) {
3         return false;
4     }
5     return true;
6 }

重構后:
1 private boolean isNotEmpty(String str) {
2     if (str != null && str.length() == 0) {
3         return true;
4     }
5     return false;
6 }
15、Pull Members Up
作用:將子類的成員上移到父類中。
重構前:
 1 public class RefactorBase {
 2
 3 }
 4
 5 public class RafactorSub extends RefactorBase {
 6     int age = 10;
 7
 8     public void printSub() {
 9         System.out.print(age);
10     }
11 }

重構后:
 1 public class RefactorBase {
 2     int age = 10;
 3     public void printSub() {
 4         System.out.print(age);
 5     }
 6 }
 7
 8 public class RafactorSub extends RefactorBase {
 9
10 }
16、Push Members Down
作用:將父類中的成員下移到子類中,正好是“Pull Members Up”的反向操作。
重構前:
 1 public class RefactorBase {
 2     int age = 10;
 3     public void printSub() {
 4         System.out.print(age);
 5     }
 6 }
 7
 8 public class RafactorSub extends RefactorBase {
 9
10 }

重構后:
1 public class RefactorBase {
2
3 }
4 public class RafactorSub extends RefactorBase {
5     int age = 10;
6     public void printSub() {
7         System.out.print(age);
8     }
9 }
17、Use Interface Where Possible
18、Replace Inheritance with Delegation
作用:使用代理替代繼承。在java中,提倡使用組合,而不是繼承。
重構前:
 1 public abstract class AbsClass {
 2     public abstract void print();
 3 }
 4
 5 public class ClassWrapper extends AbsClass {
 6     @Override
 7     public void print() {
 8         System.out.print("print");
 9     }
10 }
11
12 private void testReplaceInheritanceWithDelegation() {
13     new ClassWrapper().print();
14 }

重構后:
 1 public abstract class AbsClass {
 2     public abstract void print();
 3 }
 4
 5 public class ClassWrapper {
 6     private final ClassImpl absClass = new ClassImpl();
 7
 8     public void print() {
 9         absClass.print();
10     }
11
12     private class ClassImpl extends AbsClass {
13         @Override
14         public void print() {
15             System.out.print("print");
16         }
17     }
18 }
19
20 public class RefactorTest {
21     private void testReplaceInheritanceWithDelegation() {
22         new ClassWrapper().print();
23     }
24 }
這一部分有點像Android中Context,ContextWrapper,ContextImpl類之間的關系。
19、Remove Middleman
作用:移除中間人,其實就是移除中間過程。
重構前:
 1 public class RefactorTest {
 2
 3     private void testRemoveMiddleMan() {
 4         BookManager bookManager = new BookManager();
 5         bookManager.addBook("java");
 6     }
 7
 8     public static class BookManager {
 9         private List<String> mBookList = new ArrayList<>();
10
11         private void addBook(String bookName) {
12             mBookList.add(bookName);
13         }
14     }
15 }

重構后:
 1 public class RefactorTest {
 2
 3     private void testRemoveMiddleMan() {
 4         BookManager bookManager = new BookManager();
 5         bookManager.getmBookList().add("java");
 6     }
 7
 8     public static class BookManager {
 9         private List<String> mBookList = new ArrayList<>();
10
11         public List<String> getmBookList() {
12             return mBookList;
13         }
14     }
15 }
對比重構前和重構后會發現,添加book這個動作,從由BookManager的addBook方法來執行,變成了直接有mBookList來執行了。這個addBook就是這個MiddleMan,顯得多余,可以優化掉。實際上優化后就變成一個inline方式了,可以對比前面講到的“Inline”。
20、Wrap Method Return Value
作用:封裝返回值
 1 public class RefactorTest {
 2
 3     private void testWrapReturnValue() {
 4         String name = getName();
 5     }
 6
 7     private String getName() {
 8         return "zhangsan";
 9     }
10 }

重構后:
 1 public class RefactorTest {
 2
 3     private void testWrapReturnValue() {
 4         String name = getName().getValue();
 5     }
 6
 7     private Person getName() {
 8         return new Person("zhangsan");
 9     }
10
11     public class Person {
12         private final String value;
13
14         public Person(String value) {
15             this.value = value;
16         }
17
18         public String getValue() {
19             return value;
20         }
21     }
22 }
21、Convert Anonymous to Inner
作用:將匿名內部類轉為內部類。
重構前:
1 private void testConvertAnonymousToInner(){
2     view.setOnClickListener(new View.OnClickListener() {
3         @Override
4         public void onClick(View v) {
5         }
6     });
7 }

重構后:
 1 public class RefactorTest{
 2
 3     View view;
 4     private void testConvertAnonymousToInner(){
 5         view.setOnClickListener(new MyOnClickListener());
 6     }
 7
 8     private static class MyOnClickListener implements View.OnClickListener {
 9         @Override
10         public void onClick(View v) {
11
12         }
13     }
14 }
22、Encapsulate Fields
作用:封裝字段,用於生成Getter/Setter
重構前:
1 public String name = "zhangsan";
2 private void testEncapsulateFields() {
3     System.out.println(name);
4 }

通過該對話框,可以選擇要封裝的字段,設置修飾符等。默認選擇時,name字段的修飾符從public變成了private,這也就避免了外部類通過實例直接訪問它。
重構后:
 1 private String name = "zhangsan";
 2 private void testEncapsulateFields() {
 3     System.out.println(getName());
 4 }
 5 public String getName() {
 6     return name;
 7 }
 8 public void setName(String name) {
 9     this.name = name;
10 }
23、Replace Temp With Query
24、Replace Constructor with Factory Method
作用:將構造方法替換為工廠方法
重構前:
 1 public class MyClass {
 2
 3     private String title;
 4     private String message;
 5     private String sure;
 6     private String cancel;
 7
 8     public MyClass(String title, String message, String sure, String cancel) {
 9         this.title = title;
10         this.message = message;
11         this.sure = sure;
12         this.cancel = cancel;
13     }
14 }
15
16 public class RefactorTest {
17     private void testReplaceConstructorWithFactory(Context context) {
18         MyClass myClass = new MyClass("title", "message", "sure", "cancle");
19     }
20 }

重構后:
 1 public class MyClass {
 2
 3     private String title;
 4     private String message;
 5     private String sure;
 6     private String cancel;
 7
 8     private MyClass(String title, String message, String sure, String cancel) {
 9         this.title = title;
10         this.message = message;
11         this.sure = sure;
12         this.cancel = cancel;
13     }
14
15     public static MyClass createMyClass(String title, String message, String sure, String cancel) {
16         return new MyClass(title, message, sure, cancel);
17     }
18 }
19
20 public class RefactorTest {
21     private void testReplaceConstructorWithFactory(Context context) {
22         MyClass myClass = MyClass.createMyClass("title", "message", "sure", "cancle");
23     }
24 }
原先public修飾的構造函數,已經變成private了,MyClass類只能通過工廠方法來獲取實例,而無法再直接new了。
25、Replace Constructor with Builder
作用:將構造方法替換為Builder方式
重構前:
 1 public class RefactorTest{
 2     private void testReplaceConstructorWithBuilder(Context context){
 3         MyDialog dialog =  new MyDialog(context,"title","message","sure","cancle");
 4     }
 5 }
 6
 7 public class MyDialog extends Dialog {
 8     private String title;
 9     private String message;
10     private String sure;
11     private String cancel;
12     public MyDialog(@NonNull Context context) {
13         super(context);
14     }
15     public MyDialog(Context context, String title, String message, String sure, String cancel) {
16         super(context);
17         this.title = title;
18         this.message = message;
19         this.sure = sure;
20         this.cancel = cancel;
21     }
22 }

重構后:
 1 public class RefactorTest {
 2     private void testReplaceConstructorWithBuilder(Context context) {
 3         MyDialog dialog = new MyDialogBuilder()
 4                 .setContext(context)
 5                 .setTitle("title")
 6                 .setMessage("message")
 7                 .setSure("sure")
 8                 .setCancel("cancle")
 9                 .createMyDialog();
10     }
11 }
12
13 public class MyDialogBuilder {
14     private Context context;
15     private String title;
16     private String message;
17     private String sure;
18     private String cancel;
19
20     public MyDialogBuilder setContext(Context context) {
21         this.context = context;
22         return this;
23     }
24
25     public MyDialogBuilder setTitle(String title) {
26         this.title = title;
27         return this;
28     }
29
30     public MyDialogBuilder setMessage(String message) {
31         this.message = message;
32         return this;
33     }
34
35     public MyDialogBuilder setSure(String sure) {
36         this.sure = sure;
37         return this;
38     }
39
40     public MyDialogBuilder setCancel(String cancel) {
41         this.cancel = cancel;
42         return this;
43     }
44
45     public MyDialog createMyDialog() {
46         return new MyDialog(context);
47     }
48 }
看到這里,我們應該能夠聯想到AlertDialog類中的Builder了。將構造函數的形式,轉變為了建造者模式的形式,這樣不會拘泥於構造函數的參數個數,參數類型的限制,從而靈活設置屬性。
26、Generify
作用:泛型重構,自動添加泛型的參數。
重構前:
1 private void testGenerify() {
2     List list = new ArrayList();
3     list.add("one");
4     list.add("two");
5     list.add("three");
6 }

重構后:
1 private void testGenerify() {
2     List<String> list = new ArrayList<String>();
3     list.add("one");
4     list.add("two");
5     list.add("three");
6 }
27、Migrate
28、Internationalize(國際化)
29、Remove Unused Resources
作用:一直不用的資源
示例:下圖中1.jpg是一個沒有被應用的文件。


在執行該重構方法后,1.jpg就被刪除了。

出處:https://www.cnblogs.com/andy-songwei/p/11809700.html
====================================================================================================================
下面我把簡書https://www.jianshu.com/p/f8cb51bc8e19上的內容也貼進來了,一起參考吧!
使用Android Studio對代碼進行重構
簡介
2013年Google I/O大會上,谷歌推出新的Android開發環境——Android Studio,從此Android程序員有了新的選擇,使用Android Studio進行App開發。AndroidStudio是一項全新的基於IntelliJ IDEA的Android開發環境。類似於Eclipse ADT插件,現在已經成為了官方推薦的ide,同時Eclipse不再進行更新。
軟件開發中,經過幾個版本迭代,不少程序員會覺的以前的代碼架構可能不滿足日益增長的需求,這時候都會想到了重構,關於重構網上也有不少用於的資料。
資料里面列舉了如下幾種方法,對代碼進行重構。
31天重構學習筆記01. 封裝集合
31天重構學習筆記02. 移動方法
31天重構學習筆記03. 提升方法
31天重構學習筆記04. 降低方法
31天重構學習筆記05. 提升字段
31天重構學習筆記06. 降低字段
31天重構學習筆記07. 重命名(方法,類,參數)
31天重構學習筆記08. 使用委派代替繼承
31天重構學習筆記09. 提取接口
31天重構學習筆記10. 提取方法
31天重構學習筆記11. 使用策略類
31天重構學習筆記12. 分解依賴
31天重構學習筆記13. 提取方法對象
31天重構學習筆記14. 分離職責
31天重構學習筆記15. 移除重復內容
31天重構學習筆記16. 封裝條件
31天重構學習筆記17. 提取父類
31天重構學習筆記18. 使用條件判斷代替異常
31天重構學習筆記19. 提取工廠類
31天重構學習筆記20. 提取子類
31天重構學習筆記21. 合並繼承
31天重構學習筆記22. 分解方法
31天重構學習筆記23. 引入參數對象
31天重構學習筆記24. 分解復雜判斷
31天重構學習筆記25. 引入契約式設計
31天重構學習筆記26. 避免雙重否定
31天重構學習筆記27. 去除上帝類
31天重構學習筆記28. 為布爾方法命名
31天重構學習筆記29. 去除中間人對象
31天重構學習筆記30. 盡快返回
31天重構學習筆記31. 使用多態代替條件判斷
Android Studio是基於優秀的ide的,ide提供了豐富的功能,很方便的對代碼進行重構,下圖是我的Android Studio Refactor菜單,部分快捷鍵與默認快捷鍵不同是因為方便而修改的。

古人雲『工欲善其事必先利其器』,所以在對代碼進行重構前,需要詳細了解Android Studio提供的功能,下面對AS(Android Studio,后面簡稱AS)菜單進行簡單示例。
如何使用
鼠標光標選中或者放在代碼上,按下快捷鍵就可以彈出當前代碼可以使用的功能。
如下所示:
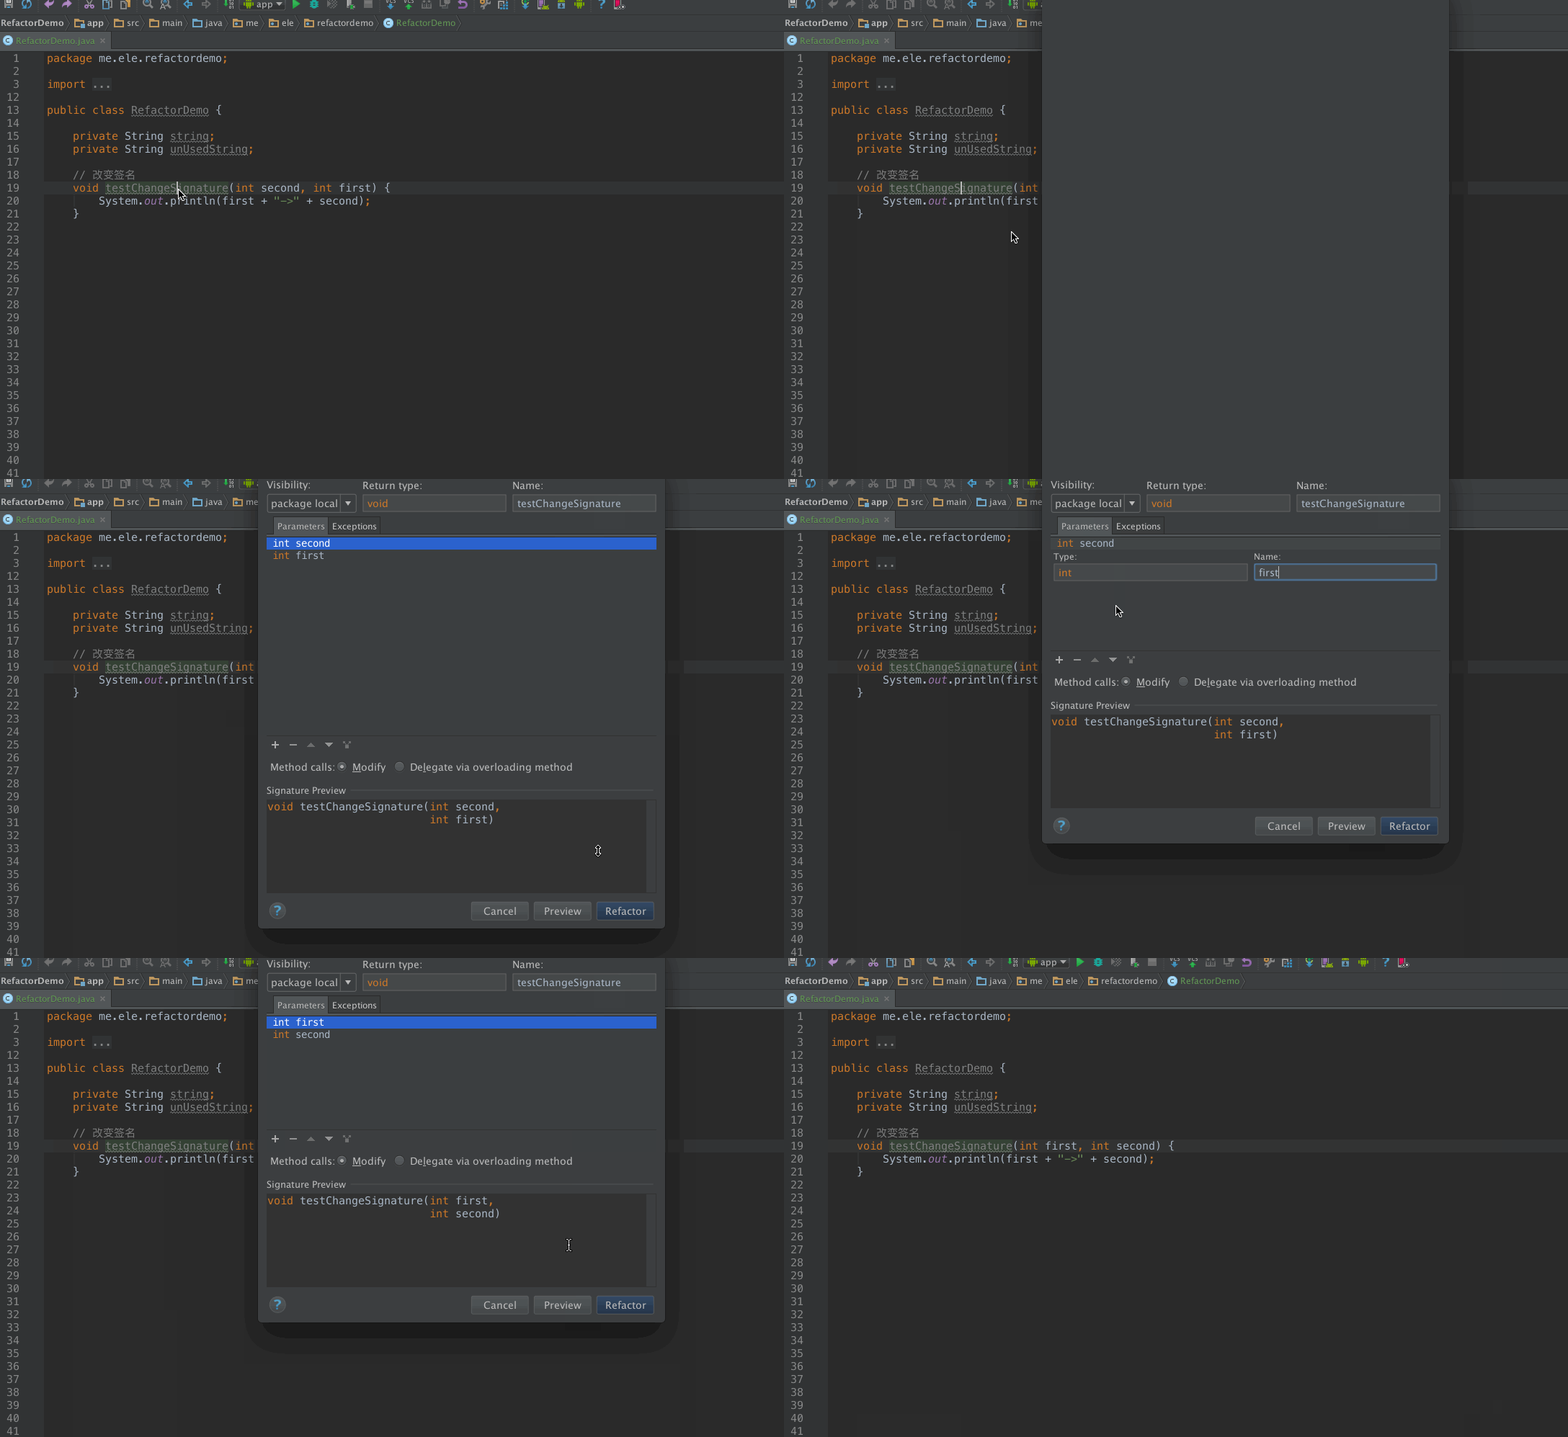
代碼與操作示例
- ChangeSignature,改變函數簽名,可以修改函數的名字,參數的順序,參數的名字。
Before:
    // 改變簽名
    void testChangeSignature(int second, int first) {
        System.out.println(first + "->" + second);
    }
Gif:
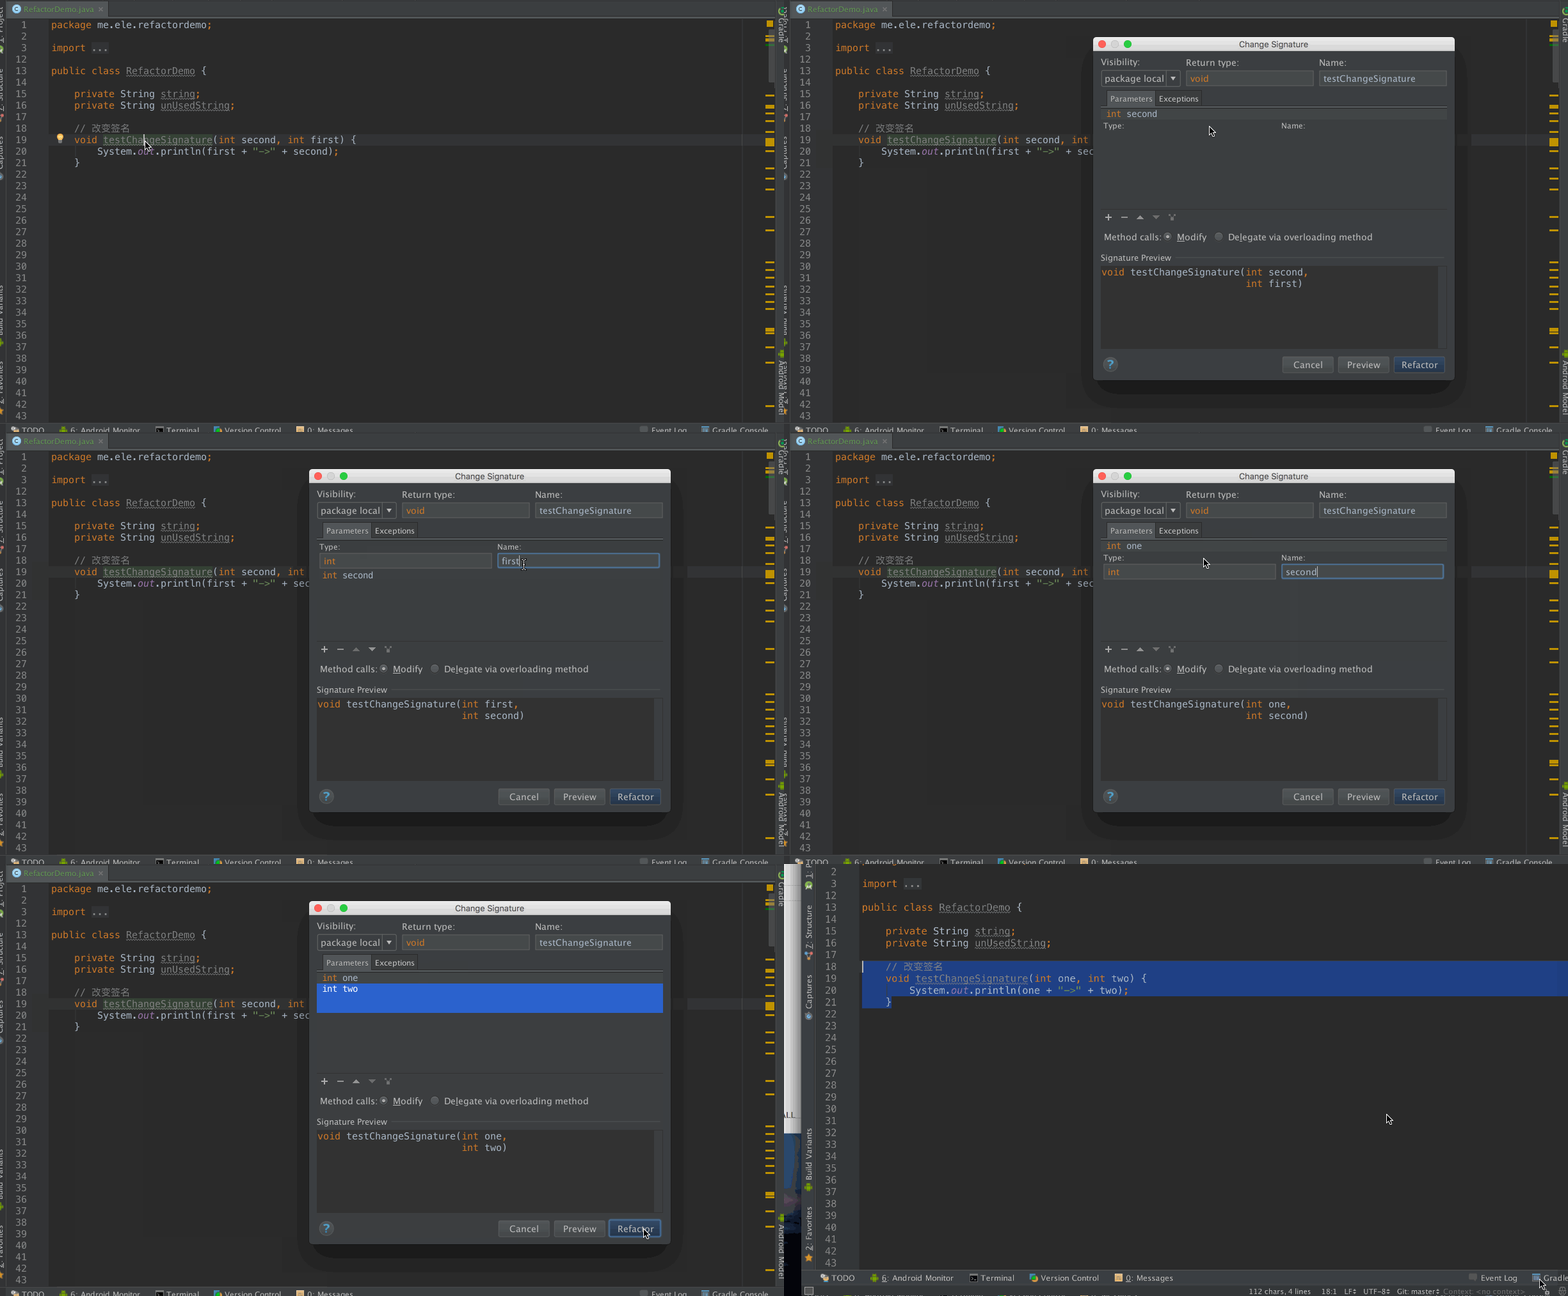
After:
    // 改變簽名
    void testChangeSignature(int one, int two) {
        System.out.println(one + "->" + two);
    }
修改前參數依次是second、first,修改是one、two。
- ChangeClassSignatuere,改變類的簽名,可以修改類的泛型簽名
Before:
    // 改變類的簽名
    void testChangeClassSignatuere() {
        String second = "second";
        int first = 100;
        new ChangeClassSignatuere(second, first);
    }

// **********************分割線*******************************

public class ChangeClassSignatuere {

    private int first;
    private String second;

    public ChangeClassSignatuere(String second, int first) {
        this.first = first;
        this.second = second;
    }

    @Override
    public String toString() {
        return "ChangeClassSignatuere{" +
                "second='" + second + '\'' +
                ",first=" + first +
                '}';
    }
}
Gif:
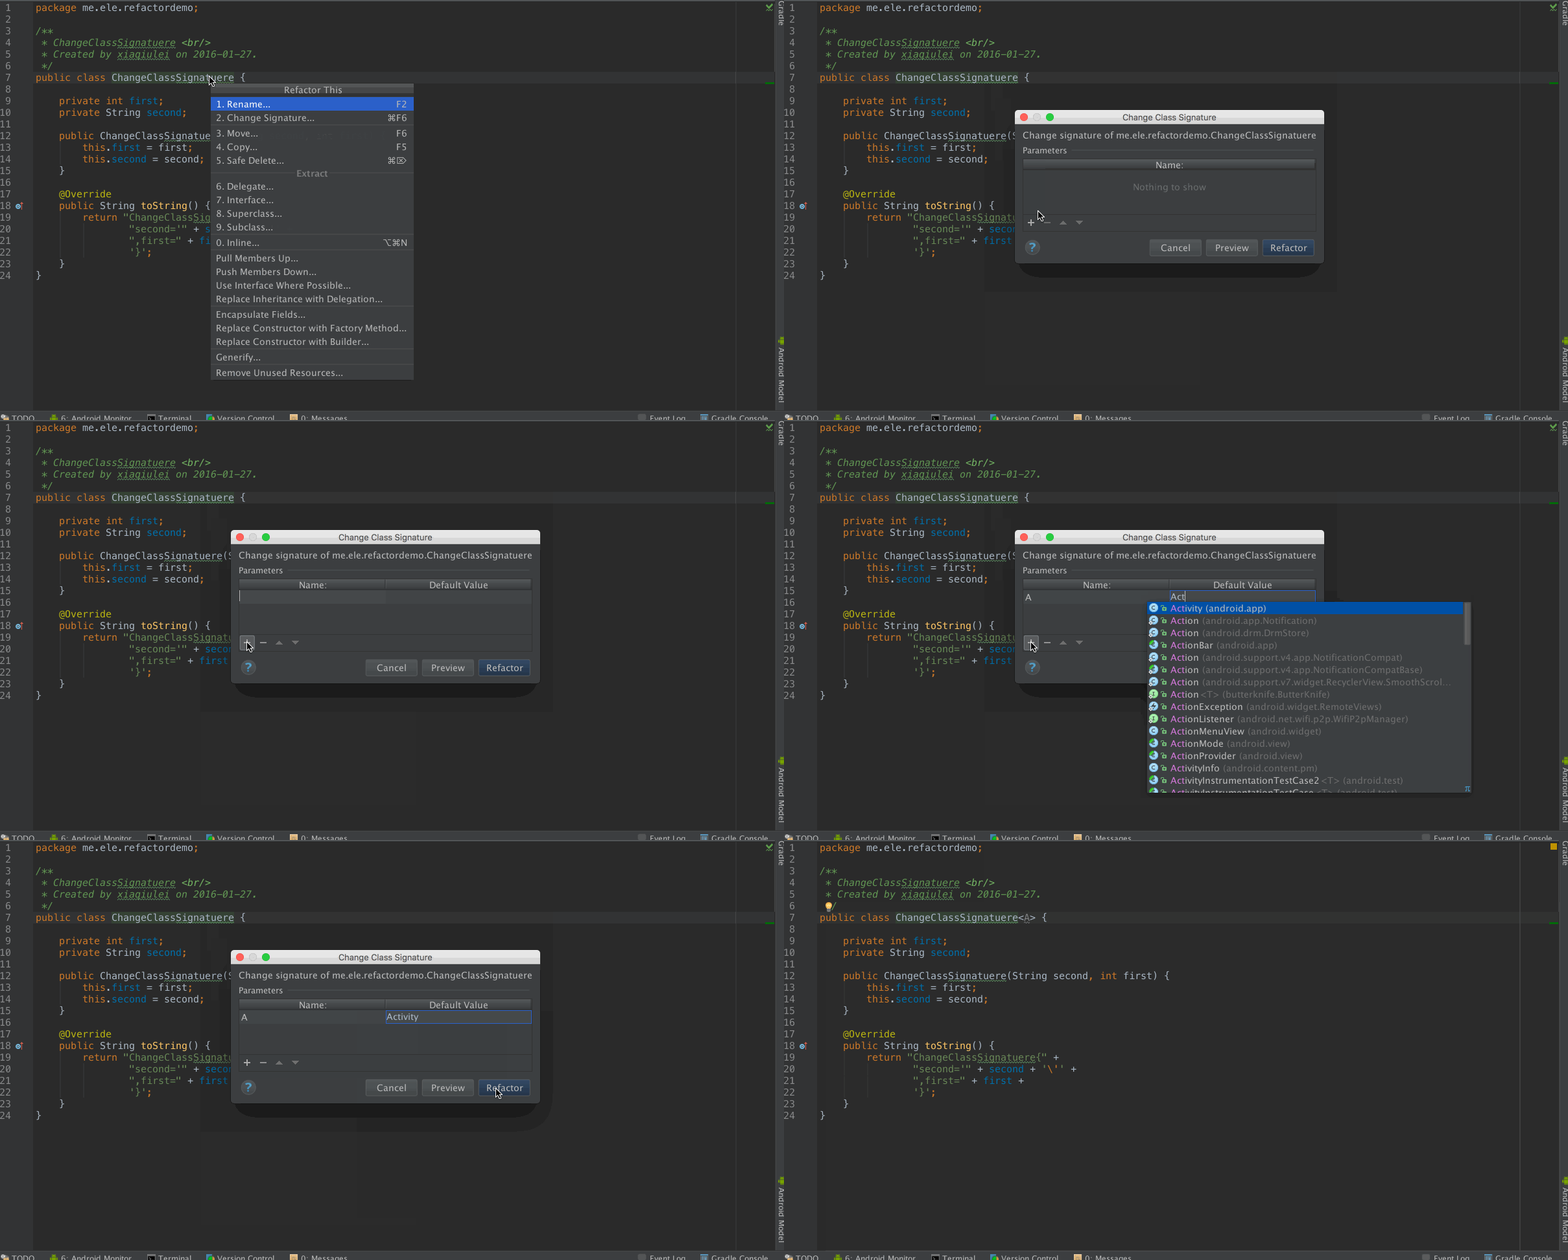
After:
    // 改變類的簽名
    void testChangeClassSignatuere() {
        String second = "second";
        int first = 100;
        new ChangeClassSignatuere<Activity>(second, first);
    }
// **********************分割線*******************************

public class ChangeClassSignatuere<A> {

    private int first;
    private String second;

    public ChangeClassSignatuere(String second, int first) {
        this.first = first;
        this.second = second;
    }

    @Override
    public String toString() {
        return "ChangeClassSignatuere{" +
                "second='" + second + '\'' +
                ",first=" + first +
                '}';
    }
}
- 修改匿名類為內部類
Before:
    // 匿名類改成內部類
    void testConvertAnonymousToInner() {
        View.OnClickListener clickListener = new View.OnClickListener() {

            @Override
            public void onClick(View v) {
                System.out.println("onClick");
            }
        };
    }
Gif:
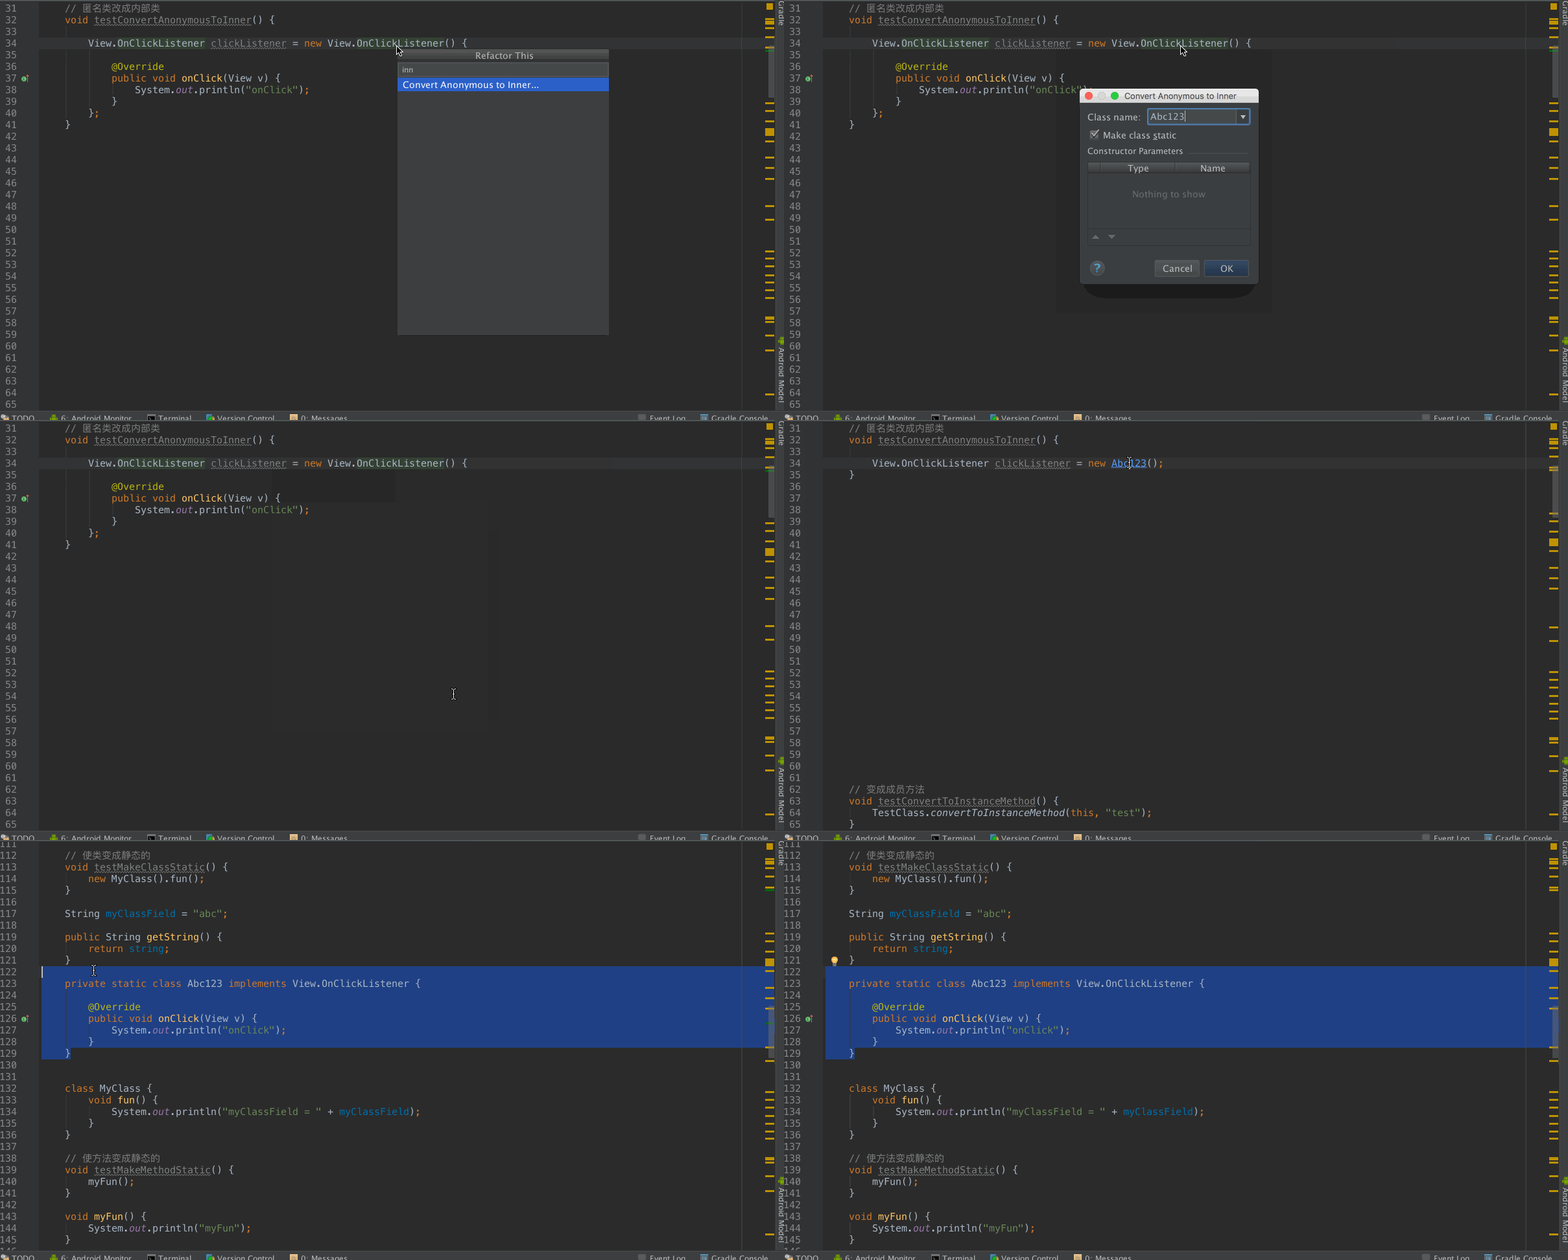
After:
    // 匿名類改成內部類
    void testConvertAnonymousToInner() {

        View.OnClickListener clickListener = new Abc123();
    }

    private static class Abc123 implements View.OnClickListener {

        @Override
        public void onClick(View v) {
            System.out.println("onClick");
        }
    }
這個是我最喜歡的一個功能,有時候匿名類剛剛開始邏輯很簡單,過不了多久邏輯太多,就可以使用快捷鍵變成一個內部類。
- ConvertToInstanceMethod,修改一個方法變成成員方法
Befor:
    // 變成成員方法
    void testConvertToInstanceMethod() {
        TestClass.convertToInstanceMethod(this, "test");
    }

public class TestClass {

    static void convertToInstanceMethod(RefactorDemo demo, String string) {
        System.out.println("convertToInstanceMethod = " + demo);
        System.out.println("convertToInstanceMethod = " + string);
    }
}
After:
    // 變成成員方法
    void testConvertToInstanceMethod() {
        this.convertToInstanceMethod("test");
    }

    void convertToInstanceMethod(String string) {
        System.out.println("convertToInstanceMethod = " + this);
        System.out.println("convertToInstanceMethod = " + string);
    }
在修改前,調用convertToInstanceMethod方法,第一個參數相是RefactorDemo,傳遞是this, 修改后就那個方法直接移動到本類中。
- Copy,復制一個類
Before:
    // 復制一個類
    void testCopy() {
        new FirstClass();
    }

public class FirstClass implements Serializable {

    public String first;

    @Override
    public String toString() {
        return "FirstClass{" +
                "first='" + first + '\'' +
                '}';
    }
}
Gif:
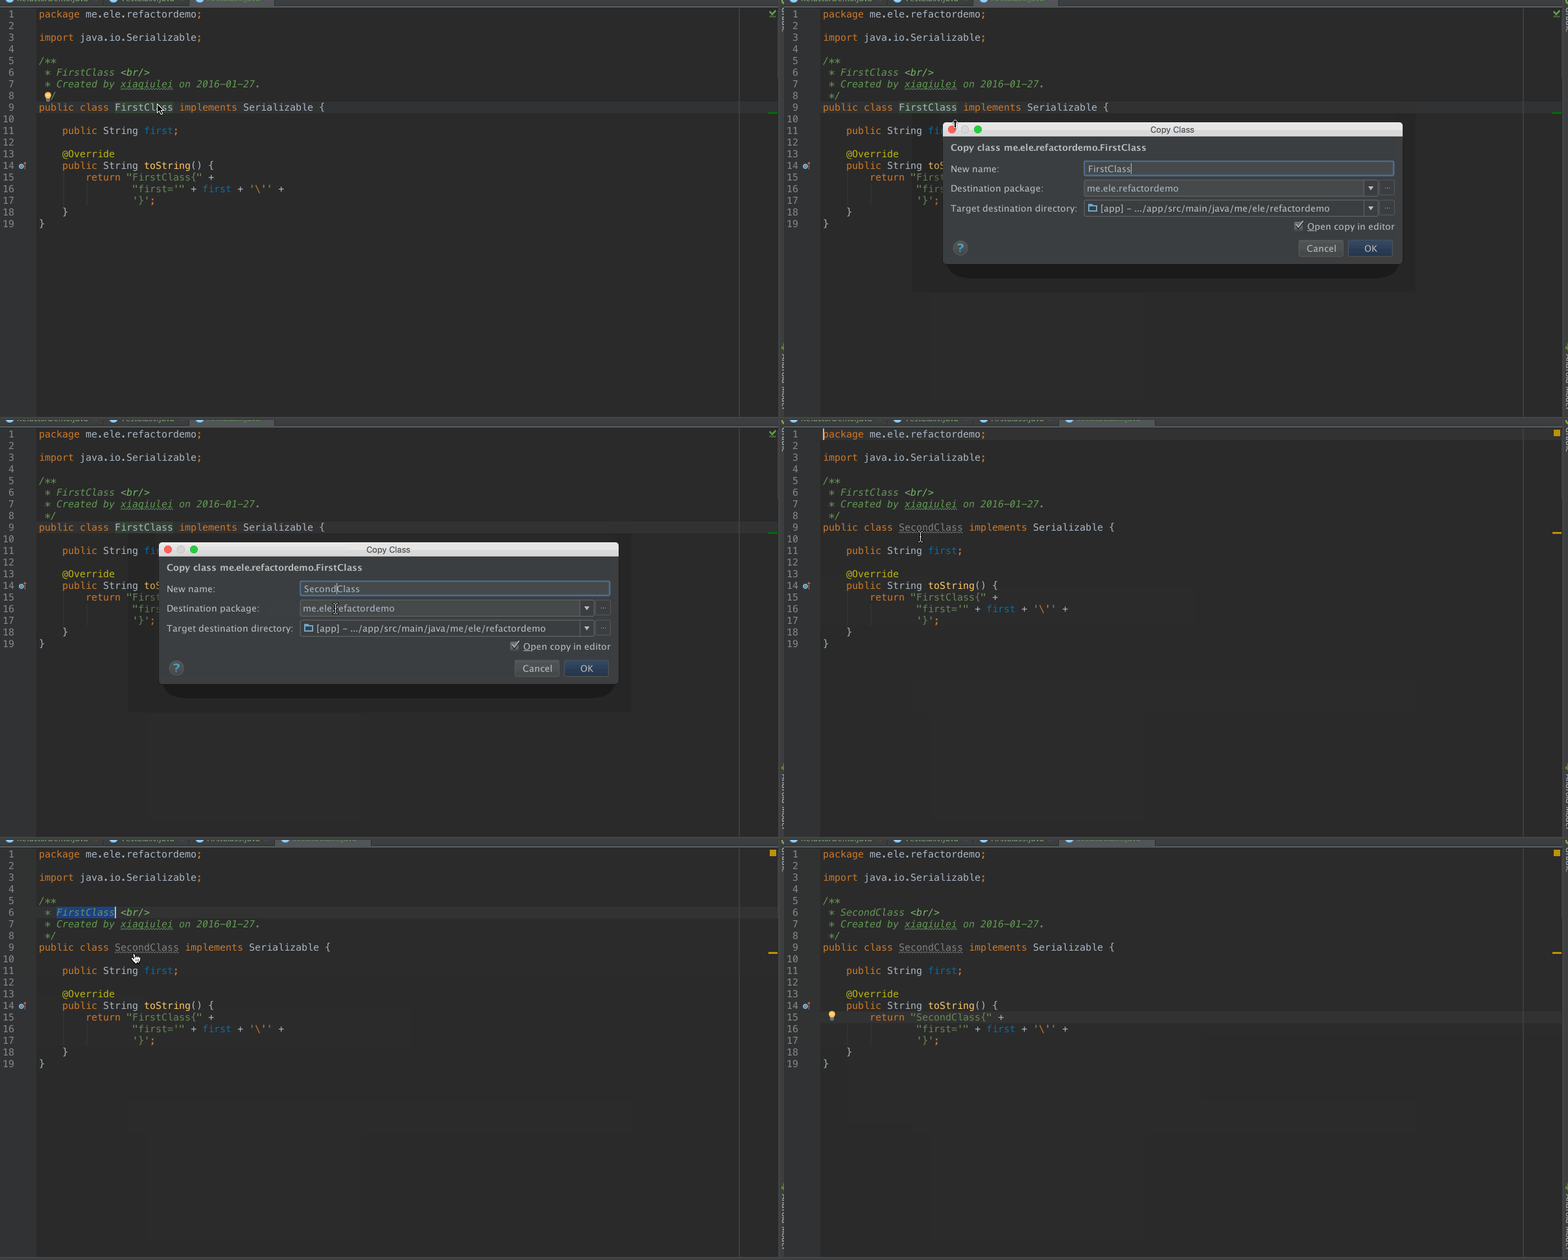
After:
public class SecondClass implements Serializable {

    public String first;

    @Override
    public String toString() {
        return "SecondClass{" +
                "first='" + first + '\'' +
                '}';
    }
}
- EncapsulateFields,壓縮一個字段,間接訪問
Before:
    String filed = "filed";

    // 壓縮一個字段,間接訪問
    void testEncapsulateFields() {
        System.out.println(filed);
    }
After:
    private String filed = "filed";

    // 壓縮一個字段,間接訪問
    void testEncapsulateFields() {
        System.out.println(getFiled());
    }

    public String getFiled() {
        return filed;
    }

    public void setFiled(String filed) {
        this.filed = filed;
    }
相當於簡介訪問一個field,自動生成setter和getter。
- GenerifyRefactoring,泛型重構
Before:
    // 泛型重構
    void testGenerifyRefactoring() {
        List list = new ArrayList();
        list.add("one");
        list.add("two");
        list.add("three");
    }
After:
    // 泛型重構
    void testGenerifyRefactoring() {
        List<String> list = new ArrayList<String>();
        list.add("one");
        list.add("two");
        list.add("three");
    }
自動添加泛型的參數。
- Inline,內聯函數
Before:
    // 內聯
    void testInline() {
        int a = 100;
        int b = 200;
        System.out.println(add(a, b));
    }

    int add(int a, int b) {
        return a + b;
    }
Gif:
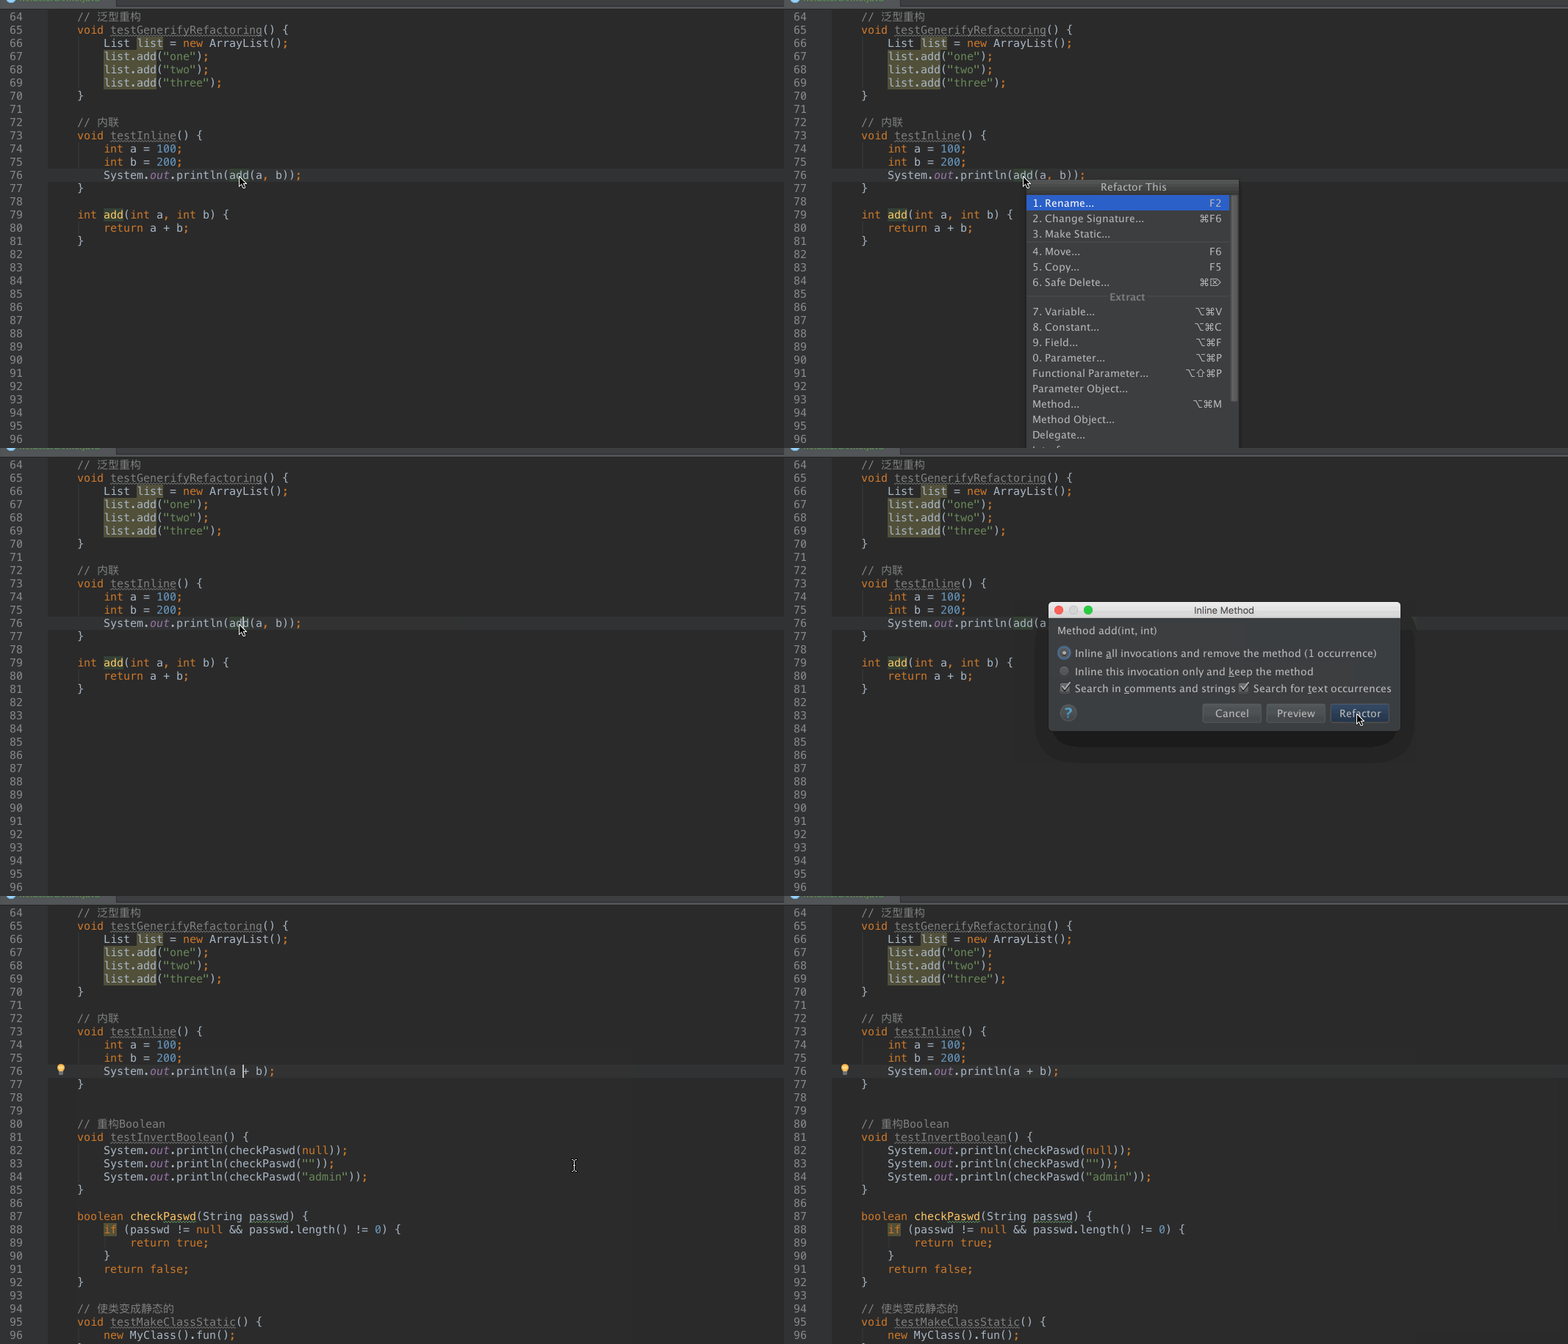
After:
    // 內聯
    void testInline() {
        int a = 100;
        int b = 200;
        System.out.println(a + b);
    }
原先需要調用一個函數的地方,直接把那個函數里面的代碼復制過來。
- InvertBoolean,重構Boolean
Before:
    // 重構Boolean
    void testInvertBoolean() {
        System.out.println(checkPaswd(null));
        System.out.println(checkPaswd(""));
        System.out.println(checkPaswd("admin"));
    }

    boolean checkPaswd(String passwd) {
        if (passwd != null && passwd.length() != 0) {
            return true;
        }
        return false;
    }
Gif:
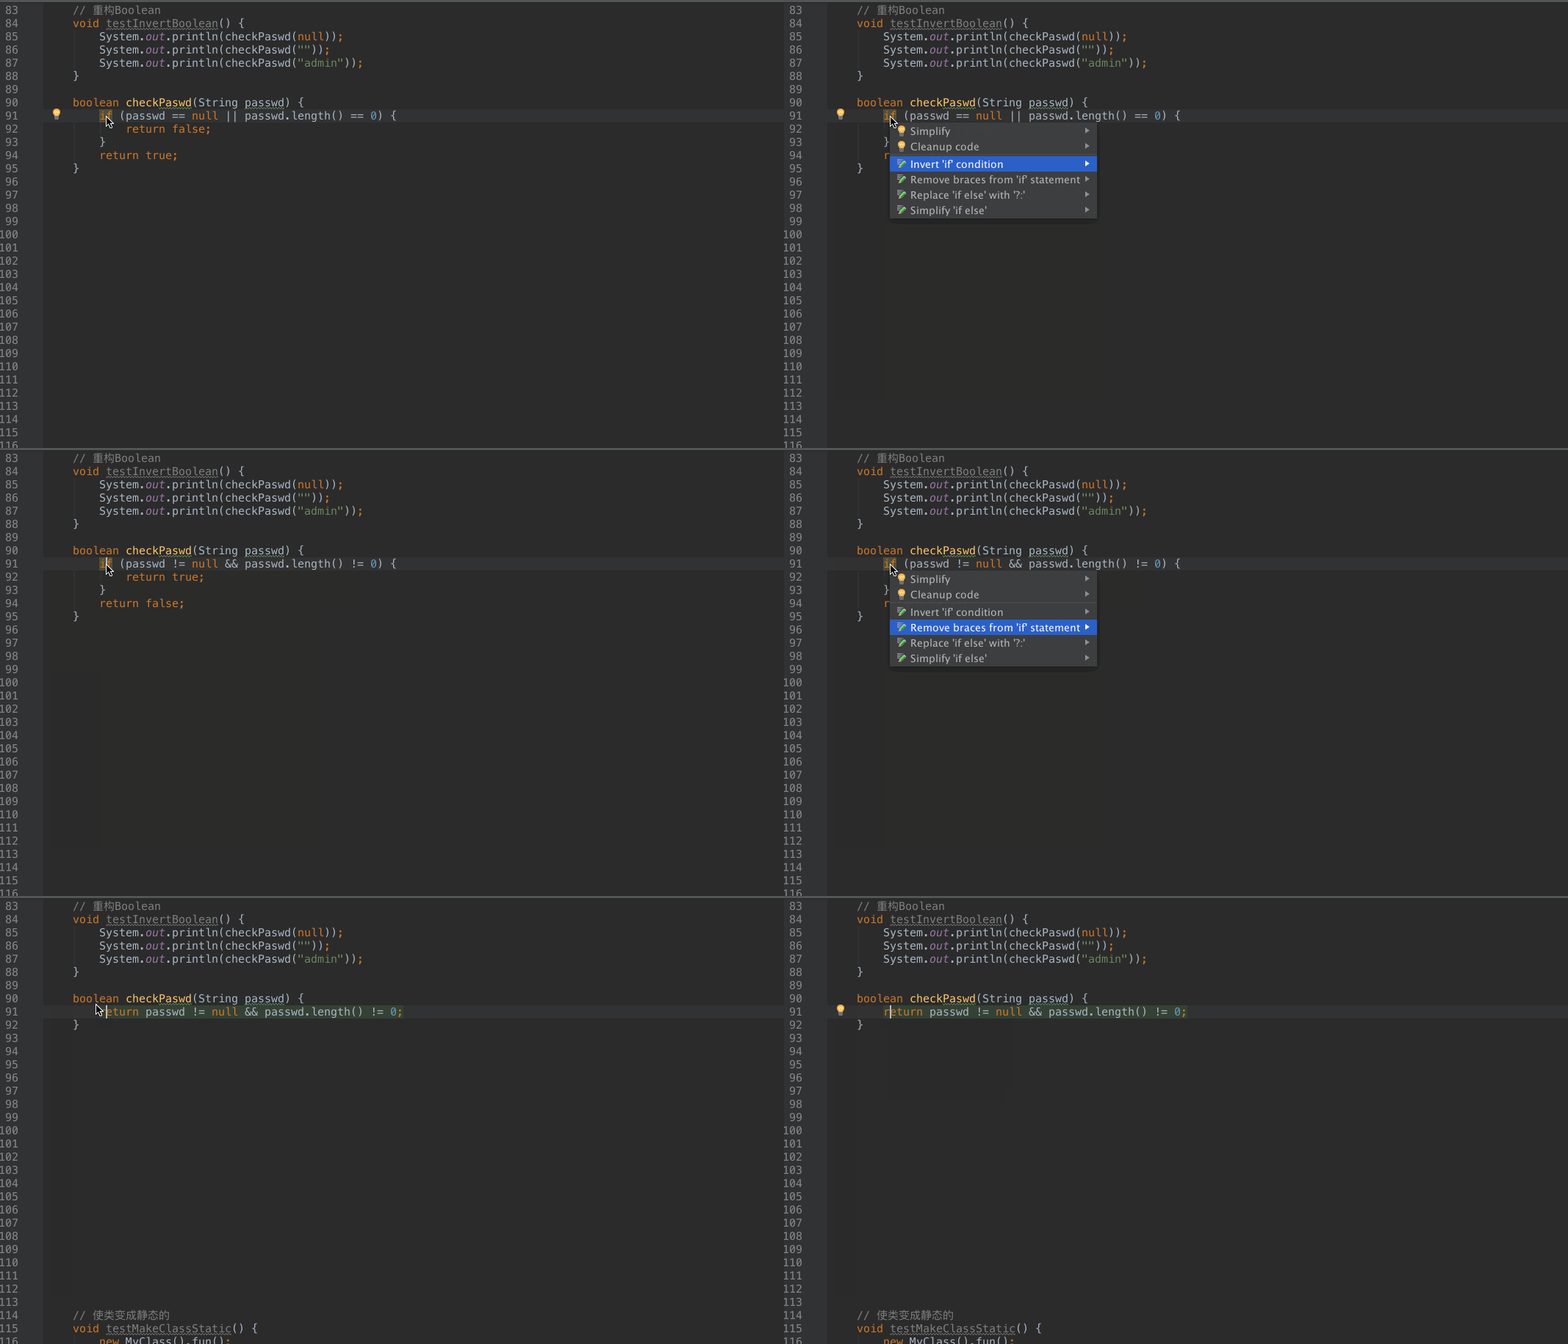
After:
    // 重構Boolean
    void testInvertBoolean() {
        System.out.println(checkPaswd(null));
        System.out.println(checkPaswd(""));
        System.out.println(checkPaswd("admin"));
    }

    boolean checkPaswd(String passwd) {
        return passwd != null && passwd.length() != 0;
    }
- MakeClassStatic,使類變成靜態的
Before:
    // 使類變成靜態的
    void testMakeClassStatic() {
        new MyClass().fun();
    }

    String myClassField = "abc";

    class MyClass {
        void fun() {
            System.out.println("myClassField = " + myClassField);
        }
    }
Gif:
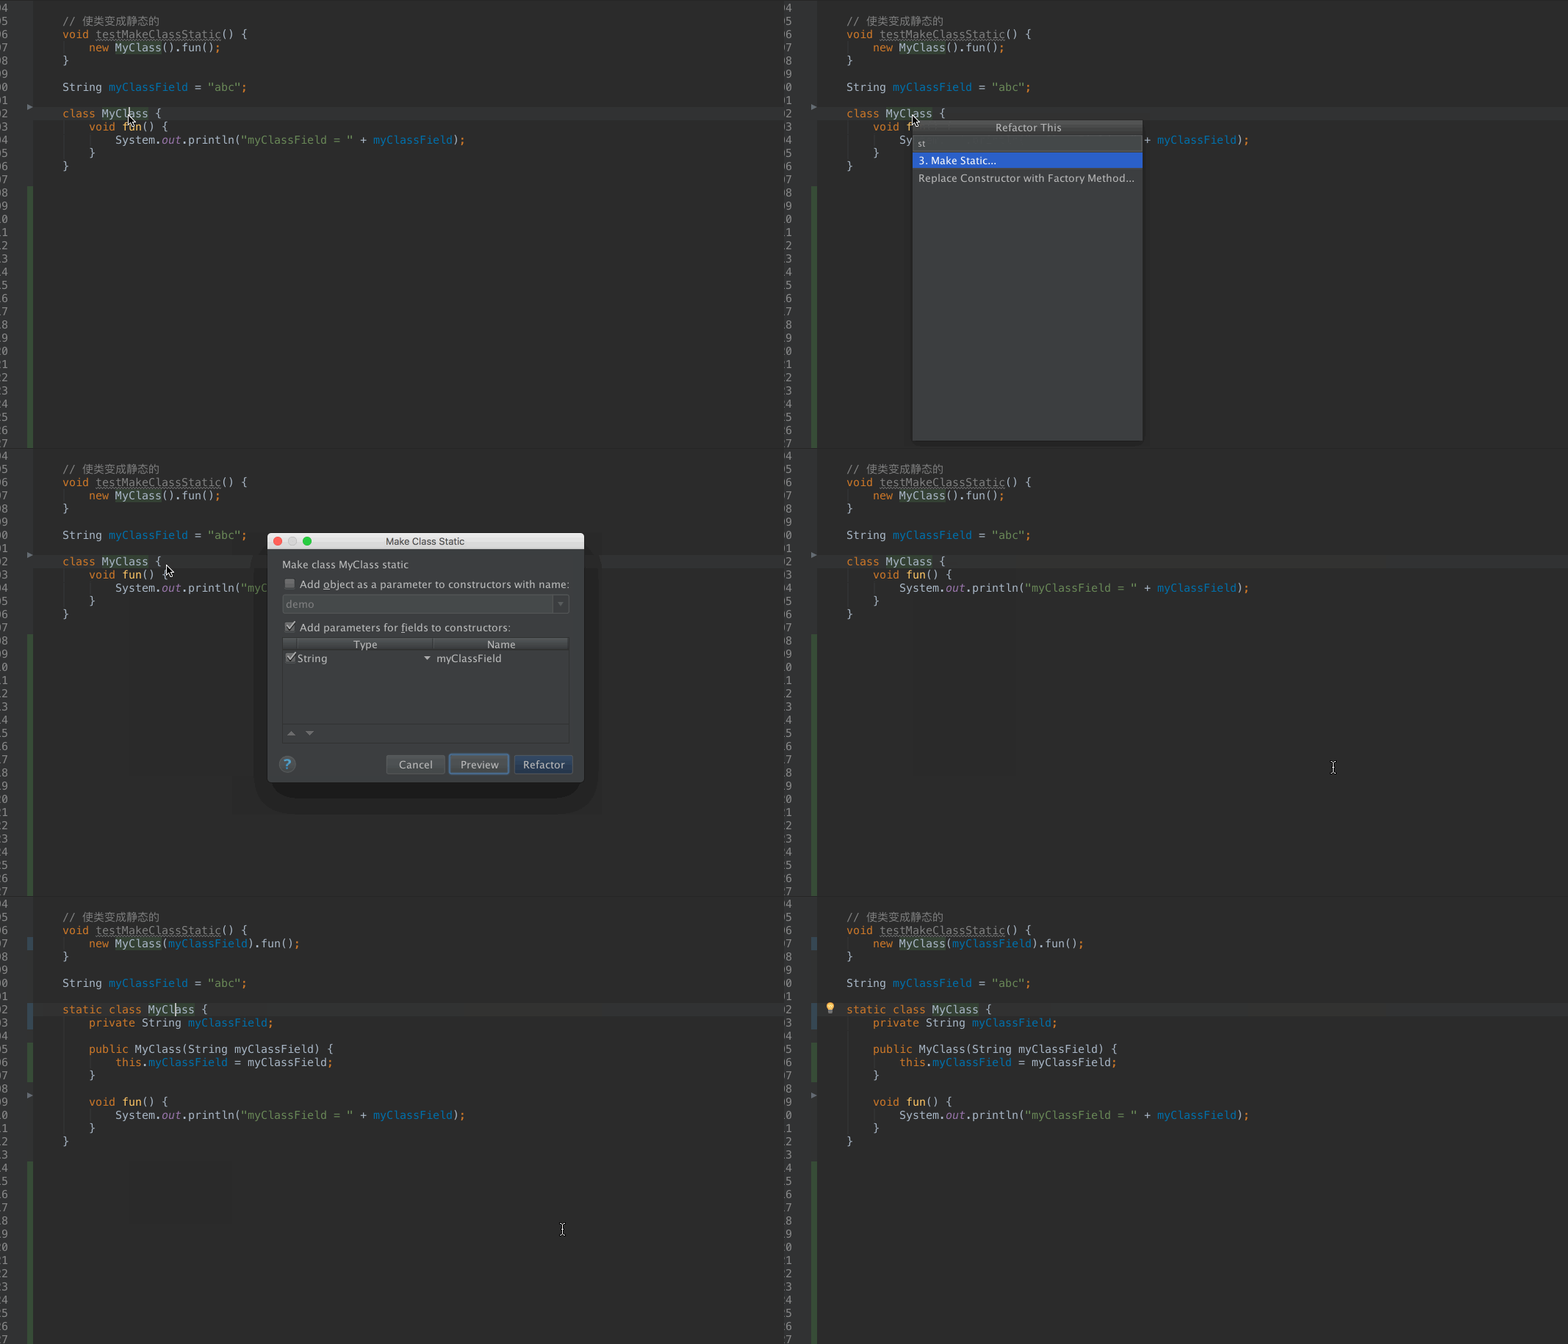
After:
    // 使類變成靜態的
    void testMakeClassStatic() {
        new MyClass(myClassField).fun();
    }

    String myClassField = "abc";

    static class MyClass {
        private String myClassField;

        public MyClass(String myClassField) {
            this.myClassField = myClassField;
        }

        void fun() {
            System.out.println("myClassField = " + myClassField);
        }
    }
修改前需要調用外部內的成員變量myClassField,實際編譯過后MyClass的class是持有外部類的對象,這樣才能訪問myClassField,通過重構,使得myClassField通過構造方法傳入進去,然后再在fun方法中使用,這樣重構會減少類的依賴。
- MakeMethodStatic,使方法變成靜態的
Before:
    // 使方法變成靜態的
    void testMakeMethodStatic() {
        myFun();
    }

    void myFun() {
        System.out.println("myFun");
    }
After:
    // 使方法變成靜態的
    void testMakeMethodStatic() {
        myFun();
    }

    static void myFun() {
        System.out.println("myFun");
    }
- Move,移動一個類
Before:
    // 移動一個類
    void testMove() {
        new MoveClass().fun();
    }

    static class MoveClass {

        String movde;

        @Override
        public String toString() {
            return "MoveClass{" +
                    "movde='" + movde + '\'' +
                    '}';
        }

        void fun() {
            System.out.println(this);
        }
    }
Gif:
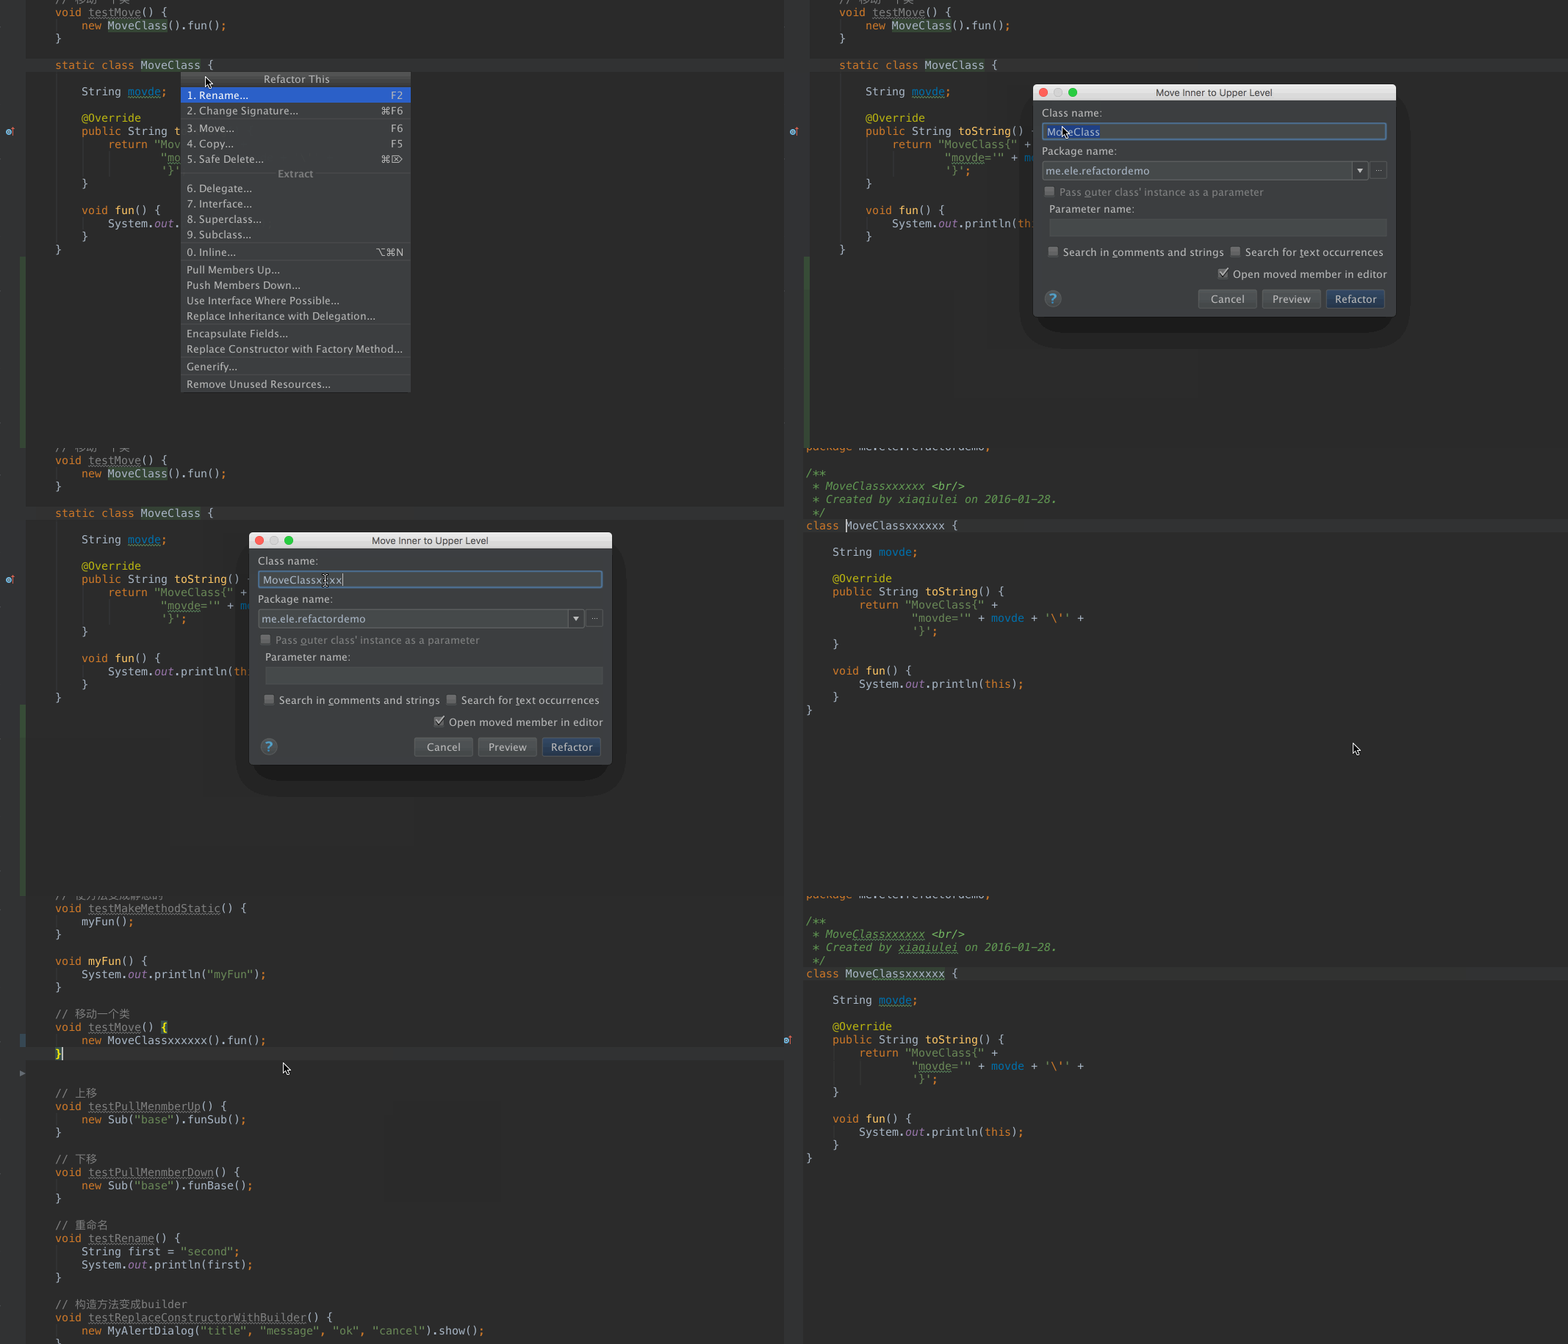
After:
    // 移動一個類
    void testMove() {
        new MoveClassxxxxxx().fun();
    }

class MoveClassxxxxxx {

    String movde;

    @Override
    public String toString() {
        return "MoveClass{" +
                "movde='" + movde + '\'' +
                '}';
    }

    void fun() {
        System.out.println(this);
    }
}
- PullMenmberUp,上移
Before:
public class Base {

    public String baseString;

    public Base(String baseString) {
        this.baseString = baseString;
    }

    public void funBase() {
        System.out.println(baseString);
    }
}
public class Sub extends Base {


    public Sub(String baseString) {
        super(baseString);
    }

    public void funSub() {
        System.out.println(baseString);
    }
}

    // 上移
    void testPullMenmberUp() {
        new Sub("base").funSub();
    }
Gif:
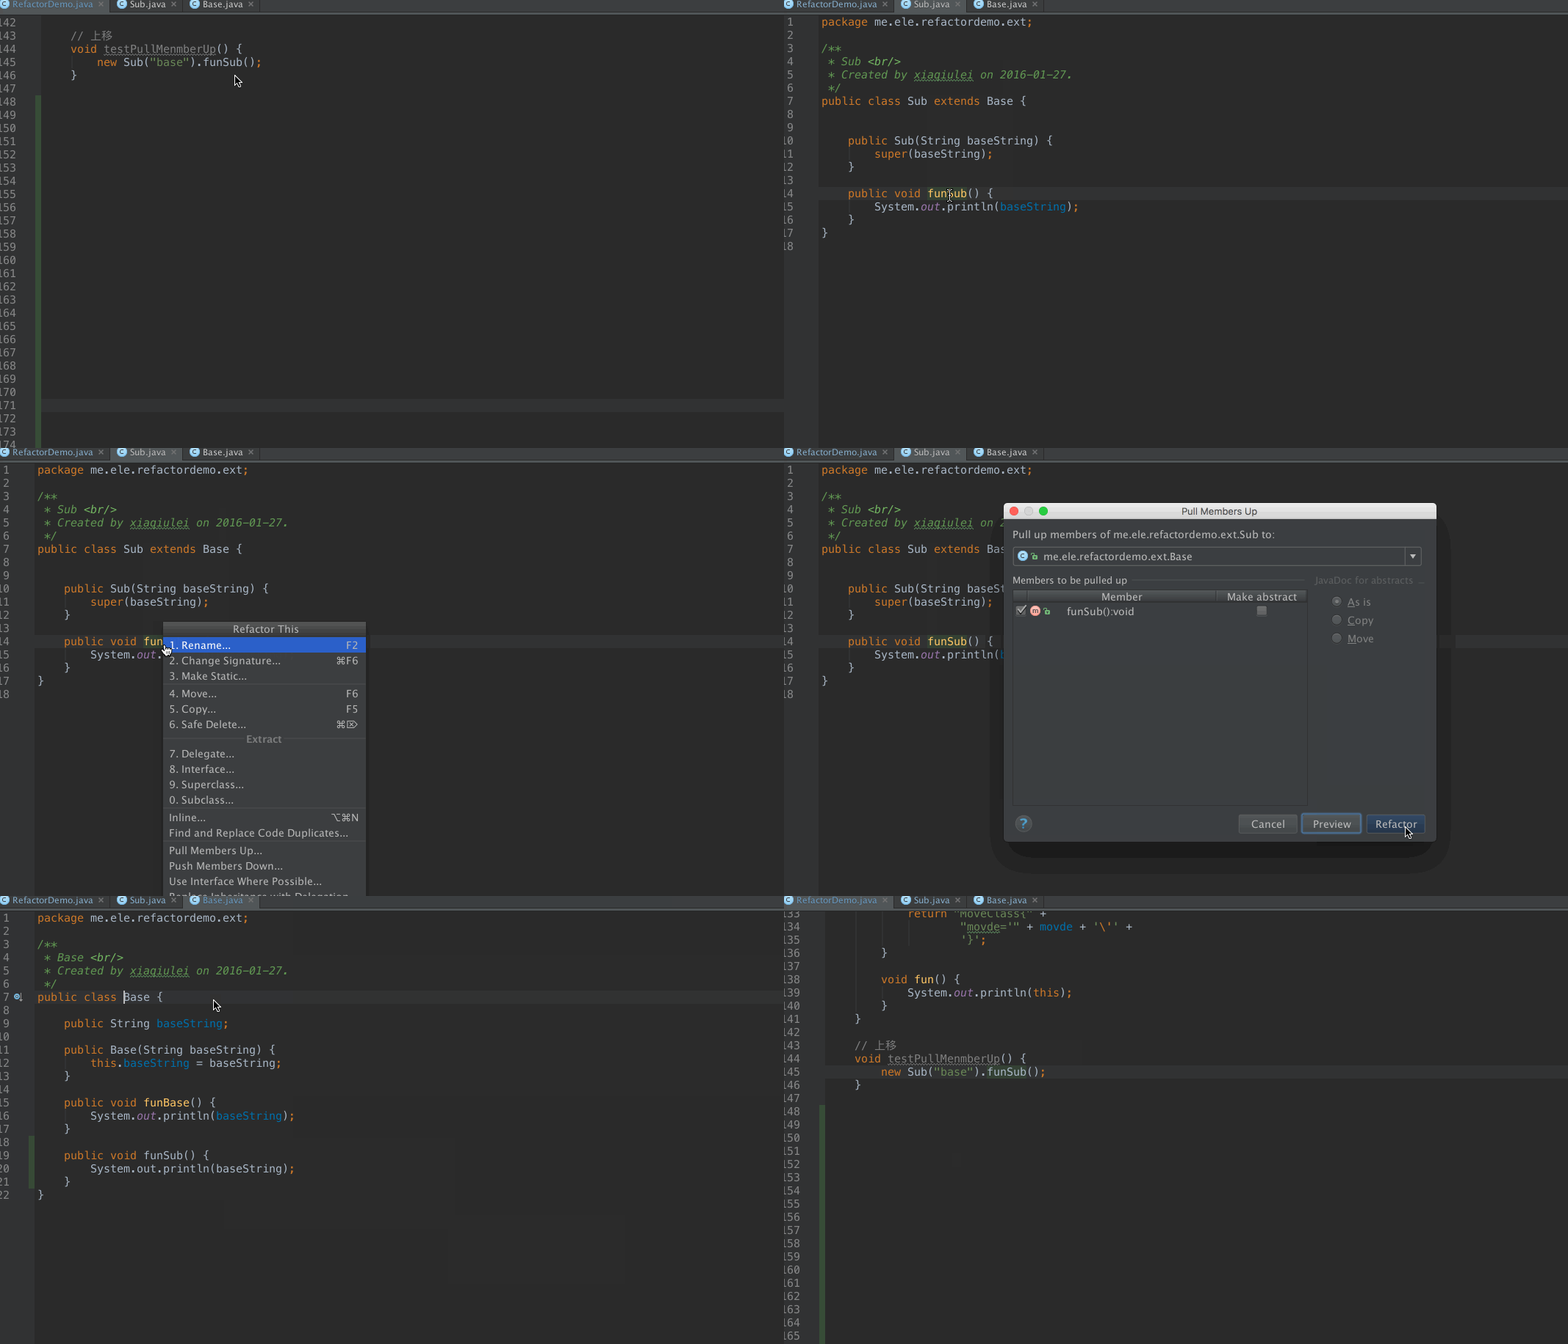
After:
public class Base {

    public String baseString;

    public Base(String baseString) {
        this.baseString = baseString;
    }

    public void funBase() {
        System.out.println(baseString);
    }

    public void funSub() {
        System.out.println(baseString);
    }
}

public class Sub extends Base {


    public Sub(String baseString) {
        super(baseString);
    }

}
實際上就是把子類中的方法移動到父類中。
- PullMenmberDown,下移
Before:
public class Base {

    public String baseString;

    public Base(String baseString) {
        this.baseString = baseString;
    }

    public void funBase() {
        System.out.println(baseString);
    }
}
public class Sub extends Base {


    public Sub(String baseString) {
        super(baseString);
    }

    public void funSub() {
        System.out.println(baseString);
    }
}
    // 下移
    void testPullMenmberDown() {
        new Sub("base").funBase();
    }
After:
public class Base {

    public String baseString;

    public Base(String baseString) {
        this.baseString = baseString;
    }

}

public class Sub extends Base {

    public Sub(String baseString) {
        super(baseString);
    }

    public void funSub() {
        System.out.println(baseString);
    }

    public void funBase() {
        System.out.println(baseString);
    }
}
實際上就是把父類中的方法移動到子類中。
- Rename,重命名
這個功能也是我最喜歡的,只要選擇重命名一個對象或者資源,所有使用到這個對象或者資源的地方,都會進行重新命名。
Before:
    // 重命名
    void testRename() {
        String first = "second";
        System.out.println(first);
    }
Gif:
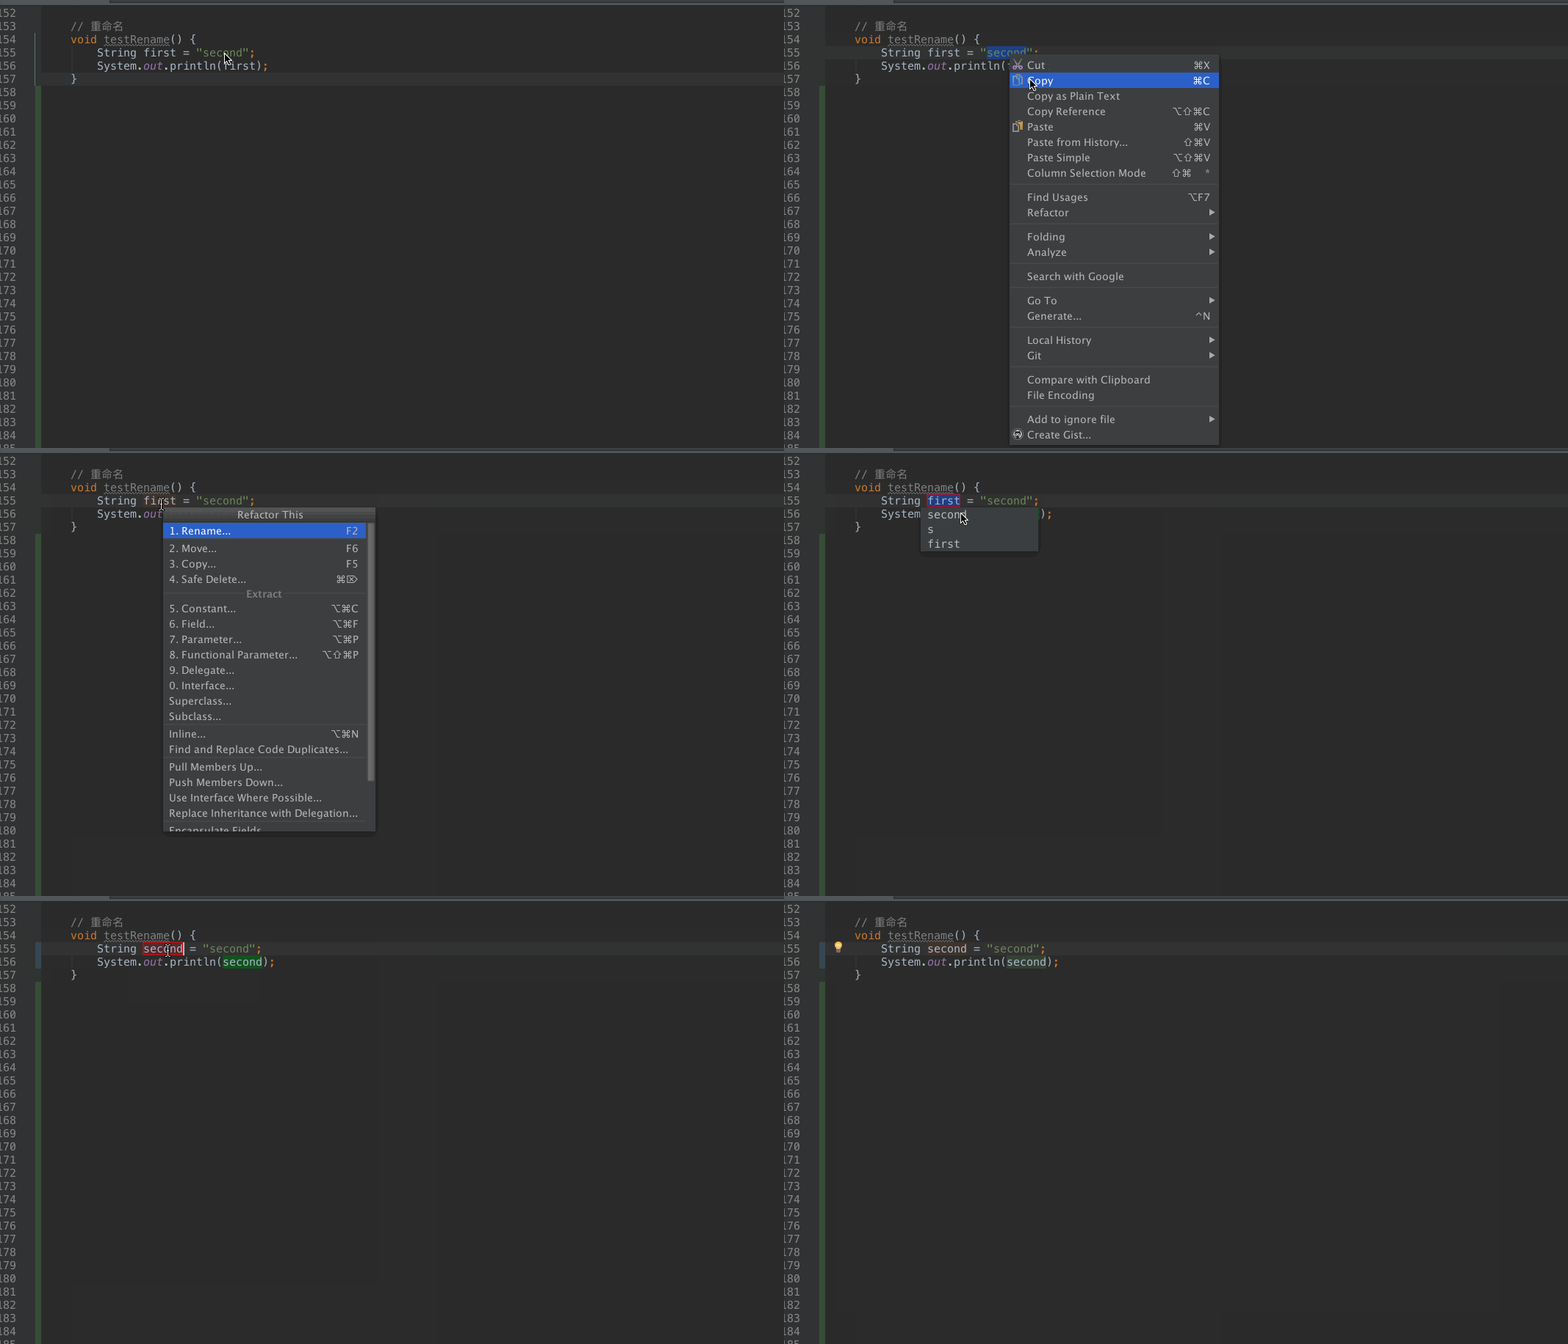
After:
    // 重命名
    void testRename() {
        String second = "second";
        System.out.println(second);
    }
- ReplaceConstructorWithBuilder,構造方法變成builder
還在羡慕Picasso,Fresco人性化調用方式嗎?很簡單,通過這個功能就可以快速生成代碼
Before:
public class MyAlertDialog {

    private String title;
    private String message;
    private String okButton;
    private String cancelButton;

    public MyAlertDialog(String title, String message, String okButton, String cancelButton) {
        this.title = title;
        this.message = message;
        this.okButton = okButton;
        this.cancelButton = cancelButton;
    }
}
    // 構造方法變成builder
    void testReplaceConstructorWithBuilder() {
        new MyAlertDialog("title", "message", "ok", "cancel").show();
    }
Gif:
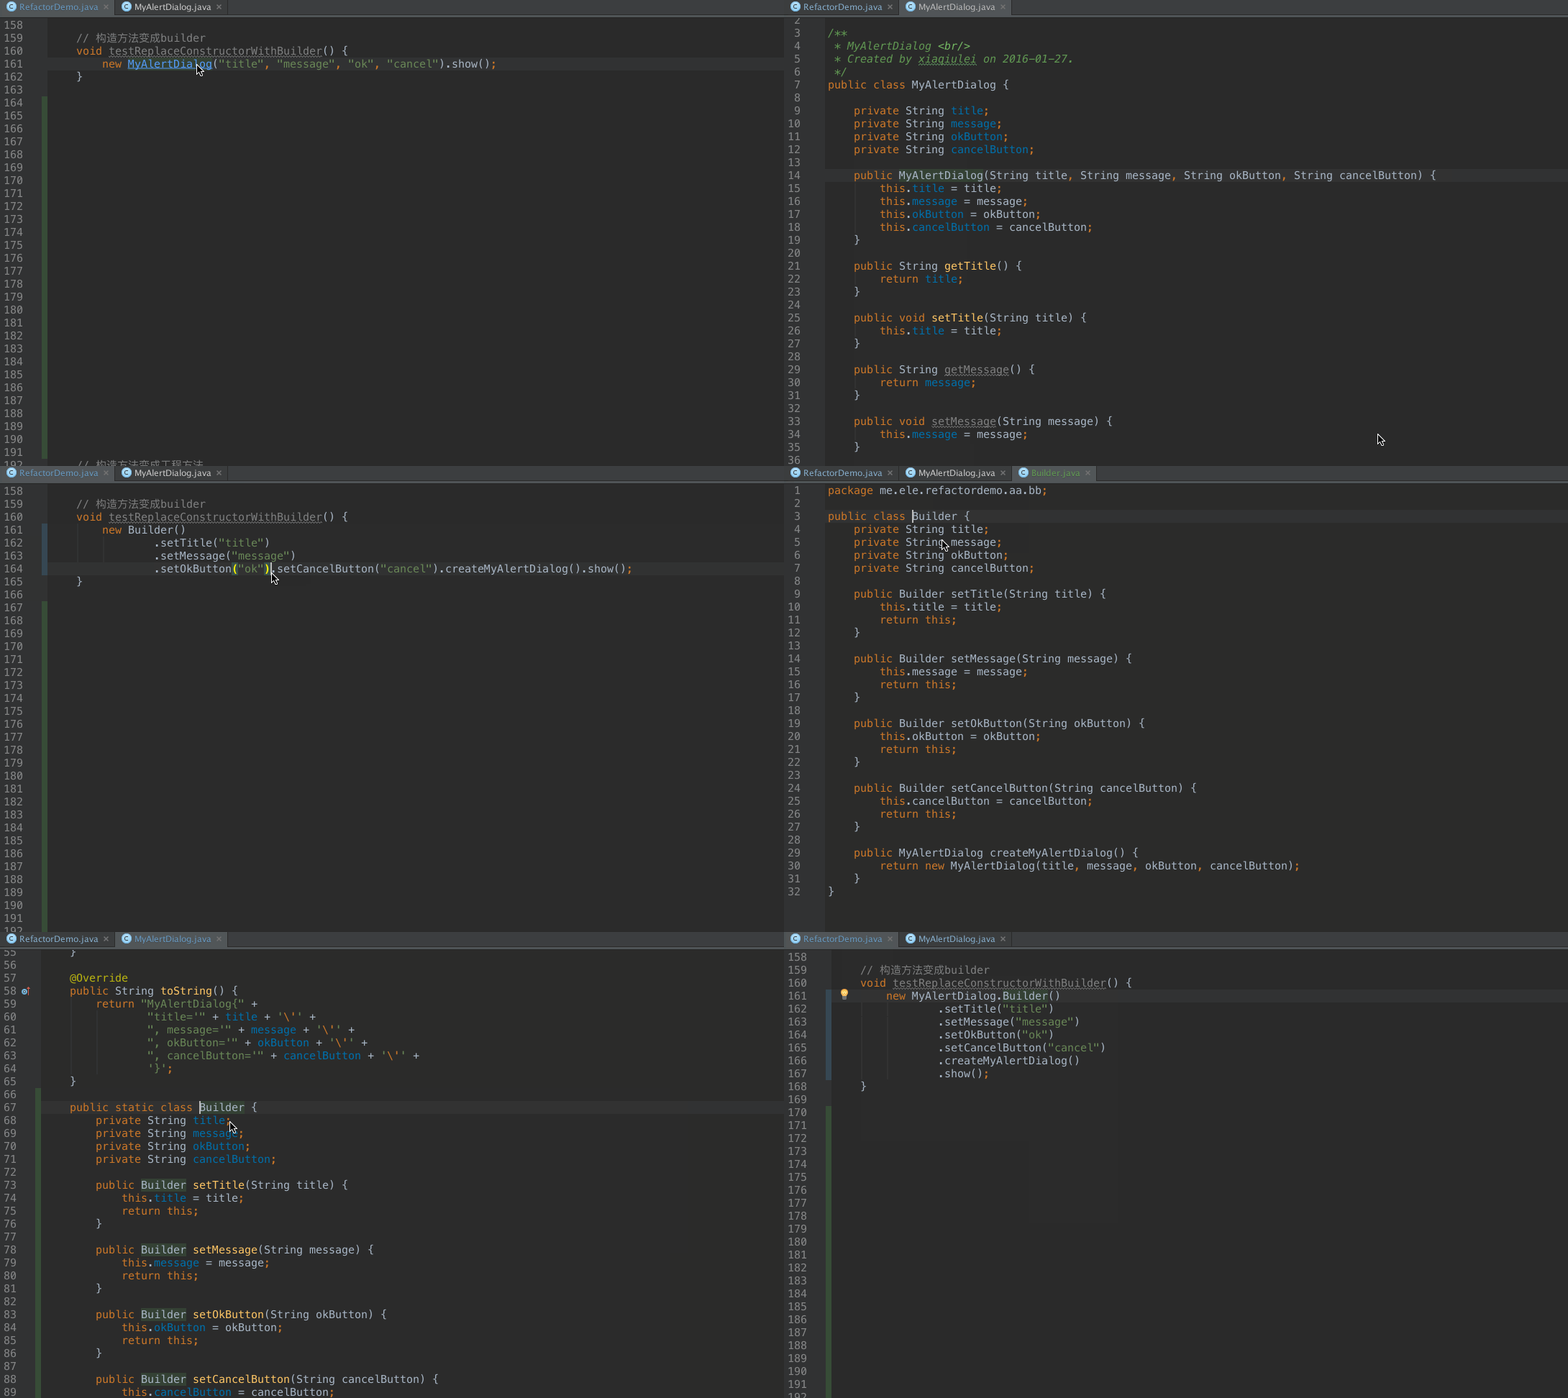
After:
    // 構造方法變成builder
    void testReplaceConstructorWithBuilder() {
        new MyAlertDialog.Builder()
                .setTitle("title")
                .setMessage("message")
                .setOkButton("ok")
                .setCancelButton("cancel")
                .createMyAlertDialog()
                .show();
    }

public static class Builder {
    private String title;
    private String message;
    private String okButton;
    private String cancelButton;

    public Builder setTitle(String title) {
        this.title = title;
        return this;
    }

    public Builder setMessage(String message) {
        this.message = message;
        return this;
    }

    public Builder setOkButton(String okButton) {
        this.okButton = okButton;
        return this;
    }

    public Builder setCancelButton(String cancelButton) {
        this.cancelButton = cancelButton;
        return this;
    }

    public MyAlertDialog createMyAlertDialog() {
        return new MyAlertDialog(title, message, okButton, cancelButton);
    }
}
- ReplaceConstructorWithFactory,構造方法變成工程方法
Before:
    // 構造方法變成工程方法
    void testReplaceConstructorWithFactory() {
        new MyAlertDialog("title", "message", "ok", "cancel").show();
    }
Gif:
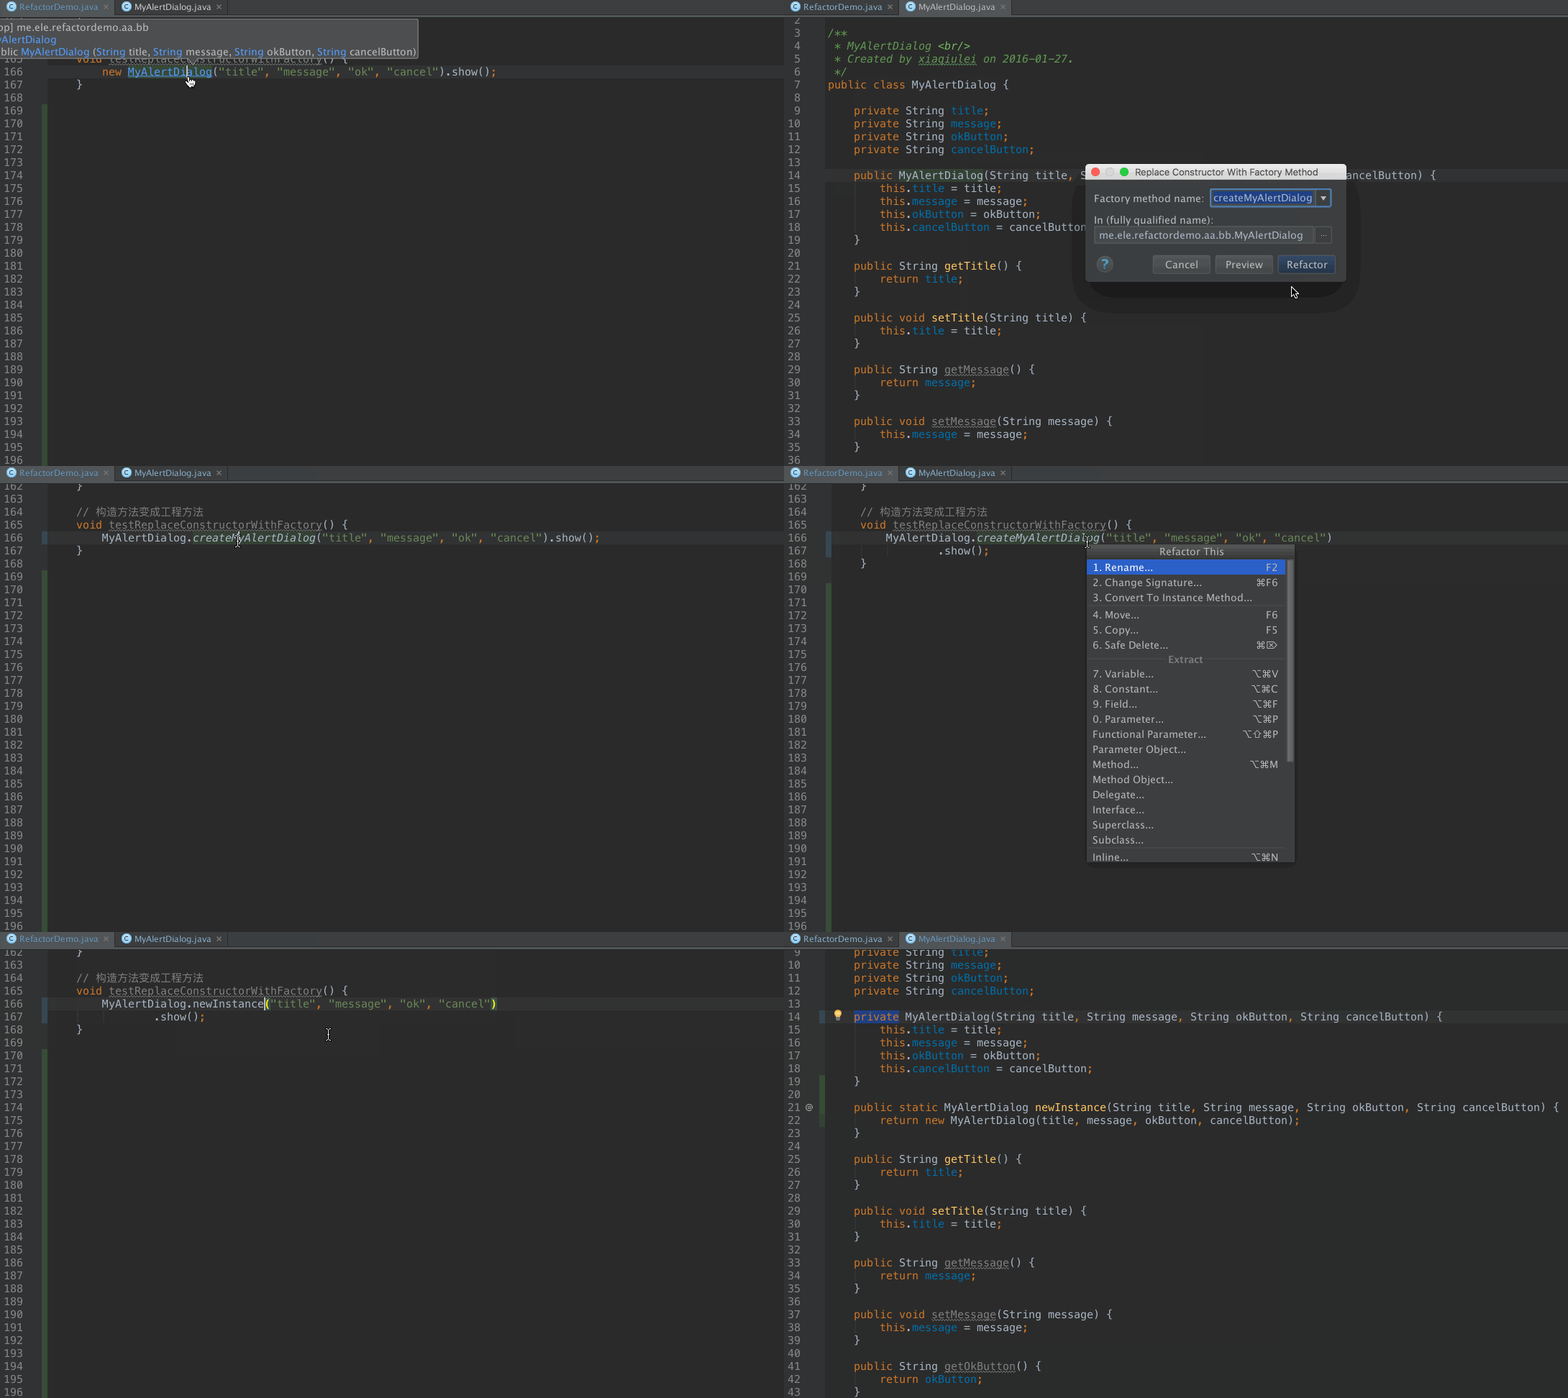
After:
    // 構造方法變成工程方法
    void testReplaceConstructorWithFactory() {
        MyAlertDialog.newInstance("title", "message", "ok", "cancel")
                .show();
    }
public class MyAlertDialog {
    private MyAlertDialog(String title, String message, String okButton, String cancelButton) {
        this.title = title;
        this.message = message;
        this.okButton = okButton;
        this.cancelButton = cancelButton;
    }

    public static MyAlertDialog newInstance(String title, String message, String okButton, String cancelButton) {
        return new MyAlertDialog(title, message, okButton, cancelButton);
    }
}
通過上面代碼發現,如果構造方法變成了工廠方式,那么它的構造參數是private的,這樣調用者只能通過工廠方式來生成對象。
- ReplaceInheritanceWithDelegation,代理代替繼承
Before:
public abstract class AbsClass {

    public abstract void sayHello();
}

public class ExtClass extends AbsClass {

    @Override
    public void sayHello() {
        System.out.println("hello");
    }
}
    // 代理代替繼承
    void testReplaceInheritanceWithDelegation() {
        new ExtClass().sayHello();
    }
Gif:
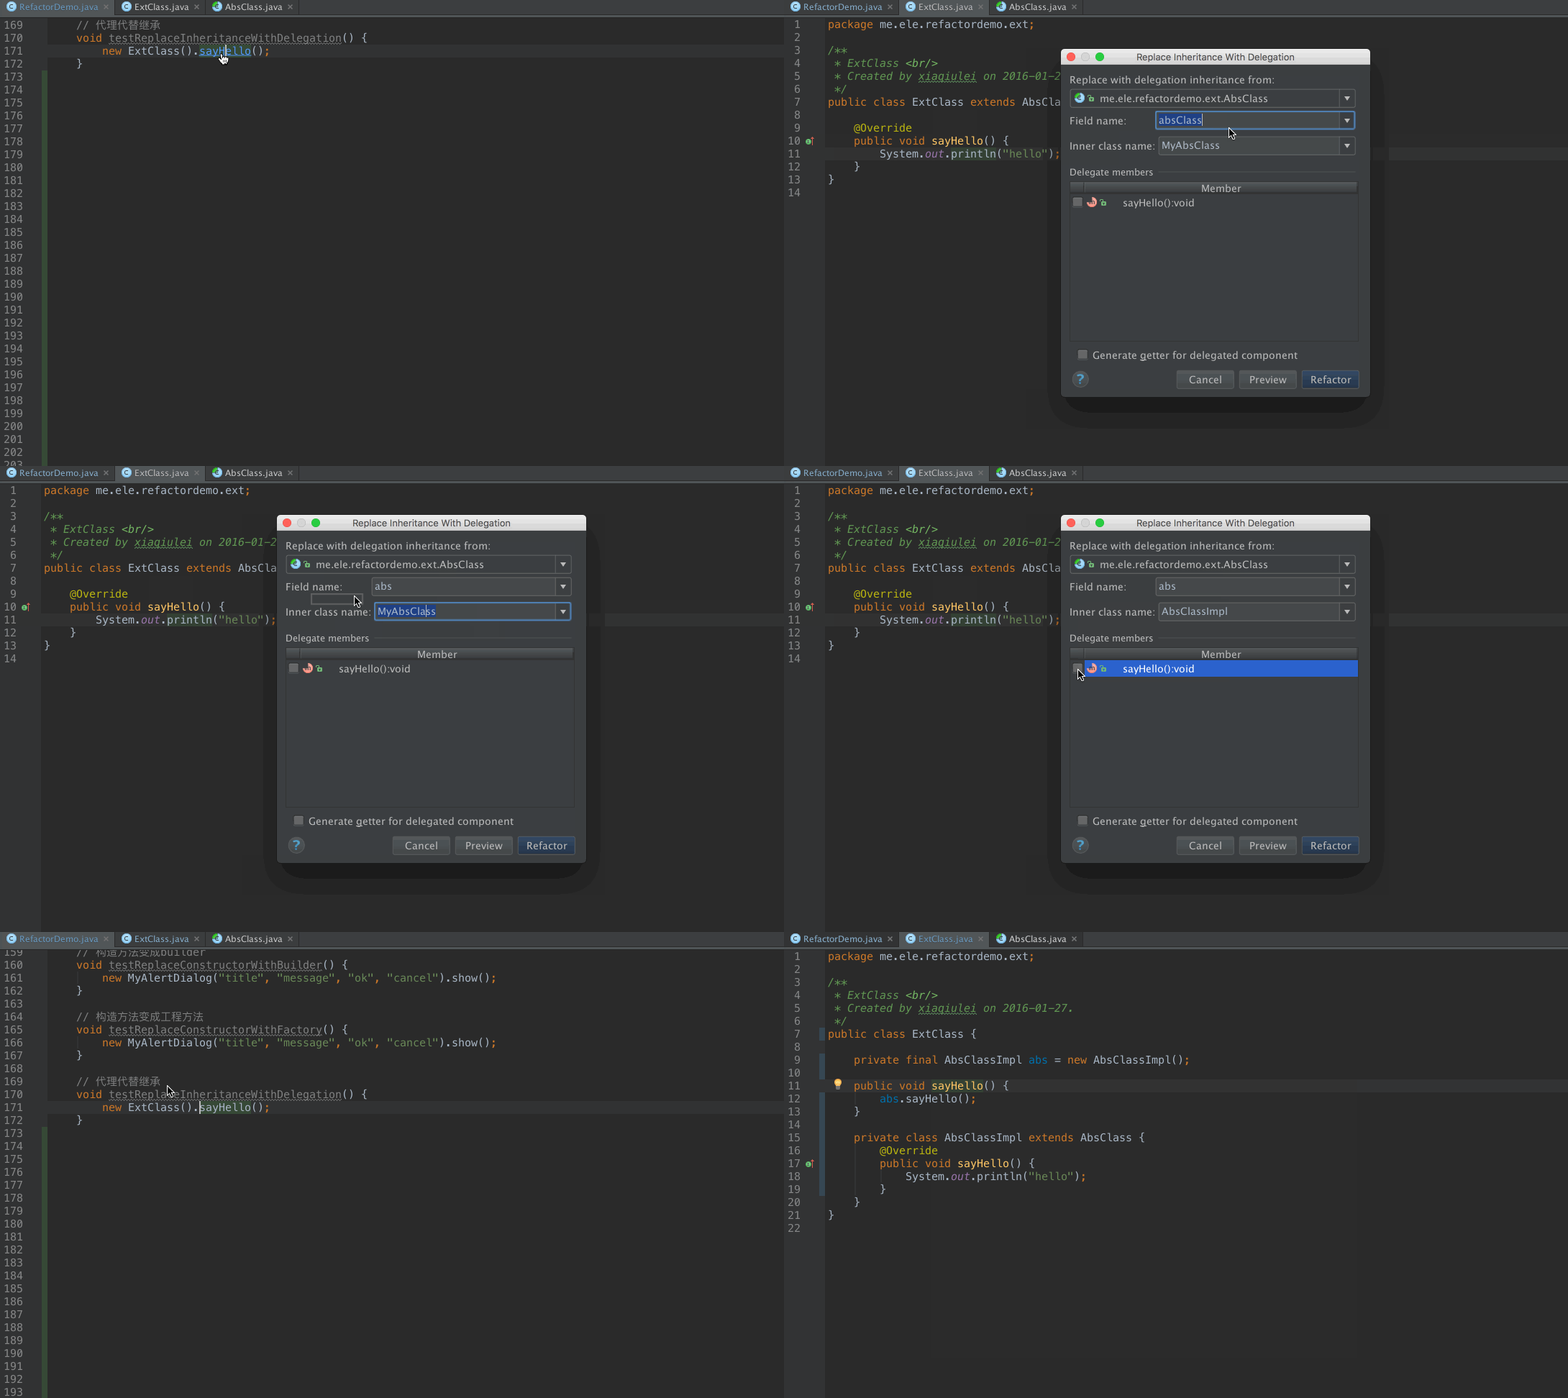
After:
public class ExtClass {

    private final AbsClassImpl abs = new AbsClassImpl();

    public void sayHello() {
        abs.sayHello();
    }

    private class AbsClassImpl extends AbsClass {
        @Override
        public void sayHello() {
            System.out.println("hello");
        }
    }
}

    // 代理代替繼承
    void testReplaceInheritanceWithDelegation() {
        new ExtClass().sayHello();
    }
書上說過,組合由於繼承大概說的就是這個意思。
- SafeDelete,安全刪除
Before:
    // 安全刪除
    void testSafeDelete() {
        String unUsedString = "abc";

        unUsedString = getUnUsedString();
        System.out.println(new Date());
    }

    public String getUnUsedString() {
        return unUsedString;
    }
After:
    // 安全刪除
    void testSafeDelete() {
        System.out.println(new Date());
    }
這個比較簡單,如果某個變量沒有使用,那么直接直接刪除所有引用這個變量的地方。
- WrapReturnValue,封裝返回值
Before:
    // 封裝返回值
    void testWrapReturnValue() {
        System.out.println(getUserName());
    }

    private String getUserName() {
        return "userName";
    }
Gif:
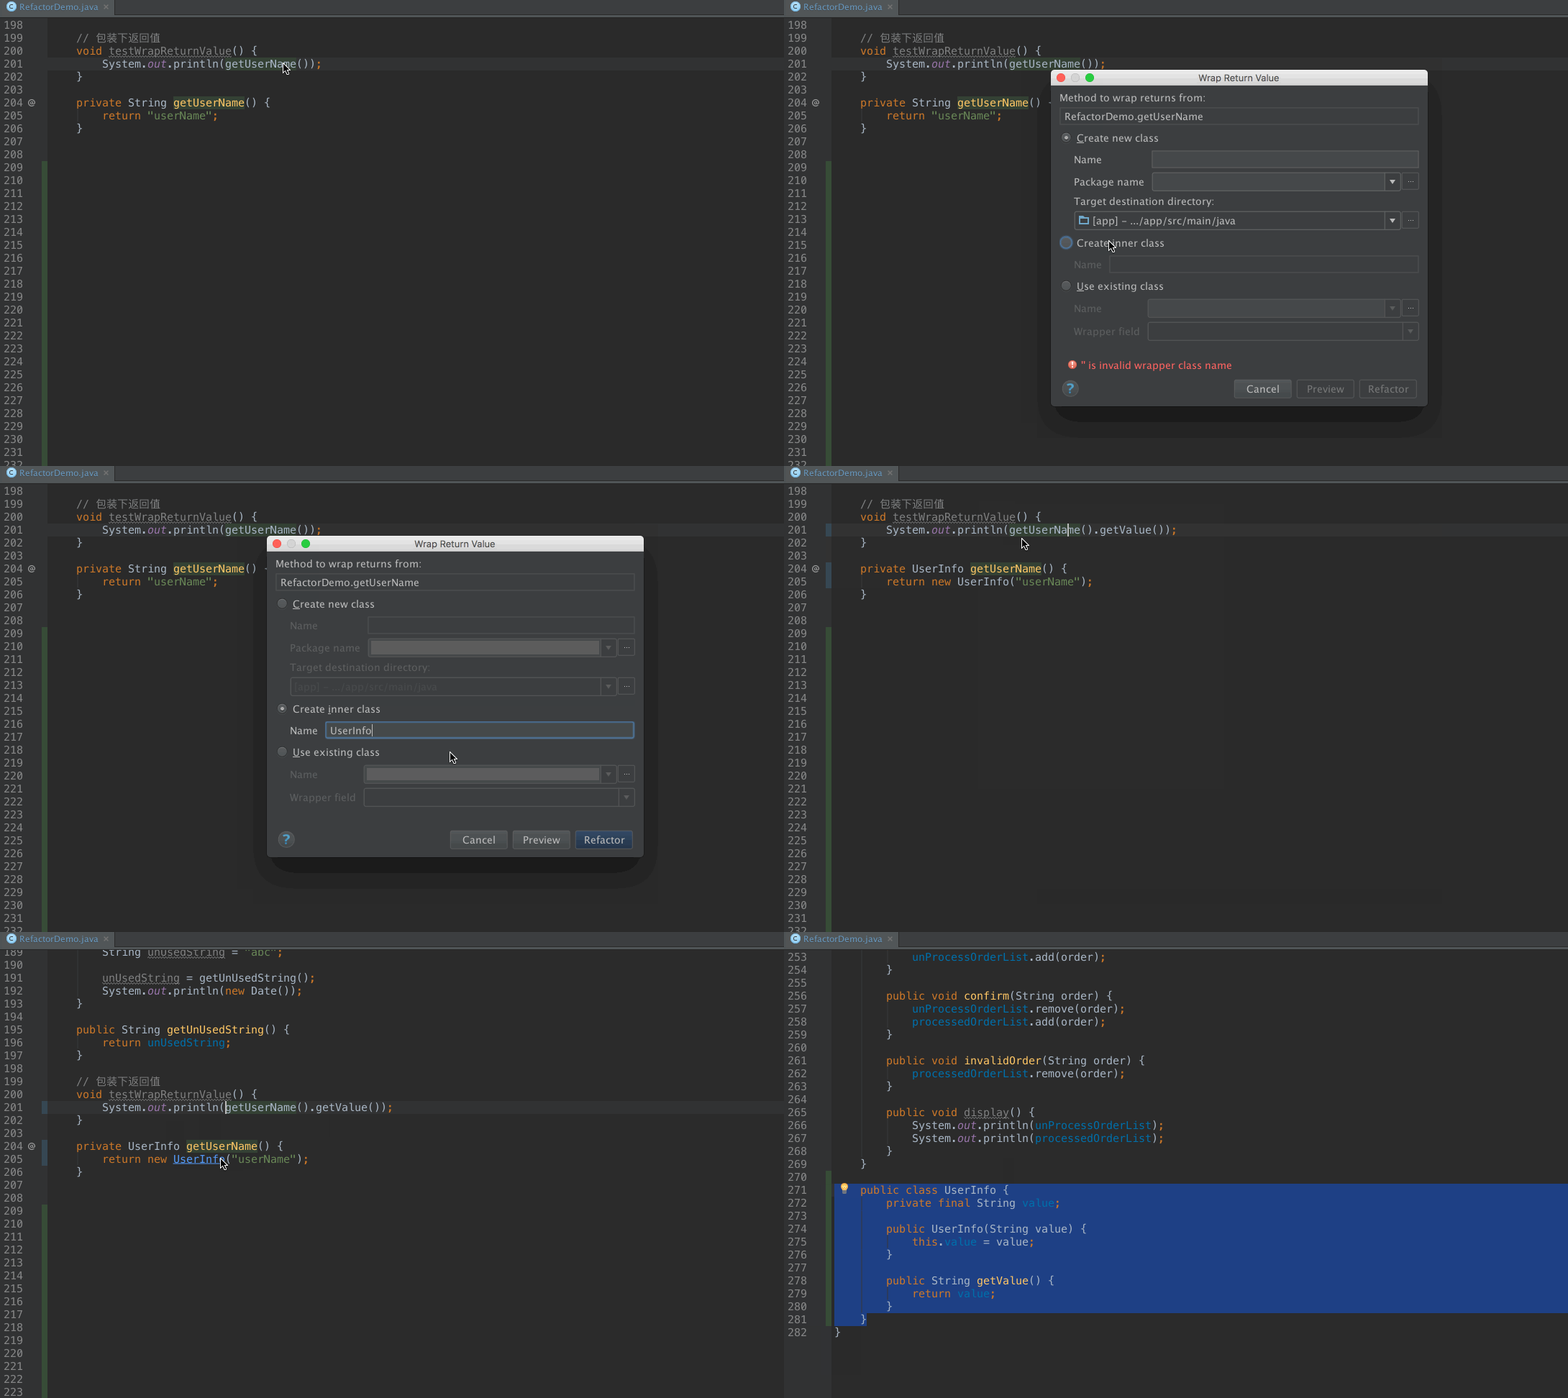
After:
    // 包裝下返回值
    void testWrapReturnValue() {
        System.out.println(getUserName().getValue());
    }

    private UserInfo getUserName() {
        return new UserInfo("userName");
    }

    public class UserInfo {
        private final String value;

        public UserInfo(String value) {
            this.value = value;
        }

        public String getValue() {
            return value;
        }
    }
- RemoveMiddleMan,去除中間人
Before:
    // 去除中間人
    void testRemoveMiddleMan() {
        OrderManager manager = new OrderManager();
        manager.newOrder("new");
        manager.confirm("confir");
        manager.invalidOrder("invalid");
    }

    public static class OrderManager {
        private List<String> unProcessOrderList;
        private List<String> processedOrderList;

        public OrderManager() {
            unProcessOrderList = new ArrayList<>();
            processedOrderList = new ArrayList<>();
        }

        public void newOrder(String order) {
            unProcessOrderList.add(order);
        }

        public void confirm(String order) {
            unProcessOrderList.remove(order);
            processedOrderList.add(order);
        }

        public void invalidOrder(String order) {
            processedOrderList.remove(order);
        }

        public void display() {
            System.out.println(unProcessOrderList);
            System.out.println(processedOrderList);
        }
    }
Gif:
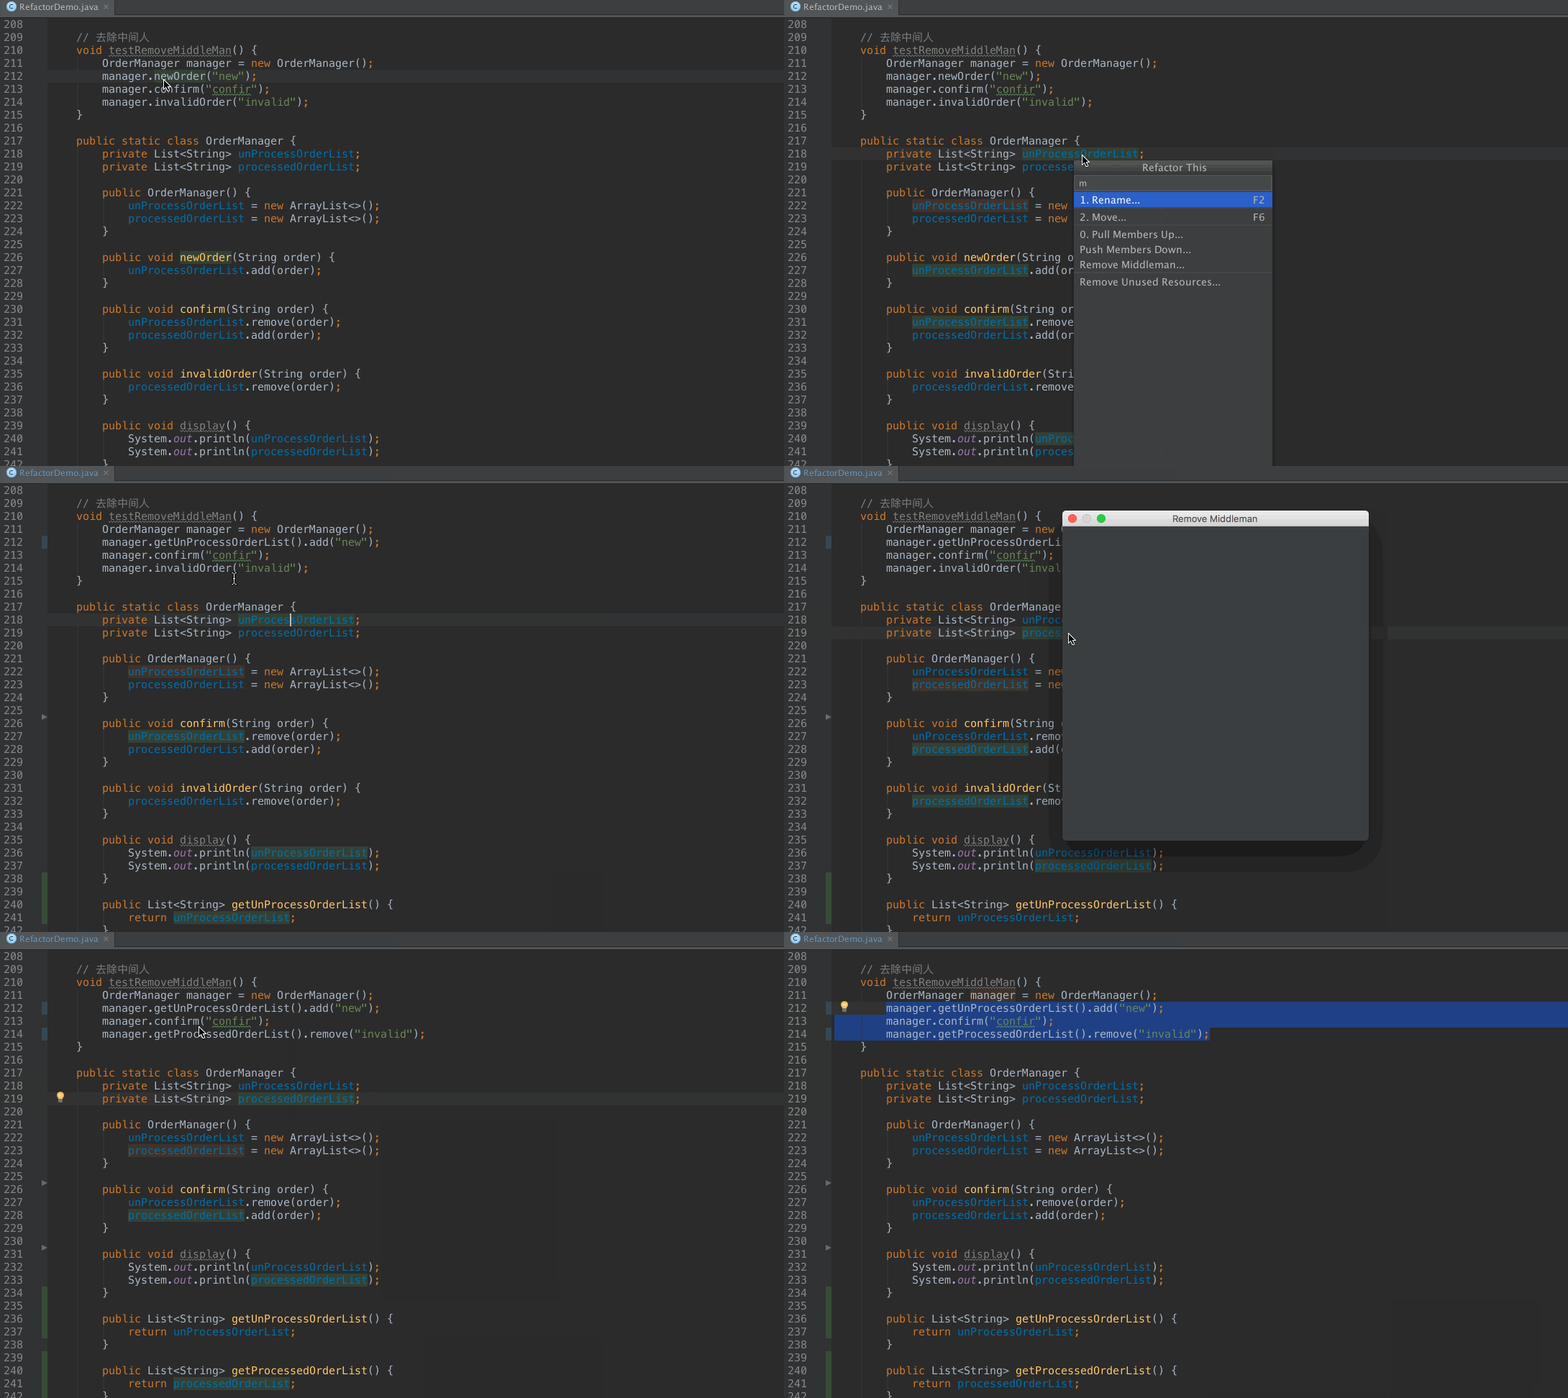
After:
    // 去除中間人
    void testRemoveMiddleMan() {
        OrderManager manager = new OrderManager();
        manager.getUnProcessOrderList().add("new");
        manager.confirm("confir");
        manager.getProcessedOrderList().remove("invalid");
    }

    public static class OrderManager {
        private List<String> unProcessOrderList;
        private List<String> processedOrderList;

        public OrderManager() {
            unProcessOrderList = new ArrayList<>();
            processedOrderList = new ArrayList<>();
        }

        public void confirm(String order) {
            unProcessOrderList.remove(order);
            processedOrderList.add(order);
        }

        public void display() {
            System.out.println(unProcessOrderList);
            System.out.println(processedOrderList);
        }

        public List<String> getUnProcessOrderList() {
            return unProcessOrderList;
        }

        public List<String> getProcessedOrderList() {
            return processedOrderList;
        }
    }
用途就是,原先OrderManager持有一個List來保存Order,調用方直接使用OrderManager來處理訂單,去除中間人的意思就是說,調用法直接獲取保存Order的容器,調用方直接自己控制容器。
代碼抽取
代碼抽取在實際使用當中非常有用。
- ExtraMethod,抽取一個方法
Before:
    // 抽取一個方法
    void testExtraMethod() {
        Map<String, Integer> map = new HashMap<>();
        map.put("one", 1);
        map.put("two", 2);
        map.put("three", 2);

        System.out.println(map);
    }
Gif:
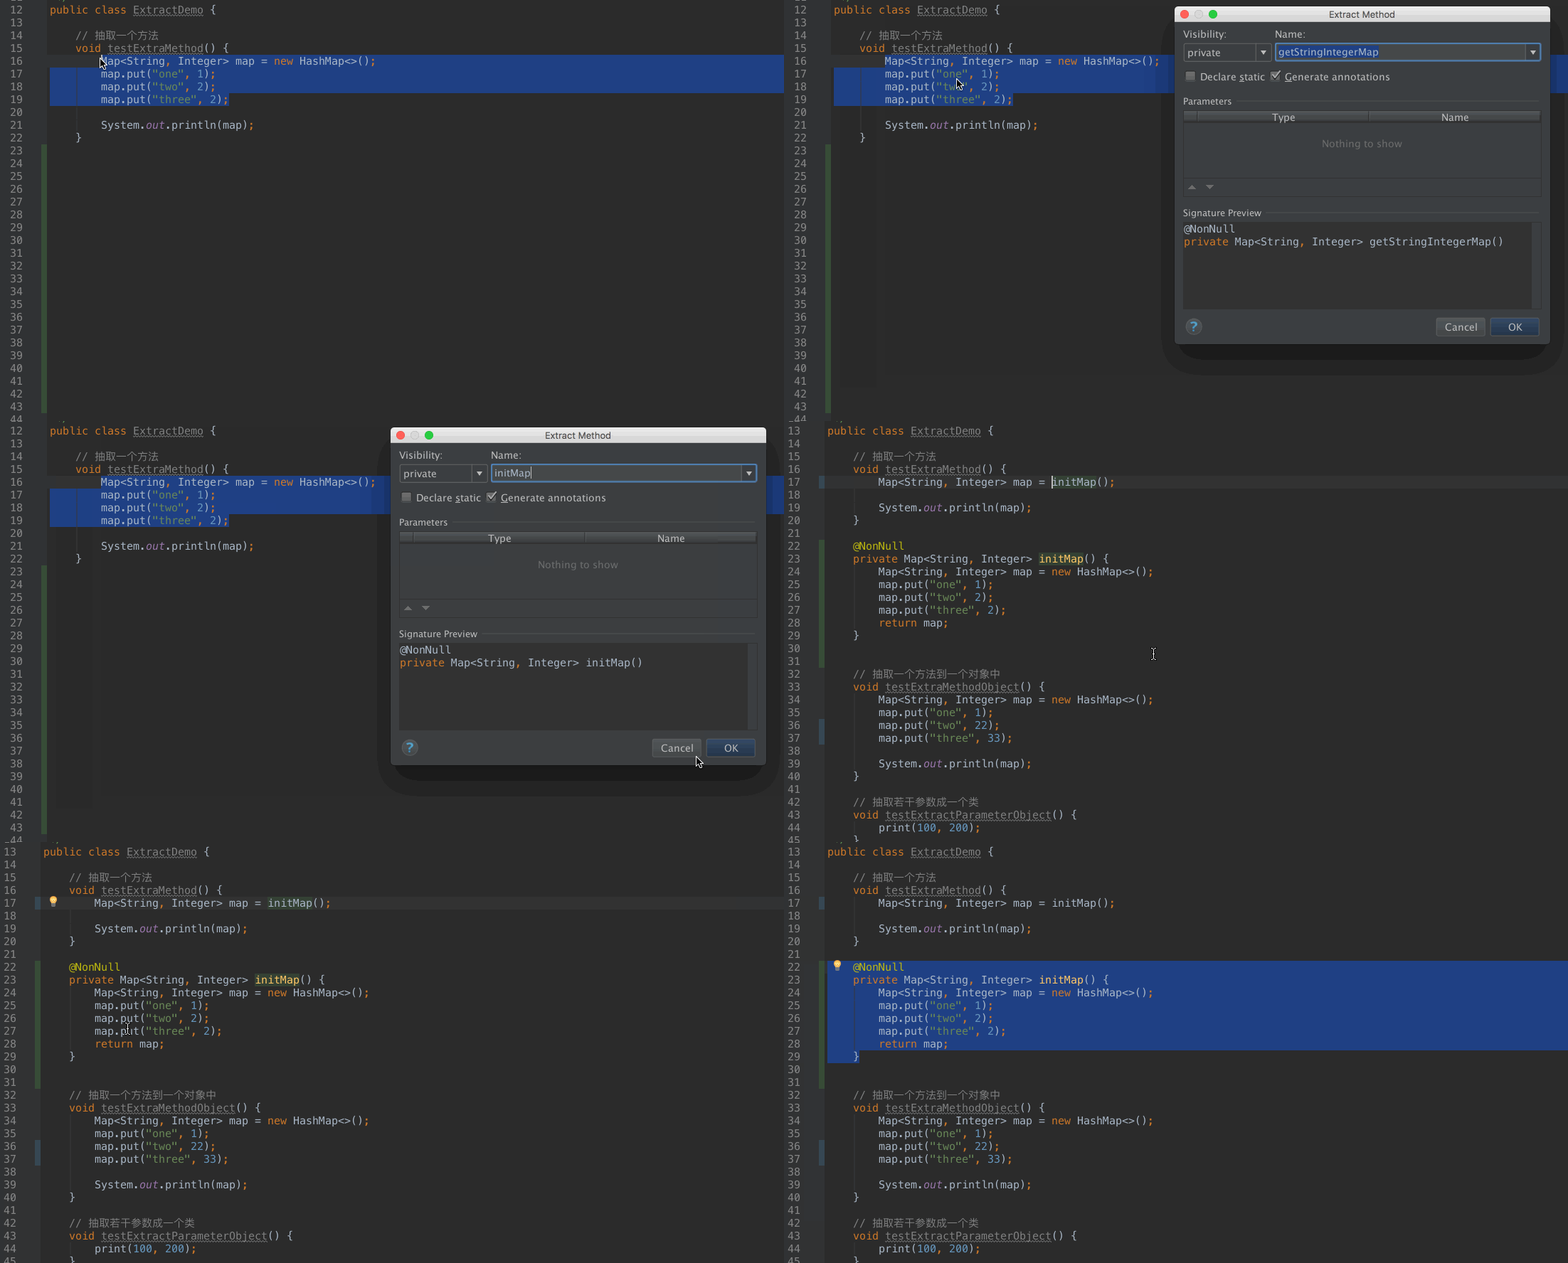
After:
    // 抽取一個方法
    void testExtraMethod() {
        Map<String, Integer> map = initMap();

        System.out.println(map);
    }

    @NonNull
    private Map<String, Integer> initMap() {
        Map<String, Integer> map = new HashMap<>();
        map.put("one", 1);
        map.put("two", 2);
        map.put("three", 2);
        return map;
    }
- ExtraMethodObject,抽取一個方法到一個對象中
和上面那個差不多,只不過把方法移動到另外一個類中。
Before:
    // 抽取一個方法到一個對象中
    void testExtraMethodObject() {
        Map<String, Integer> map = new HashMap<>();
        map.put("one", 1);
        map.put("two", 22);
        map.put("three", 33);

        System.out.println(map);
    }
After:
    // 抽取一個方法到一個對象中
    void testExtraMethodObject() {
        Map<String, Integer> map = MapUtil.invoke();
        System.out.println(map);
    }

    private static class MapUtil {
        private static Map<String, Integer> invoke() {
            Map<String, Integer> map = new HashMap<>();
            map.put("one", 1);
            map.put("two", 22);
            map.put("three", 33);
            return map;
        }
    }
- ExtractParameterObject,抽取若干參數成一個類
這個比較使用,有時候一個方法參數太多,可以把這些參數合並成一個類。
Before:
    // 抽取若干參數成一個類
    void testExtractParameterObject() {
        print(100, 200);
    }

    // widht,height --> Size Class
    void print(int width, int height) {
        System.out.println("width = " + width + ", height = " + height);
    }
Gif:
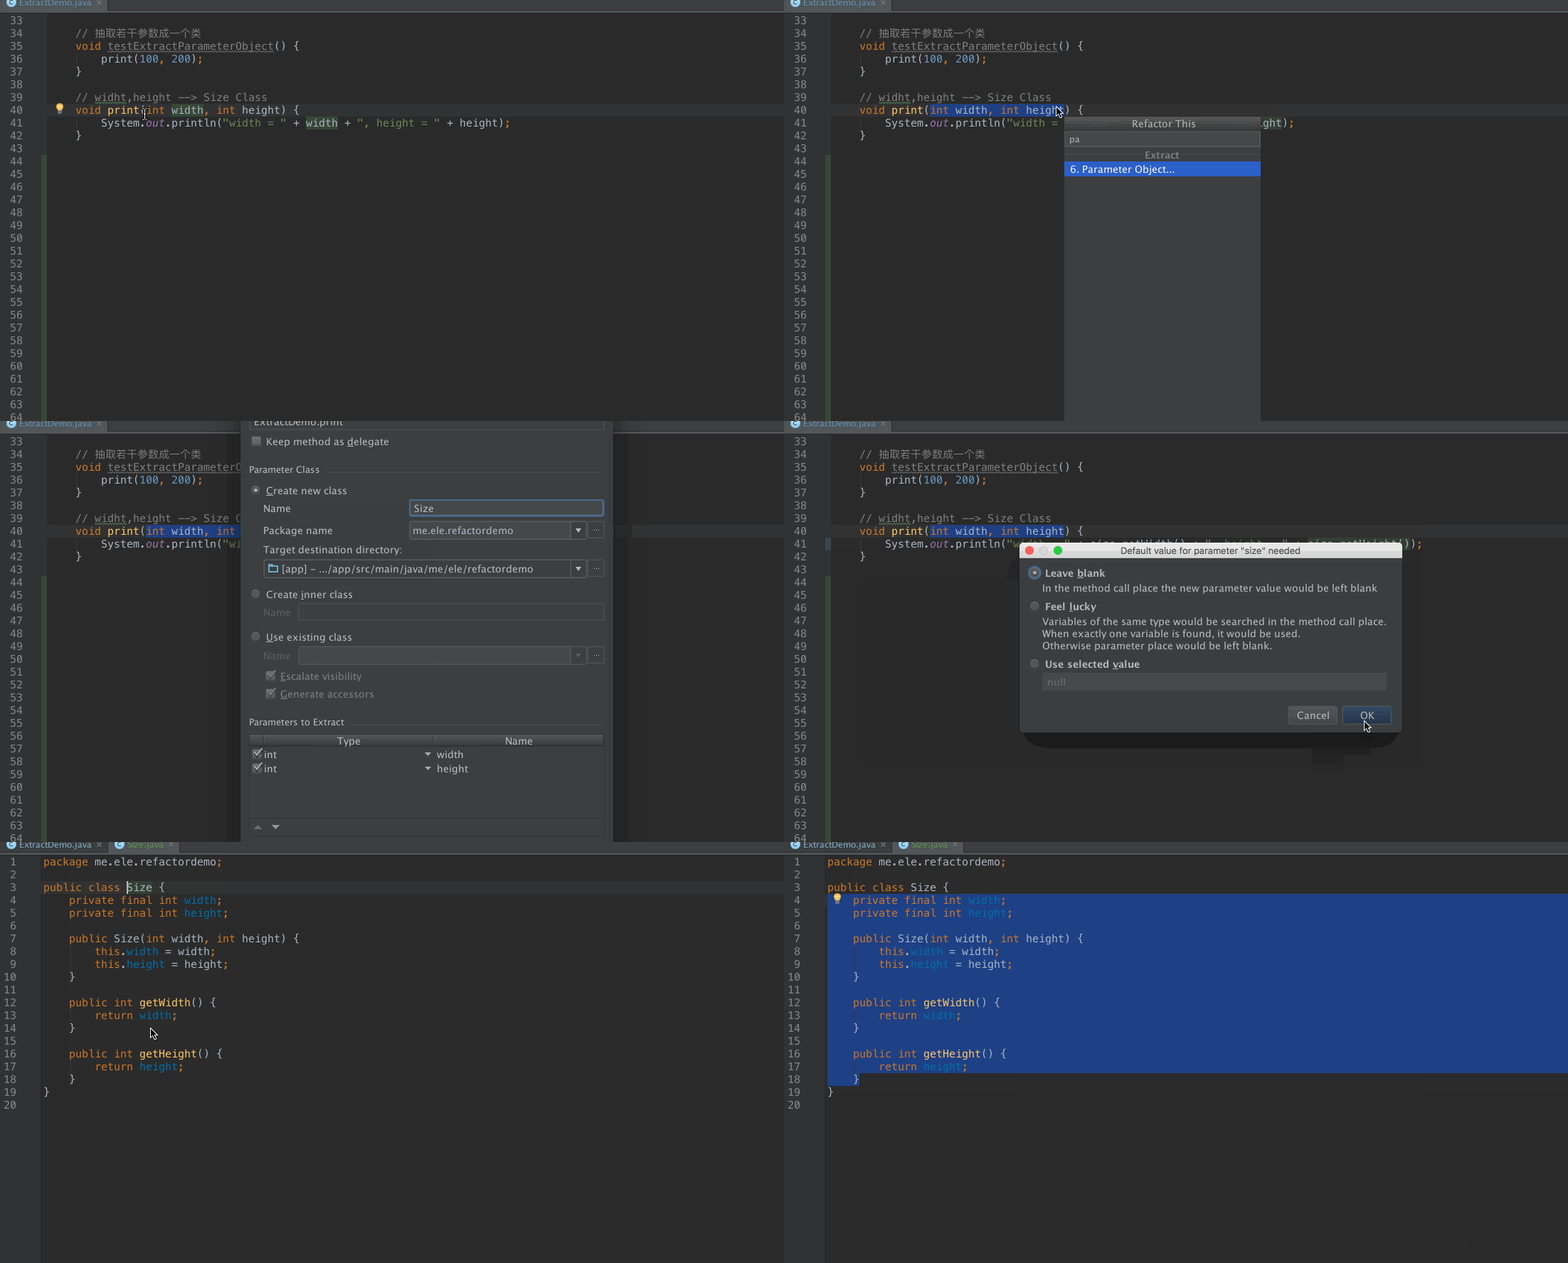
After:
    // 抽取若干參數成一個類
    void testExtractParameterObject() {
        print(new Size(100, 200));
    }

    // widht,height --> Size Class
    void print(Size size) {
        System.out.println("width = " + size.getWidth() + ", height = " + size.getHeight());
    }


public class Size {
    private final int width;
    private final int height;

    public Size(int width, int height) {
        this.width = width;
        this.height = height;
    }

    public int getWidth() {
        return width;
    }

    public int getHeight() {
        return height;
    }
}
- ExtractSuperclass,抽取到父類
Before:
    // 抽取到父類
    void testExtractSuperclass() {
        sendEvent("login_success");
    }

    public void sendEvent(Object event) {
        // EventBus.getDefault().send(event);
    }
Gif:
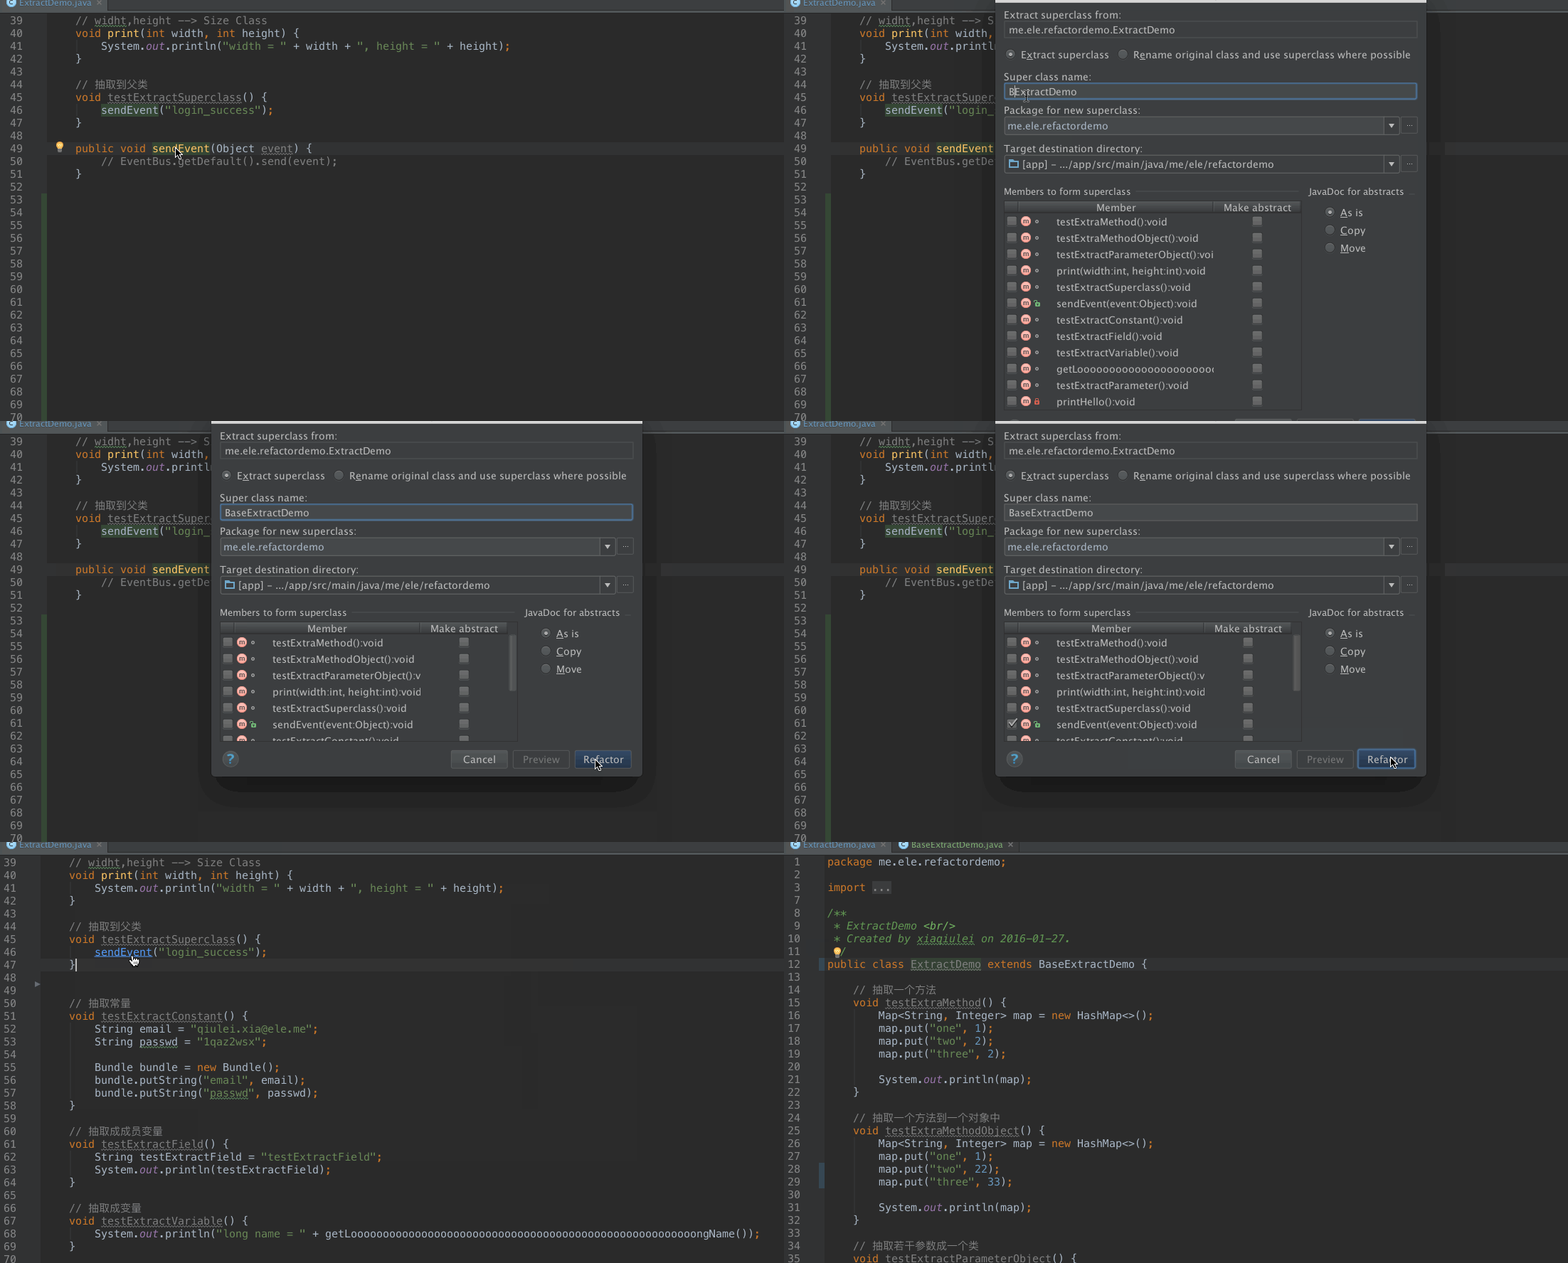
After:
public class BaseExtractDemo {
    public void sendEvent(Object event) {
        // EventBus.getDefault().send(event);
    }
}

public class ExtractDemo extends BaseExtractDemo {
    // 抽取到父類
    void testExtractSuperclass() {
        sendEvent("login_success");
    }
}
- ExtractConstant,抽取常量
Before:
    // 抽取常量
    void testExtractConstant() {
        String email = "admin@123.com";
        String passwd = "1qaz2wsx";

        Bundle bundle = new Bundle();
        bundle.putString("email", email);
        bundle.putString("passwd", passwd);
    }
Gif:
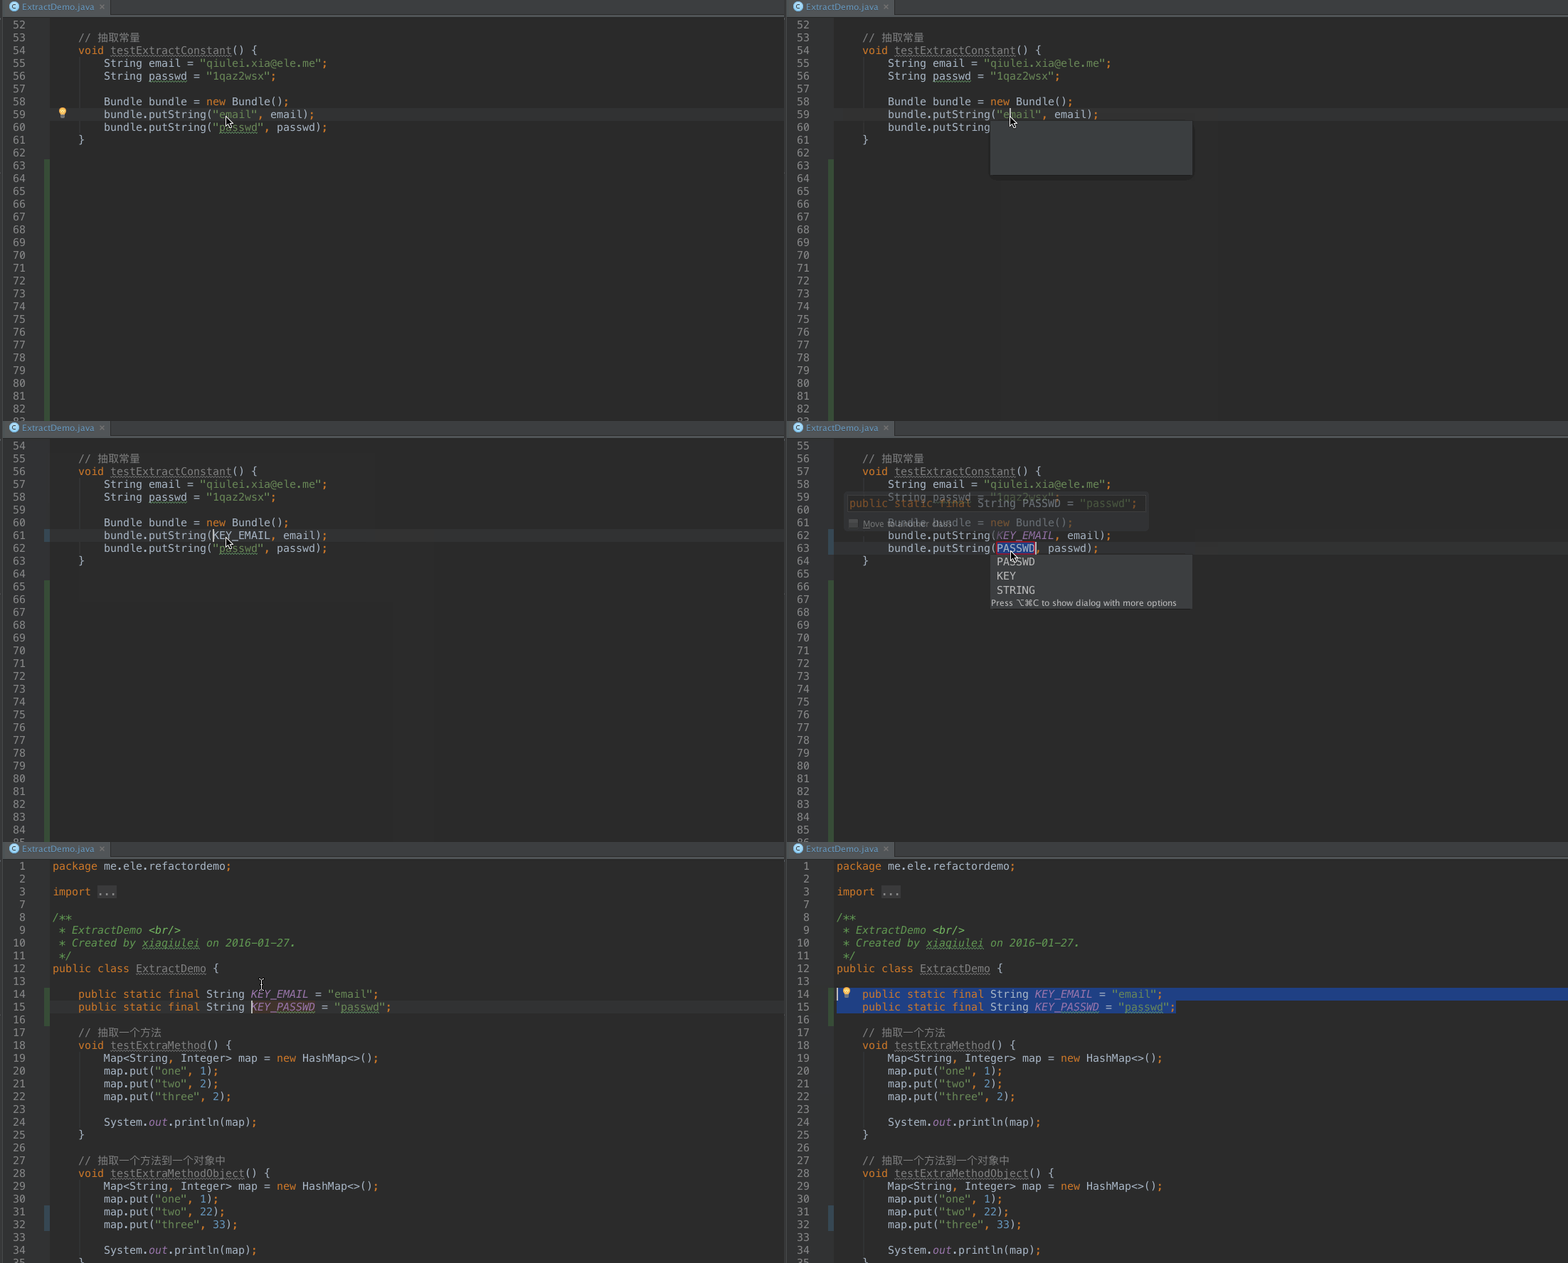
After:
    public static final String KEY_EMAIL = "email";
    public static final String KEY_PASSWD = "passwd";

    // 抽取常量
    void testExtractConstant() {
        String email = "admin@123.com";
        String passwd = "1qaz2wsx";

        Bundle bundle = new Bundle();
        bundle.putString(KEY_EMAIL, email);
        bundle.putString(KEY_PASSWD, passwd);
    }
- ExtractField,抽取成成員變量
Before:
    // 抽取成成員變量
    void testExtractField() {
        String testExtractField =  "testExtractField";
        System.out.println(testExtractField);
    }
After:
    private String testExtractField;

    // 抽取成成員變量
    void testExtractField() {
        testExtractField = "testExtractField";
        System.out.println(testExtractField);
    }
- ExtractVariable,抽取成變量
Before:
    // 抽取成變量
    void testExtractVariable() {
        System.out.println("long name = " + getLoooooooooooooooooooooooooooooooooooooooooooooooooooooongName());
    }

    String getLoooooooooooooooooooooooooooooooooooooooooooooooooooooongName() {
        return "getLoooooooooooooooooooooooooooooooooooooooooooooooooooooongName";
    }
Gif:
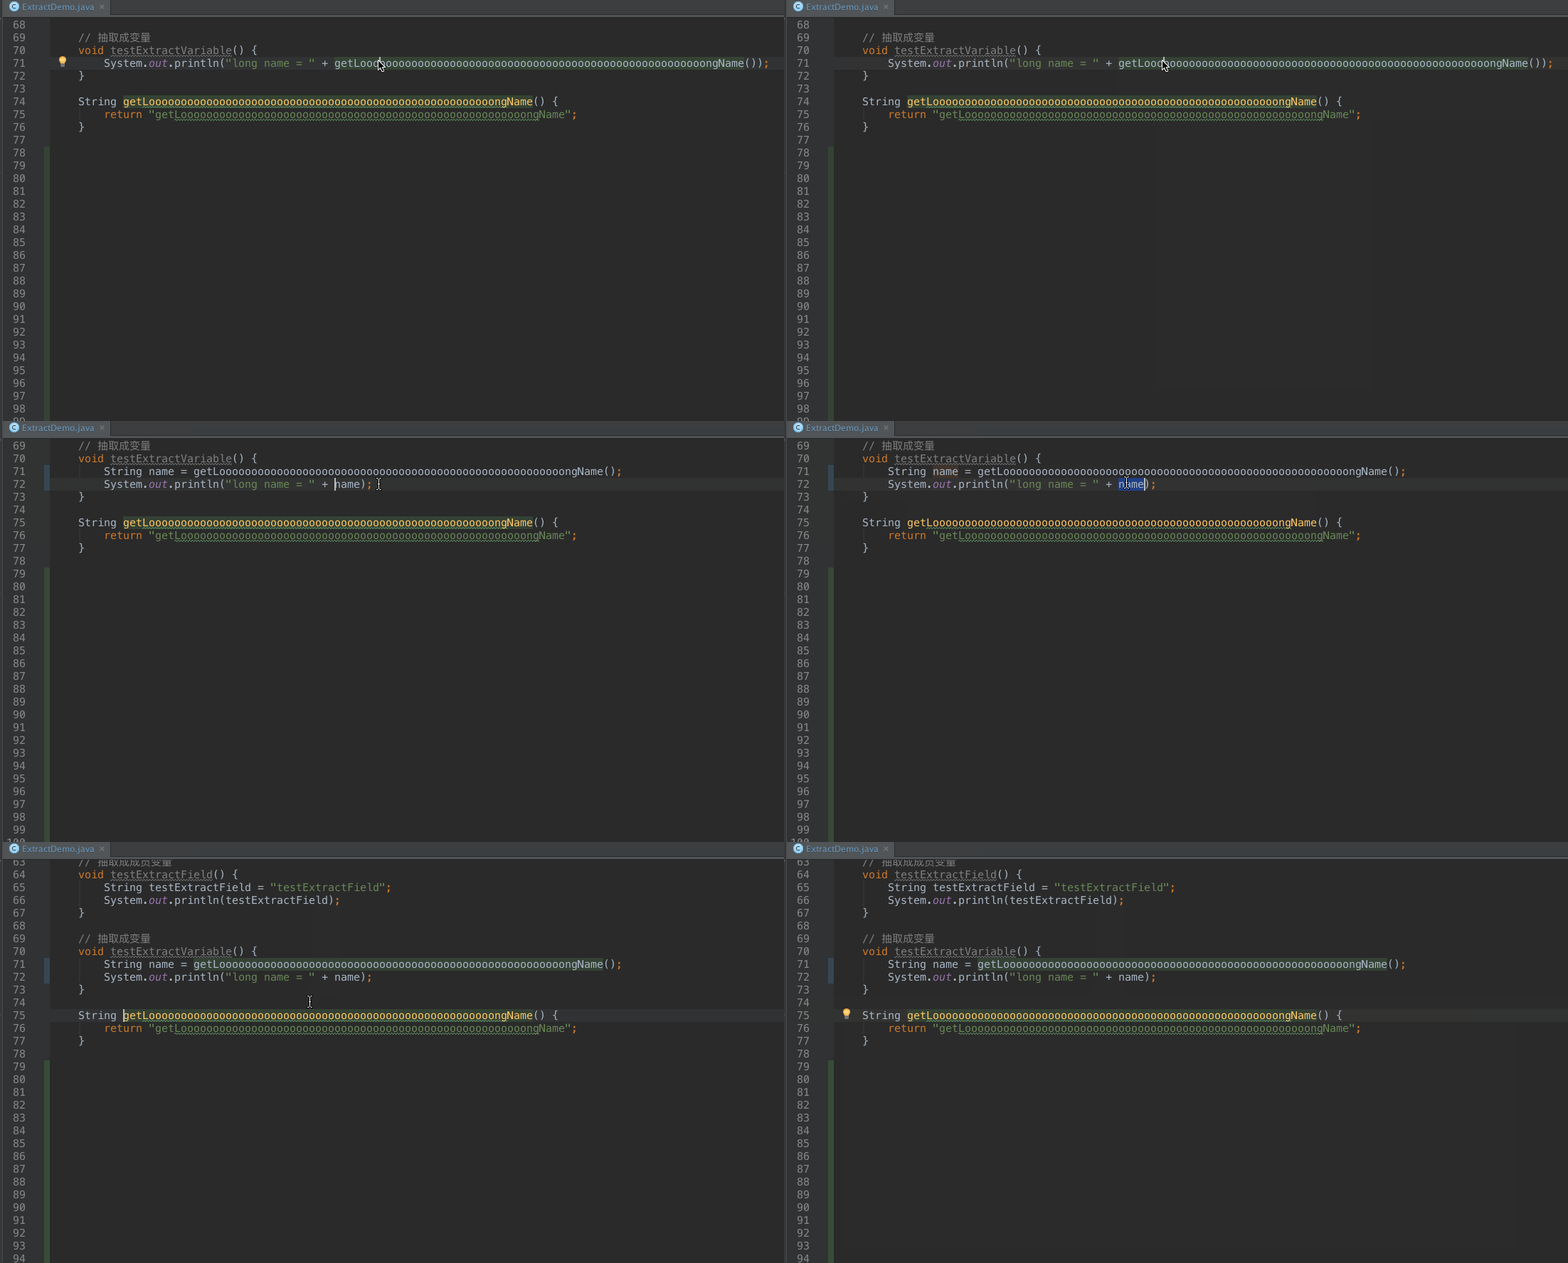
After:
    // 抽取成變量
    void testExtractVariable() {
        String name = getLoooooooooooooooooooooooooooooooooooooooooooooooooooooongName();
        System.out.println("long name = " + name);
    }

    String getLoooooooooooooooooooooooooooooooooooooooooooooooooooooongName() {
        return "getLoooooooooooooooooooooooooooooooooooooooooooooooooooooongName";
    }
有時候,一行代碼寫的很長,可以使用這個方法,對代碼進行重構。
- ExtractParameter,抽取成方法的參數
Before:
    // 抽取成方法的參數
    void testExtractParameter() {
        printHelloString();
    }

    private void printHelloString() {
        String str = "printHello";
        System.out.println(str);
    }
Gif:
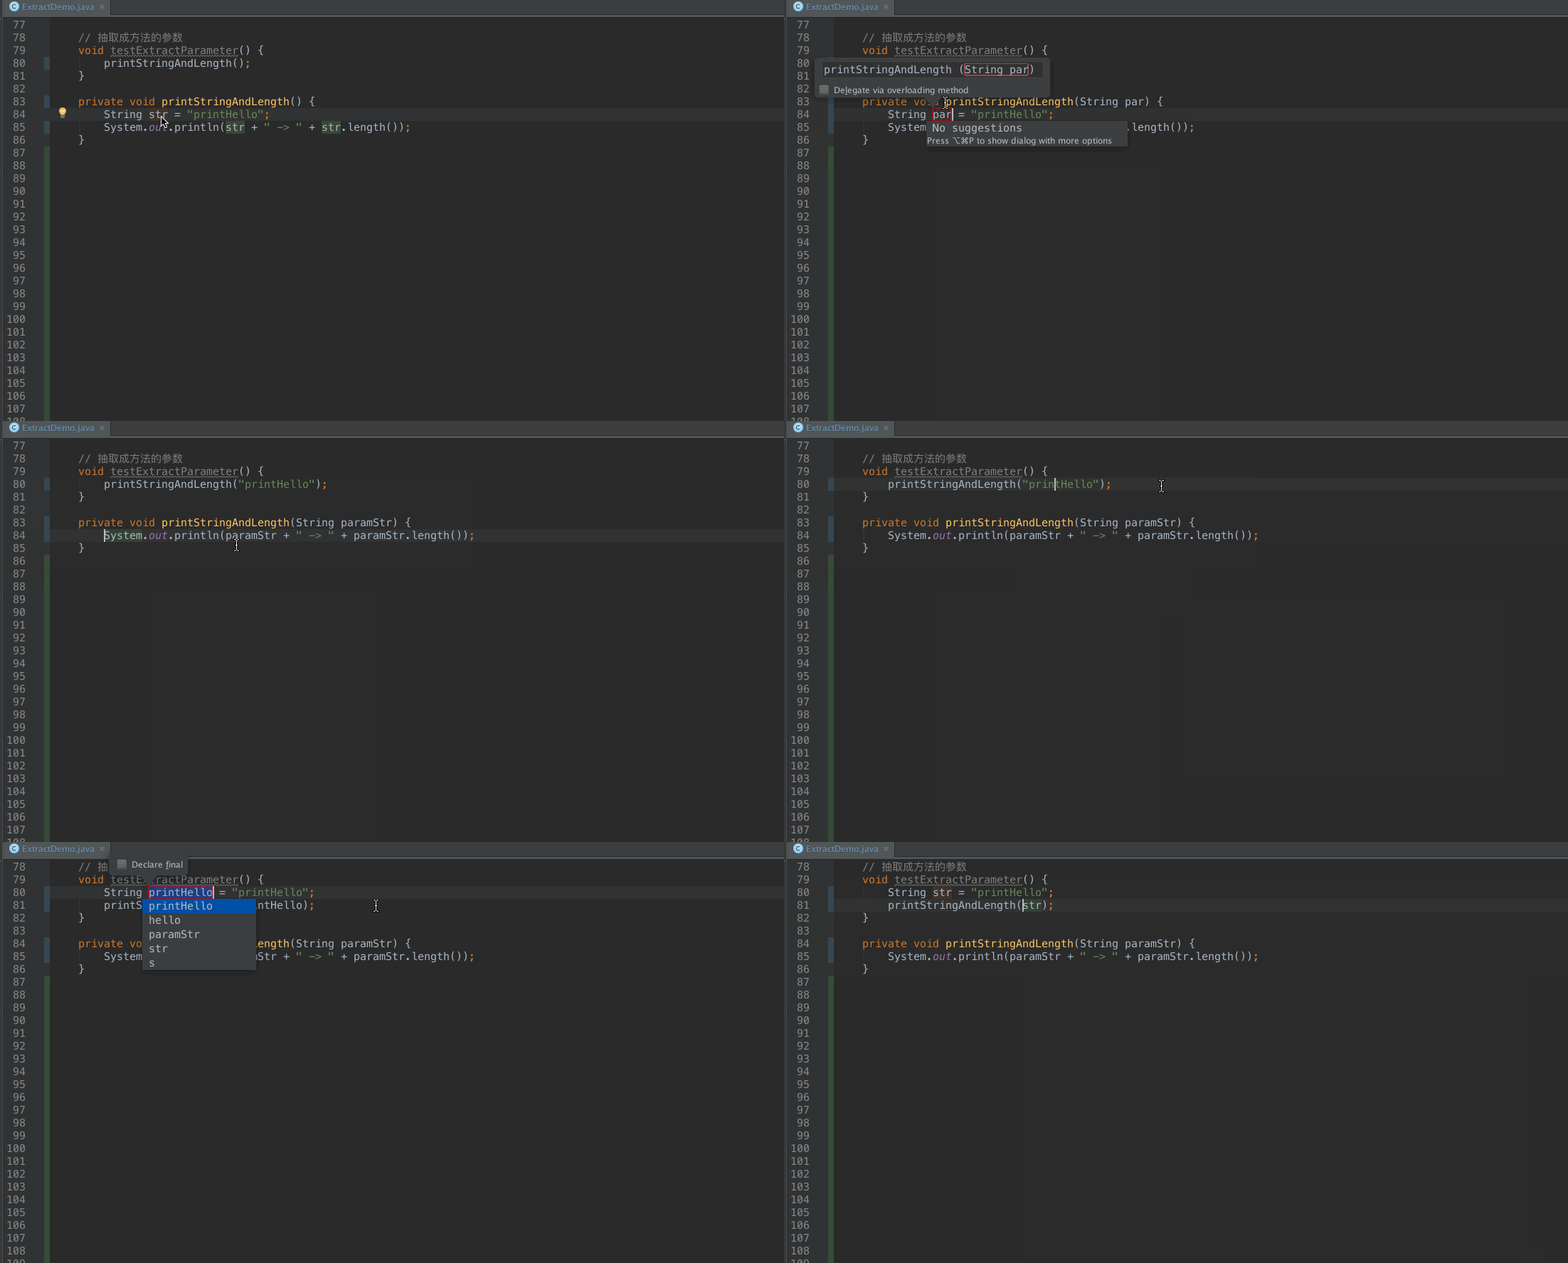
After:
    // 抽取成方法的參數
    void testExtractParameter() {
        String str = "printHello";
        printStringAndLength(str);
    }

    private void printStringAndLength(String paramStr) {
        System.out.println(paramStr + " -> " + paramStr.length());
    }
Android資源重構
- ExtractLayout,布局文件抽取
Before:
<?xml version="1.0" encoding="utf-8"?>
<android.support.design.widget.CoordinatorLayout xmlns:android="http://schemas.android.com/apk/res/android" xmlns:app="http://schemas.android.com/apk/res-auto" android:layout_width="match_parent" android:layout_height="match_parent" android:fitsSystemWindows="true">

    <android.support.design.widget.AppBarLayout android:layout_width="match_parent" android:layout_height="wrap_content" android:theme="@style/AppTheme.AppBarOverlay">

        <android.support.v7.widget.Toolbar android:id="@+id/toolbar" android:layout_width="match_parent" android:layout_height="?attr/actionBarSize" android:background="?attr/colorPrimary" app:popupTheme="@style/AppTheme.PopupOverlay" />

    </android.support.design.widget.AppBarLayout>

    <include layout="@layout/content_main" />

    <android.support.design.widget.FloatingActionButton android:id="@+id/fab" android:layout_width="wrap_content" android:layout_height="wrap_content" android:layout_gravity="bottom|end" android:layout_margin="@dimen/fab_margin" android:src="@android:drawable/ic_dialog_email" />

</android.support.design.widget.CoordinatorLayout>
Gif:
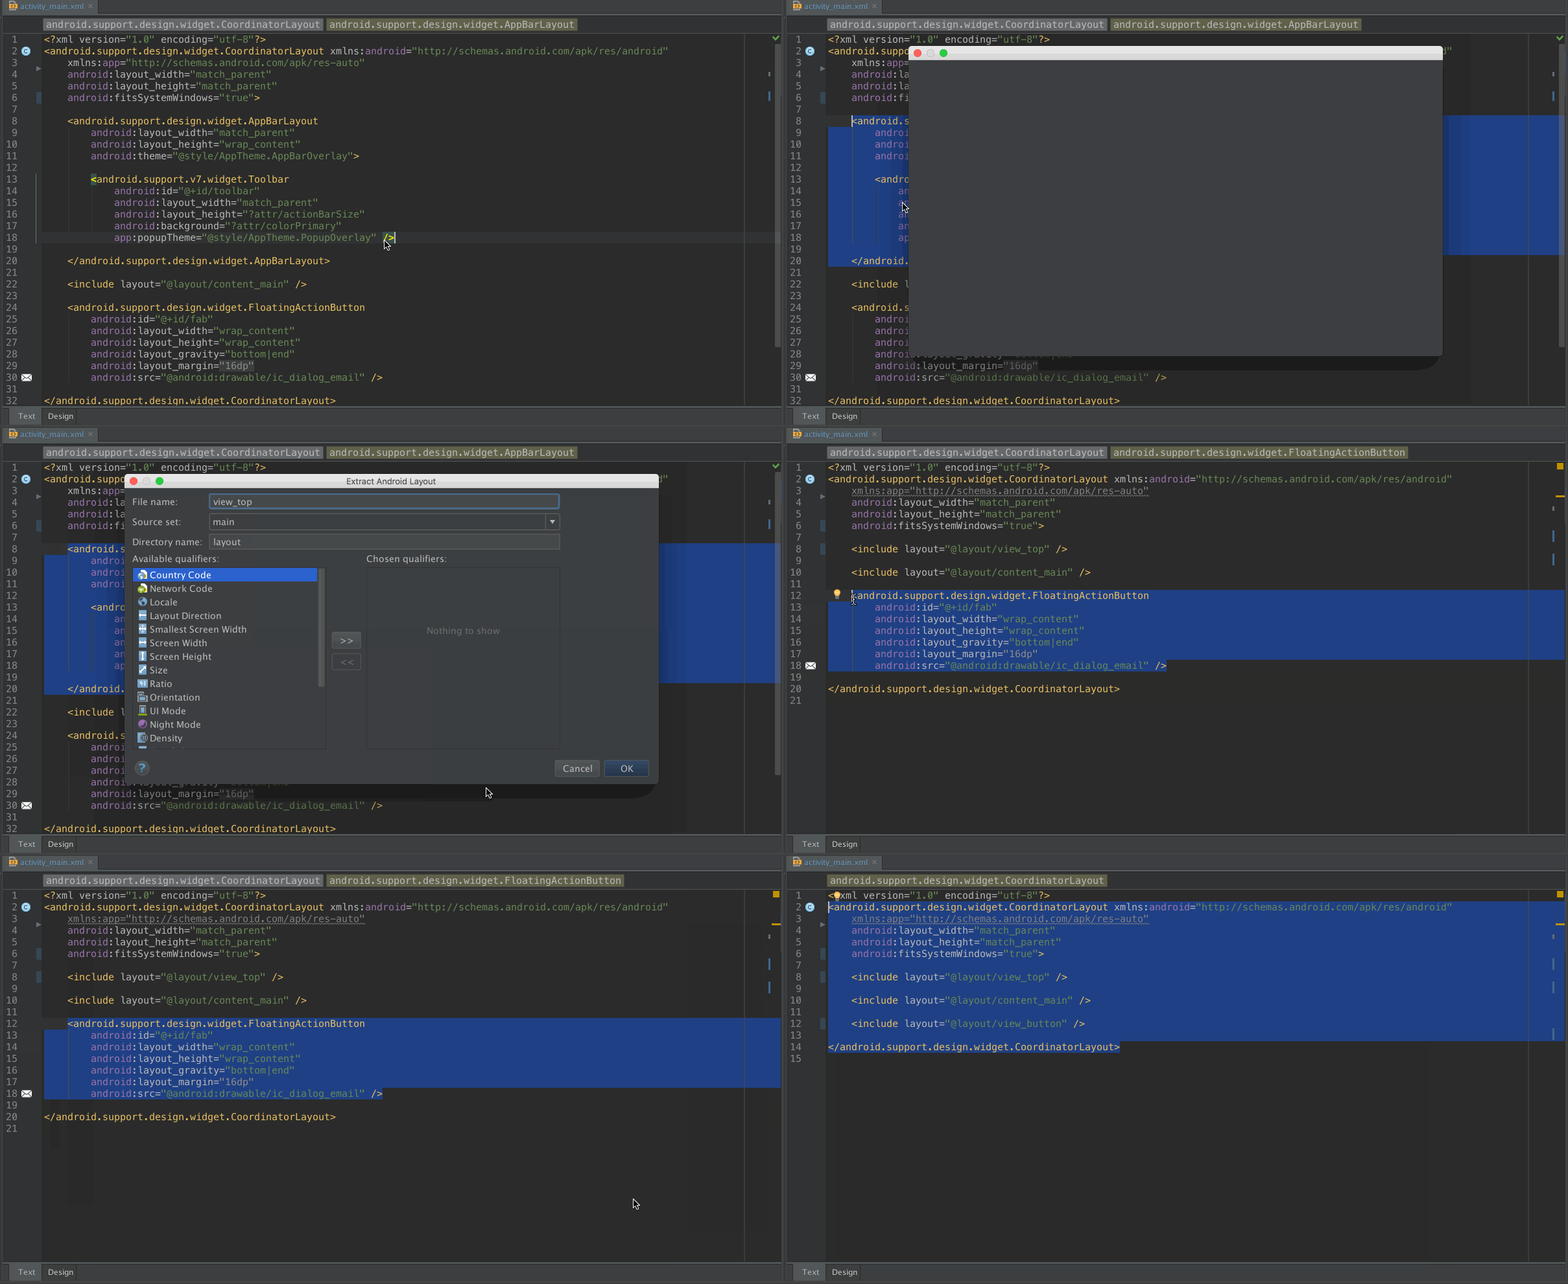
After:
<?xml version="1.0" encoding="utf-8"?>
<android.support.design.widget.CoordinatorLayout xmlns:android="http://schemas.android.com/apk/res/android" android:layout_width="match_parent" android:layout_height="match_parent" android:fitsSystemWindows="true">

    <include layout="@layout/view_top" />

    <include layout="@layout/content_main" />

    <include layout="@layout/view_button" />

</android.support.design.widget.CoordinatorLayout>
- ExtractStyle,樣式抽取
Before:
<TextView android:layout_width="wrap_content" android:layout_height="wrap_content" android:text="Hello World!" android:textAlignment="center" android:textColor="#f00ff0" android:textSize="18sp" android:textStyle="bold" android:typeface="normal" />
Gif:
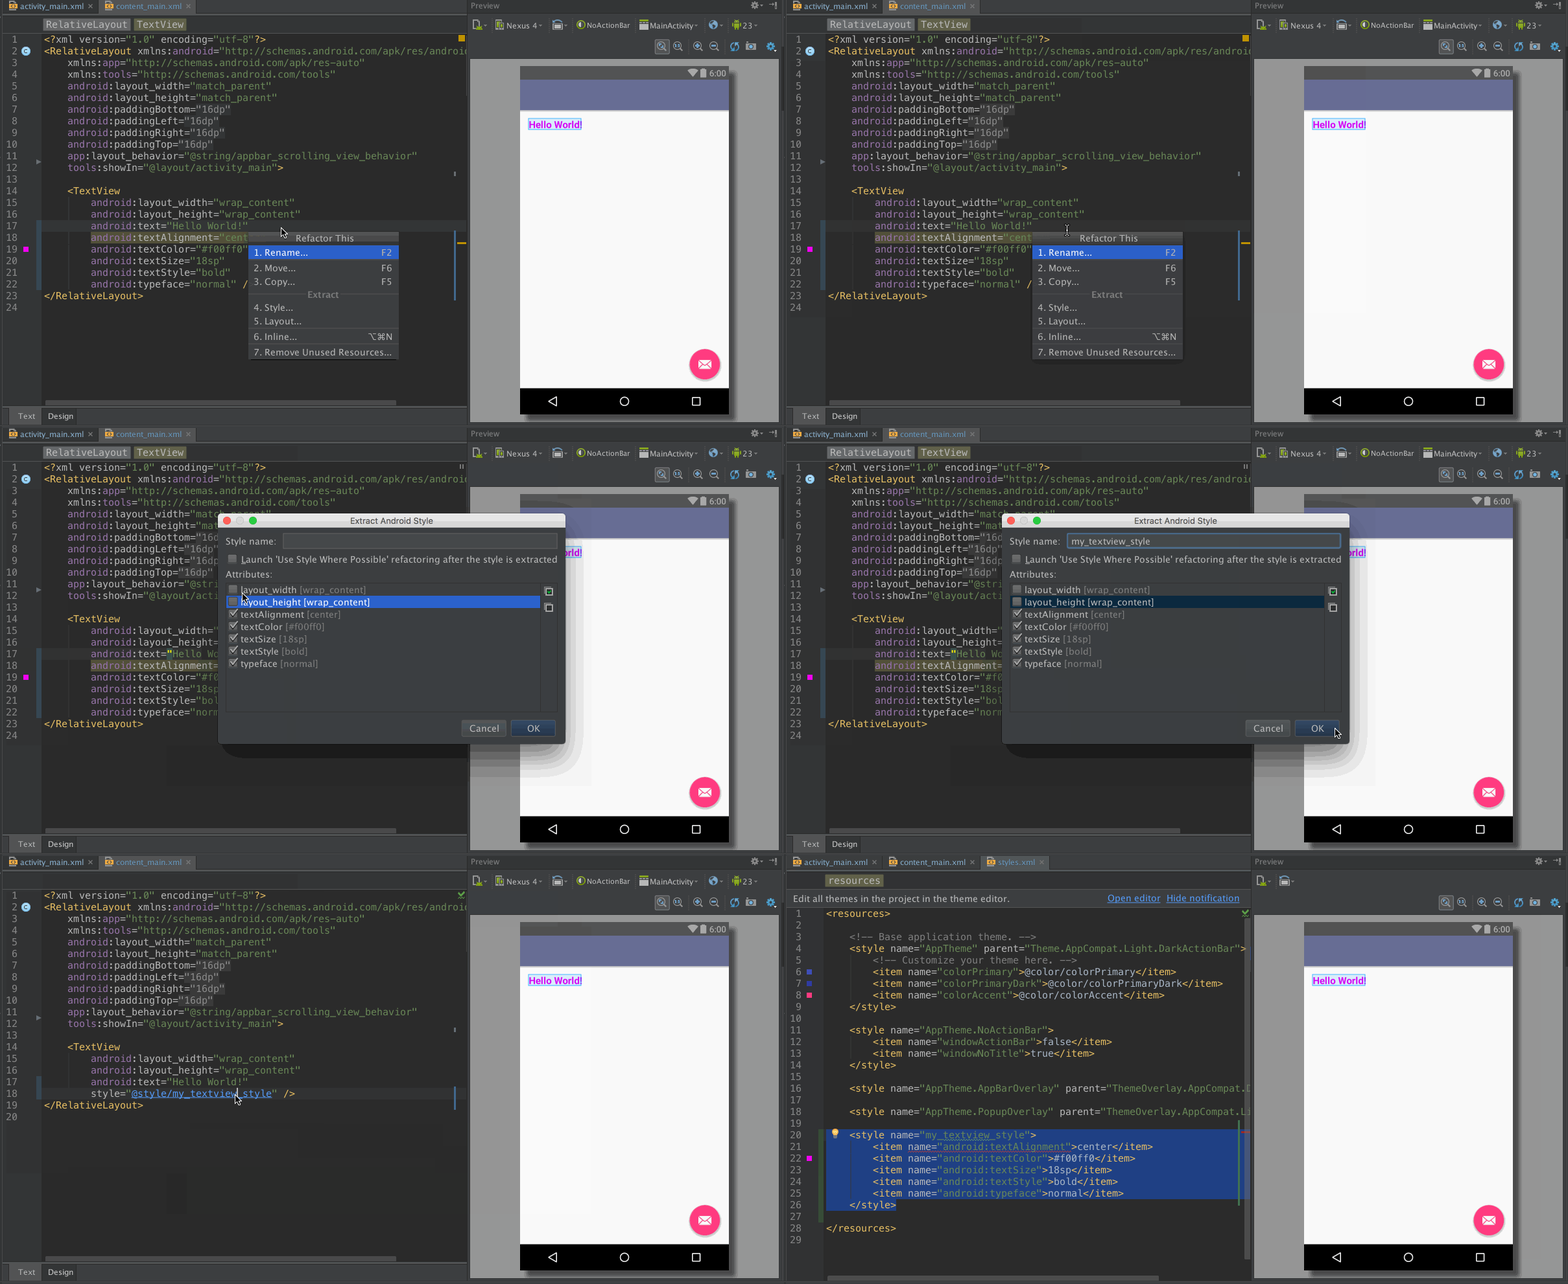
After:
    <TextView android:layout_width="wrap_content" android:layout_height="wrap_content" android:text="Hello World!" style="@style/my_textview_style" />

    <style name="my_textview_style">
        <item name="android:textAlignment">center</item>
        <item name="android:textColor">#f00ff0</item>
        <item name="android:textSize">18sp</item>
        <item name="android:textStyle">bold</item>
        <item name="android:typeface">normal</item>
    </style>
綜合示例
通過一個示例演示怎么樣重構代碼,示例是一個Activity里面有個RecyclerView,然后重構代碼,演示怎么樣分離Adapter,ViewHolder等。
Before:
public class StartActivity extends AppCompatActivity {

    @Override
    protected void onCreate(Bundle savedInstanceState) {
        super.onCreate(savedInstanceState);
        setContentView(R.layout.activity_start);
        Toolbar toolbar = (Toolbar) findViewById(R.id.toolbar);
        setSupportActionBar(toolbar);

        RecyclerView recyclerView = (RecyclerView) findViewById(R.id.recyclerView);
        recyclerView.setLayoutManager(new LinearLayoutManager(this));

        final List<String> data = new ArrayList<>();
        for (int i = 0; i < 100; i++) {
            data.add("Text " + (i + 1));
        }

        recyclerView.setAdapter(new RecyclerView.Adapter<MyViewHolder>() {

            @Override
            public MyViewHolder onCreateViewHolder(ViewGroup parent, int viewType) {
                LayoutInflater layoutInflater = (LayoutInflater) parent.getContext().getSystemService(Context.LAYOUT_INFLATER_SERVICE);
                return new MyViewHolder(layoutInflater.inflate(android.R.layout.simple_list_item_1, parent, false));
            }

            @Override
            public void onBindViewHolder(MyViewHolder holder, int position) {
                holder.bind(data.get(position));
            }

            @Override
            public int getItemCount() {
                return data.size();
            }
        });
    }

    class MyViewHolder extends RecyclerView.ViewHolder {

        TextView textView;

        public MyViewHolder(View itemView) {
            super(itemView);
            textView = (TextView) itemView.findViewById(android.R.id.text1);
        }

        void bind(String text) {
            textView.setText(text);
        }
    }
}
Gif:
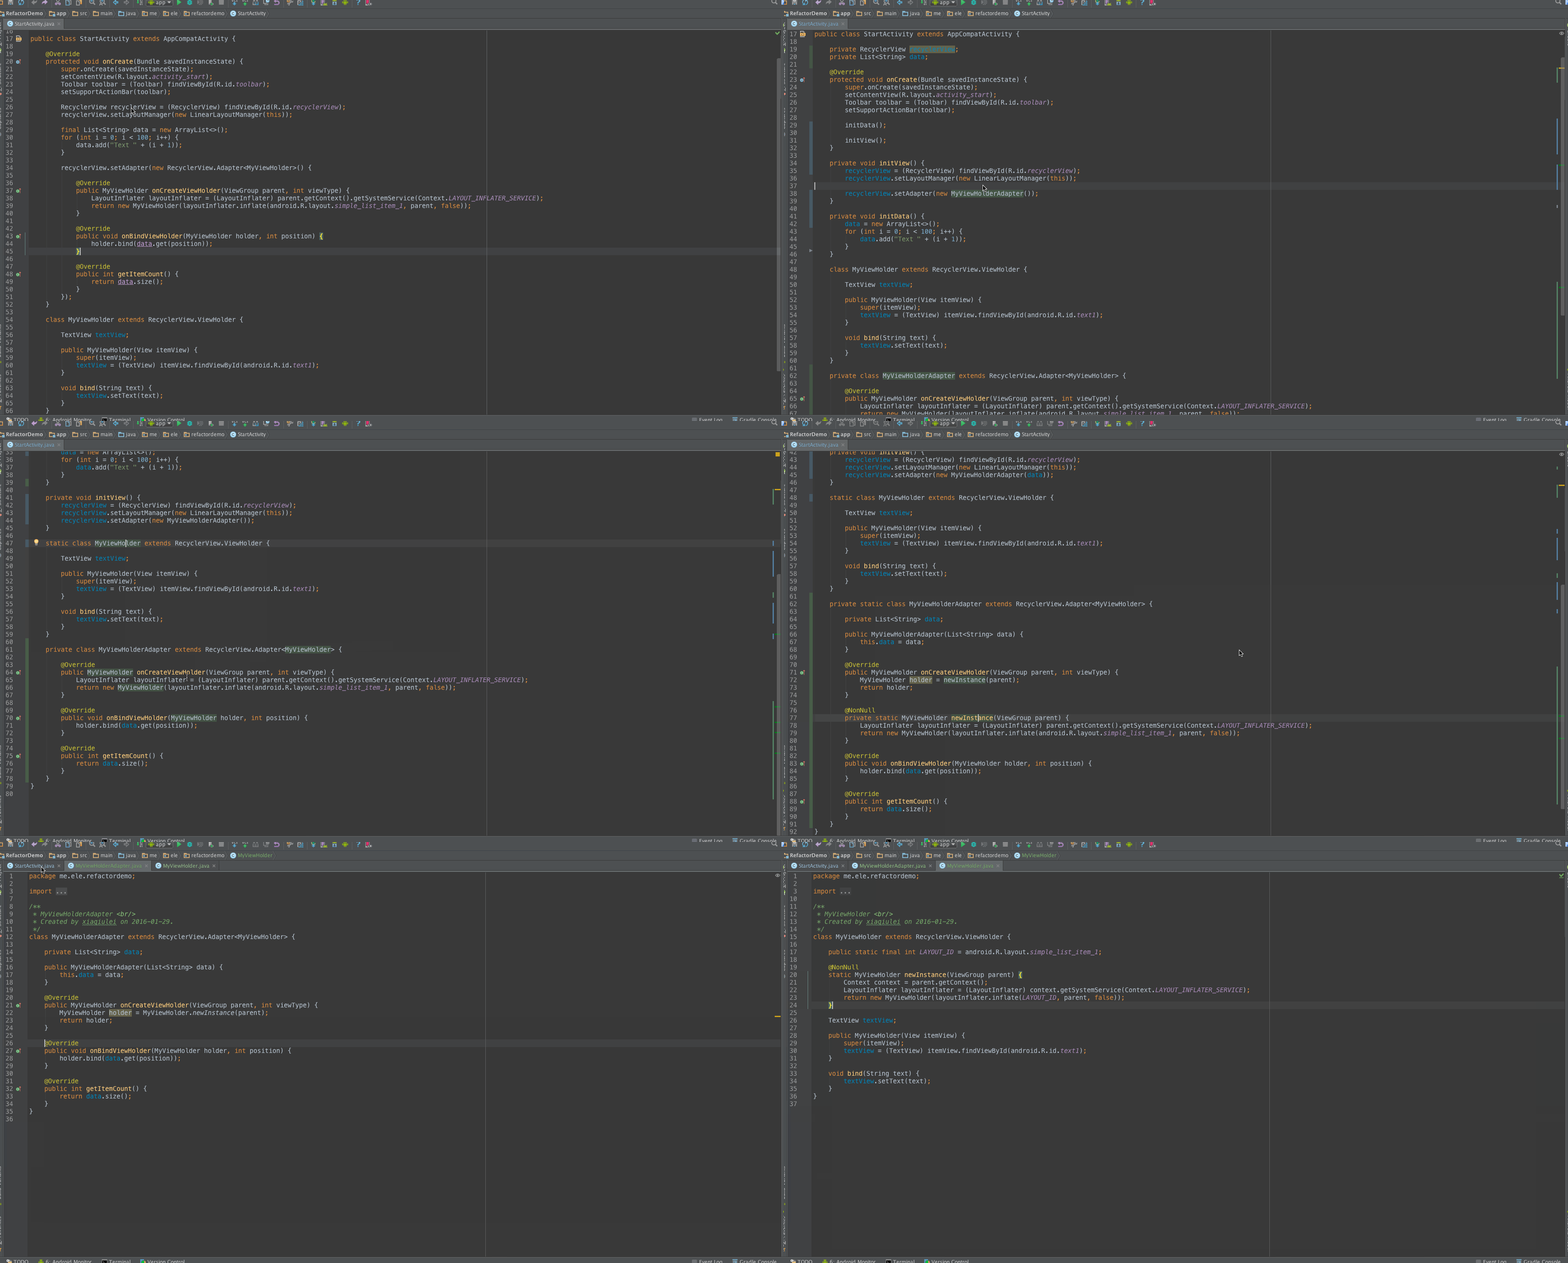
After:
public class StartActivity extends AppCompatActivity {

    private RecyclerView recyclerView;
    private List<String> data;

    @Override
    protected void onCreate(Bundle savedInstanceState) {
        super.onCreate(savedInstanceState);
        setContentView(R.layout.activity_start);
        Toolbar toolbar = (Toolbar) findViewById(R.id.toolbar);
        setSupportActionBar(toolbar);

        initData();
        initView();
    }

    private void initData() {
        data = new ArrayList<>();
        for (int i = 0; i < 100; i++) {
            data.add("Text " + (i + 1));
        }
    }

    private void initView() {
        recyclerView = (RecyclerView) findViewById(R.id.recyclerView);
        recyclerView.setLayoutManager(new LinearLayoutManager(this));
        recyclerView.setAdapter(new MyViewHolderAdapter(data));
    }
}

class MyViewHolderAdapter extends RecyclerView.Adapter<MyViewHolder> {

    private List<String> data;

    public MyViewHolderAdapter(List<String> data) {
        this.data = data;
    }

    @Override
    public MyViewHolder onCreateViewHolder(ViewGroup parent, int viewType) {
        return MyViewHolder.newInstance(parent);
    }

    @Override
    public void onBindViewHolder(MyViewHolder holder, int position) {
        holder.bind(data.get(position));
    }

    @Override
    public int getItemCount() {
        return data.size();
    }
}


class MyViewHolder extends RecyclerView.ViewHolder {

    public static final int LAYOUT_ID = android.R.layout.simple_list_item_1;

    @NonNull
    static MyViewHolder newInstance(ViewGroup parent) {
        Context context = parent.getContext();
        LayoutInflater layoutInflater = (LayoutInflater) context.getSystemService(Context.LAYOUT_INFLATER_SERVICE);
        return new MyViewHolder(layoutInflater.inflate(LAYOUT_ID, parent, false));
    }

    TextView textView;

    public MyViewHolder(View itemView) {
        super(itemView);
        textView = (TextView) itemView.findViewById(android.R.id.text1);
    }

    void bind(String text) {
        textView.setText(text);
    }
}
總結
至此,Android Studio的重構功能講解完成,由於Android Studio更新很快,很多功能還需要自己去發掘。
『君子生非異也,善假於物也』,好好使用工具,可以偷個懶。

