Android APP開發中,開發者們都想有一個公共的組件,可以實現后台數據的監聽,同時實時更新到UI進行顯示,從而大大簡化開發過程。Google針對這一開發需求,提供了Jetpack LiveData組件。下面我們來一起看下LiveData的基本使用方法吧!
首先,先了解下使用LiveData的優點。
-
確保UI與數據狀態匹配
-
不需要擔心內存泄漏問題
-
Activity停止后數據變化不會導致Crash
-
不再需要人工生命周期的處理
-
始終使用最新的數據
-
正確應用配置更改
-
共享資源
LiveData遵循觀察者模式,實現LifeCycle接口,因此可以監聽數據的實時更新,感知應用的生命周期,讓開發者能夠更多的關注業務具體實現。
下面我們來通過一個小Demo來簡單介紹下LiveData的基本使用方法。
本例中,數據變化通知UI的顯示由四個控件體現,分別為:系統時間(Long型)、系統時間、天氣、遠端數據。針對這四個控件的動態顯示,我們分別來看下其是如何實現的。
框架搭建
APP首先需要搭建使用LiveData的環境:
1. 導入依賴包
//app build.gradle
dependencies {
    ...
    implementation deps.lifecycle.viewmodel_ktx
    implementation deps.lifecycle.livedata_ktx
    ...
}
## 2. 創建ViewModel類(用於LiveData數據的封裝,和UI交互)
``` class LiveDataViewModel( private val dataSource: DataSource ) : ViewModel() {...} ```
## 3. 布局文件中引用ViewModel對象
 <layout>
     <data>
		 <variable
		     name="viewmodel"
		     type="com.android.example.livedatabuilder.LiveDataViewModel" />
     </data>
     ...
</layout>
## 4. Activity綁定ViewModel
``` //MainActivity //成員變量 private val viewmodel: LiveDataViewModel by viewModels { LiveDataVMFactory } //onCreate val binding = DataBindingUtil.setContentView
// Bind ViewModel
binding.viewmodel = viewmodel
//LifeDataVMFactory
object LiveDataVMFactory : ViewModelProvider.Factory {
private val dataSource = DefaultDataSource(Dispatchers.IO)
override fun <T : ViewModel?> create(modelClass: Class
@Suppress("UNCHECKED_CAST")
return LiveDataViewModel(dataSource) as T
}
}
<br/>
### 注意:此處構造ViewModel采用的dataSource為DefaultDataSource,后續數據是根據此數據源來進行獲取的。
<br/>
# 系統時間(Long型)顯示
<br/>
系統時間的顯示,通過在UI上綁定ViewModel,通過getCurrentTime方法后台更新、提交數據,來通知UI進行顯示的更新。
<br/>
//xml
<TextView
android:id="@+id/time"
android:text="@{Long.toString(viewmodel.currentTime)}"
.../>
//LiveDataViewModel
val currentTime = dataSource.getCurrentTime()
//DefaultDataSource
override fun getCurrentTime(): LiveData
liveData {
while (true) {
emit(System.currentTimeMillis())//通知當前系統時間
delay(1000)//延時1秒
}
}
<br/>
# 系統時間顯示
<br/>
系統時間的顯示是根據系統獲取的Long型變量變化映射得到的,Long值發生變化時,實時更新系統時間顯示。
<br/>
//xml
<TextView
android:id="@+id/time_transformed"
android:text="@{viewmodel.currentTimeTransformed}"
.../>
//LiveDataViewModel 此處有兩種方式實現
//1. currentTime變更后實時通知UI更新
val currentTimeTransformed : LiveData
Date(it).toString()
}
//2. 延時500ms后通知
val currentTimeTransformed = currentTime.switchMap {
// timeStampToTime is a suspend function so we need to call it from a coroutine.
liveData { emit(timeStampToTime(it)) }
}
private suspend fun timeStampToTime(timestamp: Long): String {
delay(500) // Simulate long operation
val date = Date(timestamp)
return date.toString()
}
<br/>
# 天氣顯示
<br/>
天氣的顯示通過動態改變數據源提供的數據,從而通知UI顯示(DataSource數據的更新實時通過LiveData傳遞到UI)。
<br/>
//xml
<TextView
android:id="@+id/current_weather"
android:text="@{viewmodel.currentWeather}"
.../>
//LiveDataViewModel
val currentWeather: LiveData
emit(LOADING_STRING)
emitSource(dataSource.fetchWeather())
}
//DefaultDataSource
private val weatherConditions = listOf("Sunny", "Cloudy", "Rainy", "Stormy", "Snowy")
override fun fetchWeather(): LiveData
var counter = 0
while (true) {
counter++
delay(2000)//延時兩秒
//按順序循環顯示weatherConditions中的天氣數據信息
emit(weatherConditions[counter % weatherConditions.size])
}
}
<br/>
# 遠端數據顯示
<br/>
遠端數據的請求通過Button的點擊事件觸發,數據獲取成功后,通知TextView進行數據顯示。
<br/>
//xml
<TextView
android:id="@+id/cached_value"
android:text="@{viewmodel.cachedValue}"
.../>
<Button
android:id="@+id/refresh_button"
android:onClick="@{() -> viewmodel.onRefresh()}"
.../>
//LiveDataViewModel
val cachedValue = dataSource.cachedData
fun onRefresh() {
// Launch a coroutine that reads from a remote data source and updates cache
viewModelScope.launch {
dataSource.fetchNewData()
}
}
//DefaultDataSource
private val _cachedData = MutableLiveData("This is old data")
override val cachedData: LiveData
override suspend fun fetchNewData() {
// Force Main thread
withContext(Dispatchers.Main) {
_cachedData.value = "Fetching new data..."
_cachedData.value = simulateNetworkDataFetch()
}
}
private var counter = 0
// Using ioDispatcher because the function simulates a long and expensive operation.
private suspend fun simulateNetworkDataFetch(): String = withContext(ioDispatcher) {
delay(3000)//延時3秒
counter++
"New data from request #$counter"//返回此字符串
}
<br/>
##### 小提示:本例中的viewModelScope使用的是Kotlin Coroutines(協程)功能,更多協程使用方法,請查看Coroutines在架構組件中的應用:[官方文檔鏈接](https://developer.android.google.cn/topic/libraries/architecture/coroutines)[]()
<br/>
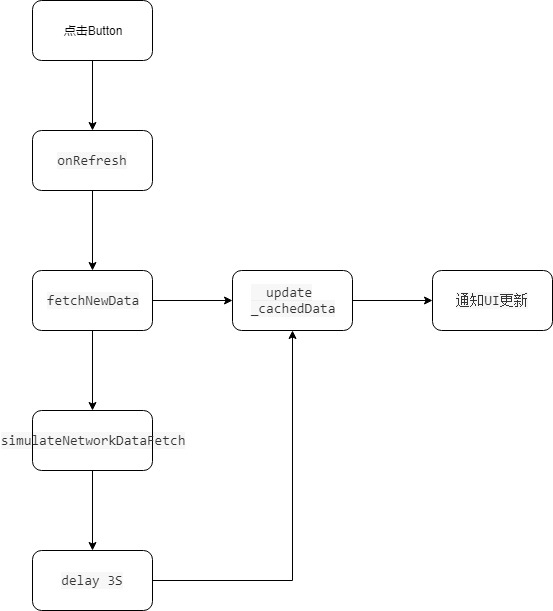
遠端數據的更新流程為:<br/><br/>
<center>
</center>
<br/>
將上述四個控件分別綁定對應的LiveData對象,增加其數據變化,就能夠實現前文描述的APP動態變化效果了。
<br/>
[幫助文檔](https://developer.android.google.cn/topic/libraries/architecture/livedata)
 
[源碼路徑](https://github.com/android/architecture-components-samples)<br/><br/>
小技巧: github 代碼下載速度慢,可以克隆到碼雲上(gitee.com)再下載。
<br/><br/>
通過這四個控件的LiveData與UI的交互使用,你學會如何使用LiveData了嗎?
<br/><br/>
<center><font color='green'>歡迎關注公眾號,留言討論更多技術問題。</center>
<center>

</center>