序章
想要一個自己的知識管理系統,用了 Hexo ,但是沒有發現自己心儀的主題,就自己做了一個。本文記錄了制作的全過程。本人編碼功底和前端知識並不是特別雄厚,希望能由此文引出各路大神的興趣,以后制作出更多優秀的主題。
預覽: https://itabyss.github.io/
源碼: https://github.com/ITAbyss/hexo-wiki
教程文章:https://www.cnblogs.com/yyhh/p/11058985.html

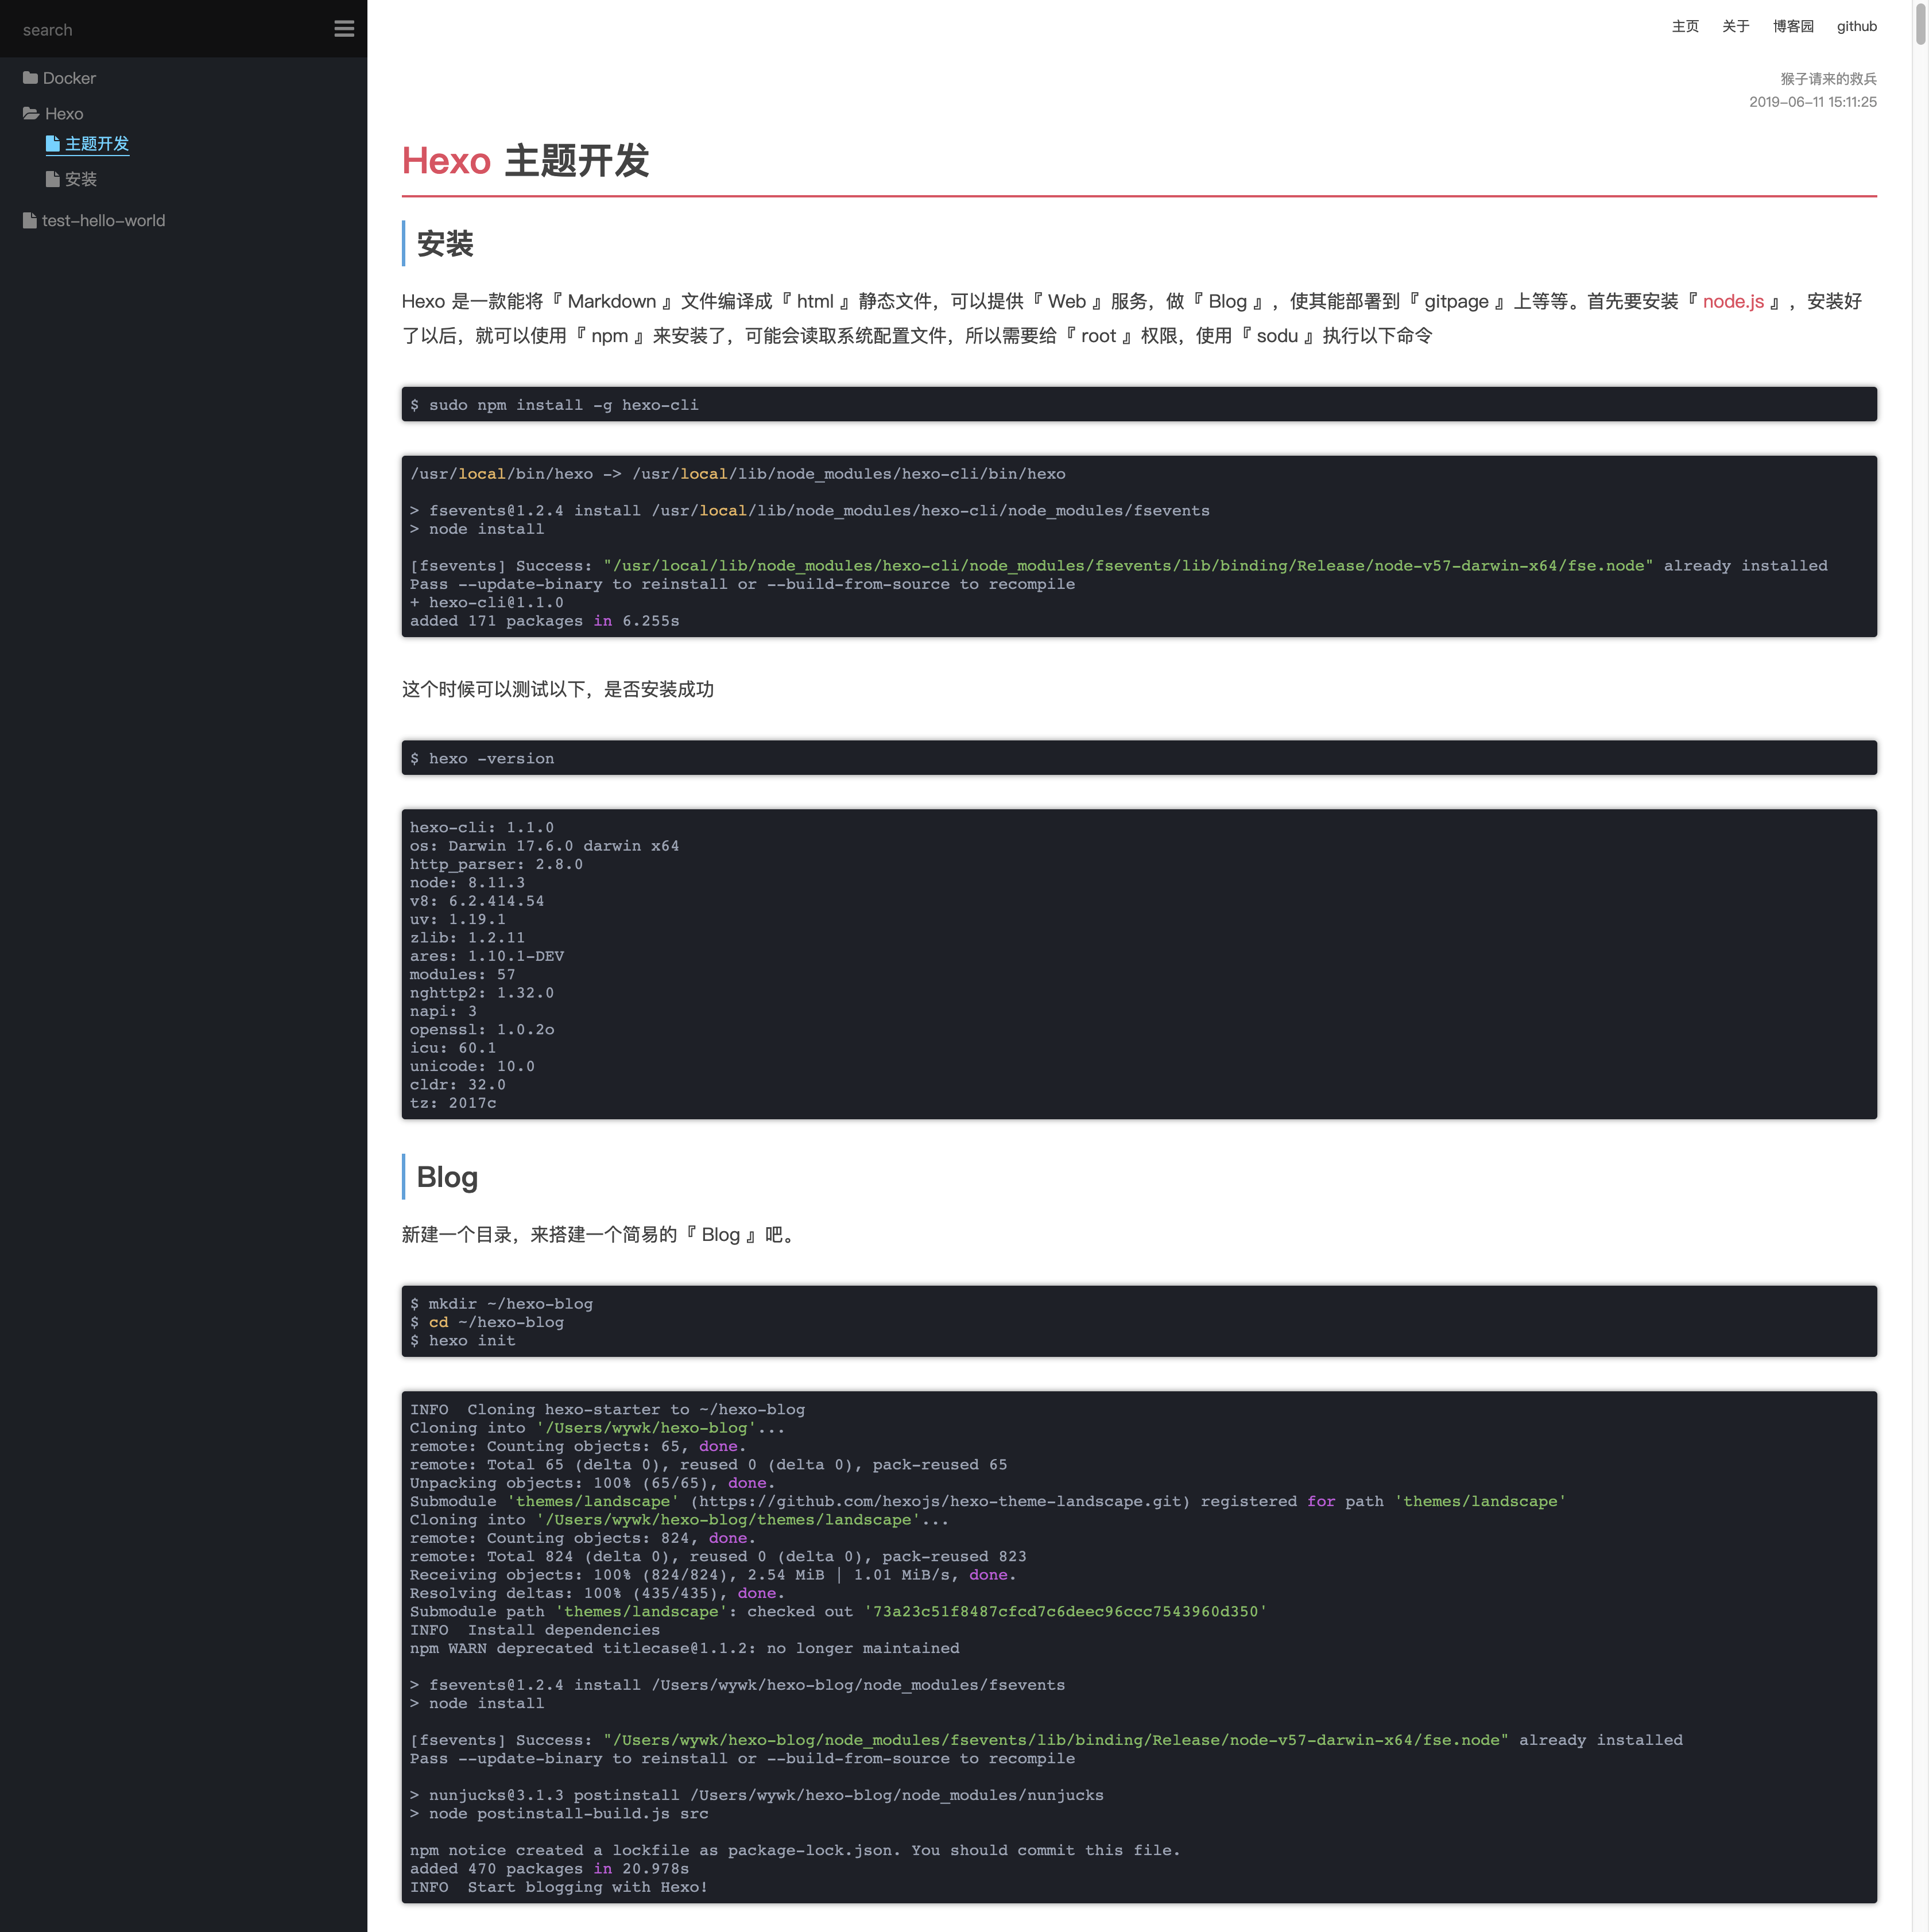
安裝
Hexo 是一款能將『 Markdown 』文件編譯成『 html 』靜態文件,可以提供『 Web 』服務,做『 Blog 』,使其能部署到『 gitpage 』上等等。首先要安裝『 node.js 』,安裝好了以后,就可以使用『 npm 』來安裝了,可能會讀取系統配置文件,所以需要給『 root 』權限,使用『 sodu 』執行以下命令
$ sudo npm install -g hexo-cli
/usr/local/bin/hexo -> /usr/local/lib/node_modules/hexo-cli/bin/hexo

> fsevents@1.2.4 install /usr/local/lib/node_modules/hexo-cli/node_modules/fsevents
> node install

[fsevents] Success: "/usr/local/lib/node_modules/hexo-cli/node_modules/fsevents/lib/binding/Release/node-v57-darwin-x64/fse.node" already installed
Pass --update-binary to reinstall or --build-from-source to recompile
+ hexo-cli@1.1.0
added 171 packages in 6.255s
這個時候可以測試以下,是否安裝成功
$ hexo -version
hexo-cli: 1.1.0
os: Darwin 17.6.0 darwin x64
http_parser: 2.8.0
node: 8.11.3
v8: 6.2.414.54
uv: 1.19.1
zlib: 1.2.11
ares: 1.10.1-DEV
modules: 57
nghttp2: 1.32.0
napi: 3
openssl: 1.0.2o
icu: 60.1
unicode: 10.0
cldr: 32.0
tz: 2017c
新建 Blog
新建一個目錄,來搭建一個簡易的『 Blog 』吧。
$ mkdir ~/hexo-blog
$ cd ~/hexo-blog
$ hexo init
INFO  Cloning hexo-starter to ~/hexo-blog
Cloning into '/Users/wywk/hexo-blog'...
remote: Counting objects: 65, done.
remote: Total 65 (delta 0), reused 0 (delta 0), pack-reused 65
Unpacking objects: 100% (65/65), done.
Submodule 'themes/landscape' (https://github.com/hexojs/hexo-theme-landscape.git) registered for path 'themes/landscape'
Cloning into '/Users/wywk/hexo-blog/themes/landscape'...
remote: Counting objects: 824, done.
remote: Total 824 (delta 0), reused 0 (delta 0), pack-reused 823
Receiving objects: 100% (824/824), 2.54 MiB | 1.01 MiB/s, done.
Resolving deltas: 100% (435/435), done.
Submodule path 'themes/landscape': checked out '73a23c51f8487cfcd7c6deec96ccc7543960d350'
INFO  Install dependencies
npm WARN deprecated titlecase@1.1.2: no longer maintained

> fsevents@1.2.4 install /Users/wywk/hexo-blog/node_modules/fsevents
> node install

[fsevents] Success: "/Users/wywk/hexo-blog/node_modules/fsevents/lib/binding/Release/node-v57-darwin-x64/fse.node" already installed
Pass --update-binary to reinstall or --build-from-source to recompile

> nunjucks@3.1.3 postinstall /Users/wywk/hexo-blog/node_modules/nunjucks
> node postinstall-build.js src

npm notice created a lockfile as package-lock.json. You should commit this file.
added 470 packages in 20.978s
INFO  Start blogging with Hexo!
初始化之后,看到如上信息,說明已經初始化成功了。接下來,直接啟動服務,就可以大致瀏覽『 Blog 』了。
$ cd ~/hexo-blog
$ hexo s
INFO  Start processing
INFO  Hexo is running at http://localhost:4000/. Press Ctrl+C to stop.
啟動后,訪問『 http://localhost:4000 』

當然也可以使用一些其他的命令,可以通過幫助來查看
hexo help
Usage: hexo <command>

Commands:
  clean     Remove generated files and cache.
  config    Get or set configurations.
  deploy    Deploy your website.
  generate  Generate static files.
  help      Get help on a command.
  init      Create a new Hexo folder.
  list      List the information of the site
  migrate   Migrate your site from other system to Hexo.
  new       Create a new post.
  publish   Moves a draft post from _drafts to _posts folder.
  render    Render files with renderer plugins.
  server    Start the server.
  version   Display version information.

Global Options:
  --config  Specify config file instead of using _config.yml
  --cwd     Specify the CWD
  --debug   Display all verbose messages in the terminal
  --draft   Display draft posts
  --safe    Disable all plugins and scripts
  --silent  Hide output on console
主題下載
Hexo 有很多精彩的主題,可以去『 官方主題網站 』去查閱,找到自己喜歡的主題。
這次所寫是自己基於Hexo的框架,編寫一個自己喜歡的主題。我個人喜歡極簡快速的主題,所以不太喜歡花哨的、很多插件、很多掛件的那種,感覺加載起來特別的卡,可能是作為性能測試人員的壞毛病,喜歡追求極致的速度。沒有找到自己喜歡的極簡風格,所以就自己寫了一個簡單的 wiki ,用於代替雲筆記。
主題開發
目錄結構
首先得創建一個自己 Blog 的文件夾,我這邊建的文件夾叫『 wiki 』,然后在這個文件夾下,進行 Hexo 的初始化。
mkdir wiki
cd wiki
hexo init
初始化之后就會有一個這樣的目錄。
wiki ➔  tree -L 1
.
├── _config.yml       // 總體的配置文件
├── node_modules      // NodeJs 所依賴的包,后期也可以自己添加插件
├── package-lock.json // 支持 hexo 運行的 NodeJs 包
├── package.json      // 自定義的 NodeJs 包
├── scaffolds         // Hexo Markdown 加載時的關鍵字,如data,title等,它會在啟動的時候默認加載
├── source            // md 源文件目錄
└── themes            // 主題文件夾
    └── landscape     // 默認主題
我們編寫 md 文檔放在 『source』文件夾中,在運行『hexo generate』的時候,會根據『source』目錄中的 md 文件自動生成一組 『html』格式的靜態文件組,會在wiki目錄下新建一個 『public』目錄,存放在其中。
在『_config.yml』中的 73 行左右,可以看到配置的默認主題『theme: landscape』,所對應的是 themes 目錄下的 landscape 目錄。
# Extensions
## Plugins: https://hexo.io/plugins/
## Themes: https://hexo.io/themes/
theme: landscape
在『themes』目錄下,新建一個自己的主題『wiki』,並且新建一些可以支持運行的文件與目錄,按照如下目錄格式創建,里面可以不寫東西,下面寫有注釋的,就是我新建的文件。
wiki ➔  tree -L 1
.
├── _config.yml
├── node_modules
├── package-lock.json
├── package.json
├── scaffolds
├── source
└── themes
    ├── landscape
    └── wiki                // 自建的主題目錄
        ├── _config.yml     // 主題配置文件
        ├── layout          // 主要構造 html 的模板
        │   ├── index.ejs   // 主頁模板
        │   ├── layout.ejs  // 布局模板
        │   └── post.ejs    // md 編譯成 html 后的文件模板
        └── source          // 靜態資源文件目錄
            ├── css         // css 樣式目錄
            └── js          // JavaScript 腳本目錄
在『_config.yml』中 73 行左右修改主題,指向剛創建的 wiki 目錄。
這里的『_config.yml』指的是 Hexo 的配置文件。
后面如果要修改主題的配置文件,全部都會叫做 『themes._config.yml』。
想要了解更加詳細的資料可以去查閱官網配置詳解
# Extensions
## Plugins: https://hexo.io/plugins/
## Themes: https://hexo.io/themes/
## theme: landscape
theme: wiki
在 wiki 目錄下,啟動 hexo 進行測試
# 可以使用 hexo server 也可以直接簡寫 hexo s
hexo s
INFO  Start processing
INFO  Hexo is running at http://localhost:4000 . Press Ctrl+C to stop.
可以看到一個白色的界面

模塊介紹
為了測試該界面,分別在剛剛新建的 layout.ejs、index.ejs、post.ejs 中加些文字。
『layout.ejs』 這個文件是用於布局的
這里是 layout.ejs
『index.ejs』 這個文件是用於主頁的
這里是 index.ejs
『post.ejs』 這個文件是用於文章的
這里是 post.ejs
刷新 http://localhost:4000/,可以看到有中文亂碼。

在 『layout.ejs』加上 html 代碼,加上 utf-8 編碼顯示。
<!DOCTYPE html>
<html>
<head>
    <title></title>
    <meta charset="utf-8">
</head>
<body>

    這里是 layout.ejs

</body>
</html>
重啟 hexo 服務 【注意: 這次要重啟,還是亂碼的請重啟】
重啟好了再刷新 http://localhost:4000/

可以發現 layout.ejs 給默認展示出來了,但是 index.ejs 和 post.ejs 呢?
可以用 ejs 引入代碼,將這兩個模板給引入
<!DOCTYPE html>
<html>
<head>
    <title></title>
    <meta charset="utf-8">
</head>
<body>

    這里是 layout.ejs

    <%- include("index.ejs") %>

    <%- include("post.ejs") %>

</body>
</html>

EJS 標簽
這里簡單介紹一下 ejs 語法,介紹幾個用的到的標簽也是就好了。想要了解更加詳細的資料可以查閱 EJS文檔。
| 標簽 | 含義 |
|---|---|
| <% | 腳本標簽,用於流程控制 |
| <%_ | 刪除前面的空格符 |
| <%= | 輸出數據到模板 |
| <%- | 輸出非轉義數據到模板 |
| <%# | 注釋 |
| <%% | 輸出字符串『<%』 |
| >% | 腳本結束標簽 |
| -%> | 結束時,刪除換行符 |
| _%> | 結束時,刪除空格符 |
| <%- include("index.ejs") %> | 引入其他模板 |
上面代碼就引入了各個 ejs 模板,可以更加方便用於模塊開發。稍微測試一下
『layout.ejs』
<!DOCTYPE html>
<html>
<head>
    <title></title>
    <meta charset="utf-8">
</head>
<body>

    這里是 layout.ejs

    <%- include("index.ejs") %>

    <%- include("post.ejs") %>

    <!-- 一般在寫邏輯的時候會用到這個標簽,這個標簽不會輸出到頁面上 -->
    <%  %>

    <!-- 這個標簽會輸出到頁面上,是帶着非轉義符號的 -->
    <%
        var test = "基本上,就用這兩組標簽,其他的也用不上。";
    %>

    <%- test %>


</body>
</html>

Hexo 變量
再一個就是要介紹一下,Hexo Api 我們會根據它提供的變量 api 來獲取頁面信息,進行 Blog 開發。同樣介紹一下稍微常用的。
| 變量 | 描述 |
|---|---|
| site | 總體變量,幾乎都是從這里開始的 |
| site.posts | 所有文章 |
| site.posts[0].path | 文章路徑,帶日期的 |
| site.posts[0].slug | 文章路徑,根據項目文件夾的路徑來的 |
| site.posts[0]._id | 文章的唯一 id,后面會用於 active 對比 |
| site.posts[0].title | 文章的標題 |
| site.posts[0].date | 文章的時間 |
| page.date | 在直接訪問文章路徑下,文章的時間 |
| page.title | 在直接訪問文章路徑下,文章的標題 |
| page._id | 在直接訪問文章路徑下,文章的的唯一 id,后面會用於 active 對比 |
| page.content | 引入對應文章的正文 |
| config.xxx | 總體配置文件的引用 _config.yml |
| theme.xxx | 主題配置文件 theme._config.yml |
| <%- body %> | 同時引入 post.ejs 和 index.ejs |
| <%- css(path, ...) %> | 引入 css 文件 |
| <%- js(path, ...) %> | 引入 js 文件 |
同樣是稍微的測試一下
『layout.ejs』
<!DOCTYPE html>
<html>
<head>
<title></title>
<meta charset="utf-8">
</head>
<body>
這里是 layout.ejs
<%- include("index.ejs") %>
<%- include("post.ejs") %>
<!-- 一般在寫邏輯的時候會用到這個標簽,這個標簽不會輸出到頁面上 -->
<% %>
<!-- 這個標簽會輸出到頁面上,是帶着非轉義符號的 -->
<%
var test = "基本上,就用這兩組標簽,其他的也用不上。";
%>
<%- test %>
<br />
<% site.posts.forEach(function(post){ %>
<%- post.path %>
<br />
<%- post.slug %>
<br />
<%- post._id %>
<br />
<%- post.title %>
<br />
<%- post.date %>
<br />
<a href="/<%- post.path %>"><%- post.title %></a>
<% }); %>
<%- body %>
</body>
</html>

可以看到,點擊了這個 Hello World 的超鏈接,跳轉過去,並沒有看到任何信息,是因為在 post.ejs 中沒有引入文章,所以沒有信息,這個時候在 post.ejs 中引入文章
『post.ejs』
這里是 post.ejs

<%- page.content %>

這個時候訪問主頁的 Hello World 之后,就會訪問文章的 url 了,此時也有文章出現了。
如果想要看變量里面都是什么東西,可以使用 js 的 console.log() 來查看,在控制台中查看
『layout.ejs』
<!DOCTYPE html>
<html>
<head>
    <title></title>
    <meta charset="utf-8">
</head>
<body>

    <% console.log(site.posts) %>

</body>
</html>
主題制作
主題布局
說道這里,萬事俱備,就可以正兒八經的開始做事了。我想要一個這樣布局的 wiki

文件結構
新建靜態資源文件,並且放一下測試的 md 文件進 _posts 中,整個 wiki 的目錄如下。主要添加了 theme.wiki.source 中的靜態資源和已經布局用的 ejs
wiki ➔  tree -N
.
├── _config.yml
├── db.json
├── node_modules
├── package-lock.json
├── package.json
├── scaffolds
├── source
│   └── _posts
│       ├── Docker
│       │   ├── 基礎介紹
│       │   │   ├── 01. 鏡像.md
│       │   │   ├── 02. 容器.md
│       │   │   ├── 03. 數據.md
│       │   │   ├── 04. 倉庫.md
│       │   │   ├── 05. 網絡.md
│       │   │   └── 06. Dockerfile.md
│       │   └── 鏡像部署
│       │       ├── CentOS
│       │       │   └── success.png
│       │       ├── CentOS.md
│       │       ├── Git.md
│       │       ├── MongoDB.md
│       │       ├── MySQL.md
│       │       ├── Redis.md
│       │       └── Tomcat.md
│       ├── Hexo
│       │   ├── 安裝
│       │   │   ├── img-20180627184245526.png
│       │   │   ├── img-20180627190554905.png
│       │   │   └── img-20180627190808193.png
│       │   ├── 安裝.md
│       │   ├── 主題開發
│       │   │   ├── img-20180627190808193.png
│       │   │   ├── img-20190611175811781.png
│       │   │   ├── img-20190611180317902.png
│       │   │   ├── img-20190611180729426.png
│       │   │   ├── img-20190611181023821.png
│       │   │   ├── img-20190611210222968.png
│       │   │   ├── img-20190611212914872.png
│       │   │   ├── img-20190611213529727.png
│       │   │   ├── img-20190611214947308.png
│       │   │   └── 布局.png
│       │   └── 主題開發.md
│       └── test-hello-world.md
└── themes
    ├── landscape
    └── wiki
        ├── _config.yml
        ├── layout
        │   ├── aside.ejs   // 用於側邊欄
        │   ├── index.ejs   // 用於主頁
        │   ├── layout.ejs  // 用於布局
        │   ├── nav.ejs     // 用於導航
        │   └── post.ejs    // 用於文章
        └── source
            ├── css
            │   └── main.css
            ├── js
            │   └── main.js
            └── lib
主題配置文件
在 theme._config.yml 配置文件中,添加自己主題的標題,用於 layout.ejs 的引用。
title: IT Abyss Wiki

author: 猴子請來的救兵

menus:
  主頁: /
  關於: /about

links:
  博客園: https://www.cnblogs.com/yyhh/
  github: https://github.com
設計主布局文件
『layout.ejs』
<!DOCTYPE html>
<html>
<head>
    <title><%- theme.title %></title>
    <meta charset="utf-8">

    <!-- 引入配置文件 -->
    <%- css('css/main.css') %>

</head>
<body>

    <div id="main">
        <!-- 引入側邊欄 -->
        <aside id="#aside">
            <%- include('aside.ejs') %>
        </aside>

        <!-- 引入導航 -->
        <nav>
            <%- include('nav.ejs') %>
        </nav>

        <!-- 引入正文 -->
        <div id="content">
      <%- body %>
        </div>

    </div>

    <!-- 引入 js 文件 -->
    <%- js('js/main.js') %>

</body>
</html>
訂制 css 樣式表中的測試樣式,添加幾個測試的顏色,便於觀察布局。
『css/main.css』
/* #################### 全局 #################### */
* {
    margin: 0;
    padding: 0;
    border: 0;
}

html, body {
    height: 100%;
}

aside {
    width: 300px;
    height: 100%;
    position: fixed;
    background: #262a30;
}

nav {
    height: 50px;
    background: #b9e1b1;
}

#content {
    height: 100%;
    padding-left: 300px;
    background: #f9f7ed;
}
/* #################### 全局 #################### */

添加導航欄
將剛剛配置文件里面加的導航給列出來
『nav.ejs』
<ul id="menu">
    <!-- 內部鏈接本頁面直接跳轉 -->
    <% for ( menu in theme.menus ) { %>
    <li class="menu-item">
        <a href="<%- theme.menus[menu] %>" class="menu-item-link"><%- menu %></a>
    </li>
    <% } %>

    <!-- 外部鏈接打開新的窗口跳轉 -->
    <% for ( link in theme.links ) { %>
    <li class="menu-item">
        <a href="<%- theme.links[link] %>" class="menu-item-link" target="_blank"><%- link %></a>
    </li>
    <% } %>

</ul>
添加 css 美化
『main.css』
/* #################### 導航 #################### */
nav #menu {
    float: right;
    padding-right: 20px;
}
nav ul li {
    float: left;
    padding: 10px;
    list-style: none;
}
nav ul li a{
    color: #555;
    font-size: 12px;
    text-decoration: none;
}
nav ul li a:hover {
    border-bottom: 1px solid;
}
/* #################### 導航 #################### */

添加側邊欄
想要一個有樹狀結構的側邊欄,然后給目錄、文件、以及搜索框增加圖標,需要外部的圖片庫 。
我的用的圖片庫是『Font Awesome』。下載好了,放到 source/lib 中。
themes/wiki/
├── _config.yml
├── layout
│   ├── aside.ejs
│   ├── index.ejs
│   ├── layout.ejs
│   ├── nav.ejs
│   └── post.ejs
└── source
    ├── css
    │   └── main.css
    ├── js
    │   └── main.js
    └── lib
        └── font-awesome // 下載好的文字圖片庫
            ├── css
            ├── fonts
            ├── less
            └── scss
在布局文件中,新增字體圖片庫的 css 文件引用
『layout.ejs』
<!DOCTYPE html>
<html>
<head>
    <title><%- theme.title %></title>
    <meta charset="utf-8">

    <!-- 引入配置文件 -->
    <%- css('css/main.css') %>

    <!-- 字體圖片庫 -->
    <%- css('lib/font-awesome/css/font-awesome.min.css') %>

</head>
<body>

    <div id="main">
        <!-- 引入側邊欄 -->
        <aside>
            <%- include('aside.ejs') %>
        </aside>

        <!-- 引入導航 -->
        <nav>
            <%- include('nav.ejs') %>
        </nav>

        <!-- 引入正文 -->
        <div id="content">
            <div id="article">
                <%- body %>
            </div>
        </div>

    </div>

    <!-- 引入 js 文件 -->
    <%- js('js/main.js') %>

</body>
</html>
添加側邊欄代碼,主要做了路徑轉樹的算法,然后顯示樹。新增了一個搜索框。
『aside.ejs』
<!-- 搜索欄 -->
<div id="search">
    <input class="search-input" type="text" placeholder="search">
    <i class="fa fa-search"></i>
</div>

<!-- 側邊目錄欄 -->
<div id="tree">
    <%
        <!-- 將路徑轉換成 tree 目錄結構 -->
        const pathToTree = (input) => {
            var output = [];
            input.forEach(function(post){
                <!-- 用來分割去掉時間的路徑 -->
                var chain = post.slug.split("/");
                var currentNode = output;
                for (var j = 0; j < chain.length; j++) {
                    if (chain[j] === '') {
                        break;
                    }
                    var wantedNode = chain[j];
                    var lastNode = currentNode;

                    for (var k = 0; k < currentNode.length; k++) {
                        if (currentNode[k].title == wantedNode) {
                            currentNode = currentNode[k].children;
                            break;
                        }
                    }

                    if (lastNode == currentNode) {
                        var newNode = currentNode[k] = { post: post, title: wantedNode, children: [] };
                        currentNode = newNode.children;
                    } else {
                        delete currentNode.children
                    }
                }
            });
            return output;
        }

        <!-- console.log(output) -->
    %>

    <%
        <!-- 遞歸輸出側邊欄目錄 tree -->
        const showTree = (input) => {

            <!-- 按 tile ascii 排序 -->
            input.sort(function(a, b){
                var len = a.title.length > b.title.length ? a.title.length : b.title.length;
                for ( var i = 0; i < len; i++ ) {
                    res = a.title[i].charCodeAt() - b.title[i].charCodeAt();
                    if ( res ) { return res }
                }
            });

            <!-- 循環輸出 html 結構 -->
            input.forEach(function(node) {
                if ( node.children == 0 ) {

    %>
                    <ul>
                        <li class="file<%- (is_post() && node.post._id == page._id) ? ' active' : '' %>">
                            <a href="<%- config.root %><%- node.post.path %>">
                                <i class="fa fa-file"></i>
                                <%- node.title %>
                            </a>
                        </li>
                    </ul>
    <%
                }
                else {
    %>
                    <ul>
                        <li class="directory">
                            <a href="#" class="directory">
                                <i class="fa fa-folder"></i>
                                <%- node.title %>
                            </a>
                            <%- showTree(node.children) %>
                        </li>

                    </ul>
    <%
                }
            });
        }

        showTree(pathToTree(site.posts))
    %>
</div>

在 main.css 文件中,增加側邊欄美化
『main.css』
/* #################### 側邊欄 #################### */
/* 搜索框 */
aside input {
    width: 290px;
    height: 50px;
    margin: 0;
    border: 0;
    padding: 0;
    left: 0;
    font-size: 14px;
    background: #131417;
    text-indent: 20px;
    outline: none;
    color: #87daff;
    position: absolute;
}

/* 搜索圖標 */
aside #search i.fa.fa-search {
    position: absolute;
    top: 0;
    right: 0;
    color: #757575;
    font-size: 20px;
    width: 40px;
    height: 50px;
    background: #131417;
    text-align: center;
    line-height: 2.5;
}

/* 滾動條 */
aside {
    overflow-y: scroll;
}

/* 樹目錄位置 */
aside #tree {
    padding-top: 55px
}

/* 樹目錄 */
aside ul {
    padding: 0px 5px 5px 20px;
}
aside ul li {
    list-style: none;
    line-height: 25px;
}
aside ul li a {
    color: #999;
    font-size: 14px;
    text-decoration: none

}
aside ul li a:hover {
    color: #ccc;
    border-bottom: 1px solid #ccc;
    cursor:pointer;
}
aside #tree .active a,
aside #tree .active a:hover {
    color: #87daff;
    border-bottom: 1px solid #87daff;
}

aside #tree i.fa {
    padding-right: 5px;
}

/* #################### 側邊欄 #################### */

添加文章
側邊欄還有搜索功能,和目錄折疊功能沒實現,這個后面再實現,先把鏈接里面的內容給搞定,這個時候需要編輯 post.ejs了
『post.ejs』
<div>
    <span id="post-author">作者: <%- theme.author %></span>
    <span id="post-date"><%- date(page.date, "YYYY-MM-DD HH:mm:ss") %></span>
</div>

<div id="article">
    <%- page.content %>
</div>

圖片插件
可以看到,大致雛形出來了,但是圖片都是 404 找不到。

查看后,發現圖片的路徑不對。因為我用 『Typora』進行 md 的編寫。里面有個設置就是將圖片保存在當前文件名命名的同級目錄下。

因此為了保證 Hexo 的圖片與我設置的一致,需要安裝一個 NodeJs 插件 『hexo-asset-image』獲取文件相對路徑下同名文件夾的圖片。
返回到 hexo init 的 wiki 目錄下進行安裝 【注意: 不是主題的wiki,是根目錄wiki】
npm install https://github.com/CodeFalling/hexo-asset-image --save
安裝好了插件以后,需要在總的配置文件 _config.yml 的第 38 行,將值修改成 true
# 獲取文件相對目錄的圖片
post_asset_folder: true
安裝好了,重新啟動一下 hexo
wiki ➔  hexo s
INFO  Start processing
update link as:-->/2019/06/11/Hexo/主題開發/img-20180627190808193.png
update link as:-->/2019/06/11/Hexo/主題開發/img-20190611175811781.png
update link as:-->/2019/06/11/Hexo/主題開發/img-20190611180317902.png
update link as:-->/2019/06/11/Hexo/主題開發/img-20190611180729426.png
update link as:-->/2019/06/11/Hexo/主題開發/img-20190611181023821.png
update link as:-->/2019/06/11/Hexo/主題開發/img-20190611210222968.png
update link as:-->/2019/06/11/Hexo/主題開發/img-20190611212914872.png
update link as:-->/2019/06/11/Hexo/主題開發/img-20190611213529727.png
update link as:-->/2019/06/11/Hexo/主題開發/img-20190611214947308.png
update link as:-->/2019/06/11/Hexo/主題開發/%E5%B8%83%E5%B1%80.png
update link as:-->/2018/06/27/Hexo/安裝/img-20180627190808193.png
update link as:-->/2018/06/27/Hexo/安裝/img-20180627190808193.png
update link as:-->/2018/01/17/Docker/鏡像部署/CentOS/success.png
update link as:-->/2018/01/17/Docker/鏡像部署/CentOS/success.png
INFO  Hexo is running at http://localhost:4000 . Press Ctrl+C to stop.
看日志,發現他已經在更新我的圖片了,看一眼 Blog 圖片就已經出來了,不再是 404 了。

仔細看文件路徑,在我 『主題開發.md』文件的同級,有個名字叫『主題開發』的文件夾,里面存着我引用的圖片資源,這樣的路徑,才能被這個插件給加載出來。
├── Hexo
│       │   ├── 安裝
│       │   │   ├── img-20180627184245526.png
│       │   │   ├── img-20180627190554905.png
│       │   │   └── img-20180627190808193.png
│       │   ├── 安裝.md
│       │   ├── 主題開發
│       │   │   ├── img-20180627190808193.png
│       │   │   ├── img-20190611175811781.png
│       │   │   ├── img-20190611180317902.png
│       │   │   ├── img-20190611180729426.png
│       │   │   ├── img-20190611181023821.png
│       │   │   ├── img-20190611210222968.png
│       │   │   ├── img-20190611212914872.png
│       │   │   ├── img-20190611213529727.png
│       │   │   ├── img-20190611214947308.png
│       │   │   └── 布局.png
│       │   └── 主題開發.md
代碼高亮
剩下的就是給文章做 css 美化了,當然,美化一定要代碼高亮了。我用的代碼高亮是比較流行的 『highlightjs』下載了其中我非常喜歡的 『atom-one-dark』的主題。如果有自己更喜歡的主題,可以根據自己的喜好進行下載。
跟圖片庫『font-awesome』一樣,也把它放進 source/lib 中
themes/wiki/source/
├── css
│   └── main.css
├── js
│   └── main.js
└── lib
    ├── font-awesome
    └── highlight
在 『laout.ejs』中,引入它的 css 與 js,引入后,記得讓高亮加載
<!DOCTYPE html>
<html>
<head>
    <title><%- theme.title %></title>
    <meta charset="utf-8">

    <!-- 引入配置文件 -->
    <%- css('css/main.css') %>

    <!-- 字體圖片庫 -->
    <%- css('lib/font-awesome/css/font-awesome.min.css') %>

    <!-- 代碼高亮庫 -->
    <%- css('/lib/highlight/styles/atom-one-dark') %>

</head>
<body>

    <div id="main">
        <!-- 引入側邊欄 -->
        <aside>
            <%- include('aside.ejs') %>
        </aside>

        <!-- 引入導航 -->
        <nav>
            <%- include('nav.ejs') %>
        </nav>

        <!-- 引入正文 -->
        <div id="content">
            <%- body %>
        </div>

    </div>

    <!-- 引入 js 文件 -->
    <%- js('js/main.js') %>

    <!-- 引入代碼高亮的 js -->
    <%- js('/lib/highlight/highlight.pack.js') %>
    <script>hljs.initHighlightingOnLoad();</script>

</body>
</html>

發現代碼並沒有高亮,找了下原因,原來是默認主題已經是 『highlight』代碼高亮了,但是它的這些並不夠炫酷,還是選擇堅持用我自己下載的,所以我必須得去總配置文件 _config.yml 里面,把它給關閉,大概在 42 行的位置,將這 3 個選項關閉。
『_config.yml』
highlight:
  enable: false
  line_number: false
  auto_detect: false
  tab_replace:
修改配置文件以后,得重啟 hexo 在重啟前,先 hexo clean 以免還有緩存在。
hexo clean
hexo s

代碼出現高亮了,現在美化文章,增加 css
『main.css』
/* #################### 文章 #################### */
/* 作者 時間 相關 */
#post-author {
    font-size: 9px;
    position: absolute;
    top: 60px;
    right: 30px;
    color: #999;
}

#post-date {
    font-size: 9px;
    position: absolute;
    top: 80px;
    right: 30px;
    color: #999;
}

/* 文章各個元素間隔 */
#article {
    padding: 30px;
}
#article * {
    margin: 30px 0;
}


#article h1,
#article h2,
#article h3,
#article h4,
#article h5,
#article h6 {
    line-height: 40px;
    margin: 20px 0 15px;
}


#article h1 {
    font-size: 32px;
    font-weight: 900;
    padding-bottom: 10px;
    border-bottom: 2px solid #e06c75;
}

#article h2 {
    font-size: 25px;
    border-left: 3px solid #73b1e0;
    padding-left: 10px;
}

#article h3 {
    font-size: 22px
}

#article a {
    color: #e06c75;
    text-decoration: none;
}

#article a:hover {
    border-bottom: 1px solid;
}

#article h1 a:hover{
    border-bottom: none;
}

#article code {
    border-radius: 3px;
    box-shadow: 0px 0px 5px #999;
}

#article img {
    max-width: 100%;
    height: auto;
    border-radius: 5px;
    box-shadow: 0px 0px 8px #999;
}

#article pre {
    font-size: 14px;
    margin: 20px 0 15px;
}

#article p {
    margin: 0 0 10px;
    line-height: 30px
}

/* 表格處理 */
#article table {
  width: 100%;
  border: 0;
  margin: 20px 0 50px 0;
  border-collapse: collapse;
  border-spacing: 0;
  line-height: 35px;
  border-radius: 8px;
  box-shadow: 0px 0px 5px #999;
}

#article table th {
  background: #73b1e0;
  font-weight: 800;
  font-size: 18px;
  text-align: left;
  line-height: 35px;
  color: #FFF;
}

#article table tr:nth-child(odd) {
  background: #F4F4F4;
}

#article table tr:hover,
#article table td:hover {
  background: #badbf5;
  color: #FFF;
}

#article table td, table th {
  padding: 5px 20px 5px 20px
}

#article table tr:first-child th:first-child {
  border-top-left-radius: 3px;
}

#article table tr:first-child th:last-child {
  border-top-right-radius: 3px;
}

#article table tr:last-child td:first-child {
  border-bottom-left-radius: 3px;
}

#article table tr:last-child td:last-child {
  border-bottom-right-radius: 3px;
}

/* #################### 文章 #################### */

目錄點擊事件
到這個時候,就需要編寫 js 了。我使用了 jQuery 庫,本來不准備用第三方插件了,后面發現,早晚都要用,干脆一開始就使用好了。
下載 jQuery 庫,放到 sorce/lib 中
themes/wiki/source/
├── css
│   └── main.css
├── js
│   └── main.js
└── lib
    ├── font-awesome
    ├── highlight
    └── jquery-3.4.1.min.js
在 layout.ejs 中引入 jquery 庫,這里得注意,要先引用 jquery 再引入自己的 js 代碼,否則在編寫的時候,找不到 jqeury 庫。因為 html 在編譯的時候,是從上往下順序執行的,如果不先引入庫文件,在自己的代碼中就找不到庫文件了。
<!DOCTYPE html>
<html>
<head>
    <title><%- theme.title %></title>
    <meta charset="utf-8">

    <!-- 引入配置文件 -->
    <%- css('css/main.css') %>

    <!-- 字體圖片庫 -->
    <%- css('lib/font-awesome/css/font-awesome.min.css') %>

    <!-- 代碼高亮庫 -->
    <%- css('/lib/highlight/styles/atom-one-dark') %>

</head>
<body>

    <div id="main">
        <!-- 引入側邊欄 -->
        <aside>
            <%- include('aside.ejs') %>
        </aside>

        <!-- 引入導航 -->
        <nav>
            <%- include('nav.ejs') %>
        </nav>

        <!-- 引入正文 -->
        <div id="content">
            <%- body %>
        </div>

    </div>

    <!-- 引入代碼高亮的 js -->
    <%- js('/lib/highlight/highlight.pack.js') %>

    <!-- 引入 jquery -->
    <%- js('/lib/jquery-3.4.1.min.js') %>
    <script>hljs.initHighlightingOnLoad();</script>

    <!-- 引入 js 文件 -->
    <%- js('js/main.js') %>

</body>
</html>
接着就是編寫自己的 js 了。代碼大致意識,都寫在注釋里了。
『main.js』
$(document).ready(function () {
    clickTreeDirectory();
});

// 點擊目錄事件
function clickTreeDirectory() {
    // 判斷有 active 的話,就遞歸循環把它的父目錄打開
    var treeActive = $("#tree .active");
    if ( treeActive.length ) {
        showActiveTree(treeActive, true);
    }

    // 點擊目錄,就觸發折疊動畫效果
    $(document).on("click", "#tree a[class='directory']", function (e) {
        // 用來清空所有綁定的其他事件
        event.preventDefault();

        var icon = $(this).children(".fa");
        var iconIsOpen = icon.hasClass("fa-folder-open");
        var subTree = $(this).siblings("ul");

        icon.removeClass("fa-folder-open").removeClass("fa-folder");

        if (iconIsOpen) {
            if (typeof subTree != "undefined") {
                subTree.slideUp({ duration: 100 });
            }
            icon.addClass("fa-folder");
        } else {
            if (typeof subTree != "undefined") {
                subTree.slideDown({ duration: 100 });
            }
            icon.addClass("fa-folder-open");
        }
    });
}

// 循環遞歸展開父節點
function showActiveTree(jqNode, isSiblings) {
    if ( jqNode.attr("id") === "tree"  ) { return; }
    if ( jqNode.is("ul") ) {
        jqNode.css("display", "block");

        // 這個 isSiblings 是給搜索用的
        // true 就顯示開同級兄弟節點
        // false 就是給搜索用的,值需要展示它自己就好了,不展示兄弟節點
        if ( isSiblings ) {
            jqNode.siblings().css("display", "block");
            jqNode.siblings("a").css("display", "inline");
            jqNode.siblings("a").find(".fa-folder").removeClass("fa-folder").addClass("fa-folder-open");
        }
    }
    jqNode.each(function(){ showActiveTree($(this).parent(), isSiblings); });
}

搜索
這個搜索框一開始就設計好了,但是沒有什么功能。要是做全文本搜索的話,就需要安裝插件了。這里只是簡單的在側邊欄的文章目錄上進行搜索。在 js 代碼中增加以下。
『main.js』
// 搜索框輸入事件
function serachTree() {
    // 解決搜索大小寫問題
    jQuery.expr[':'].contains = function (a, i, m) {
        return jQuery(a).text().toUpperCase().indexOf(m[3].toUpperCase()) >= 0;
    };

    $("#search input").on("input", function(e){
        e.preventDefault();

        // 獲取 inpiut 輸入框的內容
        var inputContent = e.currentTarget.value;

        // 沒值就收起父目錄,但是得把 active 的父目錄都展開
        if ( inputContent.length === 0 ) {
            $(".fa-folder-open").removeClass("fa-folder-open").addClass("fa-folder");
            $("#tree ul").css("display", "none");
            if ( $("#tree .active").length ) {
                showActiveTree($("#tree .active"), true);
            }
            else {
                $("#tree").children().css("display", "block");
            }
        }
        // 有值就搜索,並且展開父目錄
        else {
            $(".fa-folder").removeClass("fa-folder").addClass("fa-folder-open");
            $("#tree ul").css("display", "none");
            var searchResult = $("#tree li").find("a:contains('" + inputContent + "')");
            if ( searchResult.length ) {
                showActiveTree(searchResult.parent(), false)
            }
        }
    });
}

局部刷新
發現搜索出來東西以后,點擊搜索的連接,頁面會閃一下,然后我的樹狀結構目錄就變了,作為測試的我,這種 bug 不能忍呀。琢磨了很久,想到可以使用 ajax 做局部刷新。就是刷新下圖中的局部區域。

網上搜索以后,發現已經有現成的東西了它叫做 『 pjax 』,下載后放進 source/lib 中,在布局中引用,在 js 里新增邏輯。
themes/wiki/source/
├── css
│   └── main.css
├── js
│   └── main.js
└── lib
    ├── font-awesome
    ├── highlight
    ├── jquery-3.4.1.min.js
    └── jquery.pjax.js
『layout.ejs』
<!DOCTYPE html>
<html>
<head>
    <title><%- theme.title %></title>
    <meta charset="utf-8">

    <!-- 引入配置文件 -->
    <%- css('css/main.css') %>

    <!-- 字體圖片庫 -->
    <%- css('lib/font-awesome/css/font-awesome.min.css') %>

    <!-- 代碼高亮庫 -->
    <%- css('/lib/highlight/styles/atom-one-dark') %>

</head>
<body>

    <div id="main">
        <!-- 引入側邊欄 -->
        <aside>
            <%- include('aside.ejs') %>
        </aside>

        <!-- 引入導航 -->
        <nav>
            <%- include('nav.ejs') %>
        </nav>

        <!-- 引入正文 -->
        <div id="content">
            <%- body %>
        </div>

    </div>

    <!-- 引入代碼高亮的 js -->
    <%- js('/lib/highlight/highlight.pack.js') %>

    <!-- 引入 jquery -->
    <%- js('/lib/jquery-3.4.1.min.js') %>

    <!-- 引入 pjax -->
    <%- js('/lib/jquery.pjax.js') %>

    <!-- 引入 js 文件 -->
    <%- js('js/main.js') %>

</body>
</html>
『main.js』
$(document).ready(function () {
    clickTreeDirectory();
    serachTree();
    pjaxLoad();
});

function pjaxLoad(){
    $(document).pjax('#tree a', '#content', {fragment:'#content', timeout:8000});
    $(document).pjax('#menu a', '#content', {fragment:'#content', timeout:8000});
    $(document).on({
        "pjax:complete": function(e) {
            $("pre code").each(function (i, block){
                hljs.highlightBlock(block);
            });

            // 添加 active
            $("#tree .active").removeClass("active");
            e.relatedTarget.parentNode.classList.add("active");
        }
    });
}
文章索引目錄
文章的索引目錄,可以根據文章的 h1 h2 h3 標簽,把他們給弄出來,然后分級自動生成目錄。
首先在 aside.ejs 做一個存放目錄的 div,先試試目錄好不好用。
『aside.ejs』
...
<!-- 最尾部添加,這里就不列以前的代碼了 -->
<div id="toc"></div>
我想在我點擊目錄鏈接的時候,文章滑動至我想看的位置,並且在文章滑動過的位置,導航都標記已讀的狀態。加入 js 代碼。先丟進 aside 的 toc 中測試一下。
『main.js』
$(document).ready(function () {
    hljs.initHighlightingOnLoad();
    clickTreeDirectory();
    serachTree();
    pjaxLoad();
    showArticleIndex();
});

function showArticleIndex() {
    // 先刷一遍文章有哪些節點,把 h1 h2 h3 加入列表,等下循環進行處理。
    // 如果不夠,可以加上 h4 ,只是我個人覺得,前 3 個就夠了,出現第 4 層就目錄就太長了,太細節了。
    var h1List = h2List = h3List = [];
    var labelList = $("#article").children();
    for ( var i=0; i<labelList.length; i++ ) {
        if ( $(labelList[i]).is("h1") ) {
            h2List = new Array();
            h1List.push({node: $(labelList[i]), id: i, children: h2List});
        }

        if ( $(labelList[i]).is("h2") ) {
            h3List = new Array();
            h2List.push({node: $(labelList[i]), id: i, children: h3List});
        }

        if ( $(labelList[i]).is("h3") ) {
            h3List.push({node: $(labelList[i]), id: i, children: []});
        }
    }

    // 閉包遞歸,返回樹狀 html 格式的文章目錄索引
    function show(tocList) {
        var content = "<ul>";
        tocList.forEach(function (toc) {
            toc.node.before('<span class="anchor" id="_label'+toc.id+'"></span>');
            if ( toc.children == 0 ) {
                content += '<li><a href="#_label'+toc.id+'">'+toc.node.text()+'</a></li>';
            }
            else {
                content += '<li><a href="#_label'+toc.id+'">'+toc.node.text()+'</a>'+show(toc.children)+'</li>';
            }
        });
        content += "</ul>"
        return content;
    }

  // 最后組合成 div 方便 css 設計樣式,添加到指定位置
    $("aside #toc").empty();
    $("aside #toc").append(show(h1List));

    // 點擊目錄索引鏈接,動畫跳轉過去,不是默認閃現過去
    $("#toc a").on("click", function(e){
        e.preventDefault();
        // 獲取當前點擊的 a 標簽,並前觸發滾動動畫往對應的位置
        var target = $(this.hash);
        $("body, html").animate(
            {'scrollTop': target.offset().top},
            500
        );
    });

    // 監聽瀏覽器滾動條,當瀏覽過的標簽,給他上色。
    $(window).on("scroll", function(e){
        var anchorList = $(".anchor");
        anchorList.each(function(){
            var tocLink = $('#toc a[href="#'+$(this).attr("id")+'"]');
            var anchorTop = $(this).offset().top;
            var windowTop = $(window).scrollTop();
            if ( anchorTop <= windowTop+50 ) {
                tocLink.addClass("read");
            }
            else {
                tocLink.removeClass("read");
            }
        });
    });
}
新增 css 樣式,用來支撐滾動已讀狀態的。
『main.css』
/* #################### 文章索引 #################### */

aside #toc a.read{
    /*color: #e06c75;*/
    color: #87daff;
    border-bottom: 0;
    -webkit-transition: 0.5s;
    -moz-transition: 0.5s;
    -ms-transition: 0.5s;
    -o-transition: 0.5s;
}

aside #toc a{
    color: #999;
    border-bottom: 0;
    -webkit-transition: 0.2s;
    -moz-transition: 0.2s;
    -ms-transition: 0.2s;
    -o-transition: 0.2s;
}

aside #toc a:hover{
    /*color: #87daff;*/
    color: #e5c07b;
    padding-left: 20px;
    -webkit-transition: 0.1s;
    -moz-transition: 0.1s;
    -ms-transition: 0.1s;
    -o-transition: 0.1s;
}

/* #################### 文章索引 #################### */

本來想着 wiki 這種不需要文章目錄索引的。但是萬一文章真的很長呢?好歹得有個目錄吧,還是有個目錄方便點。初期布局的時候,就沒有想過目錄要放哪,這下尷尬了。放在這個位置吧,還是有點丑,想點辦法把這個目錄優化一下,想着左上方的搜索圖標沒啥用,換成按鈕好了,當點擊時,分別切換文章索引目錄,與樹目錄。
修改 aside.ejs ,把這個搜索圖標,加個 id
『aside.ejs』
<!-- 搜索欄 -->
<div id="search">
    <input class="search-input" type="text" placeholder="search">
    <i class="fa fa-search"></i>
</div>
修改如下
『aside.ejs』
<!-- 搜索欄 -->
<div id="search">
    <input class="search-input" type="text" placeholder="search">
    <i id="search-icon" class="fa fa-bars" title="切換目錄與索引">
</div>
然后給它實現 js 事件。
『main.js』
$(document).ready(function () {
    hljs.initHighlightingOnLoad();
    clickTreeDirectory();
    serachTree();
    pjaxLoad();
    showArticleIndex();
    switchTreeOrIndex();
});

// 點擊搜索旁的按鈕,切換目錄與索引
function switchTreeOrIndex(){
    $("#search-icon").on("click", function(e){
        $("#tree").animate({height:'toggle'},0);
        $("#toc").animate({height:'toggle'},0);
    });
}
修改 css 給圖標加上一個選中狀態,大概 70 行的位置,以前是對 i 標簽進行設置的,現在換成 id ,並且對它的 hover 選中狀態進行變色。
『main.css』
/* 搜索圖標 */
aside #search #search-icon {
    position: absolute;
    top: 0;
    right: 0;
    color: #999;
    font-size: 20px;
    width: 40px;
    height: 50px;
    background: #131417;
    text-align: center;
    line-height: 2.5;
    text-decoration: none
}
aside #search #search-icon:hover {
    cursor: pointer;
    color: #87daff;
    -webkit-user-select: none;
  -moz-user-select: none;
  -ms-user-select: none;
  -o-user-select: none;
}

好了,現在點擊這個圖標,就會切換目錄或者索引了。就是圖標選的不太好,可以選中把圖標換掉。如果想要更多的圖標,可以去『Font Awesome』找喜歡的。
『aside.ejs』
<!-- 搜索欄 -->
<div id="search">
    <input class="search-input" type="text" placeholder="search">
    <i id="search-icon" class="fa fa-bars" title="切換目錄與索引">
</div>

主頁
其實主頁可以直接引用最喜歡的 md 文件,就是主頁了。后面的關於是直接引用的,為了本文每塊都不一樣,我這里把 wiki 文章列一下,形成一個全局文章瀏覽好了。如果你的文章特別的多,這種方式很影響網絡帶寬的,如果網絡不是足夠的大,很容易造成卡頓。
『index.ejs』
<div id="articleList">
    <ul>
        <% site.posts.forEach(function(post){ %>

            <li class="article-li">
                <span class="article-date"><%- date(post.date, "YYYY-MM-DD") %></span>
                <a class="article-read" href="<%- config.root %><%- post.path %>"> 閱讀全文 </span>
                <a class="article-title" href="<%- config.root %><%- post.path %>"><%- post.slug.split("/")[post.slug.split("/").length-1] %></a>
                <div class="article-digest">
                    <%- post.more.replace(/<\/?.+?\/?>/g, "").substring(0, 100) %>
                    ...
                </div>
            </li>

        <% }); %>
    </ul>
</div>
美化樣式
『css.main』
/* #################### 主頁 #################### */

#articleList {
    position: absolute;
}

#articleList .article-li {
    margin: 20px;
    height: 200px;
    border-radius: 5px;
    box-shadow: 1px 1px 8px #999;
    list-style: none;
    border: 1px solid #999;
}

#articleList .article-digest * {
    word-wrap: break-word;
    display: inline;
    font-size: 12px;
    color: #555;
    text-decoration: none;
    cursor:auto;
    border-radius: none;
    box-shadow: none;
}

#articleList .article-digest{
    padding: 30px;
    position: relative;
    top: 35px;
    width: 85%;
}

#articleList .article-date{
    position: relative;
    background: #e06c75;
    color: #f9f7ed;
    padding: 10px;
    top: -5px;
    border-radius: 2px;
    margin-left: 30px;
}

#articleList .article-read {
    position: absolute;
    background: #e06c75;
    color: #f9f7ed;
    padding: 10px;
    border-radius: 2px;
    right: 15px;
    margin-top: 140px;
    text-decoration: none;
    z-index: 1;
}

#articleList .article-title {
    position: relative;
    color: #555;
    text-decoration: none;
    font-size: 24px;
    font-weight: bold;
    top: 50px;
    right: 110px;
}

/* #################### 主頁 #################### */
添加 pjax,在 pjaxLoad 中,增加一個主頁的。
『main.js』
function pjaxLoad(){
    $(document).pjax('#tree a', '#content', {fragment:'#content', timeout:8000});
    $(document).pjax('#menu a', '#content', {fragment:'#content', timeout:8000});
    $(document).pjax('#articleList a', '#content', {fragment:'#content', timeout:8000});
    $(document).on({
        "pjax:complete": function(e) {
            $("pre code").each(function (i, block){
                hljs.highlightBlock(block);
            });

            // 添加 active
            $("#tree .active").removeClass("active");
            e.relatedTarget.parentNode.classList.add("active");

            showArticleIndex();
        }
    });
}

主頁設計就這樣了,其實主頁可以很花哨、炫酷的。可以把自己最自豪的作品展示在這里。ejs 是支持 html 編碼的,所以完全可以在 ejs 中寫入自己的項目。
關於
關於就是個人相關的信息,直接引入 md 就好了。在 Hexo 存放 md 的 _post 同級目錄,新建 about 目錄,同時在這個目錄下,新建一個 index.md,在里面隨便寫幾句話測試好了。
wiki ➔  tree -L 3
├── _config.yml
├── db.json
├── package-lock.json
├── package.json
├── scaffolds
├── source
│   ├── _posts
│   │   ├── Docker
│   │   ├── Hexo
│   │   └── test-hello-world.md
│   ├── about
│   │   └── index.md
└── themes
動漫妹紙掛件
在 layout.ejs 下,追加以下代碼,就有掛件。這個掛件很消耗 cpu 性能,謹慎使用。
『layout.ejs』
<script src="https://blog-static.cnblogs.com/files/yyhh/L2Dwidget.min.js"></script>

<script type="text/javascript">
L2Dwidget.init();
</script>
掛件出來了之后,看 html 源碼中,出現了一個新的 canvas 強制修改它的位置和邊框。
『main.css』
canvas#live2dcanvas {
    border: 0 !important;
    left: 0;
}

手機端自適應
在 css 中設置,當瀏覽器窗口小於 800px 時並且處於手機豎屏狀態,隱藏側邊欄,留給手機端足夠的空間進行文字瀏覽
/* #################### 自適應 #################### */

@media screen and (max-width: 800px) {
	aside {
		display: none;
	}

	#content {
		padding-left: 0;
	}

	canvas#live2dcanvas {
		display: none;
	}
}

/*豎屏*/
@media all and (orientation : portrait) {

	aside {
		display: none;
	}

	#content {
		padding-left: 0;
	}

	canvas#live2dcanvas {
		display: none;
	}

}

/* #################### 自適應 #################### */

手機端查看一眼。
『豎屏』

『橫屏』

部署
Nginx
寫好的文章是可以部署自己的雲服務器上的,如果沒有自己的也可以部署到 github 的 gitpage 上的。這邊先介紹怎么部署到 Nginx 上。
我這有一台 Linux 服務器
| 服務器 | ip |
|---|---|
| CentOS | 192.168.0.100 |
先安裝好 Nginx
Nginx安裝環境
yum install gcc -y
yum install pcre pcre-devel -y
yum install zlib zlib-devel -y
下載
wget http://nginx.org/download/nginx-1.16.0.tar.gz
tar zxvf nginx-1.16.0.tar.gz
cd nginx-1.16.0
編譯
./configure --prefix=/usr/local/nginx
安裝
make && make install
啟動 nginx
cd /usr/local/nginx/sbin/
./nginx
訪問 nginx 看是否已經可以正常瀏覽

關於這方面的部署,可以參照官方文檔 SFTP 部署
首先得在 hexo 目錄下安裝 sftp 插件
npm install hexo-deployer-sftp --save
然后在 _config.yml 中配置 deploy
『_config.yml』
deploy:
  type: "sftp"
  host: "192.168.0.100"
  user: "root"
  pass: "123456"
  remotePath: "/usr/local/nginx/html"
  port: 22
先生成文件
hexo g

INFO  Start processing
INFO  Files loaded in 459 ms
INFO  Generated: index.html
INFO  Generated: archives/index.html
INFO  Generated: about/index.html
INFO  Generated: archives/2018/01/index.html
INFO  Generated: archives/2019/06/index.html
...
再進行部署
hexo d

INFO  Deploying: sftp
* Deploying to host localhost
* local dir  = /Users/Yuki/Documents/wiki/public
* remote dir = /usr/local/nginx/html
...
好了,訪問看看。

github page
部署到 github 下的 github page 里,這個是免費的,不需要有自己的雲服務,唯一的缺點,就是國外的網速有點慢,還好 github 沒有被牆。
首先新建一個倉庫

新建一個開頭以你的賬戶命名的 yourname.github.io 的倉庫

復制你的 git 地址。

往下翻,修改它的 gitpage 位置,可以看到它的提示已經變了,並且給你了 gitpage 的地址。

同樣跟剛才部署 nginx 一樣,可以參照官文檔 Git 部署
先添加 git 插件
npm install hexo-deployer-git --save
然后在 _config.yml 中配置 deploy,這個就是你剛才復制的倉庫地址。
『_config.yml』
deploy:
  type: "git"
  repo: "https://github.com/ITAbyss/itabyss.github.io.git"
  branch: "master"
先生成文件
hexo g

INFO  Start processing
INFO  Files loaded in 459 ms
INFO  Generated: index.html
INFO  Generated: archives/index.html
INFO  Generated: about/index.html
INFO  Generated: archives/2018/01/index.html
INFO  Generated: archives/2019/06/index.html
...
再進行部署
hexo d

NFO  Deploying: git
INFO  Setting up Git deployment...
Initialized empty Git repository in /Users/Yuki/Documents/wiki/.deploy_git/.git/
[master (root-commit) 17350e4] First commit
 1 file changed, 0 insertions(+), 0 deletions(-)
 create mode 100644 placeholder
INFO  Clearing .deploy_git folder...
INFO  Copying files from public folder...
INFO  Copying files from extend dirs...
[master 9251e9f] Site updated: 2019-06-19 19:19:57
 179 files changed, 28176 insertions(+)

...
記得去掉布局測試顏色
