JavaFx項目
新建完項目,我們的項目有三個文件

- Main.java 程序入口類,載入界面並顯示
- Controller.java 事件處理,與fxml綁定
- Sample.fxml 界面
sample.fxml需要通過標簽fx:controller定義對應的controller
<!-- 最外層的那個布局使用fx:controller屬性即可 -->
<FlowPane fx:controller="sample.Controller" ..>
</FlowPane>
專業術語
舞台(Stage),場景(Scene),容器(Container),布局(Layout )和控件(Controls)之間的關系

常用容器(布局)Container
可以把容器和布局統一成一個概念
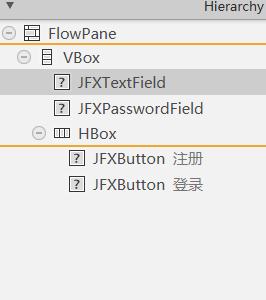
Vbox
相當於垂直方向LinearLayoutHbox
相當於垂直方向的LinearLayoutFlowPanel
相當於LinearLayout,方向可以定義水平或者垂直,設置水平方向,第一行排滿之后,會自動換行排列,設置垂直方向,第一列排滿之后,會自動換下一列BorderPane
上中下左右五個部分AnchorPane
相當於Android里面的約束布局,比如讓某個控件離右邊100px,離下邊100pxScrollPane滑動的布局GridPane通常用於這樣的布局:第一列上的只讀標簽的輸入表單和第二列上的輸入字段,也就是常用的用戶名后面加一個輸入框
常用控件(Control)
默認的為原生的,JFX前綴則是Jfoenix里面的
文本
labelJFXPasswordField密碼框JFXTextField單行輸入框JFXTextArea多行輸入框
按鈕
JFXButton
選擇框
JFXCheckboxJFXRadioButtonMenuButton下拉選擇
圖片
ImageView
進度條
JFXProcessbarJFXSlider水平調節,類似按下音量鍵出現橫線JFXSpinner圓圈進度條
開關
JFXToggleButton
列表
JFXListView
菜單
-
MenuBar自帶有鼠標滑過變色,就像SceneBuilder的菜單欄 -
Menu -
MenuItem -
RadioMenuItem點擊之后前面會有√,一列菜單可以有多個,但是只能選擇一個RadioMenuItem,RadioMenuItem之間是互斥的,需要使用toggleGroup分為同一組 -
CheckMenuItem多選,一列菜單有多個,也可以選多個ToggleGroup toggleGroup = new ToggleGroup(); RadioMenuItem radioItem1 = new RadioMenuItem("Option 1"); radioItem.setOnAction(new EventHandler<ActionEvent>() { @Override public void handle(ActionEvent e) { System.out.println("radio toggled"); } }); radioItem1.setToggleGroup(toggleGroup); RadioMenuItem radioItem2 = new RadioMenuItem("Option 2"); radioItem.setOnAction(new EventHandler<ActionEvent>() { @Override public void handle(ActionEvent e) { System.out.println("radio toggled"); } }); radioItem2.setToggleGroup(toggleGroup);
- `SeparatorMenuItem` 分割線
**前面需要在添加到MenuBar里面才能使用 **
- `SpiltMenuButton` 左邊是某個按鈕,右邊是一個下拉箭頭,點擊左邊,就會實現按鈕操作,點擊右邊,在出現的列表中選擇某一項,就可以改變左邊按鈕
### 使用SceneBuilder生成fxml布局
由於現有的工具不多,只有個界面化的工具,所以就不過多去研究fxml代碼部分了。
我們還是弄個用戶登錄界面上手吧,使用SceneBuilder弄成以下布局
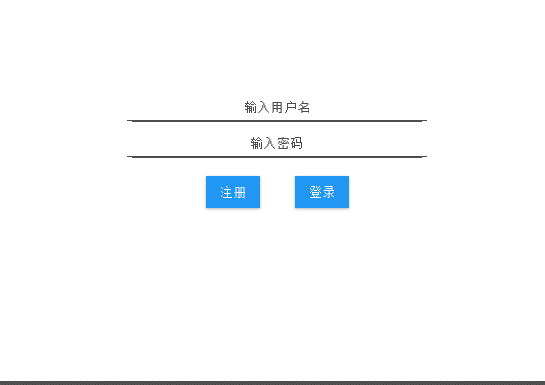
這是我做的界面大體框架,當然,也可以不一樣,實現的方法有很多種
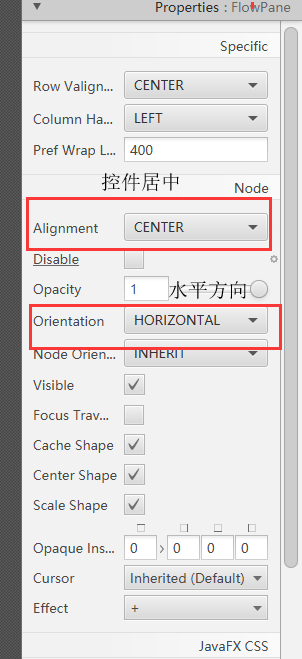
主界面里的控件居中顯示,相當於Android的布局的gravity屬性,設置子布局或者控件的顯示
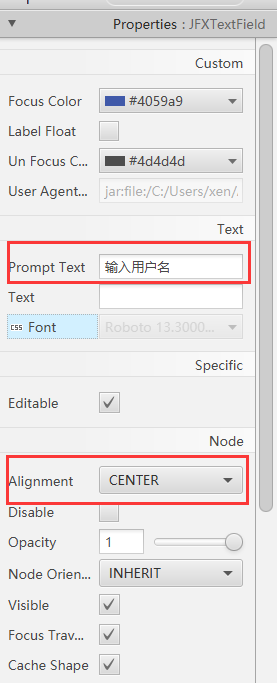
輸入框設置提示文字,居中顯示
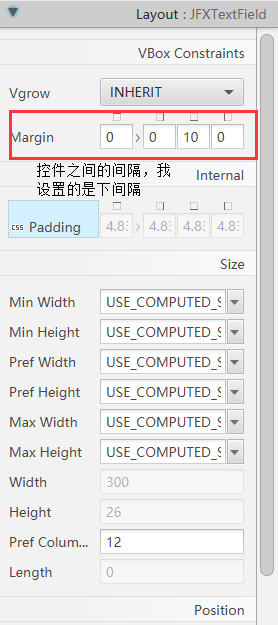
輸入框間距
下面的兩個Button間距設置同上,設置左邊那個注冊按鈕的右邊距即可
### 獲取控件實例和控件事件處理
這里,我們給我們需要的控件設置id即可通過id來找到該實例,從而調用實例對象的set方法設置內容或者是get方法獲取內容
事件處理的話,我們只需要定義一個方法名,之后再去Controller.java文件實現相關的邏輯

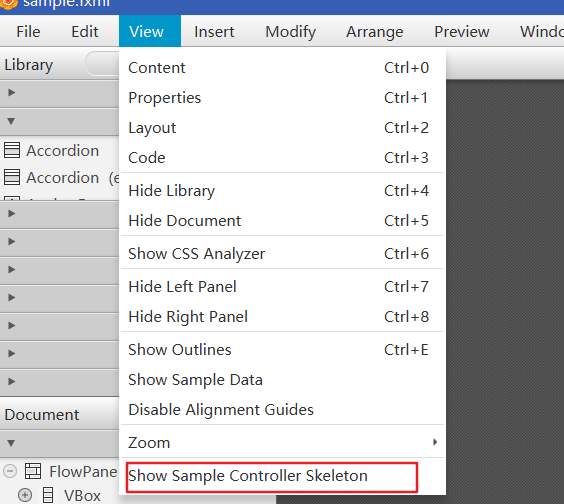
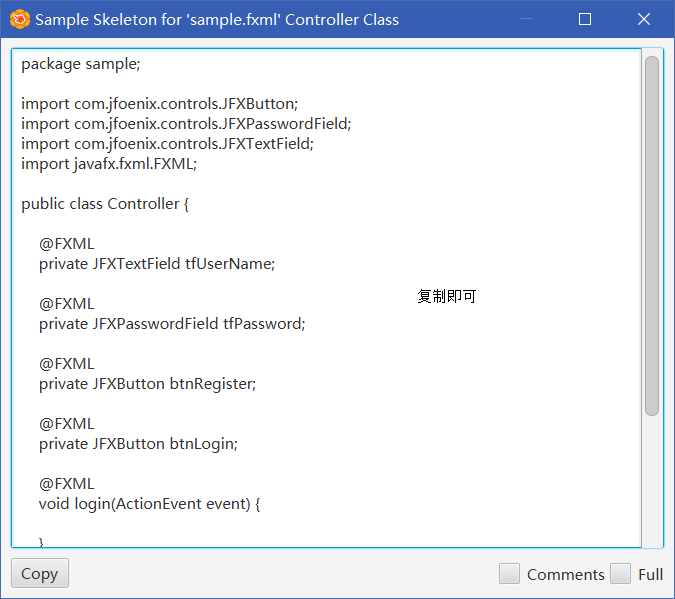
之前我們使用了屬性`fx:controller`已經讓sample.fxml和controller進行綁定了,我們可以直接讓SceneBuilder生成controller的代碼
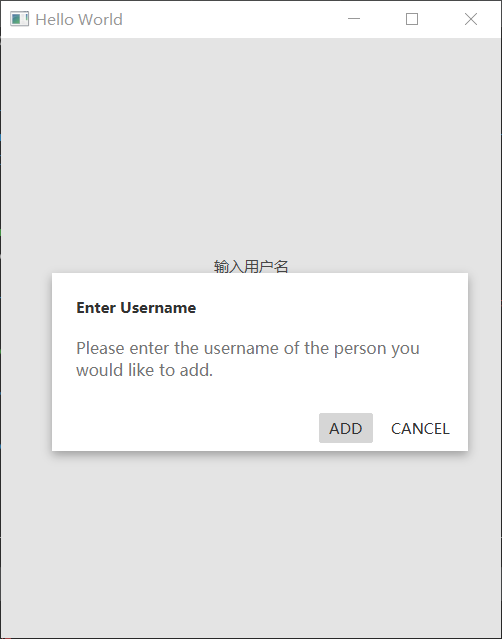
點擊登錄,提示一個對話框
[封裝JFXDialog代碼,一行代碼即可使用](https://www.cnblogs.com/kexing/p/10989323.html)
//這里,Jfoenix開發團隊沒有考慮到對話框的創建是要點擊之后生成的,demo直接是在Main.java文件里面寫的
//我是在issue那里找到了一位外國開發者,直接在controller里面創建對話框顯示
//我稍微折騰一下,准備弄個想Android那樣,對話框可以由一行代碼生成,這里就暫時使用外國開發者代碼湊合湊合
//使用的話,如果Stage的寬度不長,對話框顯示會不完全,得在Main.java中設置一下
final JFXAlert
alert.initModality(Modality.APPLICATION_MODAL);
alert.setOverlayClose(false);
// Create the content of the JFXAlert with JFXDialogLayout
JFXDialogLayout layout = new JFXDialogLayout();
layout.setHeading(new Label("Enter Username"));
layout.setBody(new VBox(new Label("Please enter the username of the person you would like to add.")));
// Buttons get added into the actions section of the layout.
JFXButton addButton = new JFXButton("ADD");
addButton.setButtonType(JFXButton.ButtonType.FLAT);
addButton.setOnAction(new EventHandler
public void handle(ActionEvent addEvent) {
// When the button is clicked, we set the result accordingly
alert.setResult("hello");
alert.hideWithAnimation();
}
});
JFXButton cancelButton = new JFXButton("CANCEL");
cancelButton.setCancelButton(true);
cancelButton.setOnAction(new EventHandler
public void handle(ActionEvent closeEvent) {
alert.hideWithAnimation();
}
});
layout.setActions(addButton, cancelButton);
alert.setContent(layout);
alert.showAndWait();
### 測試