通過完成一個 todo 應用展示 Node.js + MySQL 增刪改查的功能。這里后台使用 Koa 及其相應的一些中間件作為 server 提供服務。
初始化項目
$ mkdir node-crud && cd $_
$ yarn init -y && npx gitignore node
上面的命令創建了一個空文件夾 node-crud,進入之后初始化一個 package.json 以及創建 .gitignore 文件。
安裝 Koa 並創建 app.js 以啟動一個簡單的 server:
$ yarn add koa
$ touch app.js
app.js
const Koa = require("koa");
const app = new Koa();
app.use(async ctx => {

ctx.body = "hello world!";

});
app.listen(3000);

console.log("server started at http://localhost:3000");
使用 node 啟動服務后即可通過訪問 http://localhost:3000 查看到頁面。
$ node app.js
server started at http://localhost:3000
將啟動服務的命令添加到 package.json 的 scripts 后,可通過 yarn 方便地調用。
package.json
"scripts": {
    "start": "node app.js"
  },
然后就可以這樣來啟動服務:
$ yarn start
server started at http://localhost:3000
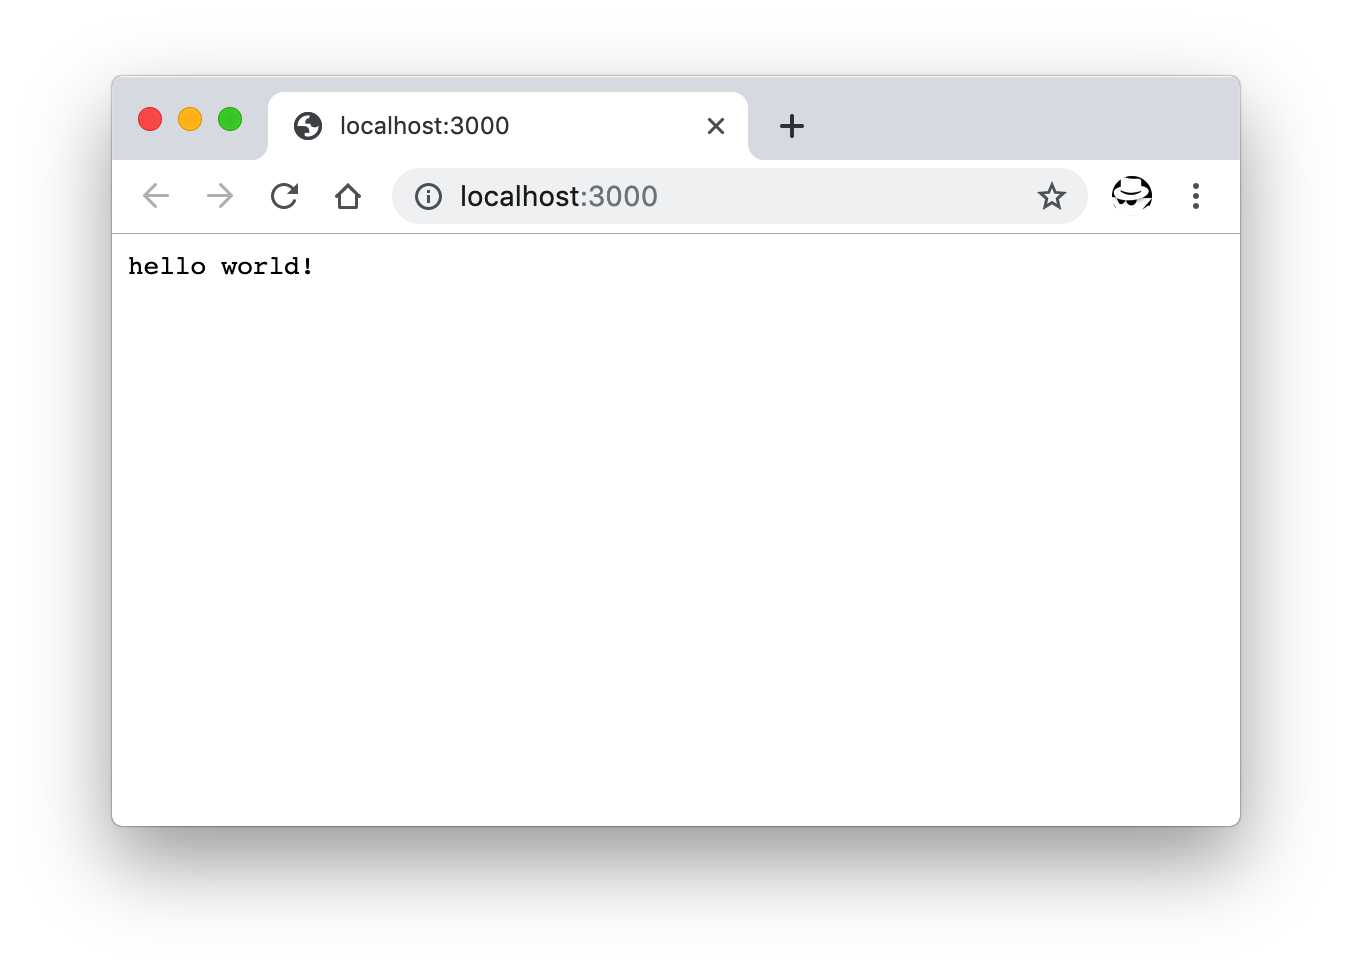
hello world 頁面
添加視圖
現在頁面還只能呈現簡單的文本,通過讓請求返回 HTML 文件,可渲染更加復雜的頁面。比如:
app.use(async ctx => {
  ctx.body = "<h1>hello world!</h1>";
});
但手動拼接 HTML 不是很方便,可通添加相應 Koa 中間件使得請求可從預先寫好的模板文件返回 HTML 到頁面。
安裝 koa-views 並使用它來返回視圖(view)。koa-views 需要配合另外的模板引擎來展示數據,這里使用 nunjucks。
$ yarn add koa-views nunjucks
在代碼中使用上面兩個 npm 模塊來返回頁面:
// 配置模板路徑及所使用的模板引擎
app.use(
  views(__dirname + "/views", {
    map: {
      html: "nunjucks"
    }
  })
);
app.use(async ctx => {

await ctx.render("form", {

todo: {}

});

});
然后創建 views 目錄並在其中放置視圖文件,比如創建一個 form.html 並在其中編輯一個 HTML 表單,后續使用它來提交數據。
views/form.html
<!DOCTYPE html>
<html lang="en">
  <head>
    <meta charset="UTF-8" />
    <meta name="viewport" content="width=device-width, initial-scale=1.0" />
    <meta http-equiv="X-UA-Compatible" content="ie=edge" />
    <title>todo crud - add todo</title>
  </head>
  <body>
    <form action="/edit" method="POST">
      <fieldset>
        <legend>add todo</legend>
        <input type="text" hidden name="id" value="{{ todo.id }}" />
        <div class="form-row">
          <label for="content">
            todo content: <input name="content" type="text" placeholder="todo content..." id="content" value="{{ todo.content }}"
            />
          </label>
        </div>
        <div class="form-row">
          <label for="is_done">
            is complete:
            <input
              name="is_done"
              type="checkbox"
              id="is_done"
              value="1"
              {%if not todo.is_done=='0'%}checked{%endif%}
            />
          </label>
        </div>
        <button type="submit">submit</button>
      </fieldset>
    </form>
  </body>
</html>
其中 {%...%} 為 nunjucks 的模板語法,更多可查看其文檔。
再次啟動服務器后,可看到如下的頁面,包含一個表單以創建一個 todo。同時如果我們在渲染這個頁面時,提供了 todo 數據,相應的數據會自動填充到表單中,此時該表單可用來編輯一個 todo。

表單頁面
添加路由
除了這個表單頁,應用中還會有一個展示所有 todo 的列表頁。需要添加路由來分別展示這兩個頁面。同樣是通過相應的 Koa 中間件來實現。這里不需要太復雜的功能,所以使用 koa-route 就能滿足需求。
安裝 koa-route :
$ yarn add koa-route
在 views 目錄下再創建一個 HTML 文件並寫入列表頁的代碼:
views/list.html
<!DOCTYPE html>
<html lang="en">
  <head>
    <meta charset="UTF-8" />
    <meta name="viewport" content="width=device-width, initial-scale=1.0" />
    <meta http-equiv="X-UA-Compatible" content="ie=edge" />
    <title>todo crud - todo list</title>
    <style>
      li{
        padding: 5px 0;
      }
    </style>
  </head>
  <body>
    <a href="/add">add</a>
    <ul>
      {% for item in list%}
      <li>
        <div class="todo-item">
          <div class="content">#{{ loop.index }}[{%if item.is_done==0%}⏳{%else%}✅{%endif%}] {{ item.content }}</div>
        </div>
      </li>
      {% else %}
      <li>nothing yet. <a href="/add">add</a> some.</li>
      {%endfor%}
    </ul>
    <a href="/add">add</a>
  </body>
</html>
列表頁中,通過 nunjucks 的 {% for item in list%} 語句遍歷數據生成列表,需要展示的列表數據會在頁面渲染時通過前面添加的 koa-view 來傳遞。
然后更新 app.js,添加路由邏輯以展示列表頁和表單頁。
const _ = require('koa-route');
app.use(

views(__dirname + "/views", {

map: {

html: "nunjucks"

}

})

);
app.use(

_.get("/", async function(ctx) {

const todos = await db.getAll();

await ctx.render("list", {

list: todos

});

})

);
app.use(

_.get("/add", async function(ctx) {

await ctx.render("form", { todo: {} });

})

);
因為 Koa 中間件是有順序的。其中 views 的配置需要在路由之前,即 _.get 部分,這樣后續中間件在路由分發時才能正確地設置上視圖。
重新啟動服務器,訪問 http://localhost:3000 便能看到列表頁。點擊頁面中 add 鏈接跳轉到表單頁以添加或編輯 todo。
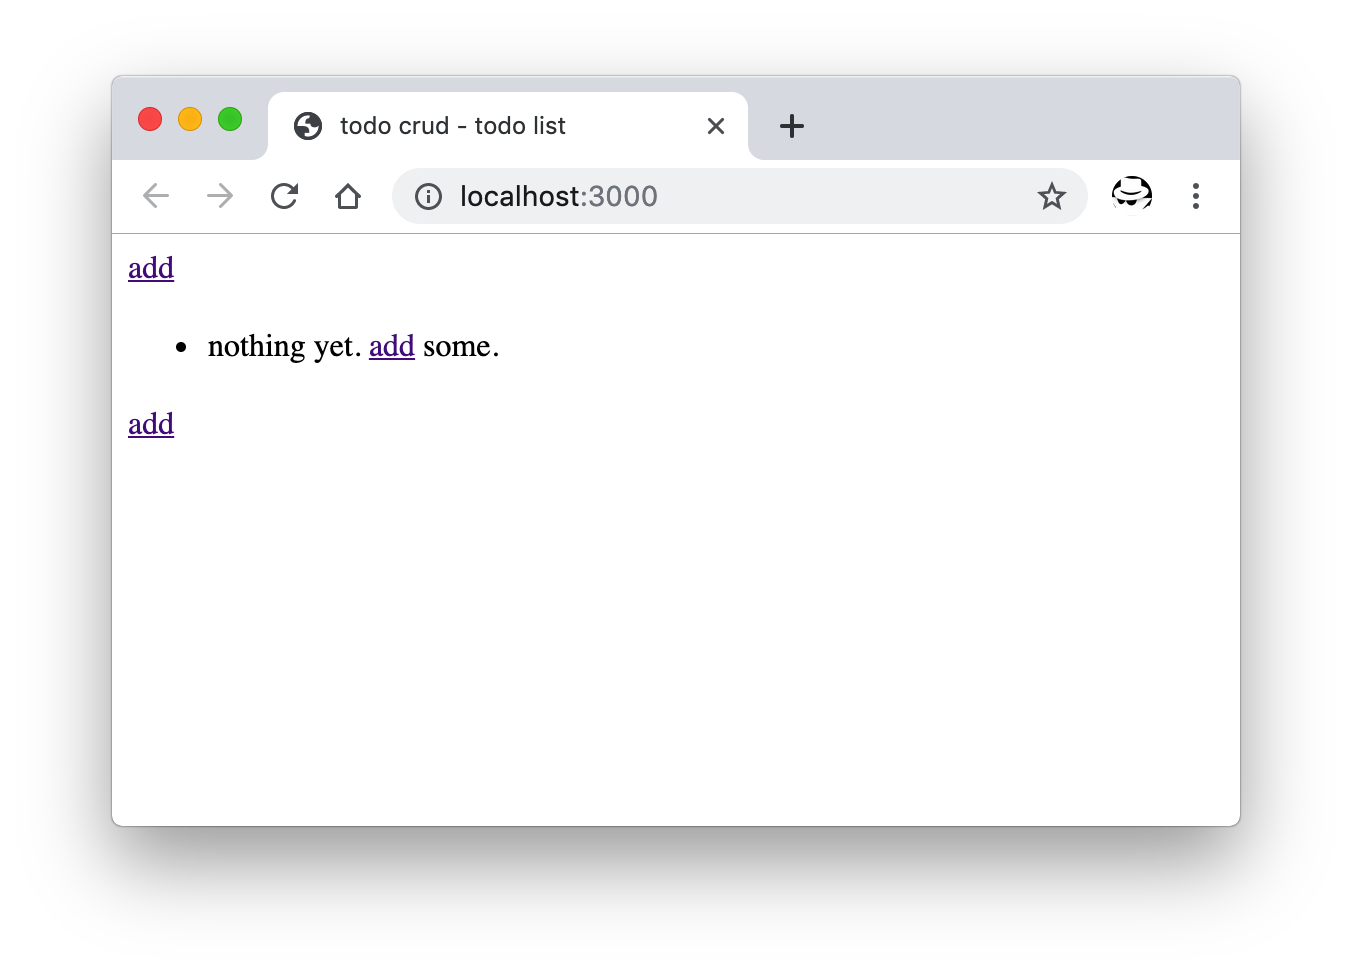
列表頁
現在我們有了可以提交數據的表單,也有了可以展示數據的列表頁。接下來就是實現接收表單提交過來的數據並存入數據庫。
表單數據的接收
通過添加相應的 Koa 中間件,以在代碼中獲取到頁面提交過來的表單數據。
安裝 koa-bodyparser 並在代碼中啟用。
$ yarn add koa-bodyparser
app.js
const bodyParser = require("koa-bodyparser");
app.use(bodyParser());
form 表單中,表單元素的 name 屬性在數據提交時便是后端拿到的字段名,元素身上的 value 屬性便是該字段的值。比如上面表單中 <input name="content" type="text" placeholder="todo content..." id="content" value="{{ todo.content }}"/> 在提交后會得到 {content:'...'}
添加新的路由以提供 POST 類型的接口來接收表單數據,因為該接口接收來的表單數據有可能是創建,有可能是編輯,這里取名 /edit:
app.use(
  _.post("/edit", async function(ctx) {
    try {
      const todo = ctx.request.body;
      // TODO: 保存到數據庫
      ctx.redirect("/");
    } catch (error) {
      ctx.body = error.stack;
    }
  })
);
這里 ctx.request.body 便是 koa-bodyparser 中間件解析數據后添加到 ctx.request 上的表單數據,等待被保存到數據庫。
接下來便是數據庫部分。
准備數據庫
假設本地已經安裝並正確配置了 MySQL,如果沒有,可參考 MySQL 上手教程。
登錄 MySQL 創建名為 todo 的數據庫:
$ mysql -u wayou -p
# 輸入密碼...
mysql> CREATE DATABASE todo
切換到剛剛創建的數據庫:
mysql> use todo;
通過以下腳本創建名為 todo 的表:
CREATE TABLE `todo` (
  `id` int(10) unsigned NOT NULL AUTO_INCREMENT,
  `content` varchar(500) COLLATE utf8mb4_general_ci DEFAULT NULL,
  `is_done` int(11) DEFAULT '0',
  `date` date NOT NULL,
  PRIMARY KEY (`id`)
)
數據庫連接
在服務端代碼中,同樣,這里需要一個相應的 Koa 中間件來連接到數據庫以進行相應的操作。
正常來講,使用 mysql 即可,但它不提供 Promise 方式的接口調用,還是 callback 的方式,寫起來有點不方便。所以這里使用另外一個 npm 模塊 promise-mysql,是對它的 Promise 改裝。
$ yarn add promise-mysql
然后就可以愉快地使用 async/await 進行相關調用了。
創建 db.js 文件來專門處理數據庫相關的操作,比如連接,數據的增刪等,這樣 app.js 中路由對應的 controller 只需要調用即可,不用摻雜數據庫相關的邏輯。
db.js
const mysql = require("promise-mysql");
async function query(sql) {

const connection = await mysql.createConnection({

host: 'localhost',

user: 'wayou',

password: 'xxx',

database: "todo"

});

try {

const result = connection.query(sql);

connection.end();

return result;

} catch (error) {

throw error;

}

}
上面代碼創建了一個接收 SQL 語句的方法,執行並返回結果。
小貼士:如果上面代碼在后續測試執行時發現報如下的錯誤:
Error: ER_NOT_SUPPORTED_AUTH_MODE: Client does not support authentication protocol requested by server; consider upgrading MySQL client
多半是用來連接的帳戶沒有相應從程序進行連接的權限,可通過如下命令來配置 MySQL。
mysql> ALTER USER 'wayou'@'localhost' IDENTIFIED WITH mysql_native_password BY 'your_new_password';
Query OK, 0 rows affected (0.01 sec)
mysql> FLUSH PRIVILEGES;
關於 mysql_native_password 可到這里了解更多。
FLUSH PRIVILEGES 用於刷新配置使其立即生效。
記錄的插入
數據庫連接准備好之后,就可以將接收到的表單數據插入到數據庫中了。
在 db.js 中添加插入數據的方法:
db.js
async function update(todo) {
  todo.is_done = todo.is_done == undefined ? 0 : todo.is_done;
if (todo.id) {

Object.assign(getTodoById(todo.id), todo);

return await query(</span></span> <span class="pl-s"> UPDATE todo</span> <span class="pl-s"> SET content='<span class="pl-s1"><span class="pl-pse">${</span><span class="pl-smi">todo</span>.<span class="pl-c1">content</span><span class="pl-pse">}</span></span>',is_done='<span class="pl-s1"><span class="pl-pse">${</span><span class="pl-smi">todo</span>.<span class="pl-smi">is_done</span><span class="pl-pse">}</span></span>'</span> <span class="pl-s"> WHERE todo.id=<span class="pl-s1"><span class="pl-pse">${</span><span class="pl-smi">todo</span>.<span class="pl-c1">id</span><span class="pl-pse">}</span></span></span> <span class="pl-s"> <span class="pl-pds">);

} else {

todo.date = new Date().toJSON().slice(0, 10);

return await query(</span></span> <span class="pl-s"> INSERT INTO todo (content,date,is_done) </span> <span class="pl-s"> VALUES ('<span class="pl-s1"><span class="pl-pse">${</span><span class="pl-smi">todo</span>.<span class="pl-c1">content</span><span class="pl-pse">}</span></span>','<span class="pl-s1"><span class="pl-pse">${</span><span class="pl-smi">todo</span>.<span class="pl-smi">date</span><span class="pl-pse">}</span></span>','<span class="pl-s1"><span class="pl-pse">${</span><span class="pl-smi">todo</span>.<span class="pl-smi">is_done</span><span class="pl-pse">}</span></span>')</span> <span class="pl-s"> <span class="pl-pds">);

}

}
該方法用於更新已有的記錄或添加新的記錄,這一點是通過判斷傳來的表單數據中是否有 id 字段,如果有,說明是編輯已有的數據,那么執行更新操作,如果沒有 id 字段,則說明是新增一個 todo。
這里的 id 字段在 form 表單中是不展示的,參見上面表單頁面的代碼,但為了在表單提交時能夠帶上 id 字段,所以在表單中放置了一個隱藏的 <input> 來標識。
需要注意的是,HTML 中 form 表單中的 checkbox,其只在被勾選時才會被提交,未勾選時不會被提交到后台。所以這里對 is_done 進行一下兼容處理。
更新路由部分的代碼,調用這里的 update 方法。
app.js
+ const db = require("./db");
app.use(

_.post("/edit", async function(ctx) {

try {

const todo = ctx.request.body;

- // TODO: 保存到數據庫

+ await db.update(todo);

ctx.redirect("/");

} catch (error) {

ctx.body = error.stack;

}

})

);
重啟服務器訪問 http://localhost:3000/add 以提交表單來創建一條數據到數據庫。

提交表單創建一條 todo
因為我們還沒有將數據庫中的列表展示到首頁,所以這里提交成功后,跳回到首頁時,數據沒展現。不過我們可以去數據庫查詢剛剛創建的結果。
mysql> SELECT * FROM todo;
+----+---------+---------+------------+
| id | content | is_done | date       |
+----+---------+---------+------------+
|  1 | 買菜    |       0 | 2019-04-26 |
+----+---------+---------+------------+
1 row in set (0.00 sec)
查詢並展示數據到頁面
剛剛已經寫入了一條數據到數據庫,現在可以通過 SELECT 語句將它查詢出來並展示到首頁的列表中。
添加相應的查詢方法到 db.js 中。
db.js
async function getAll() {
  return await query("select * from todo");
}
然后更新列表頁的 controller,調用該方法獲取數據並返回到頁面。
app.js
app.use(
  _.get("/", async function(ctx) {
-   // TODO: 從數據庫獲取數據
-   const todos = [];
+   const todos = await db.getAll();
    await ctx.render("list", {
      list: todos
    });
  })
);
重新啟動服務后,如果一切順利,訪問首頁可看到剛剛添加的 todo 展示了出來。

列表中展示來自數據庫的數據
數據更新
下面為列表頁中每條 todo 添加一個編輯按鈕,點擊后可跳轉編輯頁,同時跳轉時連接上帶上 todo 的 id。這樣編輯頁可從 url 中獲取 id 並從數據庫中將該 id 對應的數據取出來渲染到編輯頁。
還需要添加一個新路由 /edit 展示和前面創建時一樣的表單頁,將根據 id 獲取到的數據塞入表單提供編輯。
更新列表頁 HTML 添加編輯按鈕:
views/list.html
<div class="todo-item">
  <div class="content">#{{ loop.index }}[{%if item.is_done==0%}⏳{%else%}✅{%endif%}] {{ item.content }}</div>
+  <div class="action">
+    <a href="/edit?id={{ item.id }}">edit</a>
+  </div>
</div>
添加編輯頁的路由並返回這個表單:
app.js
app.use(
  _.get("/edit", async function(ctx) {
    const id = ctx.query.id;
    if (!id) {
      throw new Error("id is missing");
    }
    const todo = await db.getTodoById(id);
    if (!todo) {
      ctx.body = "item not found!";
    } else {
      await ctx.render("form", {
        todo
      });
    }
  })
);
因為參數是通過拼接到 url 傳遞而來,所以這里通過 query 部分來獲取這個 id 參數。拿到之后調用了一個方法根據 id 獲取數據。
更新 db.js 添加這個獲取數據的方法:
db.js
async function getTodoById(id) {
  const result = await query(`SELECT * FROM todo WHERE todo.id='${id}'`);
  if (result[0]) {
    return result[0];
  }
  return null;
}
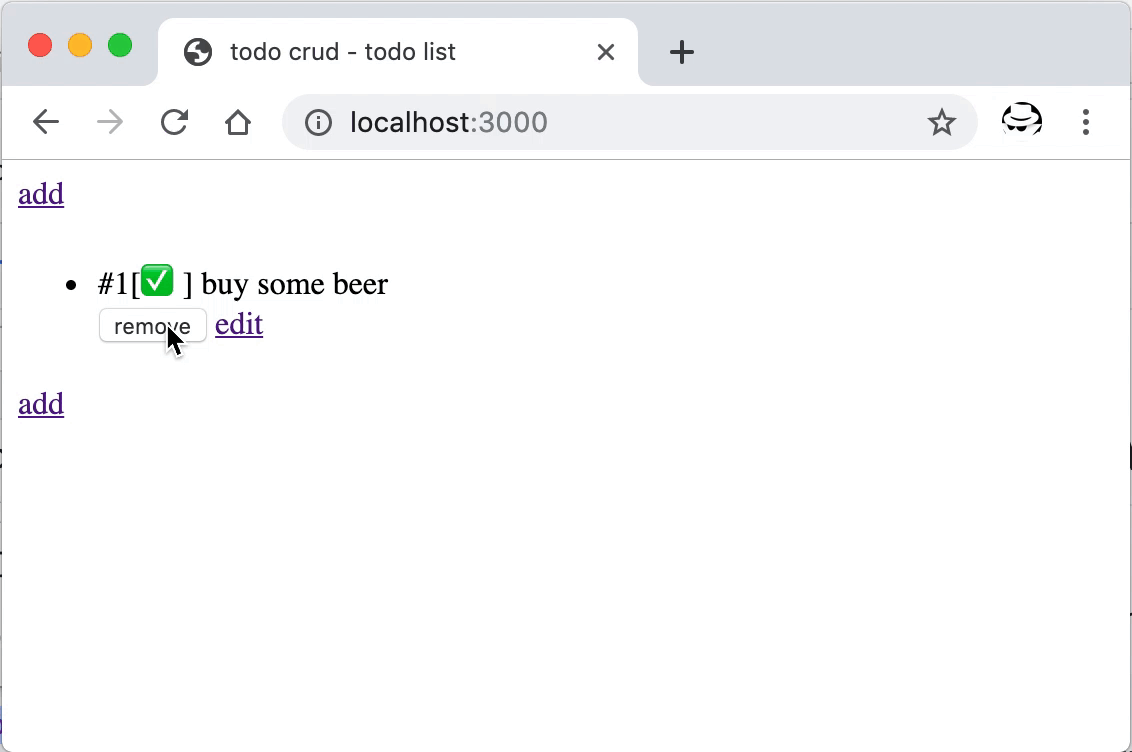
重啟后打開首頁,可以看到新增的編輯按鈕,點擊后跳轉到了新增的編輯頁面,在這里可以對已經添加的條目進行更新。

數據的更新
記錄的刪除
添加新的路由 '/remove' 提供刪除操作的接口。
app.js
app.use(
  _.post("/remove", async function(ctx) {
    const id = ctx.request.body.id;
    try {
      console.log(`remove entry ${id}`);
      await db.remove(id);
      ctx.body = {
        status: 0,
        error_message: ""
      };
    } catch (error) {
      ctx.body = error.stack;
    }
  })
);
這里 /remove 是個 POST 類型的接口,前台頁面會將需要刪除的條目 id 通過異步調用該接口傳遞過來。這里 POST 數據的獲取也通過 koa-bodyparser 來獲取,即 ctx.request.body 上面。
更新 db,js 添加從數據庫刪除條目的方法:
db.js
async function remove(id) {
  return await query(`DELETE FROM todo WHERE todo.id='${id}'`);
}
萬事具備,只差前台頁面了。
更新列表頁的模板,在剛剛添加編輯按鈕的地方,添加一個刪除按鈕。
views/list.html
<div class="todo-item">
  <div class="content">#{{ loop.index }}[{%if item.is_done==0%}⏳{%else%}✅{%endif%}] {{ item.content }}</div>
  <div class="action">
+    <button onclick="remove({{ item.id }})">remove</button>
    <a href="/edit?id={{ item.id }}">edit</a>
  </div>
</div>
同時添加相應 JavaScript 代碼發起刪除的請求,調用上面添加的 POST 接口。
views/list.html
<script>
  function remove(id) {
    fetch("/remove", {
      method: "post",
      headers:{
        'Content-Type': 'application/json'
      },
      body: JSON.stringify({ id })
    })
      .then(response => response.json())
      .then(data => {
        if (data.status) {
          alert(data.error_message);
        } else {
          alert("removed succussfully!");
          location.reload();
        }
      })
      .catch(error => alert(error));
  }
</script>
前台在使用 fetch PSOT 數據時,需要指定正確的 Content-Type,否則后台 koa-bodyparser 無法解析。
重啟后即可進行刪除操作,成功后會提示並刷新頁面。
數據的刪除操作
總結
完成本文的流程,實現了數據的增刪改查等基本操作。其中包含表單數據的提交與接收,Koa 中間件的使用以及數據庫連接,還有 SQL 語句的執行等。
本文中完整的示例代碼可在 wayou/node-crud 倉庫中找到。