Referrence:https://3gstudent.github.io/3gstudent.github.io/%E6%B8%97%E9%80%8F%E5%9F%BA%E7%A1%80-%E4%BD%BF%E7%94%A8Go%E8%AF%AD%E8%A8%80%E5%BC%80%E5%8F%91socks%E4%BB%A3%E7%90%86%E5%B7%A5%E5%85%B7/
0x00 前言
在上篇文章《滲透基礎——端口轉發與代理》提到了使用go語言分別實現正向和反向socks代理的方法,不僅開發效率高,而且能夠很方便的實現跨平台編譯。 本文將要進一步介紹Windows系統和Kali系統下使用Go語言開發的完整過程,並基於開源代碼,實現一個socks正向和反向代理的工具,記錄細節。
0x01 簡介
本文將要介紹以下內容:
- Windows系統下Go語言開發環境的搭建
- Kali系統下Go語言開發環境的搭建
- 工具代碼細節
- 開源完整實現代碼
0x02 Windows系統下Go語言開發環境的搭建
測試系統: Win7x64
1、安裝Go
下載安裝:
https://golang.org/dl
或者
https://studygolang.com/dl
2、安裝git
https://gitforwindows.org/
用來下載第三方開發包
0x03 代碼實現與Windows系統下的跨平台編譯
1、安裝第三方包
需要以下三個:
- golang.org/x/net/context
- https://github.com/armon/go-socks5
- https://github.com/hashicorp/yamux
安裝流程如下:
(1)安裝golang.org/x/net/context
go-socks5依賴,否則安裝時會提示:
go\src\github.com\armon\go-socks5\request.go:10:2: cannot find package “golang.o rg/x/net/context” in any of: C:\Go\src\golang.org\x\net\context (from $GOROOT ) C:\Users\a\go\src\golang.org\x\net\context (from $GOPATH)
在線安裝:
go get golang.org/x/net/context
通常會失敗,這里可以先從github下載再離線安裝
完整命令如下:
md %GOROOT%\src\golang.org\x
cd %GOROOT%\src\golang.org\x
git clone https://github.com/golang/net.git
go install golang.org/x/net/context
注意這里使用的路徑為GOROOT,默認路徑為C:\Go,可通過輸入go env查看
(2)安裝go-socks5
在線安裝:
go get github.com/armon/go-socks5
如果安裝失敗,同樣先從github下載再離線安裝
完整命令如下:
md %USERPROFILE%\go\src\
cd %USERPROFILE%\go\src\
git clone https://github.com/armon/go-socks5.git
go install go-socks5
需要注意這里使用的路徑為%USERPROFILE%\go\,即GOPATH,而不是GOROOT,可通過輸入go env查看
如果使用GOROOT,會出現如下錯誤:
can’t load package: C:\Go\src\go-socks5\request.go:10:2: non-standard import “go lang.org/x/net/context” in standard package “go-socks5”
(3)安裝yamux
在線安裝:
go get github.com/hashicorp/yamux
離線安裝:
cd %GOROOT%\src\
git clone https://github.com/hashicorp/yamux
go install yamux
2、實現代碼
我這里參考了https://github.com/brimstone/rsocks
添加了正向代理的功能,並在結構上做了調整,區分正向和反向代理
完整實現代碼:
https://github.com/3gstudent/Homework-of-Go/blob/master/frsocks.go
3、跨平台編譯
正常編譯命令如下:
go build frsocks.go
編譯成功后生成文件frsocks.exe
想要指定輸出文件名,這里需要先將frsocks.go重命名為main.go,再分別使用以下代碼進行跨平台編譯
(1)Windows 32位
SET CGO_ENABLED=0
SET GOOS=windows
SET GOARCH=386
go build -o frsocks_windows_386
(2)Windows 64位
SET CGO_ENABLED=0
SET GOOS=windows
SET GOARCH=amd64
go build -o frsocks_windows_adm64
(3)linux arm64
SET CGO_ENABLED=0
SET GOOS=linux
SET GOARCH=amd64
go build -o frsocks_linux_amd64
所有支持的系統如下:
- android arm
- darwin 386
- darwin amd64
- darwin arm
- darwin arm64
- dragonfly amd64
- freebsd 386
- freebsd amd64
- freebsd arm
- linux 386
- linux amd64
- linux arm
- linux arm64
- linux ppc64
- linux ppc64le
- linux mips
- linux mipsle
- linux mips64
- linux mips64le
- linux s390x
- netbsd 386
- netbsd amd64
- netbsd arm
- openbsd 386
- openbsd amd64
- openbsd arm
- plan9 386
- plan9 amd64
- solaris amd64
- windows 386
- windows amd64
來自https://golang.org/doc/install/source#environment
0x04 Kali系統下Go語言開發環境的搭建
測試系統: Kali2
1、安裝Go
下載:
wget https://dl.google.com/go/go1.11.2.linux-amd64.tar.gz
或者
wget https://studygolang.com/dl/golang/go1.11.linux-amd64.tar.gz
安裝:
tar -xzf go1.11.linux-amd64.tar.gz -C /usr/local
測試:
cd /usr/local/go
echo 'export PATH=$PATH:/usr/local/go/bin' >> /etc/profile
source /etc/profile
go
0x05 代碼實現與Kali系統下的跨平台編譯
1、安裝第三方包
需要以下三個:
- golang.org/x/net/context
- https://github.com/armon/go-socks5
- https://github.com/hashicorp/yamux
(1)安裝golang.org/x/net/context
mkdir /usr/local/go/src/golang.org/
mkdir /usr/local/go/src/golang.org/x
cd /usr/local/go/src/golang.org/x
git clone https://github.com/golang/net.git
go install golang.org/x/net/context
(2)安裝go-socks5
mkdir /root/go
mkdir /root/go/src
cd /root/go/src
git clone https://github.com/armon/go-socks5.git
go install go-socks5
(3)安裝yamux
cd /usr/local/go/src/
git clone https://github.com/hashicorp/yamux
go install yamux
2、實現代碼
https://github.com/3gstudent/Homework-of-Go/blob/master/frsocks.go
3、跨平台編譯
正常編譯命令如下:
go build frsocks.go
編譯成功后生成文件frsocks
想要指定輸出文件名,這里需要先將frsocks.go重命名為main.go,再分別使用以下代碼進行跨平台編譯
(1)Windows 32位
CGO_ENABLED=0 GOOS=windows GOARCH=386 go build -o frsocks_windows_386.exe
(2)Windows 64位
CGO_ENABLED=0 GOOS=windows GOARCH=amd64 go build -o frsocks_windows_amd64.exe
(3)linux arm64
CGO_ENABLED=0 GOOS=linux GOARCH=amd64 go build -o frsocks_linux_amd64
其它環境見https://golang.org/doc/install/source#environment
實現全平台編譯的批處理文件已上傳至github,地址如下:
https://github.com/3gstudent/Homework-of-Go/blob/master/windows_build.bat
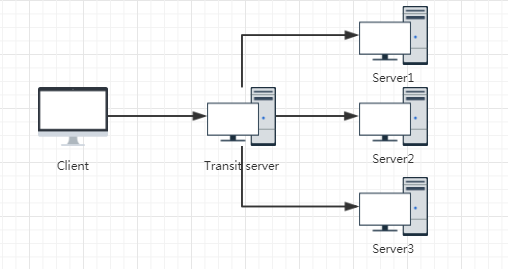
0x06 工具測試
1、正向代理
如下圖
Client:
frsocks -sockstype fsocks -listen 1080
使用代理工具連接Client的1080端口
2、反向代理
如下圖
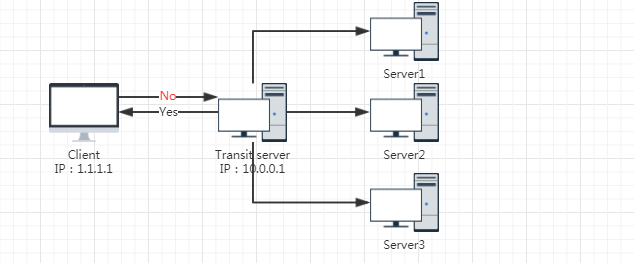
Client:
frsocks -sockstype rsocks -listen 1111 -socks 127.0.0.1:2222
Transit server:
frsocks -sockstype rsocks -connect 1.1.1.1:1111
使用代理工具連接Client的2222端口
0x07 小結
本文介紹了Windows系統和Kali系統下使用Go語言開發的完整過程,基於開源代碼,實現了一個socks正向和反向代理的工具。