無疑,對於大型項目來說,Vanilla Js 無法滿足工程需求。早在 2016 年 Anuglar 在項目中引入 TypeScript 時,大概也是考慮到強類型約束對於大型工程的必要性,具體選型考慮可參考這篇文章。然后可以看到 TypeScript 在社區中逐漸升溫。但凡社區中舉足輕重的庫,如果不是原生使用 TypeScript 編寫,那么也是通過聲明文件的方式對 TypeScript 提供支持,比如 React(雖然不是包含在官方倉庫中,而是通過 @types/react),同時官方腳手架工具(v2.1.0 之后)也開始提供開箱即用的 TypeScript 支持,通過 --typescript 參數開啟。
所以 TypeScript 絕對是趨勢。它所帶來的工程效率上的提升,是在使用 Vanilla Js 時無法體會到的。可能前期反而會因為類型約束而變得束手束腳影響效率,但這是個學習成本的問題,對於任何一門技術而言都會存在。
如果你有 Java 或 C# 的基礎,那 TypeScript 學起來幾乎沒什么成本。
安裝與配置
安裝
$ npm install -g typescript
# or
$ yarn global add typescript
安裝成功后,其 CLI 命令為 tsc,比如查看版本,
$ tsc --version
Version 3.3.3333
常用的命令:
編譯文件
$ tsc main.ts
編譯時傳遞編譯參數:
$ tsc --target es3 main.ts
完整的編譯參數可在官網 Compiler Options 文檔中查閱。
初始化配置文件
除了通過 CLI 傳遞編譯參數控制編譯的行為,也可通過創建 tsconfig.json 文件指定編譯參數。對於項目中使用來說,肯定是使用配置文件比較方便,而且,有些參數只支持通過配置文件來設置,比如 path,rootDirs。
$ tsc --init
message TS6071: Successfully created a tsconfig.json file.
該命令在當前目錄創建一個 tsconfig.json 文件,每個配置都包含注釋。完整的配置項也可在官網Compiler Options 文檔中查閱,根據自己需要和項目需求進行合理配置。大部分情況下你只會因為有某個需求才會去刻意研究如何配置,比如要改變輸出類型設置 target,寫碼過程中發現 Object.assign 不可用發現需要添加 lib 插件。所以不必被龐大的配置參數驚嚇到,只用的時候再搜索即可。
tsconfig.json
{
  "compilerOptions": {
    /* Basic Options */
    "target": "es5" /* Specify ECMAScript target version: 'ES3' (default), 'ES5', 'ES2015', 'ES2016', 'ES2017','ES2018' or 'ESNEXT'. */,
    "module": "commonjs" /* Specify module code generation: 'none', 'commonjs', 'amd', 'system', 'umd', 'es2015', or 'ESNext'. */,
    // "lib": [],                             /* Specify library files to be included in the compilation. */
    // "allowJs": true,                       /* Allow javascript files to be compiled. */
    // "checkJs": true,                       /* Report errors in .js files. */
    // "jsx": "preserve",                     /* Specify JSX code generation: 'preserve', 'react-native', or 'react'. */
    // "declaration": true,                   /* Generates corresponding '.d.ts' file. */
    // "declarationMap": true,                /* Generates a sourcemap for each corresponding '.d.ts' file. */
    // "sourceMap": true,                     /* Generates corresponding '.map' file. */
    // "outFile": "./",                       /* Concatenate and emit output to single file. */
    // "outDir": "./",                        /* Redirect output structure to the directory. */
    // "rootDir": "./",                       /* Specify the root directory of input files. Use to control the output directory structure with --outDir. */
    // "composite": true,                     /* Enable project compilation */
    // "removeComments": true,                /* Do not emit comments to output. */
    // "noEmit": true,                        /* Do not emit outputs. */
    // "importHelpers": true,                 /* Import emit helpers from 'tslib'. */
    // "downlevelIteration": true,            /* Provide full support for iterables in 'for-of', spread, and destructuring when targeting 'ES5' or 'ES3'. */
    // "isolatedModules": true,               /* Transpile each file as a separate module (similar to 'ts.transpileModule'). */
<span class="pl-c"><span class="pl-c">/*</span> Strict Type-Checking Options <span class="pl-c">*/</span></span>
<span class="pl-s"><span class="pl-pds">"</span>strict<span class="pl-pds">"</span></span><span class="pl-k">:</span> <span class="pl-c1">true</span> <span class="pl-c"><span class="pl-c">/*</span> Enable all strict type-checking options. <span class="pl-c">*/</span></span>,
<span class="pl-c"><span class="pl-c">//</span> "noImplicitAny": true,                 /* Raise error on expressions and declarations with an implied 'any' type. */</span>
<span class="pl-c"><span class="pl-c">//</span> "strictNullChecks": true,              /* Enable strict null checks. */</span>
<span class="pl-c"><span class="pl-c">//</span> "strictFunctionTypes": true,           /* Enable strict checking of function types. */</span>
<span class="pl-c"><span class="pl-c">//</span> "strictBindCallApply": true,           /* Enable strict 'bind', 'call', and 'apply' methods on functions. */</span>
<span class="pl-c"><span class="pl-c">//</span> "strictPropertyInitialization": true,  /* Enable strict checking of property initialization in classes. */</span>
<span class="pl-c"><span class="pl-c">//</span> "noImplicitThis": true,                /* Raise error on 'this' expressions with an implied 'any' type. */</span>
<span class="pl-c"><span class="pl-c">//</span> "alwaysStrict": true,                  /* Parse in strict mode and emit "use strict" for each source file. */</span>

<span class="pl-c"><span class="pl-c">/*</span> Additional Checks <span class="pl-c">*/</span></span>
<span class="pl-c"><span class="pl-c">//</span> "noUnusedLocals": true,                /* Report errors on unused locals. */</span>
<span class="pl-c"><span class="pl-c">//</span> "noUnusedParameters": true,            /* Report errors on unused parameters. */</span>
<span class="pl-c"><span class="pl-c">//</span> "noImplicitReturns": true,             /* Report error when not all code paths in function return a value. */</span>
<span class="pl-c"><span class="pl-c">//</span> "noFallthroughCasesInSwitch": true,    /* Report errors for fallthrough cases in switch statement. */</span>

<span class="pl-c"><span class="pl-c">/*</span> Module Resolution Options <span class="pl-c">*/</span></span>
<span class="pl-c"><span class="pl-c">//</span> "moduleResolution": "node",            /* Specify module resolution strategy: 'node' (Node.js) or 'classic' (TypeScript pre-1.6). */</span>
<span class="pl-c"><span class="pl-c">//</span> "baseUrl": "./",                       /* Base directory to resolve non-absolute module names. */</span>
<span class="pl-c"><span class="pl-c">//</span> "paths": {},                           /* A series of entries which re-map imports to lookup locations relative to the 'baseUrl'. */</span>
<span class="pl-c"><span class="pl-c">//</span> "rootDirs": [],                        /* List of root folders whose combined content represents the structure of the project at runtime. */</span>
<span class="pl-c"><span class="pl-c">//</span> "typeRoots": [],                       /* List of folders to include type definitions from. */</span>
<span class="pl-c"><span class="pl-c">//</span> "types": [],                           /* Type declaration files to be included in compilation. */</span>
<span class="pl-c"><span class="pl-c">//</span> "allowSyntheticDefaultImports": true,  /* Allow default imports from modules with no default export. This does not affect code emit, just typechecking. */</span>
<span class="pl-s"><span class="pl-pds">"</span>esModuleInterop<span class="pl-pds">"</span></span><span class="pl-k">:</span> <span class="pl-c1">true</span> <span class="pl-c"><span class="pl-c">/*</span> Enables emit interoperability between CommonJS and ES Modules via creation of namespace objects for all imports. Implies 'allowSyntheticDefaultImports'. <span class="pl-c">*/</span></span>
<span class="pl-c"><span class="pl-c">//</span> "preserveSymlinks": true,              /* Do not resolve the real path of symlinks. */</span>

<span class="pl-c"><span class="pl-c">/*</span> Source Map Options <span class="pl-c">*/</span></span>
<span class="pl-c"><span class="pl-c">//</span> "sourceRoot": "",                      /* Specify the location where debugger should locate TypeScript files instead of source locations. */</span>
<span class="pl-c"><span class="pl-c">//</span> "mapRoot": "",                         /* Specify the location where debugger should locate map files instead of generated locations. */</span>
<span class="pl-c"><span class="pl-c">//</span> "inlineSourceMap": true,               /* Emit a single file with source maps instead of having a separate file. */</span>
<span class="pl-c"><span class="pl-c">//</span> "inlineSources": true,                 /* Emit the source alongside the sourcemaps within a single file; requires '--inlineSourceMap' or '--sourceMap' to be set. */</span>

<span class="pl-c"><span class="pl-c">/*</span> Experimental Options <span class="pl-c">*/</span></span>
<span class="pl-c"><span class="pl-c">//</span> "experimentalDecorators": true,        /* Enables experimental support for ES7 decorators. */</span>
<span class="pl-c"><span class="pl-c">//</span> "emitDecoratorMetadata": true,         /* Enables experimental support for emitting type metadata for decorators. */</span>

}

}
VS Code 上手
TS 帶來的一大好處是其靜態類型檢查能跟編輯器很好地結合,智能健全的自動提示自不必說。推薦 VS Code 作為編輯,其對 TypeScript 有原生的支持。
用好這幾個快捷鍵,更是提升效率的關鍵。
重命名
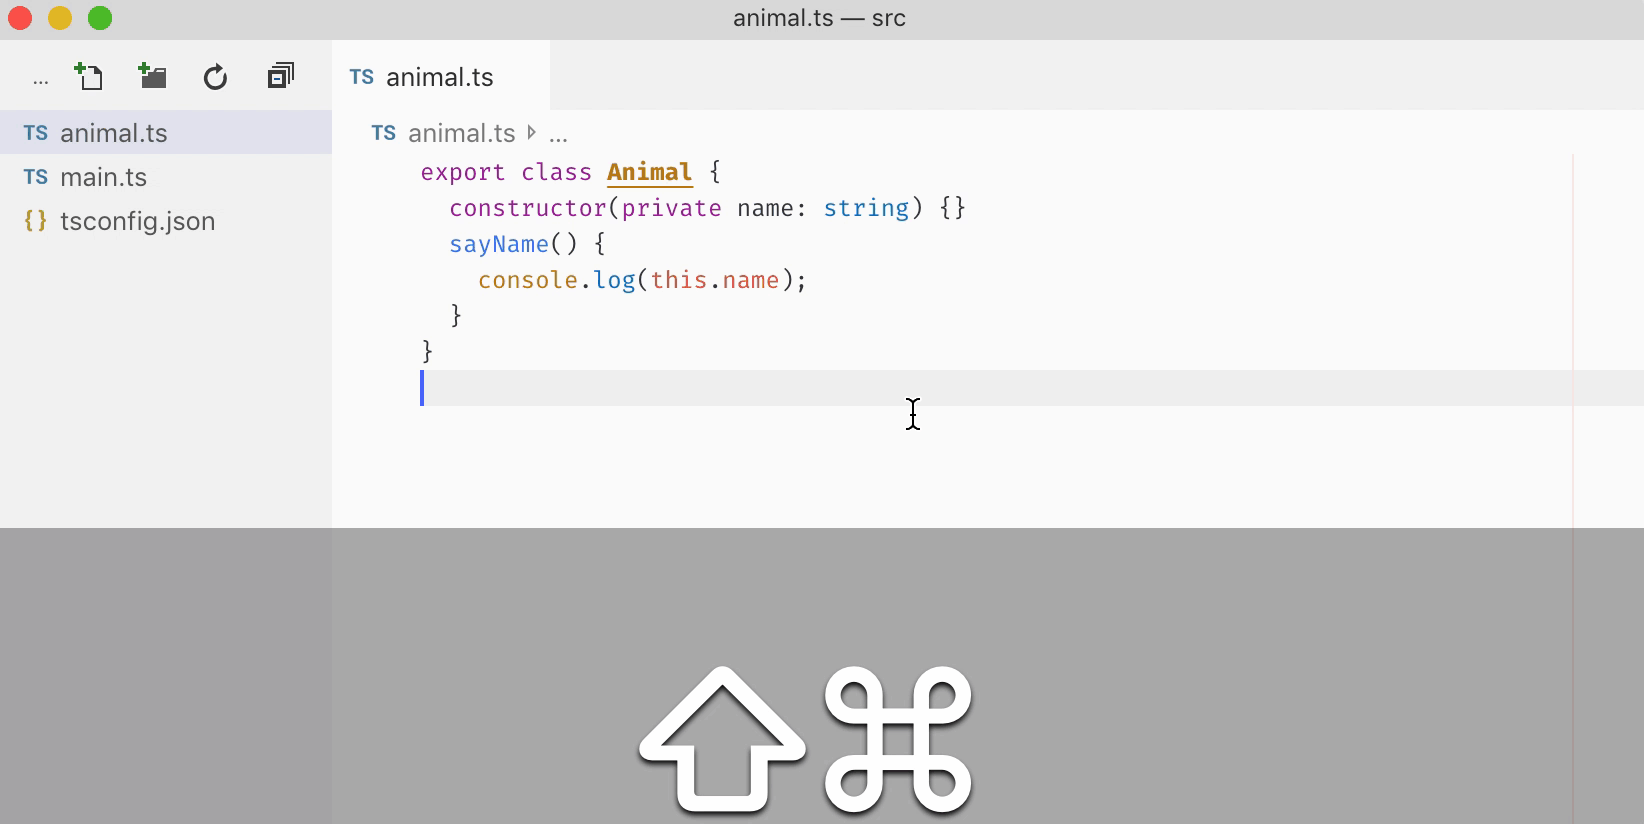
通過 F2 對標識符重重命名。這里標識符可以是變量名,方法函數名,類名或者其他字面量。如果寫代碼過程中發現命名不合理想重命名,一定使用這個快捷鍵來操作,它的好處是,只需改一處,其他與該標識符有關的地方,將自動被批量替換成新的,甚至該標識符使用的地方不在同一個文件中,也能被正確地自動應用上變更后的名稱。省去了人工替換和檢查代碼的麻煩。關鍵人工容易出錯,搜索加替換的方式只是根據字符串來進行的,而該命令是通過分析代碼的語法樹進行的。
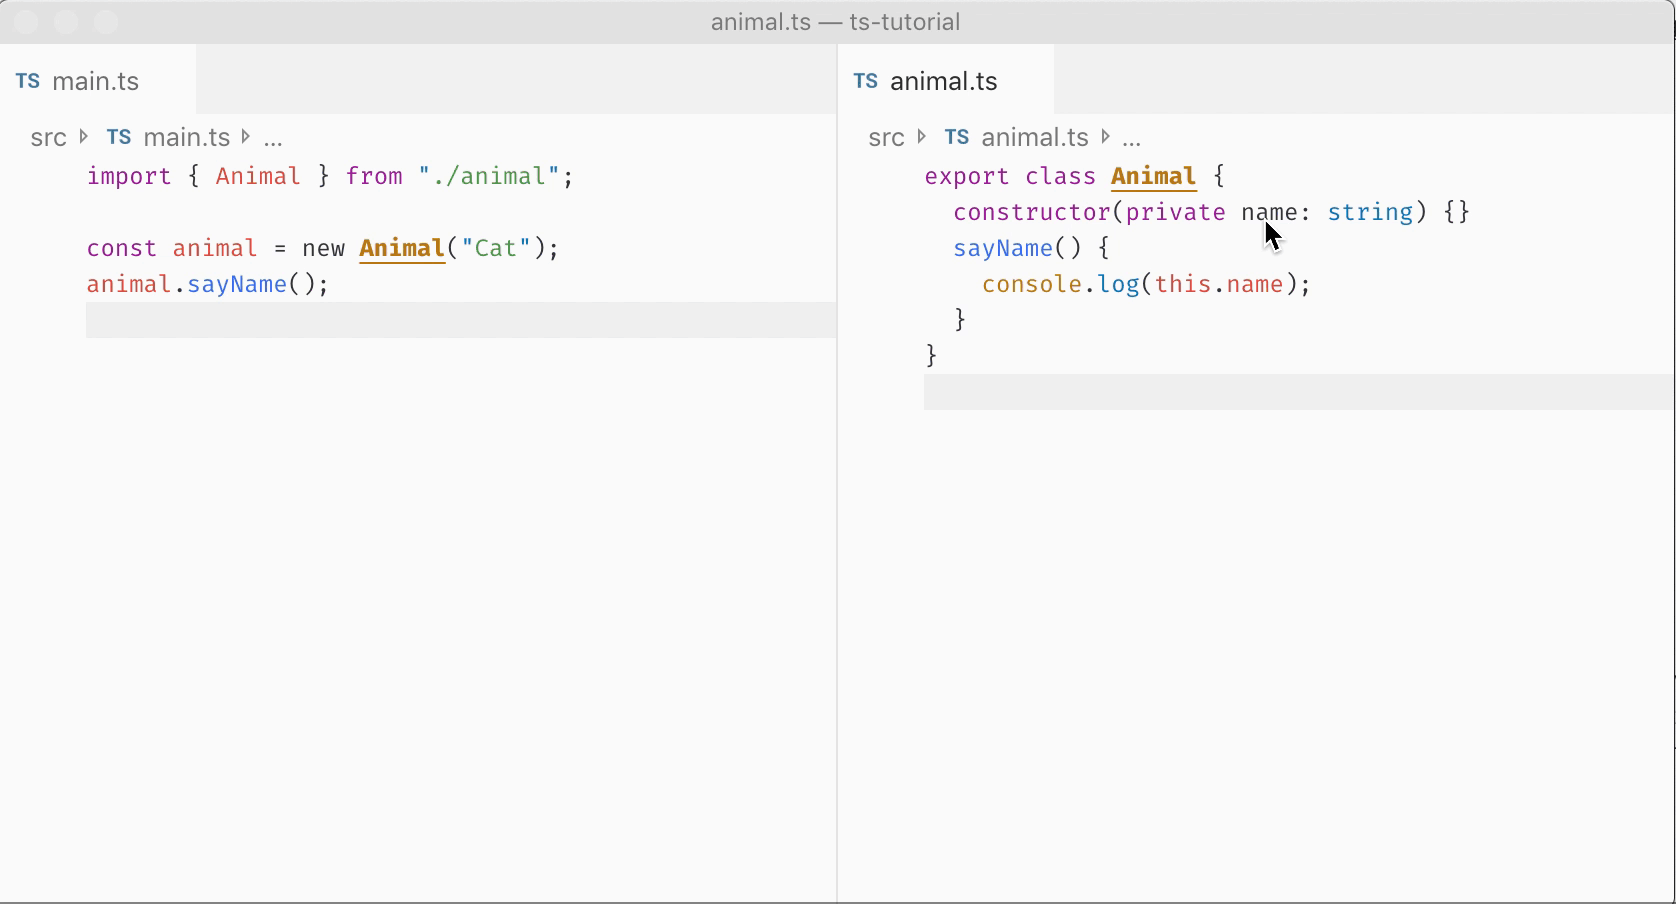
使用 F2 進行變量重命名的展示
快速跳轉
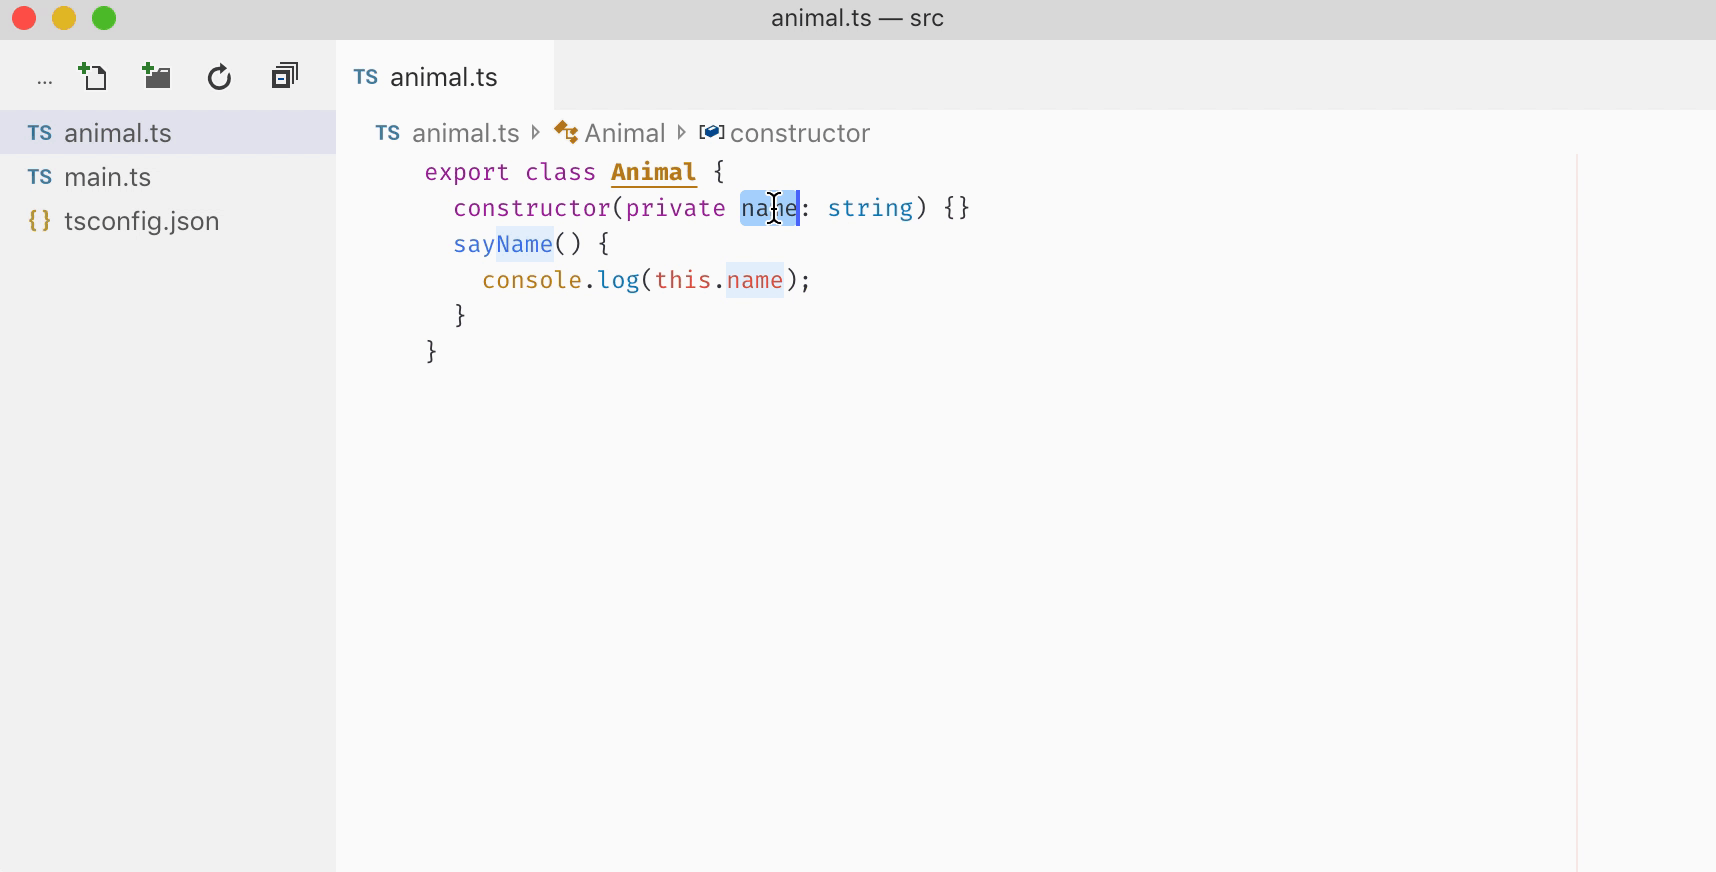
- F12 跳轉到定義。這應該是使用最為頻繁的了。

跳轉到定義
- F7 當前文件中相同的標識符間循環切換。
標識符間的跳轉切換
- F8 在錯誤處循環切換。這個跳轉可讓你在修正代碼中的錯誤時變得非常快捷。它直接將光標定位到錯誤處,修改好本處的錯誤后,繼續 F8 跳轉到下一處。一個很好的應用場景是對 js 代碼的遷移,將文件擴展名由
.js改為.ts,大概率你會看到滿屏飄紅的錯誤提示,通過不斷地 F8 來由上往下定位修改簡直再順暢不過了。
在報錯處循環切換
- control + -/= 在鼠標歷史位置間來回切換。
光標位置的來回切換
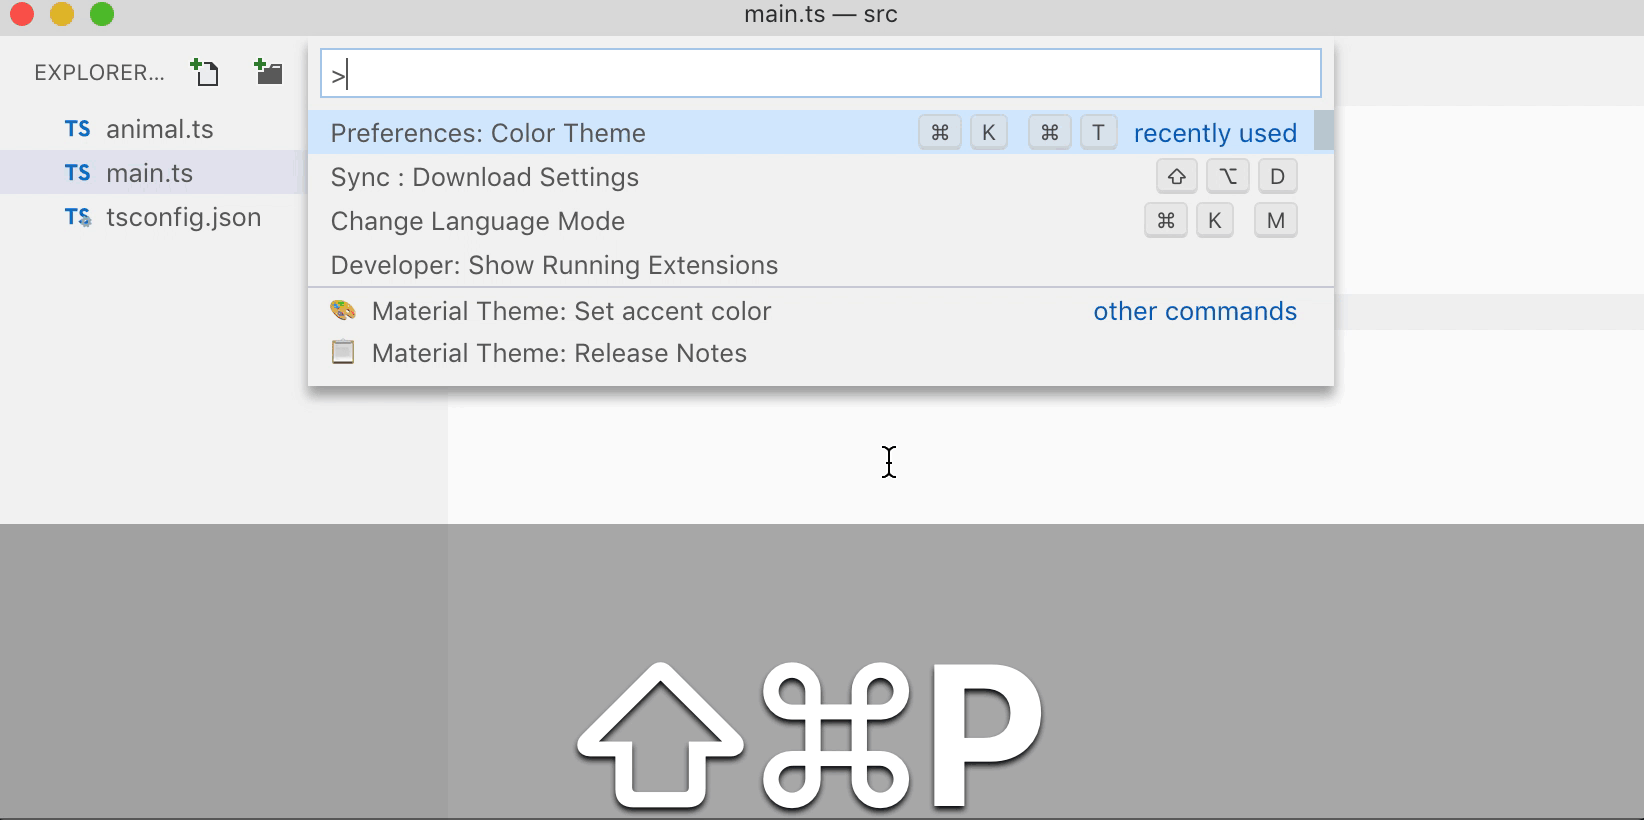
命令面板
通過 command + shift + p 打開命令面板。幾乎所有功能可以通過這里的命令來完成。
比如,
- 代碼折疊與展開
代碼折疊與展開
- 主題的切換
主題的切換
最后,你始終可通過搜索 keyboard shortcurt 來查看所有的快捷鍵。
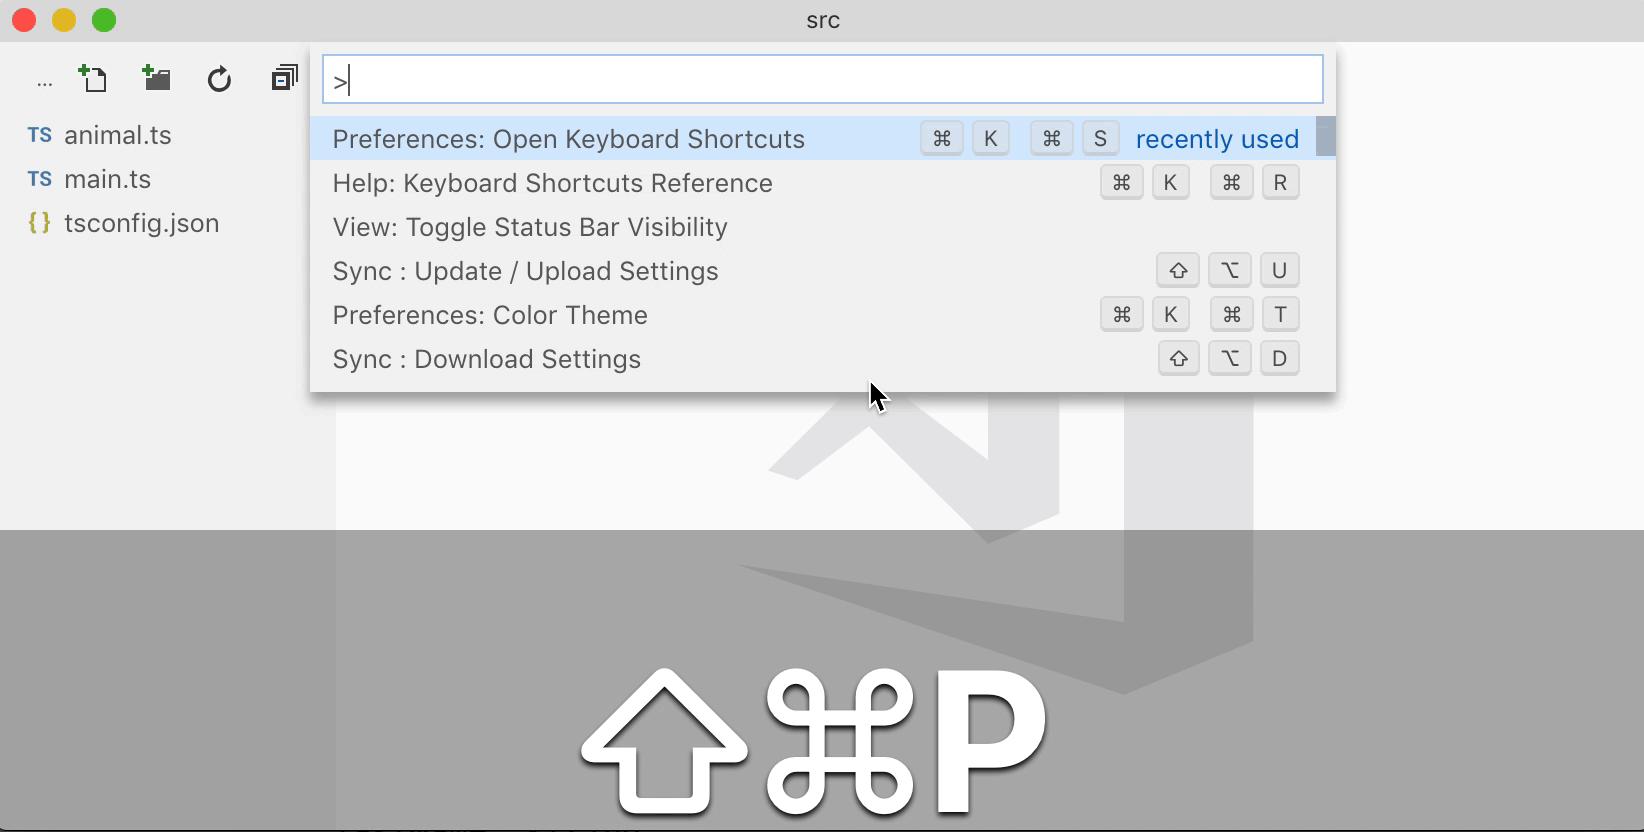
快捷鍵列表
在線工具
如果本地沒有環境,可通過 Playground ・ TypeScript 這個在線的編輯器,編輯 TypeScript 和時實查看輸出。
類型聲明
TypeScript 中,通過在變量后面添加冒號指定其類型。
let fruit: string;
// 🚨Variable 'fruit' is used before being assigned.
console.log(fruit);
當聲明 fruit 為字符串之后,TypeScript 會保證該變量的類型始終是字符串。但在未賦值之前,其實它真實的類型是 undefined。這種情況下,TypeScript 會報錯以阻止你在未初始化之前就使用。
函數的類型包含了入參的類型和返回值的類型。入參自不必說,像上面那樣冒號后指定,而返回值的類型,則是通過在入參列表結束的括號后添加冒號來指定的。
function addOne(num: number): number {
  return num + 1;
}
如果每次寫個變量或函數都需要手動指定其類型,豈不是很麻煩。所以,在一切能夠推斷類型的情況下,是不必手動指定的。比如聲明變量並初始化,會根據初始化的值來推斷變量類型。函數會根據其 return 的值來推斷其返回類型。
/** 推斷出的函數類型為:(num: number) => number */
function addOne(num: number) {
  return num + 1;
}
/** age:number */

const age = 18;

const virtualAge = addOne(age);
console.log(</span>在下虛歲 <span class="pl-s1"><span class="pl-pse">${</span>virtualAge<span class="pl-pse">}</span></span><span class="pl-pds">);
TypeScript 中的類型
JavaScript 中原生有 7 中數據類型,其中 Ojbect 為可看成數據集合,而其他 6 種(布爾,字符串,數字,undefined, null, Symbol),則是原始(primitive)數據類型。
雖然 JavaScript 中有數據類型的概念,但它是動態的,變量的類型根據所存儲的值而變化。TypeScript 作為其超集,將上面的數據類型進行了擴充,在 TypeScript 里,可以通過各種組合創建出更加復雜的數據類型。同時,TypeScript 讓數據類型固定,成為靜態可分析的。
比如,如果一個函數的入參指定為數字,那么調用的時候傳遞了字符串,這個錯誤在寫碼過程中就直接可檢查到並拋出。
function addOne(num: number) {
  return num + 1;
}
/** 🚨Argument of type '"blah"' is not assignable to parameter of type 'number'. */

addOne("blah");
JavaScript 原始類型加上擴展的幾個類型(Any, Never, Void, Enum)組成了 TypeScript 中基本的類型。更加詳細的信息可參考 Basic Types。
Boolean
布爾值,其值只能是 true 或 false。
let isEmployee: boolean = false;
function hasPermission(role: string): boolean {

return role === "admin" ? true : false;

}
Number
數字類型,不區分整形與浮點,所有數字均當作浮點數字對待。同時也支持二進制,八進制,十六進制數字。
let decimal: number = 6;
let hex: number = 0xf00d;
let binary: number = 0b1010;
let octal: number = 0o744;
String
字符串類型。TypeScript 中可使用 ES6 以之后這些還未實現的功能,所以模板字符串是可以放心使用的。
let fruit: string = "Apple";
console.log(`My favourite fruit is ${fruit}`);
Symbol
ES6 中新增,由 Symbol() 返回的類型。
let sym = Symbol("foo");
typeof sym; // "symbol"
sym.toString(); // Symbol(foo)
注意,因為是新特性,需要在 tsconfig.json 中添加相應的庫支持,否則編譯會報錯。
{
      "lib": ["dom","es2015"] /* Specify library files to be included in the compilation. */
}
Object
除了 JavaScript 中 6 個原始類型之外的類型。
function create(source: Object) {
  return Object.create(source);
}
// ✅

create({});

// ✅

create(window);
// 🚨Argument of type 'undefined' is not assignable to parameter of type 'Object'

create(null);
// 🚨Argument of type 'undefined' is not assignable to parameter of type 'Object'.ts(2345)

create(undefined);
Null 與 Undefined
兩者其實是其他任意類型的子類型。比如,一個變量定義后沒有初始化,此時其值自動為 undefined。這說明,undefined 是可以賦值給這個類型的。當我們想把變量的值取消,將其置空時,可將其設置為 null,null 也是可以賦值給其他類型變量的,前提是 tsconfig.json 中沒有開啟 strict:true。
let age: number;
console.log(age); // undefined
age = 9;

console.log(age); // 9
age = null;

console.log(age); // null
當開啟 strict:true 強制檢查后,TypeScript 會對類型進行嚴格的檢查。上面就不能在未初始化的情況下使用變量,同時也不能將 null 賦值給 number 類型。
對於這兩種類型,在強制檢查下,除非顯式對變量進行聲明其可空可未初始化。
+ let age: number | null | undefined;
console.log(age); // undefined
age = 9;

console.log(age); // 9
age = null;

console.log(age); // null
這里 number | null | undefined 是一個組合類型(union type),后面會有提到。
一般來說,建議開啟強制檢查,這樣 TypeScript 能夠最大化幫我們發現代碼中的錯誤,在寫碼時就發現問題。
Any
表示任意類型。此時等同於普通的 JavaScript 代碼,因為標記為 any 后將會跳過 TypeScript 的類型檢查。
let someVar: any;
someVar = "飯后百步走,活到 99"; // ✅
someVar = 99; // ✅
someVar = undefined; // ✅
someVar = null; // ✅
即便在開啟強制檢查的情況下,上面的操作是沒有任何問題的。一般情況下,只在一些特殊情況下使用 any,比如老代碼的兼容,三方庫代碼的引入。
declare var $: any;
$.extenfd({}, { foo: "foo" });
這里,因為 jQuery 是沒有類型的三方庫代碼,但我們知道頁面中引入后是可以調用它上面的方法的,只是 TypeScript 不識別,所以我們通過聲明一個 any 類型的變量來快速解決這個問題。不快速的辦法就是自己動手為其編寫類型聲明文件。
Void
常見於函數沒有返回值的情況。
/** () => void */
function foo() {
  console.log("foo works");
}
如果將變量顯式設置為 void,沒有多大實際意義。因為變量始終是要用來承載有用的值的,如果你發現有這種需要,可使用 null|undefiend 代替。
Never
這個類型就比較有意思了,正如其名,表示永遠也不會發生的類型。
function error(message: string): never {
  throw new Error(message);
}
關於 never 類型,印象中最巧妙的一個示例來自 TypeScript Advanced Types 文檔中關於 Discriminated Unions 的描述。既然是高級類型,下面的示例對於初學者來說如果看不懂就先跳過吧。
interface Square {
  kind: "square";
  size: number;
}
interface Rectangle {
  kind: "rectangle";
  width: number;
  height: number;
}
interface Circle {
  kind: "circle";
  radius: number;
}
type Shape = Square | Rectangle | Circle;
function assertNever(x: never): never {

throw new Error("Unexpected object: " + x);

}
function area(s: Shape) {

switch (s.kind) {

case "square":

return s.size  s.size;
 case "rectangle":
 return s.height  s.width;

case "circle":

return Math.PI * s.radius ** 2;

default:

return assertNever(s); // error here if there are missing cases

}

}
這里定義了三種基礎的形狀類型 Square,Rectangle,Circle。同時將三種類型進行組合創建了一個聯合類型 (Union Type) Shape。 函數 area 接收一個 Shape 類型的數據並對其進行處理。因為 Shape 實際上有可能是三種類型中的其中一種,並不確定,所以需要對每個類型走不同的邏輯來處理。這里通過 never 實現了這樣一個功能:假如后面我們又增加了一種新的形狀類型,此時 area 函數能夠自動拋錯,告訴我們新增的類型沒有相應的 case 分支來處理。
數組
數組本身是容器,需要上面的基本類型聯合使用。
/** 字符串數組 */
let names: Array<string>;
/** 存放數字的數組 */

let nums: Array<number>;
/** 數組中各元素類型不確定 */

let data: Array<any>;
還可通過下面的方式來表示:
/** 字符串數組 */
let names: string[];
/** 存放數字的數組 */

let nums: number[];
/** 數組中各元素類型不確定 */

let data: any[];
當數組中元數個數有限且提前知曉每個位置的類型時,可將這種數據聲明成元組(tuple,如果你用過 Python 應該不會陌生)。
let point: [number, number] = [7, 5];
let formValidateResult: [booelan, string] = [false, "請輸入用戶名"];
枚舉
枚舉類型在強類型語言中是很常見的,用來標識變量可取的候選值。
enum Gender {
    Male,
    Female
}
console.log(Gender.Female===1); // true
枚舉實質上是通過更加語義化的符號來表示數字類型的值,比如上面 Gender.Female 代表的值是 1,因為枚舉默認從 0 開始。
可通過手動指定的方式來改變默認的 0。
enum Gender {
+  Male = 1,
  Female
}
console.log(Gender.Female); // 2
當然,你也可以讓枚舉表示其他類型的值,而不是數字。只不過需要手動指定。如果手動指定非數字類型的值,那么枚舉中的項是無法像數字那樣自動自增以初始化自己,所以需要手動為每個項都顯式指定一下它應該代表的值。
enum Gender {
  Male = "male",
  Female // 🚨 Enum member must have initializer.
}
正確的做法:
enum Gender {
  Male = "male",
  Female = "female" // ✅
}
console.log(Gender.Female); // female
枚舉中的值也不一定都得是同一類型,所以下面這樣也是可以的:
enum Gender {
  Male = "male",
  Female = 2 // ✅also ojbk
}
console.log(Gender.Female); // 2
函數類型
函數的類型包含了入參及返回值兩部分。
(num: number) => string;
看起來像其他靜態類型語言比如 Java 中的抽象方法,只有聲明沒有實現的樣子。
interface Calculator {
  name: string;
  calculate: (x: number, y: number) => number;
}
class Computer implements Calculator {

constructor(public name: string) {}

calculate(x: number, y: number) {

return x + y;

}

}
const counter: Calculator = {

name: "counter",

calculate: (x: number, y: number) => {

return x - y;

}

};
interface 與 type
通過上面的基本類型,可以抽象並定義對象。通過 interface 或 type 關鍵詞,均可定義組合的復雜類型。
type Role = "manager" | "employee";
interface Person {

name: string;

age: number;

role: Role;

}
通過 type 定義的類型,又叫 type alias,除了通過它創建類型,還可方便地為現有類型創建別名,體現了其 alias 的本意。
type Name = string;
const myName: Name = "Tom";
上面的示例意義不大, type alias 在高級類型中的作用會非常明顯,能夠為復雜類型創建別名從而使用的時候只需要寫別名即可。
type Name = string;
type NameResolver = () => string;
type NameOrResolver = Name | NameResolver;
function getName(n: NameOrResolver): Name {
  if (typeof n === "string") {
    return n;
  } else {
    return n();
  }
}
兩種類型在使用上,沒多大差別,只是盡量在代碼中保持風格統一。更加具體的差異分析可繼續閱讀 TypeScript: type alias 與 interface。
交叉類型與聯合類型
交叉類型(Intersection Types)與聯合類型(Union Types)也是屬性高級類型中的內容,前面示例中有涉及到所以這里簡單介紹。
交叉類型是通過 & 操作符創建的類型,表示新的類型為參與操作的這些類型的並集。它實際上是將多個類型進行合並,而不是像其名稱那樣取交集。
interface Student {
  id: string;
  age: number;
}
interface Employee {

companyId: string;

}
type SocialMan = Student & Employee;
let tom: SocialMan;
tom.age = 5;

tom.companyId = "CID5241";

tom.id = "ID3241";
當一個學生加上工人的屬性,他成了一個社會人,嗯。
聯合類型(Union Types)正如創建這種類型所使用的操作符 | 一樣,他表示或的關系。新類型是個疊加態,在實際運行前,你不知道它到底所屬哪種類型。
function addOne(num: number | string) {
  /** 🚨 Operator '+' cannot be applied to types 'string | number' and '1'. */
  return num + 1;
}
比如對入參加一的方法,JavaScript 中我們是可以這樣干的,如果傳入的是字符串,加號操作符會對其中一個做隱式轉換。但結果可能不是你想要的數字加 1 而是變成了字符串相加。
而 TypeScript 在此時就體現了其靜態類型的優點,因為入參在這里是不確定的類型,隨着輸入的不同得到的結果是不可預期的,這大概率會導致 bug。而這個 bug 在 TypeScript 里被提前找了出來。
function addOne(num: number | string) {
  // ✅
+  return Number(num) + 1;
}
除了像上面入參不確定的情形,像前面示例有用到過的,將多個字符串聯合,也是很常見的用法。甚至最佳實踐中,建議你用聯合字符串來代替枚舉類型。But why? 參見這里
type Role = "manager" | "employee";
類型斷言
某些情況下,TypeScript 無法自動推斷類型,此時可人工干預,對類型進行顯式轉換,我們稱之為類型斷言(Type assertions)。通過在值的前面放置尖括號,括號中指定需要的類型。
let someValue: any = "this is a string";
let strLength: number = (<string>someValue).length;
因為尖括號在寫 React 組件時會有問題,容易被錯誤地當成 JSX 標簽,所以 TypeScript 還支持另一種類型轉換的操作,通過 as 關鍵字。
let someValue: any = "this is a string";
let strLength: number = (someValue as string).length;
下面看一個更加實際的情況:
interface Person {
  name: string;
  gender: "male" | "female";
}
function sayName(person: Person) {

console.log(person);

}
const tom = {

name: "tom",

gender: "male"

};
/** 🚨Type 'string' is not assignable to type '"male" | "female"' */

sayName(tom);
這里 tom 沒有顯式指定為 Person 類型,但其實因為 TypeScript 的類型約束的是數據的結構,只要是形狀上兼容,就可以將 tom 賦值給接收 Person 類型的入參。 這種機制也類似於你聲明了一個變量並賦值個數字,這個變量自動就被推斷出類型為數字一樣,然后可以在任何地方當作數字來用,即便你並沒有顯式指明。
所以這個示例中,我們需要修正一下初始化 tom 的對象中 gender 字段的類型,然后 TypeScript 就能正確推斷出 tom 是個 Person 類型。
interface Person {
  name: string;
  gender: "male" | "female";
}
function sayName(person: Person) {

console.log(person);

}
const tom = {

name: "tom",

gender: "male" as "male" | "female"

};
/** ✅ ojbk */

sayName(tom);
結合前面提到的類型別名,這里可以用 type 為性別創建一個別名類型,減少冗余。
+ type Gender = "male" | "female";
interface Person {

name: string;

+ gender: Gender;

}
function sayName(person: Person) {

console.log(person);

}
const tom = {

name: "tom",

+ gender: "male" as Gender

};
sayName(tom);
可選參數與可空字段
定義類型時,如果字段后跟隨一個問號,表示該字段可空,此時效果相當於是該類型自動與 undefined 進行了聯合操作。以下兩個類型是等效的。
type Person = {
  name: string,
  age?: number
};
type Person2 = {

name: string,

age: number | undefined

};
對於函數入參而言,入參加上問號后,可將入參標識為可選,調用時可不傳遞。
function add(x: number, y?: number) {
  return x + (y || 1);
}
但此時可選的入參需要在參數列表中位於非可選的后面,像這樣交換順序后是不行的:
/** 🚨 A required parameter cannot follow an optional parameter. */
function add(y?: number, x: number) {
  return x + (y || 1);
}
總結
了解了一些基本的類型知識和寫法就可以進行簡單的業務編寫了。你可以從官方的這個模板頁面找到適合自己的技術棧作為練手的開始。
然后,可以系統地瀏覽一遍 Handbook,對 TypeScript 整體有個健全的了解。
其中 Advanced Types 章節里可以學習到進階的類型定義和花式玩法,高級類型對於庫的作者或寫通用公共模塊來說很有必要去了解。