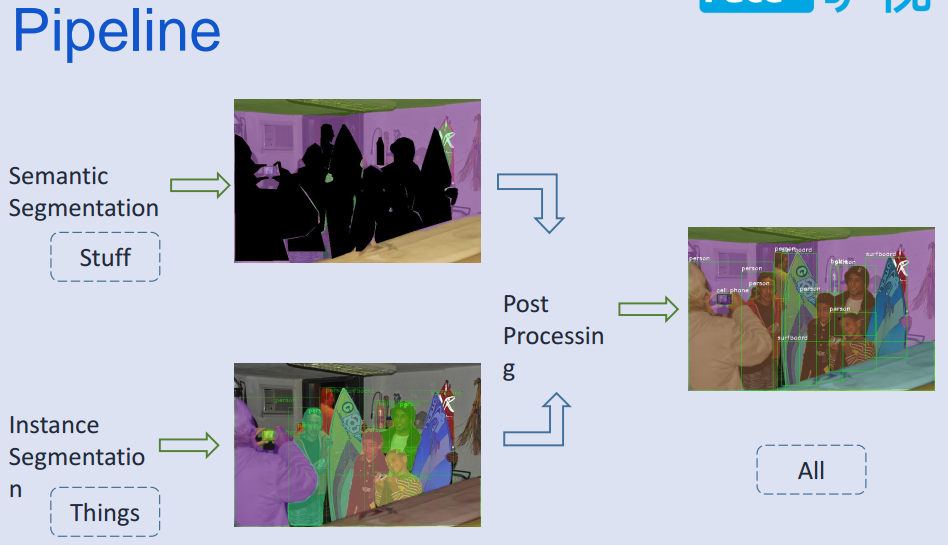
全景分割pipeline搭建
- 整體方法使用語義分割和實例分割結果,融合標簽得到全景分割結果;
-
數據集使用:panoptic_annotations_trainval2017和cityscapes;
- panoptic_annotations_trainval2017標簽為全景分割的整體標簽,之前想打算轉換成語義和實例分割標簽,在分別做各自任務,由於轉換發現有一些格式損壞的樣本在里面,需要挑出來才能繼續轉換,就暫時換成cityscpaes;
- cityscapes:發現val里面,test里面也有一些坑;
-
實例分割使用:fb最新開源的maskrcnn_benchmark,使用coco格式的數據訓練;
-
語義分割使用:deeplab系列,或者最近很多SOTA(state of the art)的分割paper,且很多開源代碼;
-
了解模型從:數據標簽輸入格式,輸出格式開始,方便直觀理解問題!!!分析數據格式及使用api!!!
coco-api
- coco.py
# The following API functions are defined:
#  COCO       - COCO api class that loads COCO annotation file and prepare data structures.
#  decodeMask - Decode binary mask M encoded via run-length encoding.
#  encodeMask - Encode binary mask M using run-length encoding.
#  getAnnIds  - Get ann ids that satisfy given filter conditions.
#  getCatIds  - Get cat ids that satisfy given filter conditions.
#  getImgIds  - Get img ids that satisfy given filter conditions.
#  loadAnns   - Load anns with the specified ids.
#  loadCats   - Load cats with the specified ids.
#  loadImgs   - Load imgs with the specified ids.
#  annToMask  - Convert segmentation in an annotation to binary mask.
#  showAnns   - Display the specified annotations.
#  loadRes    - Load algorithm results and create API for accessing them.
#  download   - Download COCO images from mscoco.org server.
# Throughout the API "ann"=annotation, "cat"=category, and "img"=image.
# Help on each functions can be accessed by: "help COCO>function".
- cocoeval.py
 # Interface for evaluating detection on the Microsoft COCO dataset.
    #
    # The usage for CocoEval is as follows:
    #  cocoGt=..., cocoDt=...       # load dataset and results
    #  E = CocoEval(cocoGt,cocoDt); # initialize CocoEval object
    #  E.params.recThrs = ...;      # set parameters as desired
    #  E.evaluate();                # run per image evaluation
    #  E.accumulate();              # accumulate per image results
    #  E.summarize();               # display summary metrics of results
cocostuff-api
- stuff:(image,label)分別為:jpg,png,可以直接加載;也有json標注的lable格式可以使用coco.py生成對象;
- 提供:cocoStuffEvalDemo.py; cocoSegmentationToPngDemo.py; pngToCocoResultDemo.py;
- cocoSegmentationToPngDemo: Converts COCO segmentation .json files (GT or results) to one .png file per image.
- pngToCocoResultDemo: Converts a folder of .png images with segmentation results back to the COCO result format.
- 可以研究一下:分割id--color(可視化用);png-->coco結果格式轉換;
panoptic-api
- 提供全景分割;語義分割和實例分割結合方法,可視化,評估方法;
- 提供全景分割和語義,實例json文件之間的轉換;
cityscapes-api
-
提供數據label.py
-
將json轉為png(TrainId,InstanId)
-
evaluation代碼很長...;貌似本身的評估代碼實在id[0-33]上做的,再考慮忽略的類別;
-
第三方有:https://github.com/facebookresearch/Detectron/tree/master/tools ;提供cityscape轉coco格式代碼;
-
這些數據api真的很讓人頭昏...代碼太長;不好理解...
maskrcnn_benchmark
- coco+cityscape: 需要將cityscapes轉成coco格式;然后進行訓練;
- cityscapes輸出類別為1-8:
    category_instancesonly = [
        'person',
        'rider',
        'car',
        'truck',
        'bus',
        'train',
        'motorcycle',
        'bicycle',
    ]
- 輸出result的格式,針對每個image_id生成多個mask:
[{"category_id": 5, "image_id": 0, "segmentation": {"counts": "b]_`04go08J4L3N2N2N2O0N20001N101O01OO01003N1N1O1O2M3K4I8M2O1O2O0000000000000000000`RObN^l0^1`SOoNUl0P1iSO^Omk0a0QTOLdk05oSOaNN`1Pl0W201O10N1N2N1O1O2N1UOnSO_MJI[l0X2Y1J6K4L6G7K6[Oe0K6I<Dhbb]1", "size": [1024, 2048]}, "score": 0.9218586087226868},
{"category_id": 5, "image_id": 0, "segmentation": {"counts": "]]jf05ho06K4M2gPODjn0>UQOFfn0<YQOFdn0=[QOCdn0<_QOB`n0??2O1N2L4O1O100O101OO10001O1O1OjQOPOZO7jm0f0aROJ`m04_RONbm00^RO0cm00]ROOcm03ZRONgm03RROFOBVn0Y1;N4M5K2M3L4M4L3M3NZbmW1", "size": [1024, 2048]}, "score": 0.8764787316322327},
{"category_id": 5, "image_id": 0, "segmentation": {"counts": "T\\5Q1j0Lfj0KSUOa2dj0g1`UO^KPi0Q6H8I5K3NO10O011O000000O1O1001O00001O1O2N5K6J5K3M5K6J001O1O00O100O1QNgXOWKYg0f4nXOUKSg0j4PYOSKRg0k4QYORKPg0m4VYOmJkf0R5ZYOgJjf0X5Q2N4L2M5fJkUO_4oj0L3N2O1N2N1N2M201O0100ON2N2M3N2M3K6L3K6D<I8_Oa0G8@a0G9H7IYd`m1", "size": [1024, 2048]}, "score": 0.9860864877700806}, {"category_id": 5, "image_id": 0, "segmentation": {"counts": "l\\o:V1fn0?C7J6H?
- 即這樣的格式coco reuslt格式:
- 實例分割相比cocostuff多一個score字段;檢測結果將segmentation換成box即可;
annotation
[{
    "image_id": int,
    "category_id": int,
    "segmentation": RLE,
    "score": float,
}]
- 通過coco.py中loadRes()轉換為數據原始(標注格式):補充一些字段
{
    "info": info,
    "images": [image],
    "annotations": [annotation],
    "licenses": [license],
}
annotation{
    "id": int,
    "image_id": int,
    "category_id": int,
    "segmentation": RLE or [polygon],
    "area": float,
    "bbox": [x,y,width,height],
    "iscrowd": 0 or 1,
}
categories[{
    "id": int,
    "name": str,
    "supercategory": str,
}]
- cityscapes實例分割instance segmentation實驗記錄指標:
- Ps:訓練coco,cityscapes數據時mAP和官方一直,cityscapes使用coco finetune時調參玄學,多卡lr=0.0001,結果離譜,單卡正確的;
| time | set | data_val | segAP | mAp |
|---|---|---|---|---|
| paper | fine | 0.315 | ||
| paper | fine+coco | 0.365 | ||
| 2018-12-06 | 單卡 | fine | 0.217 | 0.266 |
| 2018-12-11 | 多卡 | fine | 0.238 | 0.278 |
| 2018-12-08 | 單卡 | fine+coco | 0.285 | 0.331 |
| 2018-12-23 | 單卡 | fine | 0.33 | |
| 2018-12-26 | 單卡 | coco+fine | 0.344 | 0.397 |
DeeplabV3_Plus
- 代碼風格和deeplab-pytorch類似;
- 使用gtFine_labelIds.png[0-33]當做標簽讀入;但是會通過下面函數轉換到[-1-18],然后就可以直接評估;體會
self._key[index]操作:index為整張圖mask[0-33],_key為[-1,18];每個index里面的值去對應_key位置的值; - mask = (gt_image >= 0) & (gt_image < self.num_class)把-1當做unlabel標簽;
    self._key = np.array([-1, -1, -1, -1, -1, -1,
                              -1, -1, 0, 1, -1, -1,
                              2, 3, 4, -1, -1, -1,
                              5, -1, 6, 7, 8, 9,
                              10, 11, 12, 13, 14, 15,
                              -1, -1, 16, 17, 18])
    def _class_to_index(self, mask,filename=None):
        # assert the values
        values = np.unique(mask)
        for value in values:
            if value not in self._mapping :
                print(filename)
            assert (value in self._mapping)
        index = np.digitize(mask.ravel(), self._mapping, right=True)
        return self._key[index].reshape(mask.shape)
- 輸出結果和label一樣:id值組成,對用color進行可視化;怎么轉換為coco格式?
- cityscapes語義分割semantic segmentation實驗deeplabv3+記錄指標:
- DeeplabV3_Plus訓練也很吃勁,首先batchsize上不去,訓練的結果和paper也差一截;貌似本身代碼還有點問題在issue中有人提出BN參數沒有初始化!
| time | set | data_val | mIoU | MPA1 | PA1 |
|---|---|---|---|---|---|
| paper | x-65-val | ~78 | |||
| 2018-12-12 | resnet101-batch-4-513-0.007-30000 | val | ~ | 0.67874 | 0.86852 |
| 2018-12-15 | resnet101-batch4-513-0.01-lossweight | val | 0.4806 | 0.68173 | 0.902740 |
| 2018-12-18 | resnet101-batch8-513-0.007-40000 | val | 0.6886 | 0.78306 | 0.955859 |
| 2018-12-19 | resnet101-batch8-513-0.01-finetune-30000 | val | 0.7006 | 0.7864 | 0.95813 |
deeplab-pytorch
- dataset: cocostuff-10k(IGNORE_LABEL: -1)/164K(IGNORE_LABEL: 255)
- The unlabeled index is 0 in 10k version while 255 in 164k full version.
- 輸入在[0,cllass_num]范圍的標簽;
- 官方推薦Pytorch代碼,值得學習:梯度累積,學習率設置,訓練方法;
tensorflow-deeplab api
- dataset:cityscapes,pascal_voc_seg,ade20k;
- 官方deeplab代碼復現,應該也是有坑的,issue討論很多;
_CITYSCAPES_INFORMATION = DatasetDescriptor(
    splits_to_sizes={
        'train': 2975,
        'val': 500,
    },
    num_classes=19,
    ignore_label=255,
)

_PASCAL_VOC_SEG_INFORMATION = DatasetDescriptor(
    splits_to_sizes={
        'train': 1464,
        'train_aug': 10582,
        'trainval': 2913,
        'val': 1449,
    },
    num_classes=21,
    ignore_label=255,
)

# These number (i.e., 'train'/'test') seems to have to be hard coded
# You are required to figure it out for your training/testing example.
_ADE20K_INFORMATION = DatasetDescriptor(
    splits_to_sizes={
        'train': 20210,  # num of samples in images/training
        'val': 2000,  # num of samples in images/validation
    },
    num_classes=151,
    ignore_label=0,
)
- 其中cityscapes: 首先通過convert_cityscapes.sh生成[0-18]范圍的trainIdImag;這樣的label直接訓練,評估;但是最終可視化的時候,需要將trainId轉化為真實id;
- 即使用:gtFine_labelTrainIds.png進行訓練;
# To evaluate Cityscapes results on the evaluation server, the labels used
# during training should be mapped to the labels for evaluation.
_CITYSCAPES_TRAIN_ID_TO_EVAL_ID = [7, 8, 11, 12, 13, 17, 19, 20, 21, 22,
                                   23, 24, 25, 26, 27, 28, 31, 32, 33]

def _convert_train_id_to_eval_id(prediction, train_id_to_eval_id):
  """Converts the predicted label for evaluation.

  There are cases where the training labels are not equal to the evaluation
  labels. This function is used to perform the conversion so that we could
  evaluate the results on the evaluation server.

  Args:
    prediction: Semantic segmentation prediction.
    train_id_to_eval_id: A list mapping from train id to evaluation id.

  Returns:
    Semantic segmentation prediction whose labels have been changed.
  """
  converted_prediction = prediction.copy()
  for train_id, eval_id in enumerate(train_id_to_eval_id):
    converted_prediction[prediction == train_id] = eval_id

  return converted_prediction
- 該函數就是將輸出lable轉為color map;體會
colormap[label]的映射關系;
def label_to_color_image(label, dataset=_PASCAL):
  """Adds color defined by the dataset colormap to the label.

  Args:
    label: A 2D array with integer type, storing the segmentation label.
    dataset: The colormap used in the dataset.

  Returns:
    result: A 2D array with floating type. The element of the array
      is the color indexed by the corresponding element in the input label
      to the dataset color map.

  Raises:
    ValueError: If label is not of rank 2 or its value is larger than color
      map maximum entry.
  """
  if label.ndim != 2:
    raise ValueError('Expect 2-D input label')

  if np.max(label) >= _DATASET_MAX_ENTRIES[dataset]:
    raise ValueError('label value too large.')

  colormap = create_label_colormap(dataset)
  return colormap[label]
result&&bug
- 使用多線程進行數據轉換,可以參考:panoptic-api代碼風格;
- maskrcnn訓練coco和cityscapes能達到paper指標!使用coco初始化finetune cityscapes訓練過程很奇怪,使用兩張卡,試了很多中學習率,結果都差的離譜;單卡lr=0.0001/2卻能得到正確mAP;
- deeplab-pytorch訓練cocostuff10k可能復現github上的結果;
- tensorflow-api可以訓練測試,但是測試結果很差!使用官方model也一樣;發現語義分割任務對顯存消耗很大;
- 目前在可以確認實例分割和語義分割最終呈現形式:json和png的結果;實際應用當然要加更好的可視化效果;
- 目前沒有將實例分割和語義分割結果進行結合;
- 再看看panoptic-api使用,語義分割png轉成coco格式;
總結
- 最近兩個月時間的2018-11-15---2018-12-30的工作;
- 這里面代碼細節還有很多沒有弄懂,訓練方法有有待積累;
- 話說這之前對檢測分割的算法了解一些,但是代碼基本沒有訓練過;深入研究才發現,雖說這些方向目前業界發展比較快,貌似可以落地應用;但是這里面的坑太多,paper層出不窮,還有很多細節需要慢慢體會,可能只有真正實際應用才能發現bug太多!!!
- 針對語義分割,發現最近很多paper,還有復現的困難性,網絡大,跨GPU-BN等實現;
- 坑太多,暫且打住,以后有具體任務再實踐!
reference
- Panoptic Segmentation
- COCO 2018 Panoptic Segmentation Task
- Joint COCO and Mapillary Recognition Challenge Workshop at ECCV 2018
- Mask R-CNN
- Path Aggregation Network for Instance Segmentation
- Encoder-Decoder with Atrous Separable Convolution for Semantic Image Segmentation
- 語義分割 - Semantic Segmentation Papers