本文由作者潘威授權網易雲社區發布。
前言
越來越多的項目開始嘗試寫單元測試,關於單元測試的好處以及原理已經有很多資料了,這里不在做過多的講述,本文主要介紹單元測試在模塊化應用中的一些思考,以及如何優雅的寫單元測試。
易於測試的代碼
單元測試最大的痛點就是代碼耦合,比如直接持有第三方庫的引用、不合理的跨層調用等等,除此之外,static method、new object、singleton 都是不利於測試的代碼方式, 這就意味着需要 mock 大量的替身類,增加了測試成本,應該盡量避免,同時使用依賴注入的方式來代替。
如何做好單元測試?
首先,在模塊化應用中應該創建公共的單元測試模塊,里面可以放一些公共的 BaseTest、Shadow Class、Utils、Junit rules 等等,在業務模塊中直接 dependency 進來即可,提高寫單元測試的效率。
其次,明確需要測試的代碼。剛開始的時候,可以只測中間邏輯層和工具類,這部分代碼相對“干凈”,易於測試,也是邏輯分支最集中的地方。
最后,依賴注入來寫單元測試。試想一下 mock 的類都能夠自動完成注入,是不是很爽?這樣能大大提高編寫測試用例的速度,避免重復的 mock 替身類和靜態方法,並提高測試代碼的可讀性。
所以,我們引入了DI框架來做這件事情!
1、開發階段
我們只需要在一個類似於 dependency 工廠的地方統一生產這些 dependency 對象,以及這些 dependency 的 dependency。所有需要用到這些 dependency 的地方都從這個工廠里面去獲取。
2、測試階段
定義一個同樣的 dependency 工廠,不同的是,該工廠生產的是測試所需要的 Shadow 替身,能夠自動識別依賴關系,並實現自動注入!
Dagger2 的應用
沒錯!前面提到的 DI 框架就是 Dagger2,為了降低風險並減少使用成本,選擇了一個模塊進行嘗試,Dagger2 既能實現模塊內的自動注入,又能向外提供注入能力,實現跨模塊的注入。
在 Dagger2 里,生產這些 dependency 的工廠叫做 Module ,然而使用者並不是直接向 Module 要 dependency,而是有一個專門的“工廠管理員”,負責接收使用者的要求,然后到 Module 里面去找到相應的 dependency 對象,最后提供給使用者。這個“工廠管理員”叫做 Component。基本上,這就是 Dagger2 里面最重要的兩個概念。
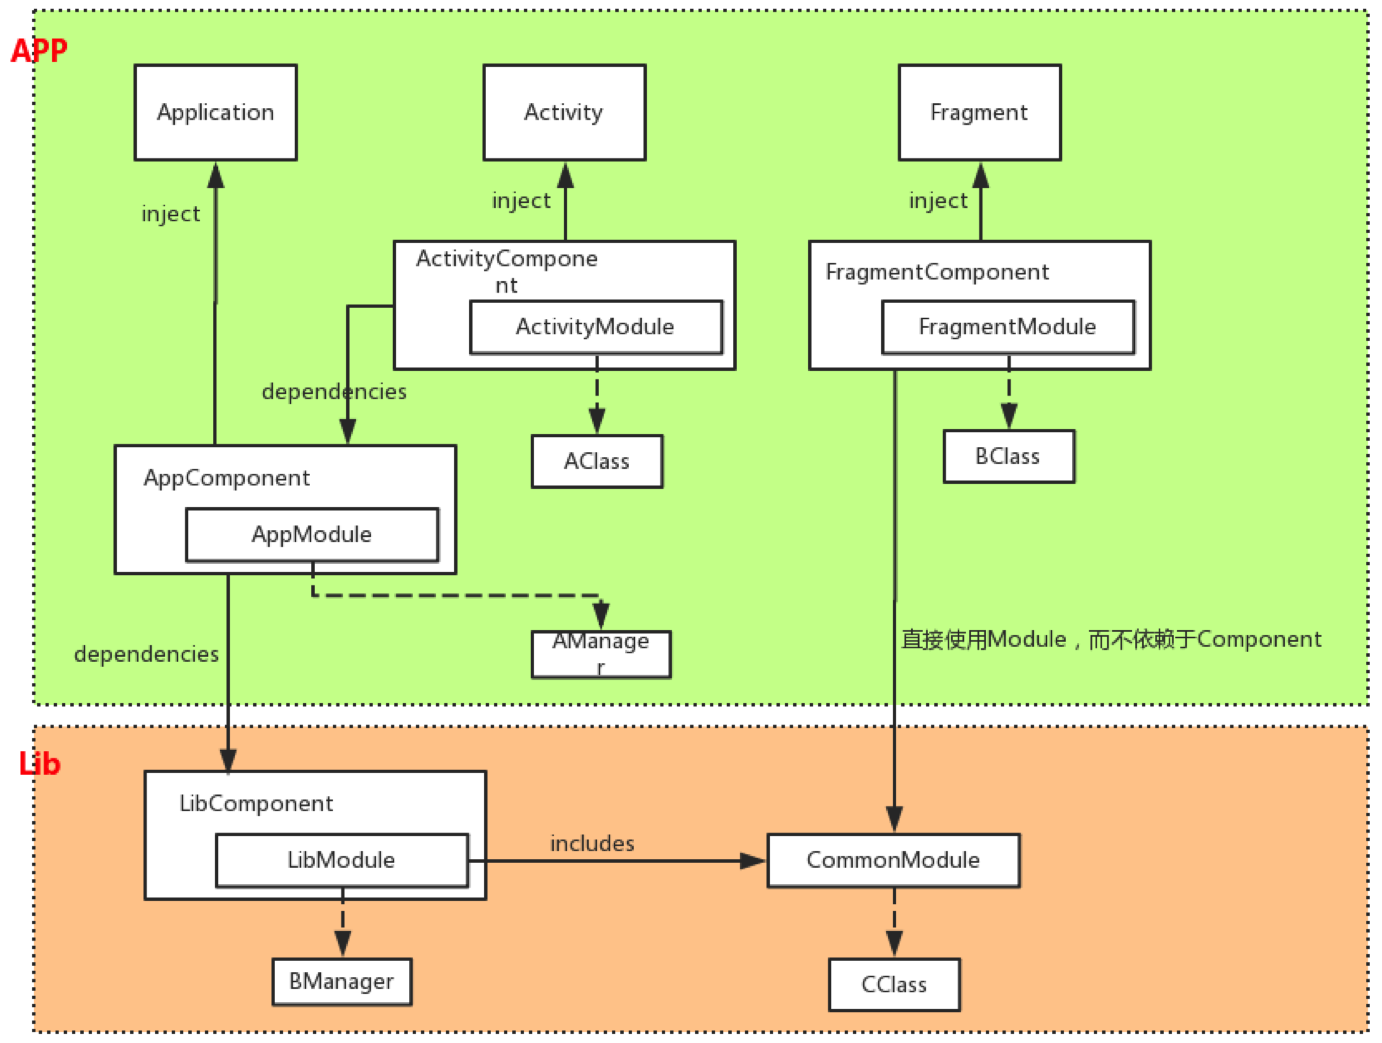
上圖是 Dagger2 在模塊之間的依賴關系,本文只介紹模塊內的應用以及單元測試的實現。
1、創建模塊級的 LibComponent 和 LibModule
LibModule里面定義了整個模塊都要用的dependency,比如PersonalContentInstance 、Scope、 DataSource等等,所以DaggerLibComponent的存在是唯一的,在模塊初始化的時候創建好,放在一個地方便於獲取。
mInstance.mComponent = DaggerPersonalContentLibComponent.builder()
                .personnalContentLibModule(new PersonnalContentLibModule())
                .build();
2、創建 Frame 級別的 FrameComponent 和 FrameModule
FrameModule 里面定義了某個頁面用到的 dependency,比如 Context、Handler、Logic、Adapter 等等,每個頁面對應一個 DaggerFrameComponent,在頁面的 onCreate() 里面創建好。
3、FrameComponent 依賴於 LibComponent
在 Frame 中可以享受到 LibComponent 中全局依賴的注入,只需要在頁面初始化的時候完成注入即可。
DaggerFrameComponent.builder()
    .libComponent(mInstance.getComponent())
    .frameModule(new FrameModule(this))
    .build()
    .injectMembers(this);
再看看單元測試里面如何來mock dependency? 比如,LearnRecordDetailLogic 會調用mScope 和 mDataSource 中的方法,而 IPersonalContentScope 和 IDataSource 的實例對象是從 Dagger2 的 Component 里面獲取的,怎樣把 mScope 和 mDataSource 給 mock 掉呢?
實際上,LearnRecordDetailLogic 向 DaggerLibComponent 獲取實例調用的是 PersonnalContentLibModule 中的 provideDataSource() 和 provideScope() 方法,最后返回給 LearnRecordDetailLogic ,也就是說,真正實例化 IPersonalContentScope 和 IDataSource 的地方是在 PersonnalContentLibModule。
@Modulepublic class PersonnalContentLibModule {
    ......    @PerLibrary
    @Provides
    PersonalContentInstance providePersonalContentInstance() {        return PersonalContentInstance.getInstance();
    }    @PerLibrary
    @Provides
    IPersonalContentScope provideScope(PersonalContentInstance instance) {        return instance.getScope();
    }    @PerLibrary
    @Provides
    IDataSource provideDataSource(PersonalContentInstance instance) {        return instance.getDataSourse();
    }
}
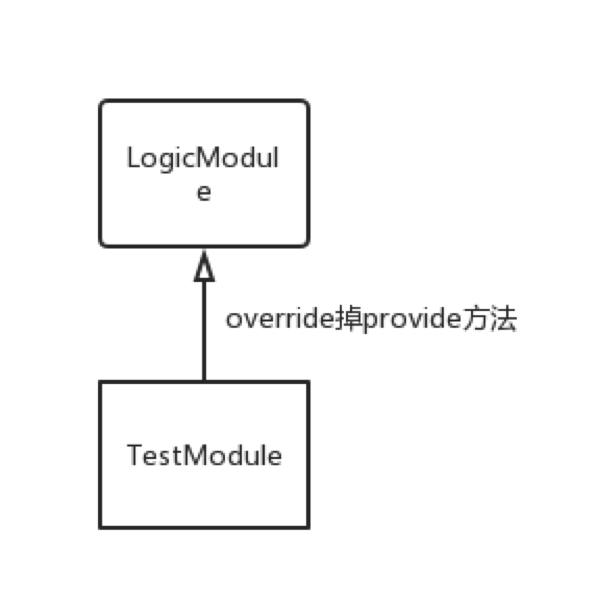
前面創建 DaggerLibComponent 的時候,給它的 builder 傳遞了一個 PersonnalContentLibModule 對象,如果我們傳給 DaggerLibComponent 的 Module 是一個 TestModule,在它的 provide 方法被調用時,返回一個 mock 的 IPersonalContentScope 和 IDataSource,那么在測試代碼中獲得的,不就是 mock 后的替身對象嗎?
public class PersonnalContentLibTestModule extends PersonnalContentLibModule {
    ......    @Override
    PersonalContentInstance providePersonalContentInstance() {        return PowerMockito.mock(PersonalContentInstance.class);
    }    @Override
    IPersonalContentScope provideScope(PersonalContentInstance instance) {        return PowerMockito.mock(IPersonalContentScope.class);
    }    @Override
    IDataSource provideDataSource(PersonalContentInstance instance) {        return PowerMockito.mock(IDataSource.class);
    }
}
以上就是 Dagger2 在單元測試里的應用。在 LibModule 的基礎上派生出一個 LibTestModule,除此之外,LearnRecordDetailLogic 還用到了 Context 和 Handler 對象,所以需要創建一個Frame級別的 Module,然后 override 掉 provide方法,讓它返回你想要的 mock 對象。
看一下效果,越復雜的類越能發揮出 Dagger2 的威力!
//使用dagger之前mContext = mock(Context.class);
mHandler = mock(Handler.class);
mDataSource = mock(IDataSource.class);
mScope = mock(IPersonalContentScope.class);
mContentInstance = mock(PersonalContentInstance.class);
when(mContentInstance.getDataSourse()).thenReturn(mDataSource);
when(mContentInstance.getScope()).thenReturn(mScope);
mockStatic(PersonalContentInstance.class);
when(PersonalContentInstance.getInstance()).thenReturn(mContentInstance);//daggerDaggerFrameTestComponent.builder()
    .libComponent(ComponentUtil.getLibTestComponent)
    .frameTestModule(new FrameTestModule())
    .build()
    .inject(this);
總結
本文介紹了 Dagger2 在模塊內以及單元測試中的應用,DI是一種很好的開發模式,即使不做單元測試,也會讓我們的代碼更加簡潔、干凈、解耦,只不過在單元測試中發揮出了更大的威力,讓很多難測的代碼測試起來更加容易。
最后,介紹一下 Dagger2 的配置方法:
在模塊的 build.gradle 中添加
dependencies {
    //other dependencies

    //Dagger2
    compile "com.google.dagger:dagger:${DAGGER_VERSION}"
    annotationProcessor "com.google.dagger:dagger-compiler:${DAGGER_VERSION}"}
正常情況下,main 目錄下的源代碼 build 后,生成代碼放在 /build/generated/source/apt/buildType 下面,但是 test 目錄下的測試代碼,在 compile-time 階段卻無法識別。查看 build 目錄,發現存在這部分代碼,但是無法正常 import 進來。所以還需要在 build.gradle 中添加如下代碼:
android.libraryVariants.all {    def aptOutputDir = new File(buildDir, "generated/source/apt/${it.unitTestVariant.dirName}")
    it.unitTestVariant.addJavaSourceFoldersToModel(aptOutputDir)
}
免費領取驗證碼、內容安全、短信發送、直播點播體驗包及雲服務器等套餐
更多網易技術、產品、運營經驗分享請訪問網易雲社區。
相關文章:
【推薦】 基於Redis+Kafka的首頁曝光過濾方案