你很可能從某種途徑聽說過 Go 語言。它越來越受歡迎,並且有充分的理由可以證明。 Go 快速、簡單,有強大的社區支持。學習這門語言最令人興奮的一點是它的並發模型。 Go 的並發原語使創建多線程並發程序變得簡單而有趣。我將通過插圖介紹 Go 的並發原語,希望能點透相關概念以方便后續學習。本文是寫給 Go 語言編程新手以及准備開始學習 Go 並發原語 (goroutines 和 channels) 的同學。
單線程程序 vs. 多線程程序
你可能已經寫過一些單線程程序。一個常用的編程模式是組合多個函數來執行一個特定任務,並且只有前一個函數准備好數據,后面的才會被調用。

首先我們將用上述模式編寫第一個例子的代碼,一個描述挖礦的程序。它包含三個函數,分別負責執行尋礦、挖礦和練礦任務。在本例中,我們用一組字符串表示 rock(礦山) 和 ore(礦石),每個函數都以它們作為輸入,並返回一組 “處理過的” 字符串。對於一個單線程的應用而言,該程序可能會按如下方式來設計:
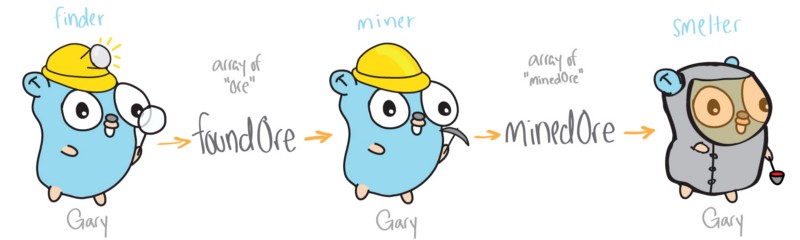
它有三個主要的函數:finder、miner 和 smelter。該版本的程序的所有函數都在單一線程中運行,一個接着一個執行,並且這個線程 (名為 Gary 的 gopher) 需要處理全部工作。
func main() {
    theMine := [5]string{"rock", "ore", "ore", "rock", "ore"}
    foundOre := finder(theMine)
    minedOre := miner(foundOre)
    smelter(minedOre)
}
在每個函數最后打印出 "ore" 處理后的結果,得到如下輸出:
From Finder: [ore ore ore]
From Miner: [minedOre minedOre minedOre]
From Smelter: [smeltedOre smeltedOre smeltedOre]
這種編程風格具有易於設計的優點,但是當你想利用多個線程並執行彼此獨立的函數時會發生什么呢?這就是並發程序設計發揮作用的地方。
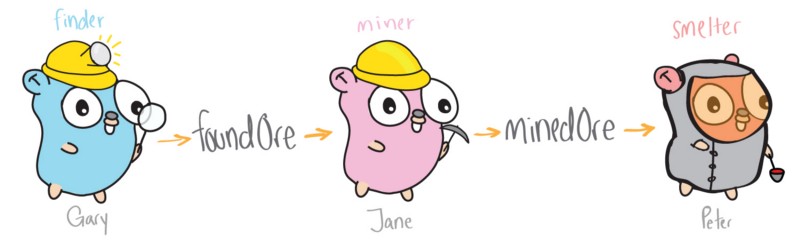
這種設計使得 “挖礦” 更高效。現在多個線程 (gophers) 是獨立運行的,從而 Gary 不再承擔全部工作。其中一個 gopher 負責尋礦,一個負責挖礦,另一個負責練礦,這些工作可能同時進行。
為了將這種並發特性引入我們的代碼,我們需要創建獨立運行的 gophers 的方法以及它們之間彼此通信 (傳送礦石) 的方法。這就需要用到 Go 的並發原語:goroutines 和 channels。
Goroutines
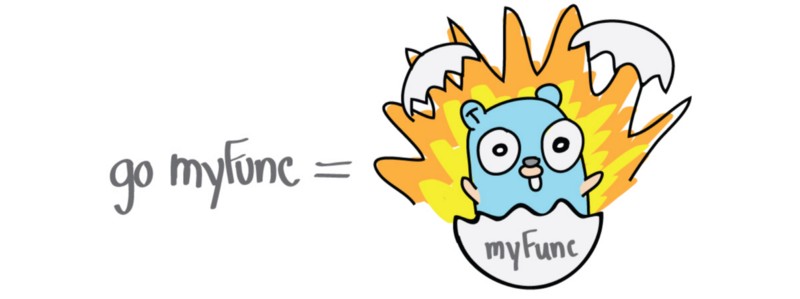
Goroutines 可以看作是輕量級線程。創建一個 goroutine 非常簡單,只需要把 go 關鍵字放在函數調用語句前。為了說明這有多么簡單,我們創建兩個 finder 函數,並用 go 調用,讓它們每次找到 "ore" 就打印出來。
func main() {
    theMine := [5]string{"rock", "ore", "ore", "rock", "ore"}
    go finder1(theMine)
    go finder2(theMine)
    <-time.After(time.Second * 5) //you can ignore this for now
}
程序的輸出如下:
Finder 1 found ore!
Finder 2 found ore!
Finder 1 found ore!
Finder 1 found ore!
Finder 2 found ore!
Finder 2 found ore!
可以看出,兩個 finder 是並發運行的。哪一個先找到礦石沒有確定的順序,當執行多次程序時,這個順序並不總是相同的。
這是一個很大的進步!現在我們有一個簡單的方法來創建多線程 (multi-gopher) 程序,但是當我們需要獨立的 goroutines 之間彼此通信會發生什么呢?歡迎來到神奇的 channels 世界。
Channels

Channels 允許 go routines 之間相互通信。你可以把 channel 看作管道,goroutines 可以往里面發消息,也可以從中接收其它 go routines 的消息。
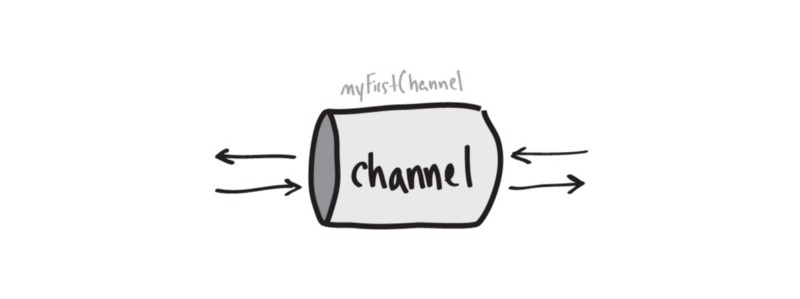
myFirstChannel := make(chan string) Goroutines 可以往 channel 發送消息,也可以從中接收消息。這是通過箭頭操作符 (<-) 完成的,它指示 channel 中的數據流向。

myFirstChannel <-"hello" // Send myVariable := <- myFirstChannel // Receive 現在通過 channel 我們可以讓尋礦 gopher 一找到礦石就立即傳送給開礦 gopher ,而不用等發現所有礦石。
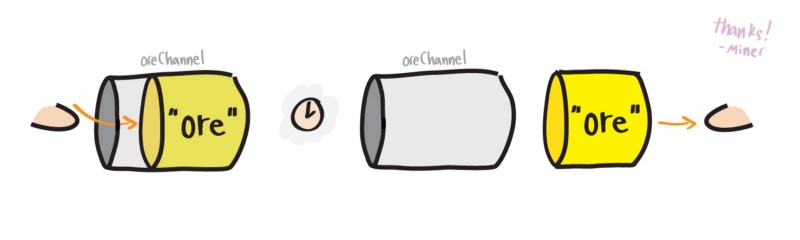
我重寫了挖礦程序,把尋礦和開礦函數改寫成了未命名函數。如果你從未見過 lambda 函數,不必過多關注這部分,只需要知道每個函數將通過 go 關鍵字調用並運行在各自的 goroutine 中。重要的是,要注意 goroutine 之間是如何通過 channel oreChan 傳遞數據的。別擔心,我會在最后面解釋未命名函數的。
func main() {
    theMine := [5]string{"ore1", "ore2", "ore3"}
    oreChan := make(chan string)

    // Finder
    go func(mine [5]string) {
        for _, item := range mine {
            oreChan <- item //send
        }
    }(theMine)

    // Ore Breaker
    go func() {
        for i := 0; i < 3; i++ {
            foundOre := <-oreChan //receive
            fmt.Println("Miner: Received " + foundOre + " from finder")
        }
    }()
    <-time.After(time.Second * 5) // Again, ignore this for now
}
從下面的輸出,可以看到 Miner 從 oreChan 讀取了三次,每次接收一塊礦石。
Miner: Received ore1 from finder
Miner: Received ore2 from finder
Miner: Received ore3 from finder
太棒了,現在我們能在程序的 goroutines(gophers) 之間發送數據了。在開始用 channels 寫復雜的程序之前,我們先來理解它的一些關鍵特性。
Channel Blocking
Channels 阻塞 goroutines 發生在各種情形下。這能在 goroutines 各自歡快地運行之前,實現彼此之間的短暫同步。
Blocking on a Send

一旦一個 goroutine(gopher) 向一個 channel 發送數據,它就被阻塞了,直到另一個 goroutine 從該 channel 取走數據。
Blocking on a Receive

和發送時情形類似,一個 goroutine 可能阻塞着等待從一個 channel 獲取數據,如果還沒有其他 goroutine 往該 channel 發送數據。
一開始接觸阻塞的概念可能令人有些困惑,但你可以把它想象成兩個 goroutines(gophers) 之間的交易。 其中一個 gopher 無論是等着收錢還是送錢,都需要等待交易的另一方出現。
既然已經了解 goroutine 通過 channel 通信可能發生阻塞的不同情形,讓我們討論兩種不同類型的 channels: unbuffered 和 buffered 。選擇使用哪一種 channel 可能會改變程序的運行表現。
Unbuffered Channels
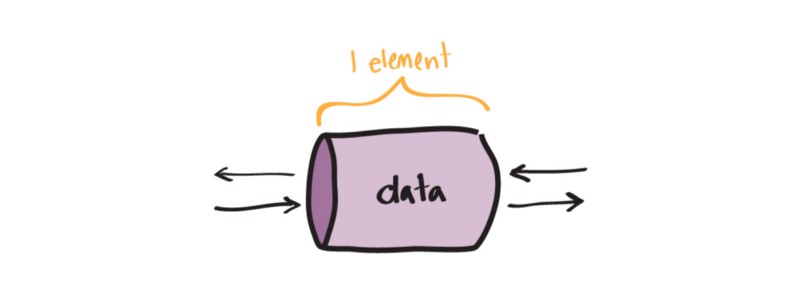
在前面的例子中我們一直在用 unbuffered channels,它們與眾不同的地方在於每次只有一份數據可以通過。
Buffered Channels
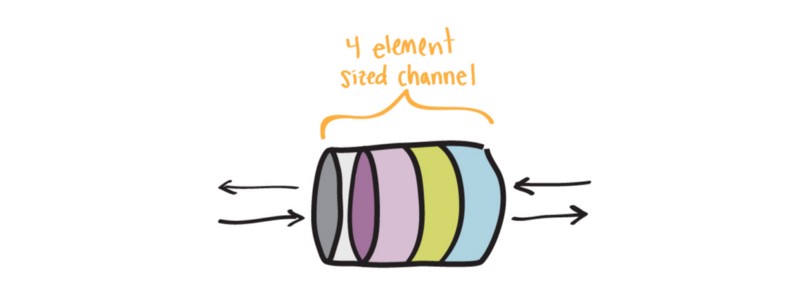
在並發程序中,時間協調並不總是完美的。在挖礦的例子中,我們可能遇到這樣的情形:開礦 gopher 處理一塊礦石所花的時間,尋礦 gohper 可能已經找到 3 塊礦石了。為了不讓尋礦 gopher 浪費大量時間等着給開礦 gopher 傳送礦石,我們可以使用 buffered channel。我們先創建一個容量為 3 的 buffered channel。
bufferedChan := make(chan string, 3) buffered 和 unbuffered channels 工作原理類似,但有一點不同—在需要另一個 gorountine 取走數據之前,我們可以向 buffered channel 發送多份數據。
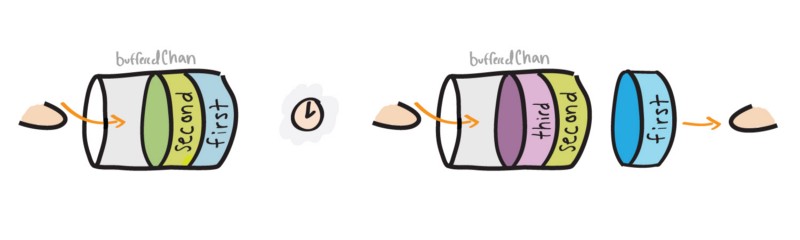
bufferedChan := make(chan string, 3)

go func() {
    bufferedChan <-"first"
    fmt.Println("Sent 1st")
    bufferedChan <-"second"
    fmt.Println("Sent 2nd")
    bufferedChan <-"third"
    fmt.Println("Sent 3rd")
}()

<-time.After(time.Second * 1)

go func() {
    firstRead := <- bufferedChan
    fmt.Println("Receiving..")
    fmt.Println(firstRead)
    secondRead := <- bufferedChan
    fmt.Println(secondRead)
    thirdRead := <- bufferedChan
    fmt.Println(thirdRead)
}()
兩個 goroutines 之間的打印順序如下:
Sent 1st
Sent 2nd
Sent 3rd
Receiving..
first
second
third
為了簡單起見,我們在最終的程序中不使用 buffered channels。但知道該使用哪種 channel 是很重要的。
注意: 使用 buffered channels 並不會避免阻塞發生。例如,如果尋礦 gopher 比開礦 gopher 執行速度快 10 倍,並且它們通過一個容量為 2 的 buffered channel 進行通信,那么尋礦 gopher 仍會發生多次阻塞。
把這些都放到一起
現在憑借 goroutines 和 channels 的強大功能,我們可以使用 Go 的並發原語編寫一個充分發揮多線程優勢的程序了。
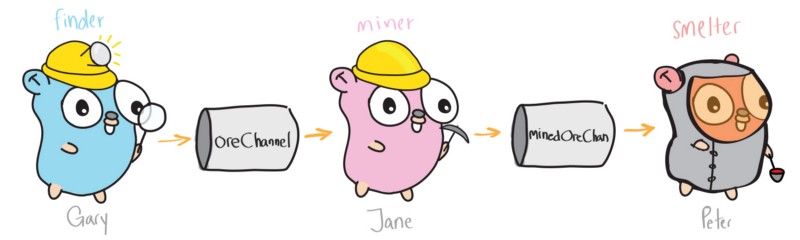
theMine := [5]string{"rock", "ore", "ore", "rock", "ore"}
oreChannel := make(chan string)
minedOreChan := make(chan string)

// Finder
go func(mine [5]string) {
    for _, item := range mine {
        if item == "ore" {
            oreChannel <- item //send item on oreChannel
        }
    }
}(theMine)

// Ore Breaker
go func() {
    for i := 0; i < 3; i++ {
        foundOre := <-oreChannel //read from oreChannel
        fmt.Println("From Finder:", foundOre)
        minedOreChan <-"minedOre" //send to minedOreChan
    }
}()

// Smelter
go func() {
    for i := 0; i < 3; i++ {
        minedOre := <-minedOreChan //read from minedOreChan
        fmt.Println("From Miner:", minedOre)
        fmt.Println("From Smelter: Ore is smelted")
    }
}()

<-time.After(time.Second * 5) // Again, you can ignore this
程序輸出如下:
From Finder:  ore
From Finder:  ore
From Miner:  minedOre
From Smelter: Ore is smelted
From Miner:  minedOre
From Smelter: Ore is smelted
From Finder:  ore
From Miner:  minedOre
From Smelter: Ore is smelted
相比最初的例子,已經有了很大改進!現在每個函數都獨立地運行在各自的 goroutines 中。此外,每次處理完一塊礦石,它就會被帶進挖礦流水線的下一個階段。
為了專注於理解 goroutines 和 channel 的基本概念,上文有些重要的信息我沒有提,如果不知道的話,當你開始編程時它們可能會造成一些麻煩。既然你已經理解了 goroutines 和 channel 的工作原理,在開始用它們編寫代碼之前,讓我們先了解一些你應該知道的其他信息。
在開始之前,你應該知道...
匿名的 Goroutines

類似於如何利用 go 關鍵字使一個函數運行在自己的 goroutine 中,我們可以用如下方式創建一個匿名函數並運行在它的 goroutine 中:
// Anonymous go routine
go func() {
    fmt.Println("I'm running in my own go routine")
}()
如果只需要調用一次函數,通過這種方式我們可以讓它在自己的 goroutine 中運行,而不需要創建一個正式的函數聲明。
main 函數是一個 goroutine

main 函數確實運行在自己的 goroutine 中!更重要的是要知道,一旦 main 函數返回,它將關掉當前正在運行的其他 goroutines。這就是為什么我們在 main 函數的最后設置了一個定時器—它創建了一個 channel,並在 5 秒后發送一個值。
<-time.After(time.Second * 5) // Receiving from channel after 5 sec 還記得 goroutine 從 channel 中讀數據如何被阻塞直到有數據發送到里面吧?通過添加上面這行代碼,main routine 將會發生這種情況。它會阻塞,以給其他 goroutines 5 秒的時間來運行。
現在有更好的方式阻塞 main 函數直到其他所有 goroutines 都運行完。通常的做法是創建一個 done channel, main 函數在等待讀取它時被阻塞。一旦完成工作,向這個 channel 發送數據,程序就會結束了。

func main() {
    doneChan := make(chan string)

    go func() {
        // Do some work…
        doneChan <- "I'm all done!"
    }()

    <-doneChan // block until go routine signals work is done
}
你可以遍歷 channel
在前面的例子中我們讓 miner 在 for 循環中迭代 3 次從 channel 中讀取數據。如果我們不能確切知道將從 finder 接收多少塊礦石呢?
好吧,類似於對集合數據類型 (注: 如 slice) 進行遍歷,你也可以遍歷一個 channel。
更新前面的 miner 函數,我們可以這樣寫:
// Ore Breaker
go func() {
    for foundOre := range oreChan {
        fmt.Println("Miner: Received " + foundOre + " from finder")
    }
}()
由於 miner 需要讀取 finder 發送給它的所有數據,遍歷 channel 能確保我們接收到已經發送的所有數據。
遍歷 channel 會阻塞,直到有新數據被發送到 channel。在所有數據發送完之后避免 go routine 阻塞的唯一方法就是用 "close(channel)" 關掉 channel。
對 channel 進行非阻塞讀
但你剛剛告訴我們 channel 如何阻塞 goroutine 的各種情形?!沒錯,不過還有一個技巧,利用 Go 的 select case 語句可以實現對 channel 的非阻塞讀。通過使用這這種語句,如果 channel 有數據,goroutine 將會從中讀取,否則就執行默認的分支。
myChan := make(chan string)

go func(){
    myChan <- "Message!"
}()

select {
    case msg := <- myChan:
        fmt.Println(msg)
    default:
        fmt.Println("No Msg")
}
<-time.After(time.Second * 1)

select {
    case msg := <- myChan:
        fmt.Println(msg)
    default:
        fmt.Println("No Msg")
}
程序輸出如下:
No Msg
Message!
對 channel 進行非阻塞寫
非阻塞寫也是使用同樣的 select case 語句來實現,唯一不同的地方在於,case 語句看起來像是發送而不是接收。
select { case myChan <- "message": fmt.Println("sent the message") default: fmt.Println("no message sent") }