小程序開發知識點總結
我承認,最近比較懶了,博客也很久沒更新了,太對不住自己了,做了一段時間小程序開發,總結了一些知識點,直接上菜。
關於小程序登錄
這里放上一張流程圖:

說明:
    小程序調用wx.login() 獲取 臨時登錄憑證code ,並回傳到開發者服務器。
    開發者服務器以code換取 用戶唯一標識openid 和 會話密鑰session_key。
    之后開發者服務器可以根據用戶標識來生成自定義登錄態,用於后續業務邏輯中前后端交互時識別用戶身份。
這里的流程用代碼來說明下:
1、小程序調用wx.login()獲取臨時登錄憑證code
2、小程序拿到code后,使用wx.request將code連同登錄返回的用戶信息一起發送至后台接口
3、后台接口收到code和用戶信息后,調用微信登錄憑證校驗接口獲取session_key、openid(session_key、openid記得保存數據庫,后續請求要用到)
const WX_URL = 'https://api.weixin.qq.com/sns/jscode2session';
let sessionData = await ctx.curl(WX_URL, {
  dataType: 'json',
  data: {
    grant_type: 'authorization_code',
    js_code: code,
    secret: this.config.weixin.secret,
    appid: this.config.weixin.appid,
  },
});
sessionData = sessionData.res.data;

其中:
    sessionData即為包含session_key和openid的對象。
4、簽名校驗
為什么要簽名校驗?
其實,就是為了保證數據的完整性,微信發送的數據會進行一次簽名,如果不進行簽名驗證的話,不能確保數據一定來自微信平台,存在被劫持的風險。
如何進行簽名校驗?
剛說到登錄和code一起提交上來的用戶信息,其實這里面還包含一個rawData和一個signature,rawData就是原始的用戶信息json串,拿到這個串之后要拼接上sessionData里面的session_key,然后使用sha1加密,再和signature比對,ru'guo'y如果一致則校驗通過,用代碼標識如下:

// 驗證用戶信息完整性
const signature2 = crypto.createHash('sha1').update(fullUserInfo.rawData + sessionData.session_key).digest('hex');
console.log(fullUserInfo.signature, signature2);
if (fullUserInfo.signature !== signature2) {
  ctx.body = { error: '登錄失敗' };
  return;
}
5、保存用戶信息,使用openid作為唯一標識(同一個appid下用戶的openid是一致的,不同的appid下可能不同)
6、返回登陸成功后的內容,包括token等
關於小程序支付
小程序的支付一般都是涉及到訂單操作了,整個流程一般如下:
1、小程序發送訂單支付請求,入參為訂單號或訂單id
2、接口收到訂單請求后,查詢訂單詳情,包括訂單總金額等
3、接口調用微信的統一下單接口,返回一些支付前的參數信息,比如支付的金額、交易編號等
const returnParams = await WeixinSerivce.createWxUnifiedOrder({
    openid: userInfo.weixin_openid,
    body: '可以隨意指定哪些內容',
    out_trade_no: orderInfo.order_sn,
    total_fee: (parseFloat(orderInfo.actual_price) * 100),
    spbill_create_ip: '',
  });
  await ctx.service.order.updateOrderPrepayId(orderId, (returnParams.package + '').replace('prepay_id=', ''));
其中,createWxUnifiedOrder的service如下:
  // 創建統一下單
  createWxUnifiedOrder(payInfo) {
    wxPayment.init({
      appid: this.config.weixin.appid, // 微信小程序appid
      mch_id: this.config.weixin.mch_id, // 商戶帳號ID
      apiKey: this.config.weixin.partner_key, // 秘鑰
      // pfx: fs.readFileSync('./apiclient_cert.p12'), //微信商戶平台證書 (optional,部分API需要使用)
    });
    return new Promise((resolve, reject) => {
      wxPayment.createUnifiedOrder({
        body: payInfo.body, // 商品或支付單簡要描述
        out_trade_no: payInfo.out_trade_no, // 商戶系統內部的訂單號,32個字符內、可包含字母
        total_fee: payInfo.total_fee,
        spbill_create_ip: payInfo.spbill_create_ip,
        notify_url: this.config.weixin.notify_url,
        trade_type: 'JSAPI',
        product_id: payInfo.out_trade_no,
        openid: payInfo.openid, // 用戶openid
      }, (err, result) => {
        console.log('統一下單參數返回:', result);
        if (result.return_code === 'SUCCESS' && result.result_code === 'SUCCESS') {
          const returnParams = {
            appid: result.appid,
            timeStamp: parseInt(Date.now() / 1000) + '',
            nonceStr: result.nonce_str,
            package: 'prepay_id=' + result.prepay_id,
            signType: 'MD5',
          };
          const paramStr = `appId=${returnParams.appid}&nonceStr=${returnParams.nonceStr}&package=${returnParams.package}&signType=${returnParams.signType}&timeStamp=${returnParams.timeStamp}&key=` + this.config.weixin.partner_key;
          returnParams.paySign = md5(paramStr).toUpperCase();
          resolve(returnParams);
        } else {
          reject(result);
        }
      });
    });
  }
4、小程序拿到返回的returnParams后,調用wx.requestPayment的api發送支付請求即可
5、獲取支付通知
獲取支付通知的目的在於判斷用戶支付結果,如上面的notify_url,就是支付通知的接口,該接口中我們可以獲取到訂單的編號等信息,然后將數據庫中的訂單改為已支付等狀態並保存支付數據信息
關於獲取用戶手機號
獲取小程序用戶手機號即微信手機號其實比較簡單,流程如下:
1、小程序端使用如下button獲取encryptedData、iv數據后發送至后台接口
<button open-type="getPhoneNumber" bindgetphonenumber="getPhoneNumber"> </button>
...
Page({
    getPhoneNumber: function(e) {
		console.log(e.detail.errMsg)
		console.log(e.detail.iv)
		console.log(e.detail.encryptedData)
		// 這里拿到encryptedData、iv后發送至后台接口
	}
})
2、接口收到encryptedData、iv后,再取出之前保存的當前用戶的session_key,進行數據解密即可
const weixinUserInfo = await WeixinSerivce.decryptUserInfoData(currentUser.session_key, encryptedData, iv);
其中decryptUserInfoData如下:
  // 解析微信登錄用戶數據
  async decryptUserInfoData(sessionKey, encryptedData, iv) {
    // base64 decode
    const _sessionKey = Buffer.from(sessionKey, 'base64');
    encryptedData = Buffer.from(encryptedData, 'base64');
    iv = Buffer.from(iv, 'base64');
    let decoded = '';
    try {
      // 解密
      const decipher = crypto.createDecipheriv('aes-128-cbc', _sessionKey, iv);
      // 設置自動 padding 為 true,刪除填充補位
      decipher.setAutoPadding(true);
      decoded = decipher.update(encryptedData, 'binary', 'utf8');
      decoded += decipher.final('utf8');
      decoded = JSON.parse(decoded);
    } catch (err) {
      return '';
    }
    if (decoded.watermark.appid !== this.config.weixin.appid) {
      return '';
    }
    return decoded;
  }
解密之后的weixinUserInfo里面即包含用戶電話信息
關於生成小程序二維碼
小程序的二維碼可以調用微信接口獲取,並且支持二維碼中攜帶指定參數,這樣其他用戶掃描二維碼后程序可以獲取到之前放進二維碼的參數。
廣泛的應用場景是商品詳情頁的分享、用戶的分銷推廣等,只要在分享的二維碼中加入商品id或者當前分享人的id等數據,再次掃描之后便可以看到商品詳情等數據或者知道新用戶是誰推廣過來的,當然應用場景還有很多,就不一一列舉了。
獲取小程序二維碼接口如下:
async genReferQRCode(params) {
    console.log(params);
    const ctx = this.ctx;
    let GET_WX_ACODE_URL = '';
    const access_token = await ctx.service.weixin.getAccessToken();
    GET_WX_ACODE_URL = `https://api.weixin.qq.com/wxa/getwxacodeunlimit?access_token=${access_token}`;
    const res = await ctx.curl(GET_WX_ACODE_URL, {
      // dataType: 'json',
      method: 'POST',
      contentType: 'json',
      data: {
        scene: params.scene,
        // page: params.page || 'pages/index/index',
      },
      writeStream: require('fs').createWriteStream(params.filePath),
    });
    console.log(res.data);
}
調用的時候其實更簡單:
const refer_code = 'qrcode_' + ctx.query.scene + '_' + ctx.service.utils.genRandomReferCode();
const filePath = ctx.app.config.upload.path + '/qrcode/' + refer_code + '.png';
await ctx.service.weixin.genReferQRCode({
  scene: refer_code,
  filePath,
  page: ctx.query.page,
});
if (fs.existsSync(filePath)) {
  ctx.body = {
    img: ctx.app.config.upload.picDomain + '/qrcode/' + refer_code + '.png',
  };
} else {
  ctx.body = {
    error: '生成二維碼失敗',
  };
  ctx.status = 500;
}
小程序端如何使用websocket實現實時消息推送等服務
其實,小程序是支持websocket的,比如拼多多等小程序,時時會看到頁面頂部彈出"誰誰購買了什么商品"之類的消息。
實現websocket也比較簡單,我這里用的是eggjs框架,引入的是socket.io,即使用socket.io實現ws協議,具體流程如下:
1、eggjs配置socket.io及redis(redis可以不用,cluster 模式下,使用 redis 可以較為簡單的實現 clients/rooms 等信息共享,此處 redis 僅用於存儲連接實例信息)
// socket.io配置
  config.io = {
    // init: { wsEngine: 'ws' }, // passed to engine.io
    namespace: {
      '/': {
        connectionMiddleware: [ 'auth' ],
        packetMiddleware: [],
      },
    },
    redis: {
      host: 'redis服務地址',
      port: 6379,
      password: 'redis密碼',
    },
  };
  // redis連接配置
  config.redis = {
    client: {
      port: 6379,
      host: 'redis服務地址',
      password: 'redis密碼',
      db: 0,
    },
  };
這里我們指定了一個auth中間件,用來做ws鏈接時的授權等操作,具體后面介紹。
2、在app目錄下新建io目錄,io目錄下新建controller、middleware目錄,然后在controller下新建nsp.js用來接收ws消息,middleware下新建auth.js用來做ws授權等其他操作
1)先看下auth.js怎么寫的?
'use strict';
// const _ = require('lodash');
const PREFIX = 'room';
module.exports = () => {
  return async (ctx, next) => {
    const { socket, app } = ctx;
    const query = socket.handshake.query;
    // 用戶信息
    const { room, userId } = query;
    // 用戶加入
    socket.join(room);
    // 備注:此處 app.redis 與插件無關,可用其他存儲代替
    await app.redis.sadd(PREFIX + ':' + room, userId);
    console.log('當前加入用戶:', userId);
    await next();
    // 用戶離開
    socket.leave(room);
    console.log('當前離開用戶:', userId);
    await app.redis.srem(`${PREFIX}:${room}`, userId);
  };
};
auth這里,我是直接拿到用戶id、room信息之后將用戶加入指定room,redis保存的是該room下的用戶id集合。用戶離開時將用戶id移除該集合即可。(這里用到了redis的sorted set這一數據類型)
2)看下nsp.js如何處理用戶消息的?
'use strict';
const Controller = require('egg').Controller;
const moment = require('moment');
class NspController extends Controller {
  async exchange() {
    console.log('socket收到消息了', moment.unix(moment().unix()).format('YYYY-MM-DD HH:mm:ss'));
    const { ctx, app } = this;
    const nsp = app.io.of('/');
    const message = ctx.args[0] || {};
    const socket = ctx.socket;
    const client = socket.id;
    try {
      const { target, payload } = message;
      console.log('收到的消息', message);
      if (!target) return;
      const msg = ctx.helper.parseMsg('exchange', payload, { client, target });
      console.log('msg', msg);
      nsp.emit(target, msg);
    } catch (error) {
      app.logger.error(error);
    }
  }
}
module.exports = NspController;
ctx.helper.parseMsg其實只是一個輔助方法,用來將入參整理,具體如下:
'use strict';
module.exports = {
  parseMsg(action, payload = {}, metadata = {}) {
    const meta = Object.assign({}, {
      timestamp: Date.now(),
    }, metadata);
    return {
      meta,
      data: {
        action,
        payload,
      },
    };
  },
};
所以這里的結果是將用戶發過來的消息再emit到target中去。
3、eggjs中配置路由ws路由
在router.js中配置如下:
// socket.io
  const { io } = app;
  io.of('/').route('exchange', io.controller.nsp.exchange);
其中exchange表示ws指定的事件使用io.controller.nsp.exchange處理。
4、小程序端引入weapp.socket.io.js(這是因為小程序不支持socket.io,所以需要這個包去做適配)
5、小程序端測試代碼:
onLaunch: function () {
    var that = this;
    that.connectWsSocket('notice', 1);
},
...
connectWsSocket(room, userId) {
    const socket = io(`http://192.168.3.55:7002?room=${room}&userId=${userId}`) // 默認進notice的房間,后台直接向該房間推送消息即可
    socket.on('connect', function () {
      console.log('connected')
    });
    socket.on('res', d => {
      console.log('received res: ', d)
    })
    setInterval(function(){
      socket.emit('exchange', {
        payload: {
          title: 'this is a news'
        },
        target: 'res'
      })
    }, 10000);
  },
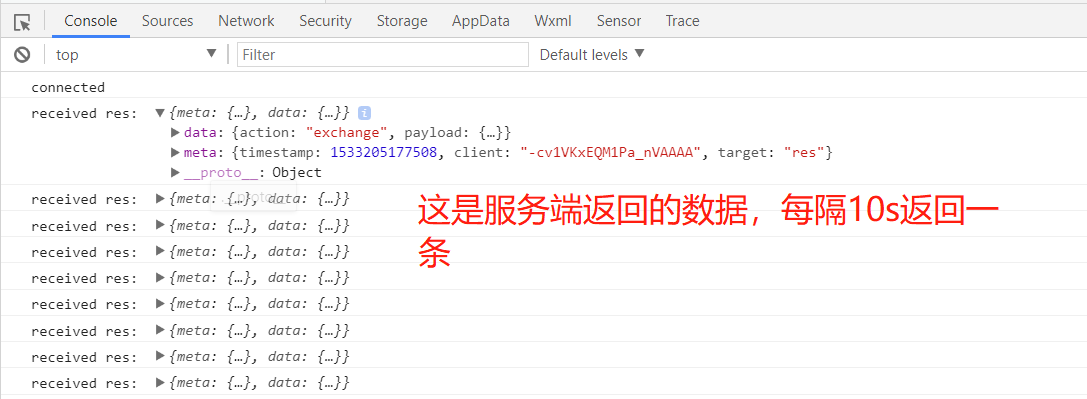
這里我們監聽res的事件,每隔10s發送一條消息至后台,並且指定消息接收的target事件為res,可以看到如下效果:
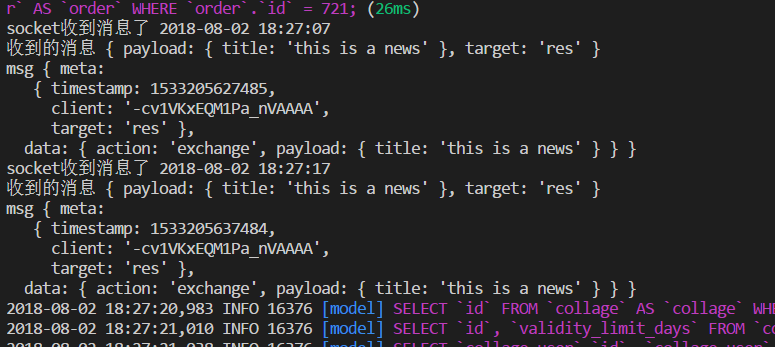
這是服務端效果:
這樣就搭建了一個小程序端的ws環境了,后續可以根據這個進行隨意消息通知,或者一些實時圖表展示的場景也可以使用這個實現。