轉自:http://www.jianshu.com/p/fde63052a3a5
本教程會介紹如何在前端JS程序中集成IdentityServer。因為所有的處理都在前端,我們會使用一個JS庫oidc-client-js, 來處理諸如獲取,驗證tokens的工作。
本教程的代碼在這里.
本教程分為三大塊:
- 在前端JS程序中使用
IdentityServer進行認證 - 在前端JS中調用API
- 僚機如何在前端更新令牌,登出和檢查會話
第一部分 - 在前端JS程序中使用IdentityServer進行認證
第一部分,我們專注在如何前端認證。我們准備了兩個項目,一個是JS前端程序,一個是IdentityServer.
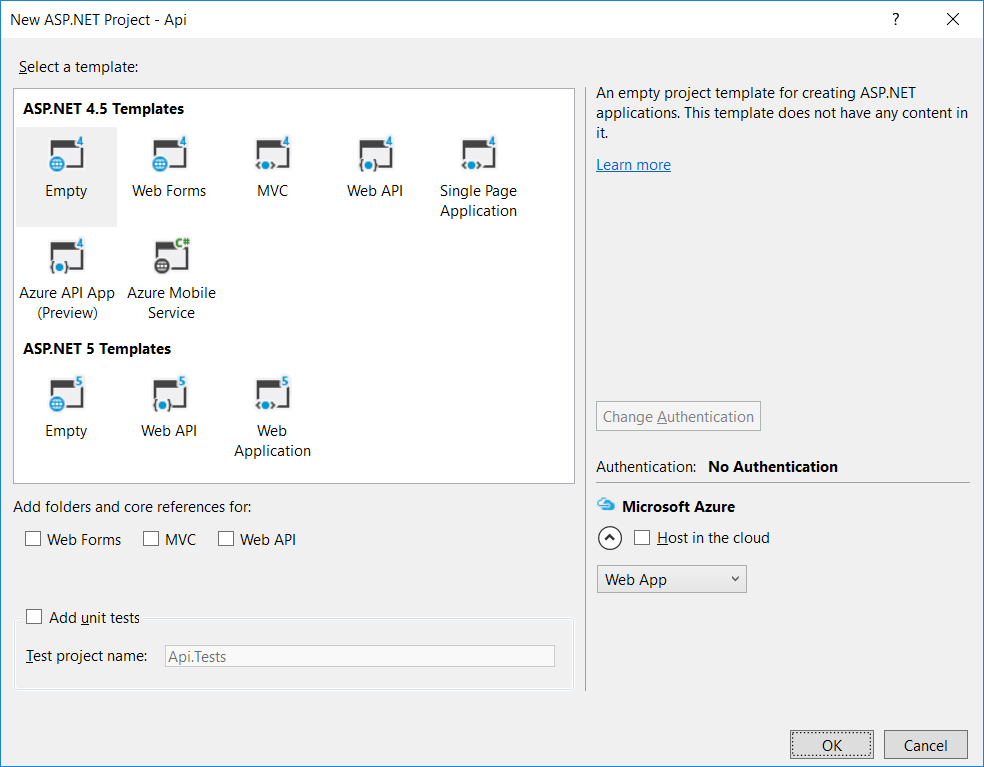
創建JS前端程序
在Visual Studio中創建一個空Web應用。
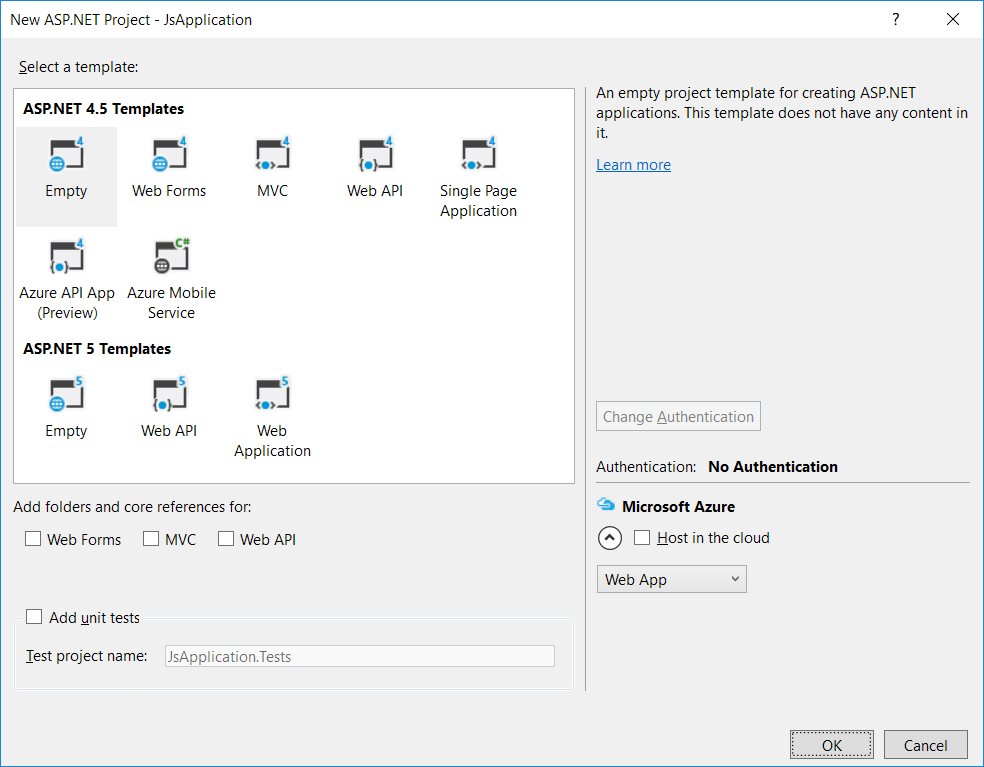
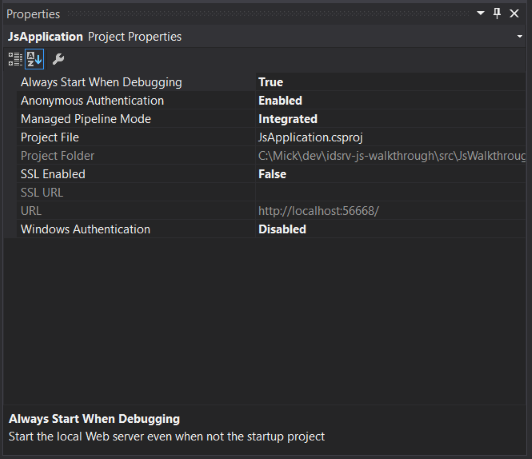
注意項目的URL,后面需要在瀏覽器中使用:
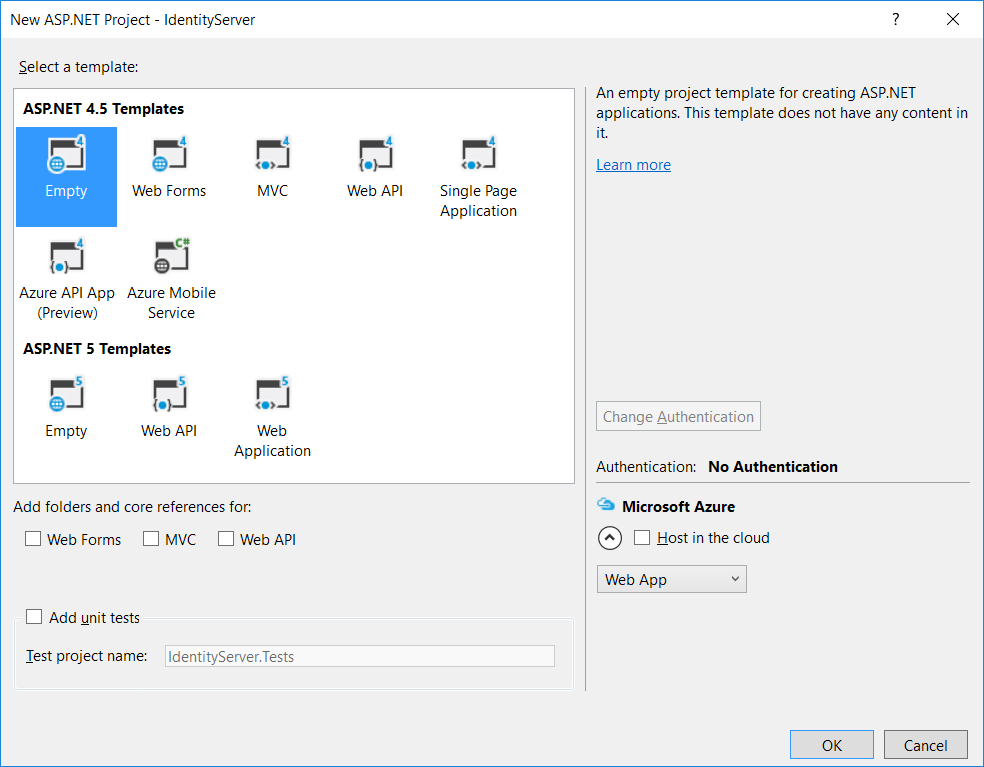
創建IdentityServer 項目
在Visual Studio中創建另外一個空Web應用程序來托管IdentityServer.
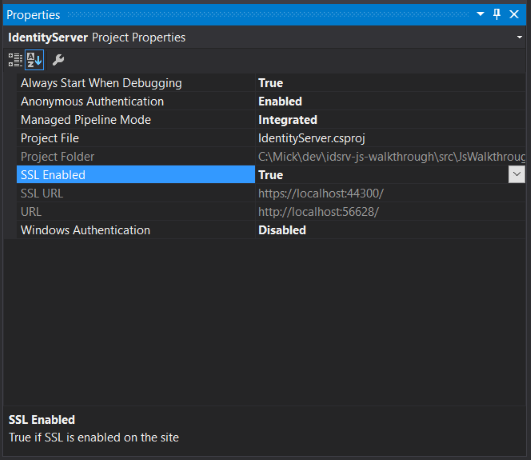
切換到項目屬性,啟用SSL:
提醒
不要忘了把Web程序的啟動URL改成https的鏈接(具體鏈接參看你項目的SSL URL).
譯者注: identityserver3不支持http的網站,必須有SSL保護
增加IdentityServer
IdentityServer is based on OWIN/Katana and distributed as a NuGet package. To add it to the newly created web host, install the following two packages:
IdentityServer是一個OWIN/Katana的中間件,通過Nuget分發。運行下面的命令安裝nuget包到IdentityServer托管程序。
Install-Package Microsoft.Owin.Host.SystemWeb
Install-Package IdentityServer3
配置IdentityServer的客戶端
IdentityServer需要知道客戶端的一些信息,可以通過返回Client對象集合告訴IdentityServer.
public static class Clients
{
    public static IEnumerable<Client> Get()
    {
        return new[]
        {
            new Client
            {
                Enabled = true,
                ClientName = "JS Client",
                ClientId = "js",
                Flow = Flows.Implicit,

                RedirectUris = new List<string>
                {
                    "http://localhost:56668/popup.html"  //請檢查端口號,確保和你剛才創建的JS項目一樣
                },

                AllowedCorsOrigins = new List<string>
                {
                    "http://localhost:56668"
                },

                AllowAccessToAllScopes = true
            }
        };
    }
}特別注意AllowedCorsOrigins屬性,上面代碼的設置,讓IdentityServer接受這個指定網站的認證請求。 譯者注: 考慮到安全性, 網站一般不接受不同域的請求,這里是設置可以接受指定的跨域請求
popup.html會在后面詳細講解,這里你照樣填就好了.
備注 現在這個客戶端可以接受任何作用域(AllowAccessToAllScopes設置為true).在生產環境,必須通過AllowScopes來限制作用域范圍。
配置IdentityServer - 用戶
接下來,我們在IdentityServer里硬編碼一些用戶--同樣的,這個可以通過一個簡單的C#類來實現。生產環境中,我們應該從數據庫里獲取用戶信息。 IdentityServer也直接支持ASP.NET 的Identity和MembershipReboot.
public static class Users
{
    public static List<InMemoryUser> Get()
    {
        return new List<InMemoryUser>
        {
            new InMemoryUser
            {
                Username = "bob",
                Password = "secret",
                Subject = "1",

                Claims = new[]
                {
                    new Claim(Constants.ClaimTypes.GivenName, "Bob"),
                    new Claim(Constants.ClaimTypes.FamilyName, "Smith"),
                    new Claim(Constants.ClaimTypes.Email, "bob.smith@email.com")
                }
            }
        };
    }
}
配置IdentityServer - 作用域
最后,我們加上作用域。 純粹認證功能,我們只需要支持標准的OIDC作用域。將來我們授權API調用,我們會創建我們自己的作用域。
public static class Scopes
{
    public static List<Scope> Get()
    {
        return new List<Scope>
        {
            StandardScopes.OpenId,
            StandardScopes.Profile
        };
    }
}
添加Startup
IdentityServer是一個OWIN中間件,需要在Startup類中配置。這個教程中,我們會配置客戶端,用戶,作用域,認證證書和一些配置選項。
在生產環境需要從windows證書倉庫或者其它安全的地方裝載證書。簡化起見,這個教程我們把證書文件直接保存在項目中。(演示用的證書可以從 這里下載.下載后直接添加到項目中,並把文件的Copy to Output Directory property 改為 Copy always).
關於如何從Azure中裝載證書,請看 這里.
public class Startup
{
    public void Configuration(IAppBuilder app)
    {
        app.UseIdentityServer(new IdentityServerOptions
        {
            SiteName = "Embedded IdentityServer",
            SigningCertificate = LoadCertificate(),

            Factory = new IdentityServerServiceFactory()
                .UseInMemoryUsers(Users.Get())
                .UseInMemoryClients(Clients.Get())
                .UseInMemoryScopes(Scopes.Get())
        });
    }

    private static X509Certificate2 LoadCertificate()
    {
        return new X509Certificate2(
            Path.Combine(AppDomain.CurrentDomain.BaseDirectory, @"bin\Config\idsrv3test.pfx"), "idsrv3test");
    }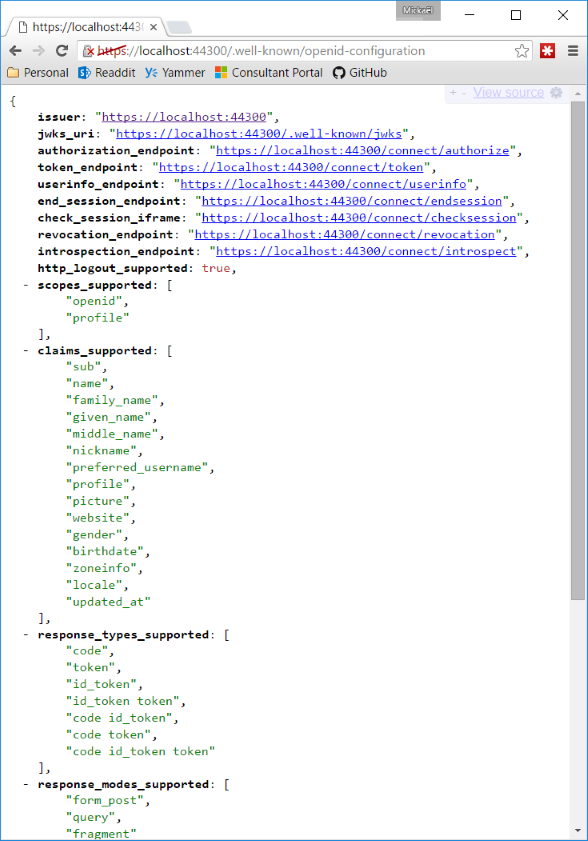
}完成上面的步驟后,一個全功能的IdentityServer就好了,你可以瀏覽探索端點來了解相信配置信息。
RAMMFAR(Run All Managed Modules For All Requests )
最后不要忘了在Web.config中添加RAMMFAR支持,否則有一些內嵌的資源無法被IIS裝載:
<system.webServer> <modules runAllManagedModulesForAllRequests="true" /> </system.webServer>JS 客戶端- 設置
我們使用下面的第三方庫來簡化我們的JS客戶端開發:
我們通過npm-- the Node.js 前段包管理器--來安裝這些前端庫. 如果你還沒有安裝npm, 你可以按照 npm安裝說明來安裝npm.
npm安裝好了后,打開命令行(CMD),轉到JSApplication目錄下,運行:
$ npm install jquery
$ npm install bootstrap
$ npm install oidc-clientnpm會把上述包按照到默認目錄node_modules.
重要npm包一般不會提交到源碼倉庫,如果你是從github倉庫中克隆代碼, 你需要在命令行(cmd)下,轉到JSApplication目錄,然后運行npm install來恢復這幾個前端包。
在JSApplication項目,加入一個基礎的Index.html文件:
<!DOCTYPE html>
<html>
<head>
    <title>JS Application</title>
    <meta charset="utf-8" />
    <link rel="stylesheet" href="node_modules/bootstrap/dist/css/bootstrap.css" />
    <style>
        .main-container {
            padding-top: 70px;
        }

        pre:empty {
            display: none;
        }
    </style>
</head>
<body>
    <nav class="navbar navbar-inverse navbar-fixed-top">
        <div class="container">
            <div class="navbar-header">
                <a class="navbar-brand" href="#">JS Application</a>
            </div>
        </div>
    </nav>

    <div class="container main-container">
        <div class="row">
            <div class="col-xs-12">
                <ul class="list-inline list-unstyled requests">
                    <li><a href="index.html" class="btn btn-primary">Home</a></li>
                    <li><button type="button" class="btn btn-default js-login">Login</button></li>
                </ul>
            </div>
        </div>

        <div class="row">
            <div class="col-xs-12">
                <div class="panel panel-default">
                    <div class="panel-heading">ID Token Contents</div>
                    <div class="panel-body">
                        <pre class="js-id-token"></pre>
                    </div>
                </div>
            </div>
        </div>
    </div>

    <script src="node_modules/jquery/dist/jquery.js"></script>
    <script src="node_modules/bootstrap/dist/js/bootstrap.js"></script>
    <script src="node_modules/oidc-client/dist/oidc-client.js"></script>
</body>
</html>
和 popup.html 文件:
<!DOCTYPE html>
<html>
<head>
    <title></title>
    <meta charset="utf-8" />
</head>
<body>
    <script src="node_modules/oidc-client/dist/oidc-client.js"></script>
</body>
</html>因為oidc-client可以打開一個彈出窗口讓用戶登錄,所以我們做了一個popup頁面
JS 客戶端 - 認證
好了,現在零件已經組裝好了,我們需要加一點邏輯代碼讓它動起來. 感謝UserManager JS類,它做了大部分骯臟的工作,我們只要一點簡單代碼就好。
// helper function to show data to the user
function display(selector, data) {
    if (data && typeof data === 'string') {
        data = JSON.parse(data);
    }
    if (data) {
        data = JSON.stringify(data, null, 2);
    }

    $(selector).text(data);
}

var settings = {
    authority: 'https://localhost:44300',
    client_id: 'js',
    popup_redirect_uri: 'http://localhost:56668/popup.html',

    response_type: 'id_token',
    scope: 'openid profile',

    filterProtocolClaims: true
};

var manager = new Oidc.UserManager(settings);
var user;

manager.events.addUserLoaded(function (loadedUser) {
    user = loadedUser;
    display('.js-user', user);
});

$('.js-login').on('click', function () {
    manager
        .signinPopup()
        .catch(function (error) {
            console.error('error while logging in through the popup', error);
        });
});
簡單了解一下這些配置項:
authority是IdentityServer的入口URL. 通過這個URL,oidc-client可以查詢如何與這個IdentityServer通信, 並驗證token的有效性。client_id這是客戶端標識,認證服務器用這個標識來區別不同的客戶端。popup_redirect_uri是使用signinPopup方法是的重定向URL。如果你不想用彈出框來登陸,希望用戶能到主登錄界面登陸,那么你需要使用redirect_uri屬性和signinRedirect方法。response_type定義響應類型,在我們的例子中,我們只需要服務器返回身份令牌scope定義了我們要求的作用域filterProtocolClaims告訴oidc-client過濾掉OIDC協議內部用的聲明信息,如:nonce,at_hash,iat,nbf,exp,aud,iss和idp
我們監聽處理Login按鈕的單擊事件,當用戶單擊登陸的時候,打開登陸彈出框(signinPopup). signinPopup返回一個Promise。只有收到用戶信息並驗證通過后才會標記成功。
有兩種方式得到identityServer返回的數據:
- 從Promise 的成功(done)處理函數得到
- 從
userLoaded事件的參數得到
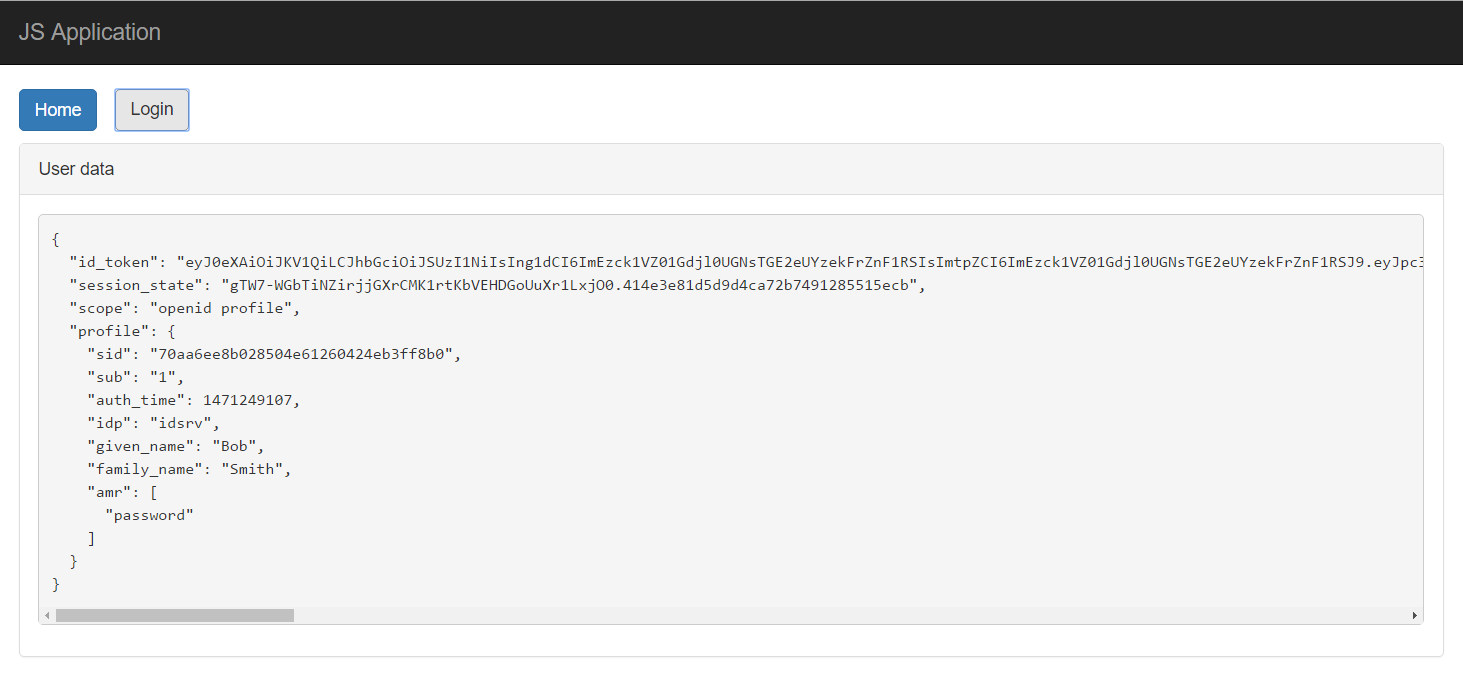
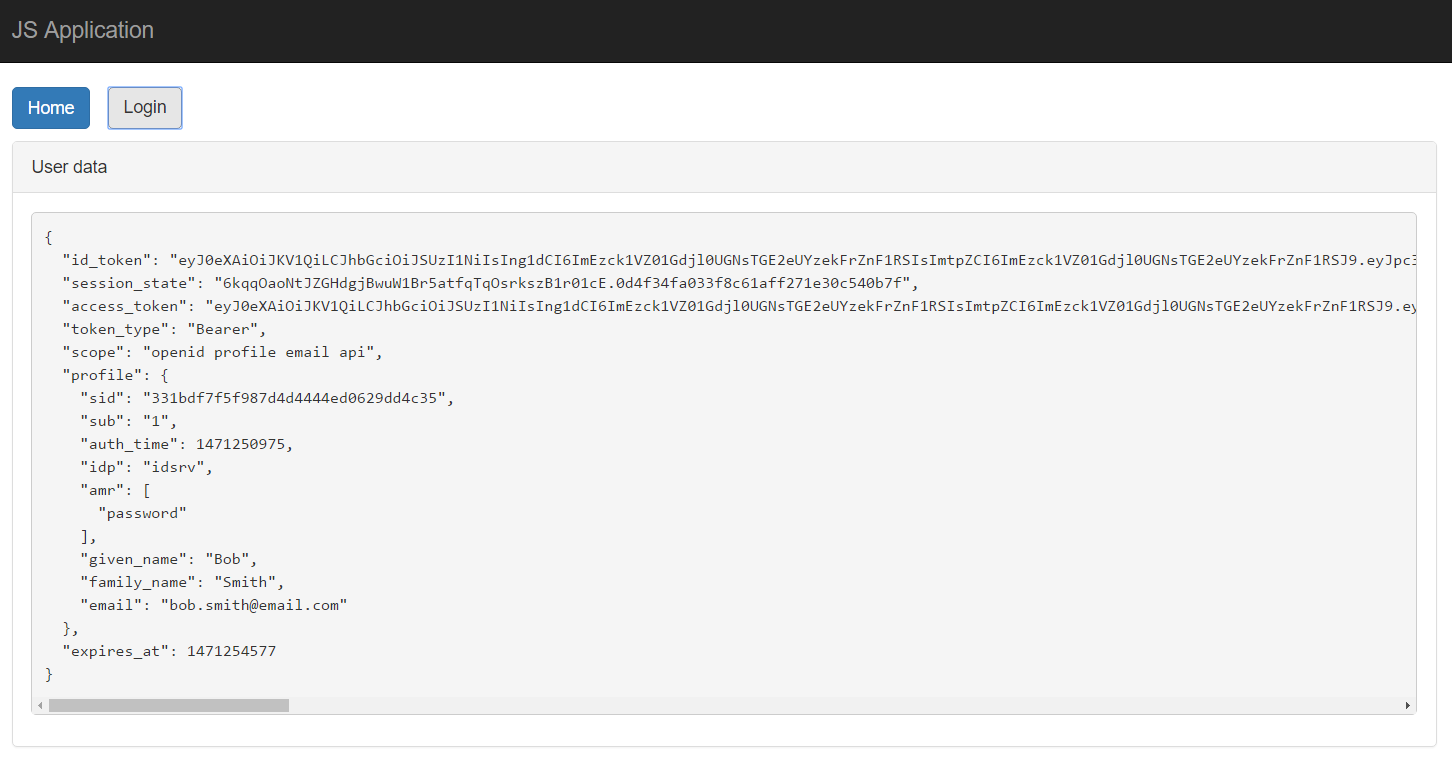
這個例子中,我們通過events.addUserLoaded·掛載了userLoaded事件處理函數,把用戶信息保存到全局的user對象中。這個對象有:id_token,scope和profile`等屬性, 這些屬性包含各種用戶具體的數據。
popup.html頁面也需要配置下:
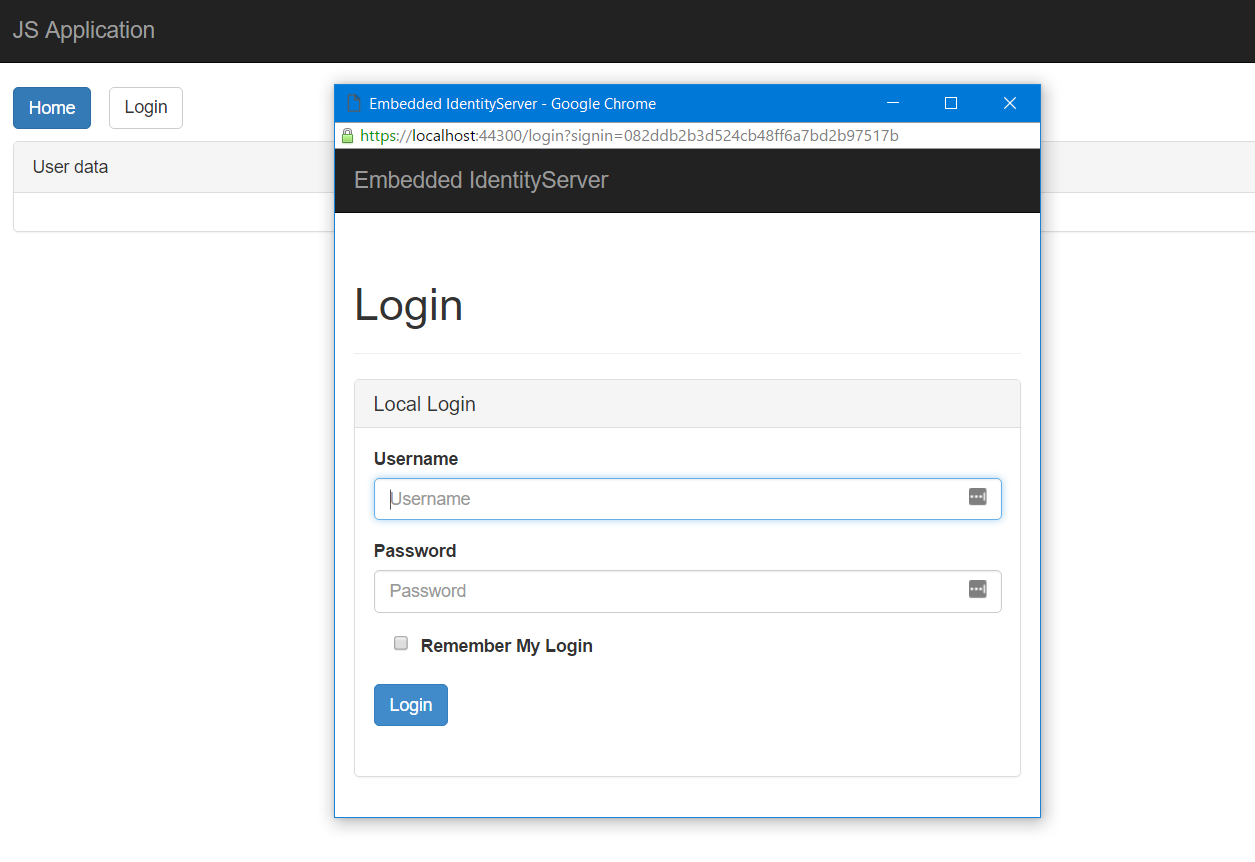
new Oidc.UserManager().signinPopupCallback();登陸內部過程:在index.html頁面的UserManager實例會打開一個彈出框,然后把它重定向到登陸頁面。當identityServer認證好用戶,把用戶信息發回到彈出框,彈出框發現登陸已經成功后自動關閉。
代碼抄到這里,登陸可以工作啦:
你可以把filterProtocolClaims 屬性設置為false,看看profile下面會多出那些聲明?
JS 應用 - 作用域
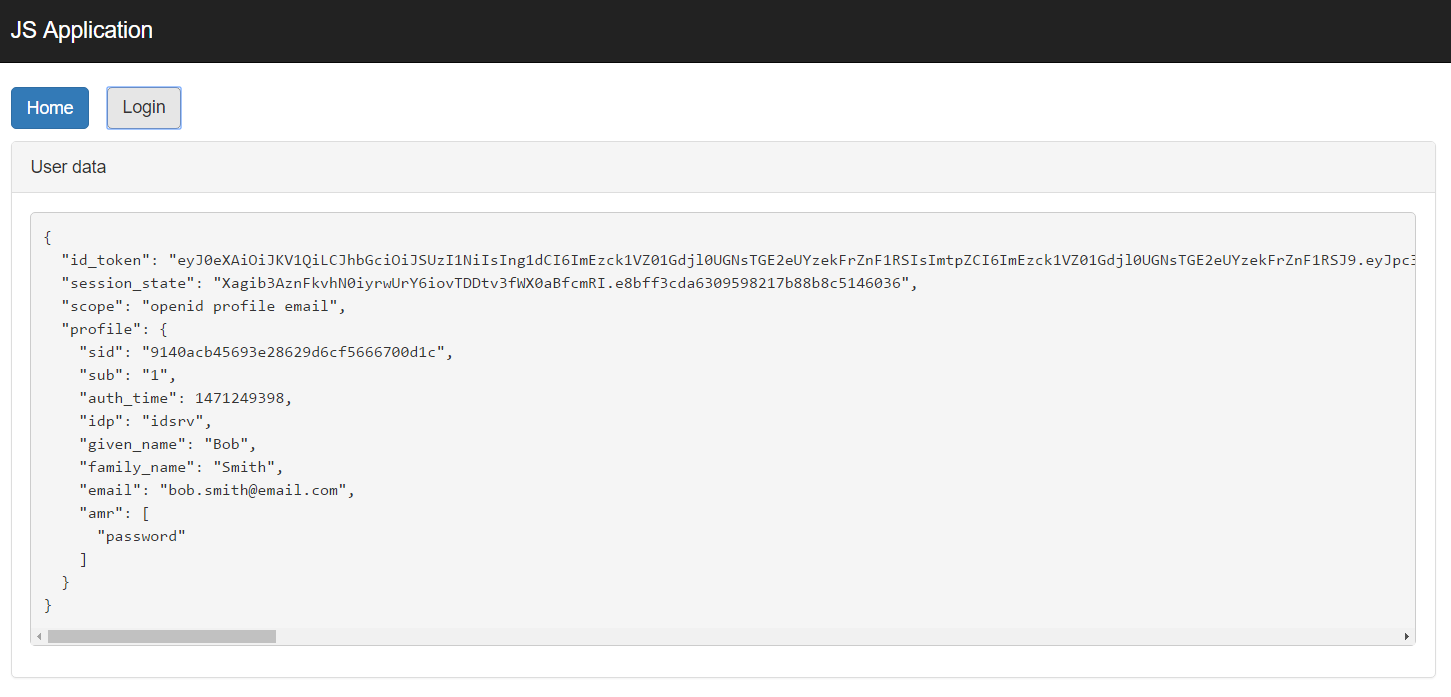
我們定義了一個email聲明,但是它好像沒有在我們的身份令牌里面?這是因為我們的JS應用只要了openid和profile作用域,沒有包括email聲明。
如果JS應用想拿到郵件地址,JS應用必須在UserManager的scopes屬性中申請獲取email作用域.
在我們的例子中,我們首先需要修改IdentityServer包含Email作用域,代碼如下:
public static class Scopes
{
    public static List<Scope> Get()
    {
        return new List<Scope>
        {
            StandardScopes.OpenId,
            StandardScopes.Profile,
            // New scope
            StandardScopes.Email
        };
    }
}
在這個教程中,JS應用不需要改,因為我們申請了所有的作用域。 但是在生產環境中,我們應該只返回用戶需要的作用域,這種情況下,客戶端代碼也需要修改。
完成上面的改動后,我們現在可以看到email信息啦:
第二部分 - 調用API
第二部分,我們演示如何從JS應用中調用受保護的API。
為了調用被保護的API,除了身份令牌,我們還要從IdentityServer得到訪問令牌,並用這個訪問令牌調用被保護的API。
創建一個API項目
在Visual Studio中創建一個空應用程序.
API項目的URL需要指定為 http://localhost:60136.
配置API
在本教程,我們將創建一個非常簡單的API
首先安裝下面的nuget包:
Install-Package Microsoft.Owin.Host.SystemWeb -ProjectName Api
Install-Package Microsoft.Owin.Cors -ProjectName Api
Install-Package Microsoft.AspNet.WebApi.Owin -ProjectName Api
Install-Package IdentityServer3.AccessTokenValidation -ProjectName Api
注意 IdentityServer3.AccessTokenValidation 包間接依賴於System.IdentityModel.Tokens.Jwt.在編寫本教程時,如果更新System.IdentityModel.Tokens.Jwt 到5.0.0會導致API項目無法啟動: 譯者注:在我翻譯的時候好像已經解決這個問題了
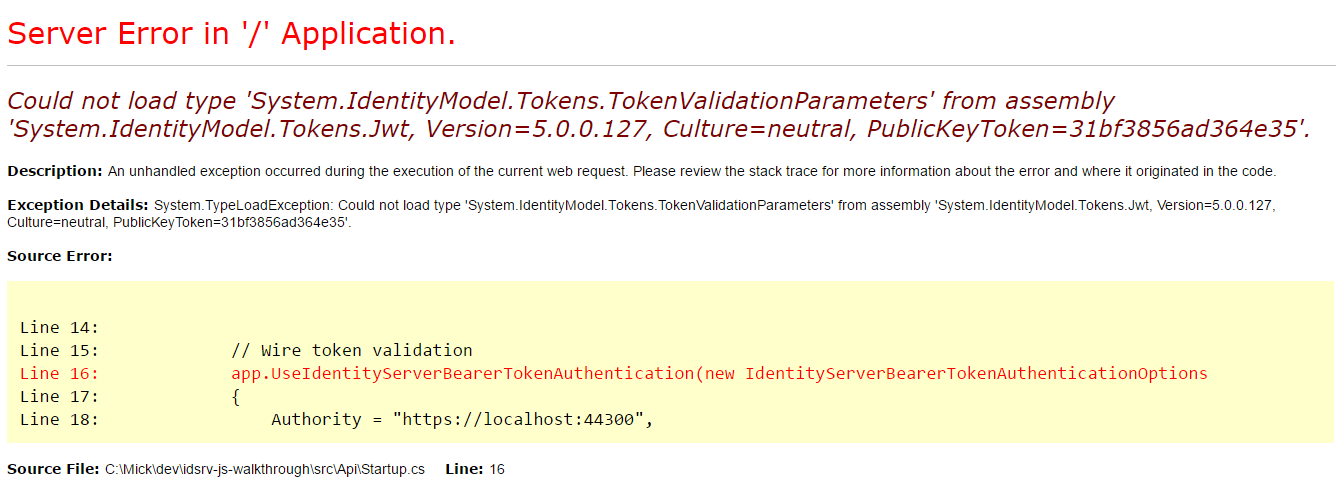
解決辦法是把System.IdentityModel.Tokens.Jwt降級到4.0.2.xxx版本:
Install-Package System.IdentityModel.Tokens.Jwt -ProjectName Api -Version 4.0.2.206221351現在讓我們創建Startup類,並構建OWIN/Katana管道。
public class Startup
{
    public void Configuration(IAppBuilder app)
    {
        // Allow all origins
        app.UseCors(CorsOptions.AllowAll);

        // Wire token validation
        app.UseIdentityServerBearerTokenAuthentication(new IdentityServerBearerTokenAuthenticationOptions
        {
            Authority = "https://localhost:44300",

            // For access to the introspection endpoint
            ClientId = "api",
            ClientSecret = "api-secret",

            RequiredScopes = new[] { "api" }
        });

        // Wire Web API
        var httpConfiguration = new HttpConfiguration();
        httpConfiguration.MapHttpAttributeRoutes();
        httpConfiguration.Filters.Add(new AuthorizeAttribute());

        app.UseWebApi(httpConfiguration);
    }
}
代碼很直觀,但是我們還是仔細看看我們在管道中用了些什么:
因為JS應用一般都要跨域,所以我們啟用了CORS。我們允許來自任何網站的跨域請求,在生產中,我們需要限制一下,改成只允許我們希望的網站來跨域請求。
API項目需要驗證令牌的有效性,我們通過IdentityServer3.AccessTokenValidation包來實現。在指定Authority 屬性后,AccessTokenValidation會自動下載元數據並完成令牌驗證的設置。
2.2版本以后,IdentityServer實現了introspection endpoint 來驗證令牌。這個端點會進行作用域認證,比傳統的令牌驗證更安全。
最后是WebAPI配置。我們使用AuthroizeAttribute來指定所有的API請求都需要認證。
現在我們來加上一個簡單的API方法:
[Route("values")]
public class ValuesController : ApiController
{
    private static readonly Random _random = new Random();

    public IEnumerable<string> Get()
    {
        var random = new Random();

        return new[]
        {
            _random.Next(0, 10).ToString(),
            _random.Next(0, 10).ToString()
        };
    }
}
更新identityServer 配置
我們在IdentityServer項目中的Scopes增加一個api作用域:
public static class Scopes
{
    public static List<Scope> Get()
    {
        return new List<Scope>
        {
            StandardScopes.OpenId,
            StandardScopes.Profile,
            StandardScopes.Email,

            // New scope registration
            new Scope
            {
                Name = "api",

                DisplayName = "Access to API",
                Description = "This will grant you access to the API",

                ScopeSecrets = new List<Secret>
                {
                    new Secret("api-secret".Sha256())
                },

                Type = ScopeType.Resource
            }
        };
    }
}
新的作用域是資源作用域,也就是說它會在訪問令牌中體現。當然例子中的JS應用不需要修改,因為它請求了全部作用域,但是在生產環境中,應該限制申請那些作用域。
更新 JS 應用
現在我們更新JS應用,申請新的api作用域
var settings = {
    authority: 'https://localhost:44300',
    client_id: 'js',
    popup_redirect_uri: 'http://localhost:56668/popup.html',

    // We add `token` to specify we expect an access token too
    response_type: 'id_token token',
    // We add the new `api` scope to the list of requested scopes
    scope: 'openid profile email api',

    filterProtocolClaims: true
};
修改包括:
- 一個新的用於顯示訪問令牌的Panel
- 更新
response_type來同時請求身份令牌和訪問令牌 - 請求
api作用域
訪問令牌通過access_token屬性獲取,過期時間放在expires_at屬性上。oidc-client會處理簽名證書,令牌驗證等麻煩的部分,我們不需要編寫任何代碼。
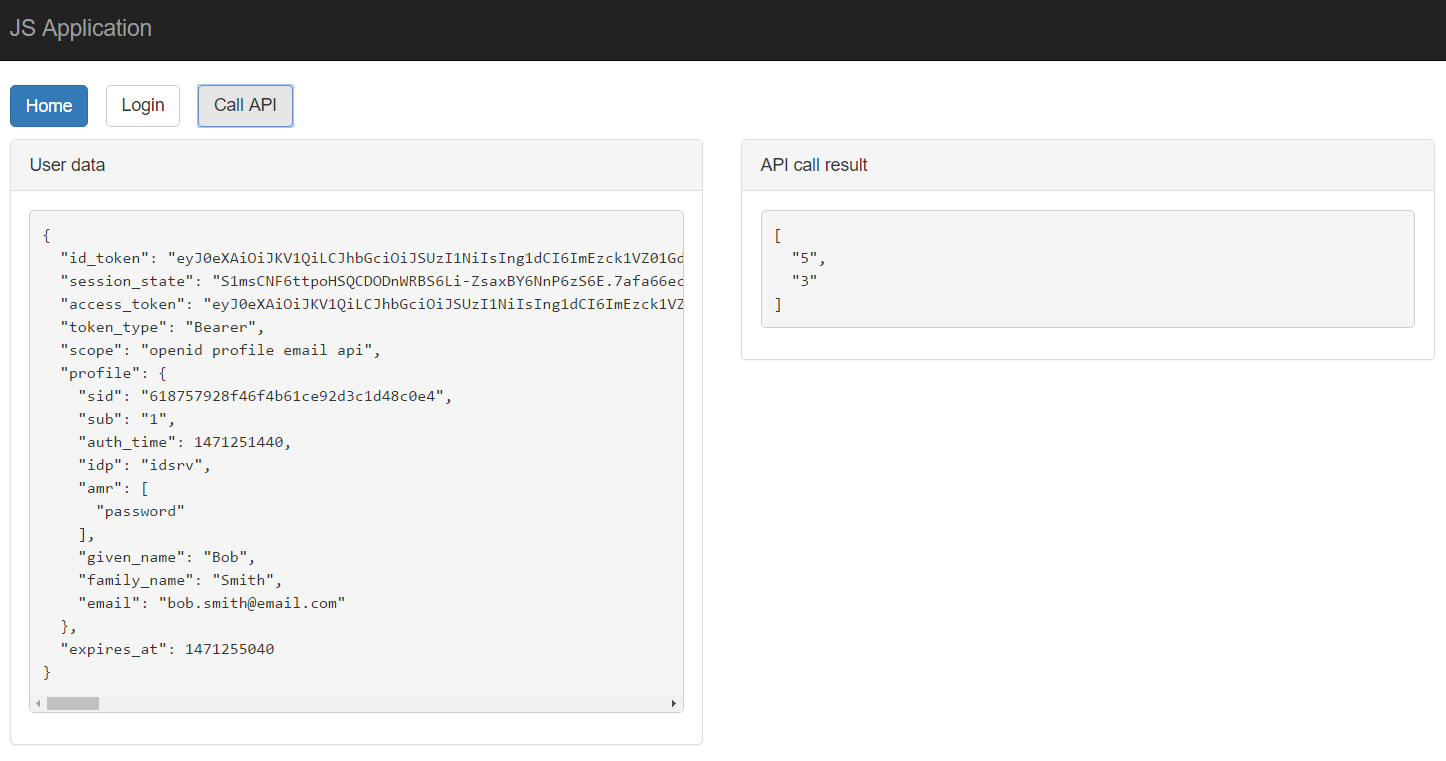
登陸以后我們會得到下面的信息:
調用 API
拿到訪問令牌,我們就可以在JS應用里調用API了。
[...]
<div class="container main-container">
    <div class="row">
        <div class="col-xs-12">
            <ul class="list-inline list-unstyled requests">
                <li><a href="index.html" class="btn btn-primary">Home</a></li>
                <li><button type="button" class="btn btn-default js-login">Login</button></li>
                <!-- New button to trigger an API call -->
                <li><button type="button" class="btn btn-default js-call-api">Call API</button></li>
            </ul>
        </div>
    </div>

    <div class="row">
        <!-- Make the existing sections 6-column wide -->
        <div class="col-xs-6">
            <div class="panel panel-default">
                <div class="panel-heading">User data</div>
                <div class="panel-body">
                    <pre class="js-user"></pre>
                </div>
            </div>
        </div>

        <!-- And add a new one for the result of the API call -->
        <div class="col-xs-6">
            <div class="panel panel-default">
                <div class="panel-heading">API call result</div>
                <div class="panel-body">
                    <pre class="js-api-result"></pre>
                </div>
            </div>
        </div>
    </div>
</div>
[...]
$('.js-call-api').on('click', function () {
var headers = {};
if (user && user.access_token) {
headers['Authorization'] = 'Bearer ' + user.access_token;
}
$.ajax({
url: 'http://localhost:60136/values',
method: 'GET',
dataType: 'json',
headers: headers
}).then(function (data) {
display('.js-api-result', data);
}).catch(function (error) {
display('.js-api-result', {
status: error.status,
statusText: error.statusText,
response: error.responseJSON
});
});
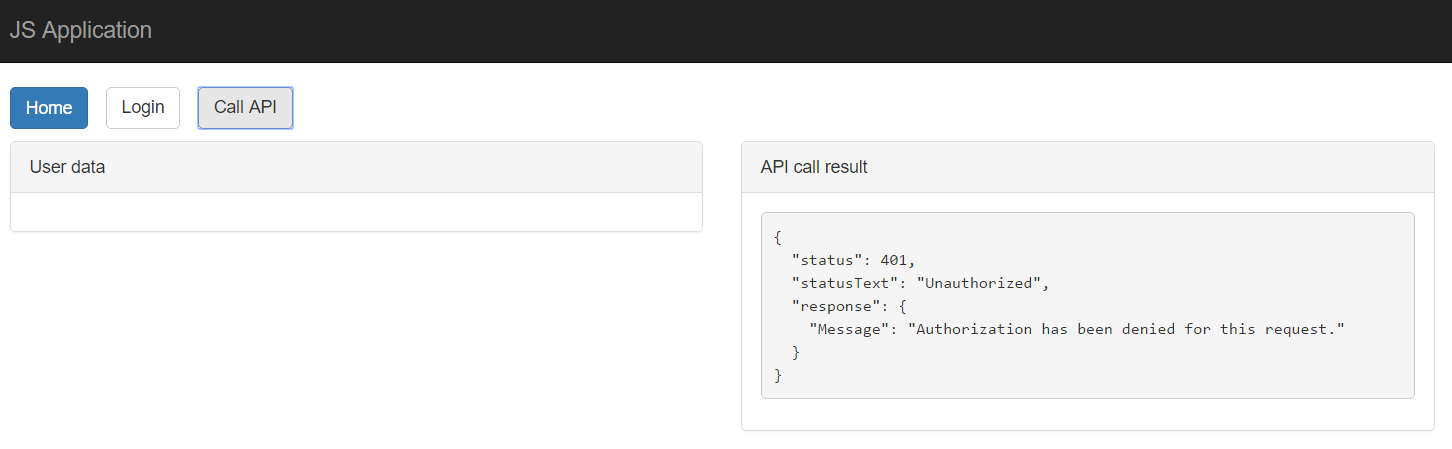
});代碼改好了,我們現在有一個調用API的按鈕和一個顯示API結果的Panel。
注意,訪問令牌會放到Authroization請求頭里。
登錄前調用,結果如下:
登陸后調用,結果如下:
登陸前訪問API,JS應用沒有得到訪問令牌,所以不會添加Authorization請求頭,那么訪問令牌驗證中間件不會介入。請求做為未認證的請求發送到API,全局特性AuthroizeAttribute會拒絕請求,返回`401未授權錯誤。
登陸后訪問API, 令牌驗證中間件在請求頭中發現了Authorization,把它傳給introspection端點驗證,收到身份信息及包含的聲明。好了,請求帶着認證信息流向了Web API,全局特性AuthroizeAttribute約束滿足了,具體的API成功調用。
Part 3 - 更新令牌,登出及檢查會話
現在JS應用可以登錄,可以調用受保護的API了。但是,令牌一旦過期,受保護的API又用不了啦。
好消息是,oidc-token-manager可以配置成在令牌過期前來自動更新訪問令牌,無需用戶介入。
過期的令牌
首先我們來看看如何讓令牌過期,我們必須縮短過期時間,過期時間是基於客戶端的一個設置項,我們編輯IdentityServer中的Clients類。
public static class Clients
{
    public static IEnumerable<Client> Get()
    {
        return new[]
        {
            new Client
            {
                Enabled = true,
                ClientName = "JS Client",
                ClientId = "js",
                Flow = Flows.Implicit,

                RedirectUris = new List<string>
                {
                    "http://localhost:56668/popup.html"
                },

                AllowedCorsOrigins = new List<string>
                {
                    "http://localhost:56668"
                },

                AllowAccessToAllScopes = true,
                AccessTokenLifetime = 10
            }
        };
    }
}
訪問令牌過期時間默認是1小時,我們把它改成10秒。
現在你登陸JS應用后,過10秒鍾在訪問API,你又會得到401未授權錯誤啦。
更新令牌
我們將依賴oidc-client-js幫我們自動更新令牌
在oidc-client-js內部會記錄訪問令牌的過期時間,並在過期前向IdentityServer發送授權請求來獲取新的訪問令牌。按照prompt 設置 --默認設置為none, 在會話有效期內,用戶不需要重新授權來得到訪問令牌--,這些動作是用戶不可見的。IdentityServer會返回一個新的訪問令牌替代即將過期的舊令牌。
下面是訪問令牌過期和更新的設置說明:
-
accessTokenExpiring事件在過期前會激發 -
accessTokenExpiringNotificationTime用來調整accessTokenExpiring激發時間.默認是過期前60秒。 - 另外一個是
automaticSilentRenew,用來在令牌過期前自動更新令牌。 - 最后
silent_redirect_uri是指得到新令牌后需要重定向到的URL。
oidc-client-js更新令牌的大致步驟如下:
當令牌快過期的時候,oidc-client-js會創建一個不可見的iframe,並在其中啟動要給新的授權請求,如果請求成功,identityServer會讓iframe重定向到silent_redirect_uri指定的URL,這部分的的JS代碼會自動更新全局用戶信息,這樣主窗口就可以得到更新后的令牌。
理論講完了,我們現在來按照上述內容改代碼:
var settings = {
    authority: 'https://localhost:44300',
    client_id: 'js',
    popup_redirect_uri: 'http://localhost:56668/popup.html',
    // Add the slient renew redirect URL
    silent_redirect_uri: 'http://localhost:56668/silent-renew.html'

    response_type: 'id_token token',
    scope: 'openid profile email api',

    // Add expiration nofitication time
    accessTokenExpiringNotificationTime: 4,
    // Setup to renew token access automatically
    automaticSilentRenew: true,

    filterProtocolClaims: true
};silent_redirect_uri需要一個頁面來處理更新用戶信息,代碼如下:
<!DOCTYPE html>
<html>
<head>
    <title></title>
    <meta charset="utf-8" />
</head>
<body>
    <script src="node_modules/oidc-client/dist/oidc-client.js"></script>
    <script>
        new Oidc.UserManager().signinSilentCallback();
    </script>
</body>
</html>
現在需要告訴IdentityServer,新的重定向地址也是合法的。
public static class Clients
{
    public static IEnumerable<Client> Get()
    {
        return new[]
        {
            new Client
            {
                Enabled = true,
                ClientName = "JS Client",
                ClientId = "js",
                Flow = Flows.Implicit,

                RedirectUris = new List<string>
                {
                    "http://localhost:56668/popup.html",
                    // The new page is a valid redirect page after login
                    "http://localhost:56668/silent-renew.html"
                },

                AllowedCorsOrigins = new List<string>
                {
                    "http://localhost:56668"
                },

                AllowAccessToAllScopes = true,
                AccessTokenLifetime = 70
            }
        };
    }
}當更新成功,UserManager會觸發一個userLoaded事件,因為我們在前面已經寫好了事件處理器,更新的數據會自動顯示在UI上。
當失敗的時候,silentRenewError事件會觸發,我們可以訂閱這個事件來了解具體什么錯了。
manager.events.addSilentRenewError(function (error) {
    console.error('error while renewing the access token', error);
});我們把訪問令牌生存期設置為10秒,並告訴oidc-client-js過期前4秒更新令牌。
現在登陸以后,每6秒會向identityserver請求更新訪問令牌一次。
登出
前端程序的登出和服務端程序的登出不一樣,比如,你在瀏覽器里刷新頁面,訪問令牌就丟失了,你需要重新登陸。但是當登陸彈出框打開時,它發現你還有一個IdentityServer的有效會話Cookie,所以它不會問你要用戶名密碼,反而立刻關閉自己。整個過程和自動后台更新令牌差不多。
真正的登出意味着從IdentityServer登出,下次進入由IdentityServer保護的程序時,必須重新輸入用戶名密碼。
過程不復雜,我們只需要在登出按鈕事件里面調用UserManager的signoutRedirect方法,當然,我們也需要在IdentityServer注冊登出重定向url:
public static class Clients
{
    public static IEnumerable<Client> Get()
    {
        return new[]
        {
            new Client
            {
                Enabled = true,
                ClientName = "JS Client",
                ClientId = "js",
                Flow = Flows.Implicit,

                RedirectUris = new List<string>
                {
                    "http://localhost:56668/popup.html",
                    "http://localhost:56668/silent-renew.html"
                },

                // Valid URLs after logging out
                PostLogoutRedirectUris = new List<string>
                {
                    "http://localhost:56668/index.html"
                },

                AllowedCorsOrigins = new List<string>
                {
                    "http://localhost:56668"
                },

                AllowAccessToAllScopes = true,
                AccessTokenLifetime = 70
            }
        };
    }
[...]
<div class="row">
<div class="col-xs-12">
<ul class="list-inline list-unstyled requests">
<li><a href="index.html" class="btn btn-primary">Home</a></li>
<li><button type="button" class="btn btn-default js-login">Login</button></li>
<li><button type="button" class="btn btn-default js-call-api">Call API</button></li>
<!-- New logout button -->
<li><button type="button" class="btn btn-danger js-logout">Logout</button></li>
</ul>
</div>
</div>var settings = {
authority: 'https://localhost:44300',
client_id: 'js',
popup_redirect_uri: 'http://localhost:56668/popup.html',
silent_redirect_uri: 'http://localhost:56668/silent-renew.html',
// Add the post logout redirect URL
post_logout_redirect_uri: 'http://localhost:56668/index.html',
response_type: 'id_token token',
scope: 'openid profile email api',
accessTokenExpiringNotificationTime: 4,
automaticSilentRenew: true,
filterProtocolClaims: true
};
[...]
$('.js-logout').on('click', function () {
manager
.signoutRedirect()
.catch(function (error) {
console.error('error while signing out user', error);
});
});當點擊logout按鈕時,用戶會重定向到IdentityServer,所以回話cookie會被清除。

注意,上面圖片顯示的是IdentityServer的頁面,不是JS應用的界面 上面的例子是通過主頁面登出,oidc-client-js提供了一種在彈出框中登出的方式,和登錄差不多,具體的信息可以參考 oidc-client-js的文檔.
檢查會話
JS應用的會話開始於我們從IdentityServer得到有效的身份令牌。IdentityServer自身也要維護一個會話管理,在響應授權請求的時候會返回一個session_state。關於OpenID Connect詳細規格說明,請參看這里.
有些情況下,我們想知道用戶是否結束了IdentityServer上的回話,比如說,在另外一個應用程序中登出引起在IdentityServer上登出。檢查的方式是計算 session_state 的值. 如果它和IdentityServer發出來的一樣,那么說明用戶還處於登陸狀態。如果變化了,用戶就有可能已經登出了,這時候建議啟動一次后台登陸請求(帶上prompt=none).如果成功,我們會得到一個新的身份令牌,也說明在IdentityServer上,用戶還是處於登陸狀態。失敗了,則說明用戶已經登出了,我們需要讓用戶重新登陸。
不幸的是,JS應用自己沒辦法計算session_state的值,因為session_state是IdentityServer的cookie,我們的JS應用無法訪問。OpenID的規格 要求裝載一個不可見的iframe調用IdentityServer的checksession端點。JS應用和iframe可以通過postMessage API通信.
checksession 端點
這個端點監聽來自postMessage的消息,按要求提供一個簡單的頁面。傳送到端點的數據用來計算會話的哈希值。如果和IdentityServer上的一樣,這個頁面返回unchanged值,否則返回changed值。如果出現錯誤,則返回error.
實現會話檢查功能
好消息是oidc-client-js啥都會 O(∩_∩)O.
事實上,默認設置就會監視會話狀態。
相關的屬性是 monitorSession.
當用戶一登陸進來,oidc-clieng-js就會創建一個不可見的iframe,這個iframe會裝載identityserver的會話檢查端點。
每隔一段時間,這個iframe都會發送client id 和會話狀態給IdentityServer,並檢查收到的結果來判定會話是否已經改變。
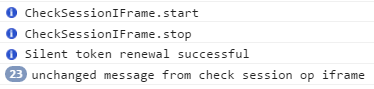
我們可以利用oidc-client-js的日志系統來認識整個過程是如何進行的。默認情況下oidc-client-js配置的是無操作(no-op)日志記錄器,我們可以簡單的讓它輸出到瀏覽器控制台。
Oidc.Log.logger = console;為了減少日志量,我們增加訪問令牌的生存期。
更新令牌會產生大量日志,現在的設置沒6秒要來一次,我們都沒有時間來詳細檢查日志。所以我們把它改成1分鍾。
public static class Clients
{
public static IEnumerable<Client> Get()
{
return new[]
{
new Client
{
Enabled = true,
ClientName = "JS Client",
ClientId = "js",
Flow = Flows.Implicit,
RedirectUris = new List<string>
{
"http://localhost:56668/popup.html",
"http://localhost:56668/silent-renew.html"
},
PostLogoutRedirectUris = new List<string>
{
"http://localhost:56668/index.html"
},
AllowedCorsOrigins = new List<string>
{
"http://localhost:56668"
},
AllowAccessToAllScopes = true,
// Access token lifetime increased to 1 minute
AccessTokenLifetime = 60
}
};
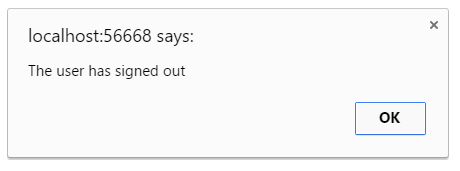
}最后,當用戶會話已經改變,自動登錄也沒成功。 UserManager會觸發一個userSinedOut事件,現在讓我們來處理這個事件。
manager.events.addUserSignedOut(function () {
    alert('The user has signed out');
});
現在重新回到JS應用,登出,打開瀏覽器控制台,重新登陸; 你會發現每隔2秒鍾(默認設置)--oidc-client-js會檢查會話是否還是有效。
現在我們來證明它按照我們設想的那樣工作,我們打開一個新的瀏覽器tab,轉到JS應用並登陸。現在這兩個tab都在檢查會話狀態。從其中要給tab登出,你會看到另外一個tab會顯示如下窗口:
作者:滅蒙鳥
鏈接:http://www.jianshu.com/p/fde63052a3a5
來源:簡書
著作權歸作者所有。商業轉載請聯系作者獲得授權,非商業轉載請注明出處。