自使用maven以來,沒少使用maven中央倉庫中的各種jar包,方便有效,但是咱們也不能總是只取不予,也應該懂得奉獻,當你寫好了一個十分好用的jar包,想貢獻出去給大家使用的時候,應該怎么做呢?當然是發布到maven的中央倉庫了,不過要說這個發布過程,還真是比較復雜,本文就來詳細說下如何發布jar包到maven中央倉庫。
開始之前,請注意幾個地址:
1、工單管理:https://issues.sonatype.org/secure/Dashboard.jspa
說明:注冊賬號、創建和管理issue,Jar包的發布是以解決issue的方式起步的
2、構件倉庫:https://oss.sonatype.org/#welcome
說明:算是正式發布前的一個過段倉庫,使用maven提交后的jar包先到這個庫中
1、創建工單
在上述的工單管理的地址中進行創建,如果沒有賬號,需要先注冊一個,記住用戶名密碼,后邊要配置到setting.xml中。
Create Issue 填寫內容說明: 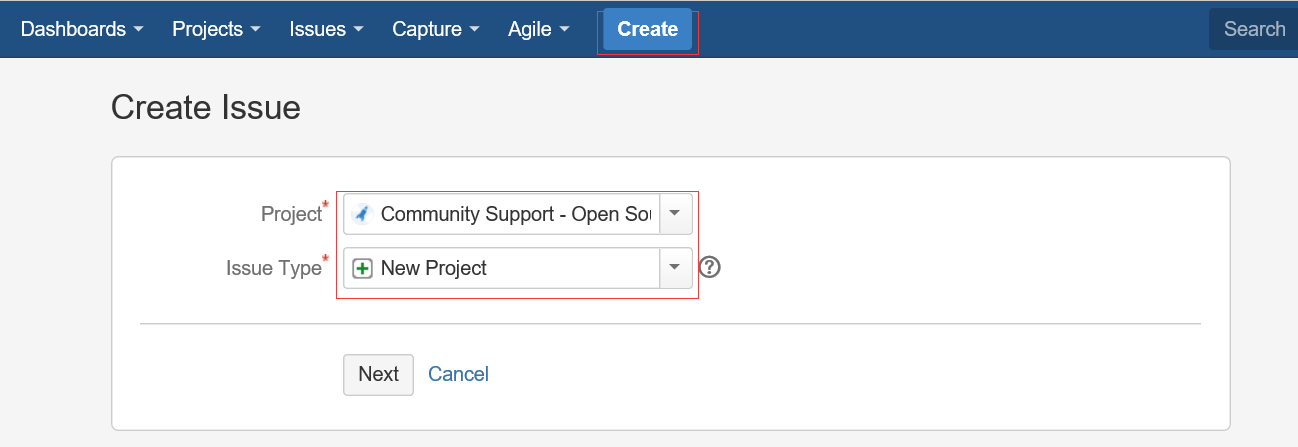
===Step 1===
Project:Community Support - Open Source Project Repository Hosting
Issue Type:New Project

===Step 2===
Summary:JAR包名稱,如:marathon-client
Group Id:你懂得,不用多說,如com.cloudnil
Project URL:項目站點,如:https://github.com/CloudNil/marathon-client
SCM url:項目源碼倉庫,如:https://github.com/CloudNil/marathon-client.git
其他內容不用填寫,創建Issue后需要等待一小段時間,Sonatype的工作人員審核處理,速度還是很快的,一般一個工作日以內,當Issue的Status變為RESOLVED后,就可以進行下一步操作了,否則,就等待… 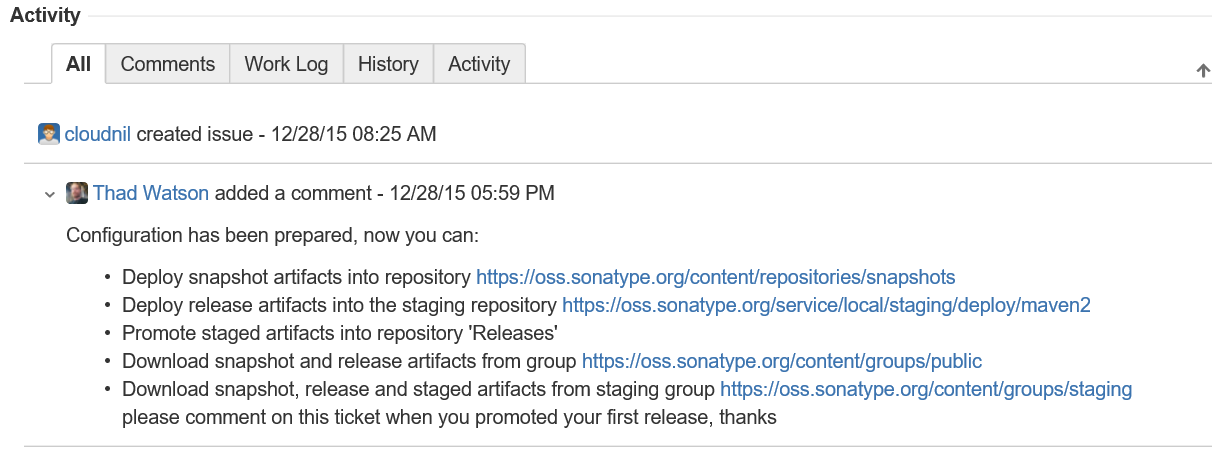
2、配置Maven
在工程的pom.xml文件中,引入Sonatype官方的一個通用配置oss-parent,這樣做的好處是很多pom.xml的發布配置不需要自己配置了:
    <parent>
        <groupId>org.sonatype.oss</groupId>
        <artifactId>oss-parent</artifactId>
        <version>7</version>
    </parent>
並增加Licenses、SCM、Developers信息:
    <licenses>
        <license>
            <name>The Apache Software License, Version 2.0</name>
            <url>http://www.apache.org/licenses/LICENSE-2.0.txt</url>
            <distribution>repo</distribution>
        </license>
    </licenses>
    <scm>
        <tag>master</tag>
        <url>git@github.com:cloudnil/marathon-client.git</url>
        <connection>scm:git:git@github.com:cloudnil/marathon-client.git</connection>
        <developerConnection>scm:git:git@github.com:cloudnil/marathon-client.git</developerConnection>
    </scm>
    <developers>
        <developer>
            <name>cloudnil</name>
            <email>cloudnil@126.com</email>
            <organization>CloudNil</organization>
        </developer>
    </developers>
修改maven配置文件setting.xml,在servers中增加server配置,找不到這個文件的同學請自己去旁邊哭會先。
  <servers>
    <server>
      <id>sonatype-nexus-snapshots</id>
      <username>Sonatype 賬號</username>
      <password>Sonatype 密碼</password>
    </server>
    <server>
      <id>sonatype-nexus-staging</id>
      <username>Sonatype 賬號</username>
      <password>Sonatype 密碼</password>
    </server>
  </servers>
3、配置gpg-key
如果是使用的windows,可以下載gpg4win,地址:https://www.gpg4win.org/download.html,安裝后在命令行中執行 gpg --gen-key生成,過程中需要填寫名字、郵箱等,其他步驟可以使用默認值,不過有個叫:Passphase的參數需要記住,這個相當於是是密鑰的密碼,下一步發布過程中進行簽名操作的時候會用到。 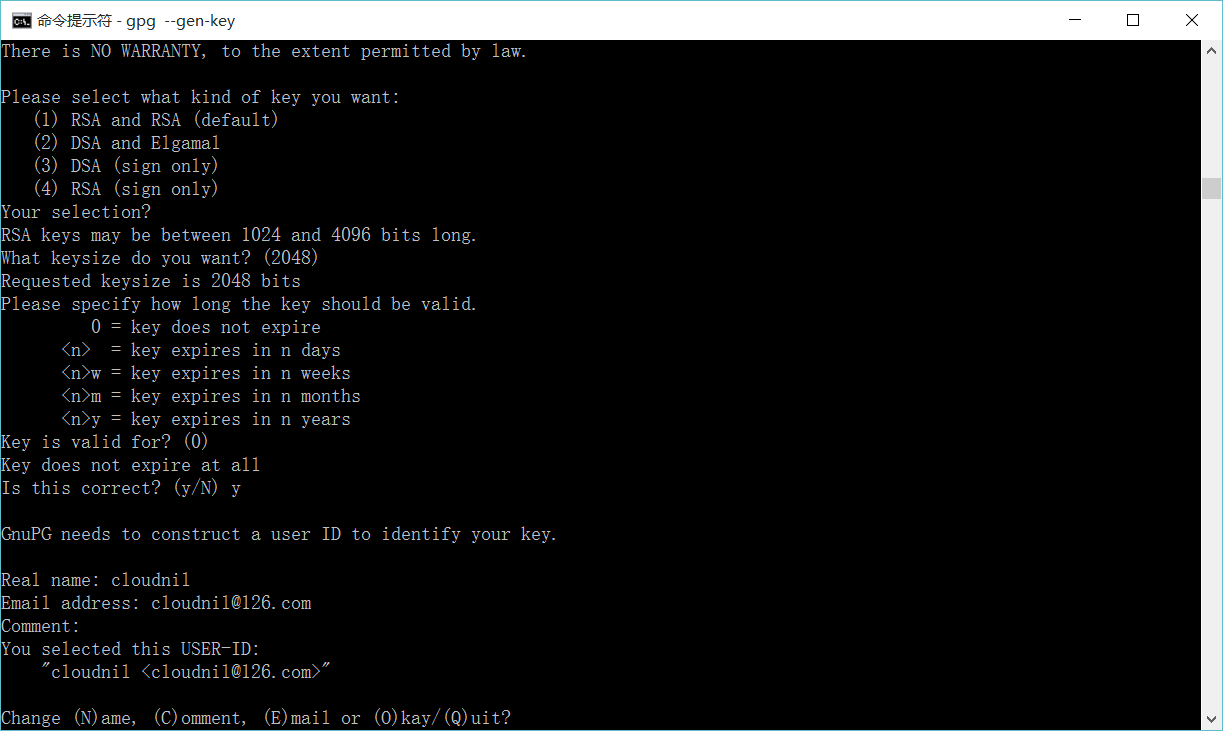
4、Deploy
這步就簡單了,就是一套命令:
mvn clean deploy -P sonatype-oss-release -Darguments="gpg.passphrase=密鑰密碼"
如果使用eclipse的mvn插件發布的話,配置如下: 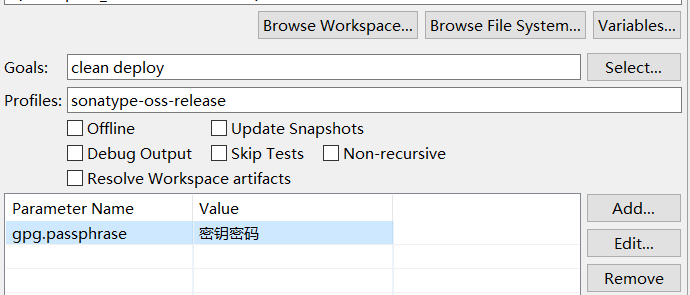
如果發布成功,就可以到構件倉庫中查看了。
5、Release
進入https://oss.sonatype.org/#stagingRepositories查看發布好的構件,點擊左側的Staging Repositories,一般最后一個就是剛剛發布的jar了,此時的構件狀態為open。
打開命令行窗口,查看gpg key並上傳到第三方的key驗證庫:
E:\98_code\workSpace\marathon-client>gpg --list-keys
C:/Users/VF/AppData/Roaming/gnupg/pubring.gpg
---------------------------------------------
pub   2048R/824B4D7A 2016-01-06
uid       [ultimate] cloudnil <cloudnil@126.com>
sub   2048R/7A10AD69 2016-01-06


E:\98_code\workSpace\marathon-client>gpg --keyserver hkp://keyserver.ubuntu.com:11371 --send-keys 824B4D7A
gpg: sending key 824B4D7A to hkp server keyserver.ubuntu.com

E:\98_code\workSpace\marathon-client>
回到https://oss.sonatype.org/#stagingRepositories,選中剛才發布的構件,並點擊上方的close–>Confirm,在下邊的Activity選項卡中查看狀態,當狀態變成closed后,執行Release–>Confirm,並在下邊的Activity選項卡中查看狀態,成功后構件自動刪除,一小段時間(約1-2個小時)后即可同步到maven的中央倉庫。
http://blog.csdn.net/tiger435/article/details/50470316
https://www.iteblog.com/archives/1807.html
SCM Implementation: Git
SCM URL
For all URLs below, we use a colon (:) as separator. If you use a colon for one of the variables (e.g. a windows path), then use a pipe (|) as separator. The separator for the port has to be a colon in any case since this part is specified in the git URL specification. See man git-fetch.
scm:git:git://server_name[:port]/path_to_repository
scm:git:http://server_name[:port]/path_to_repository
scm:git:https://server_name[:port]/path_to_repository
scm:git:ssh://server_name[:port]/path_to_repository
scm:git:file://[hostname]/path_to_repository
- Examples
scm:git:git://github.com/path_to_repository
scm:git:http://github.com/path_to_repository
scm:git:https://github.com/path_to_repository
scm:git:ssh://github.com/path_to_repository
scm:git:file://localhost/path_to_repository
Different Fetch and Push URLs
In some cases a different URL has to be used for read and write operations. This can happen if e.g. fetch is performed via the http protocol, but writing to the repository is only possible via ssh. In this case both URLs may be written into the developerConnection tag. The fetch URL has to be prefixed with [fetch=] and the push URL with [push=]
- Example:
<developerConnection>scm:git:[fetch=]http://mywebserver.org/path_to_repository[push=]ssh://username@otherserver:8898/~/repopath.git</developerConnection>
Working with branches
Since version 1.3, we assume that the name of the branch in the upstream repo is the same as the name of the current local branch. So whenever you invoke a maven-scm action which has to access the upstream repository, e.g. start a release, you should be on that very branch.
In other words: If no branch is specified manually, every git-fetch, git-pull, git-push, etc will always work on the branch in the upstream repository which has the same branch name as your current local branch
git push pushUrl currentBranch:currentBranch
Provider Configuration
The provider configuration is defined in $user.home/.scm/git-settings.xml.
<git-settings>
  <!-- will had the option --no-verify to the commit command can be helpfull to ignore trailing spaces issues with cygwin and the release plugin -->
  <commitNoVerify>false</commitNoVerify>
</git-settings>
http://maven.apache.org/scm/git.html
在編碼過程中,有些通用的代碼模塊,有時候我們不想通過復制拷貝來粗暴地復用,因為這樣不僅體現不了變化,也不利於統一管理。這里我們使用maven deploy的方式,將通用的模塊打成jar包,發布到nexus,讓其他的項目來引用,以更簡潔高效的方式來實現復用和管理。
第一:maven的settings.xml文件中設置<server>標簽
    <server>
      <id>my-deploy-release</id>
      <username>admin</username>
      <password>admin123</password>
    </server>

    <server>
      <id>my-deploy-snapshot</id>
      <username>admin</username>
      <password>admin123</password>
    </server>
此處設置的用戶名和密碼都是nexus的登陸配置
第二:在項目的pom.xml文件中設置
<distributionManagement>
    <repository>
        <id>my-deploy-release</id>
        <url>http://192.168.1.123:8081/nexus/content/repositories/releases/</url>
    </repository>

    <snapshotRepository>
        <id>my-deploy-snapshot</id>
        <url>http://192.168.1.123:8081/nexus/content/repositories/snapshots/</url>
    </snapshotRepository>
</distributionManagement>
在此,url都是nexus相應倉庫的鏈接地址,這一步做完之后,已經完成了發布所需要的基本配置。【試試命令:mvn deploy】
注意:<server>中的<id>要和<repository>、<snapshotRepository>的<id>一致,maven在發布時,會根據此id來查找相應的用戶名密碼進行登錄驗證並上傳文件。
第三:發布的靈活性配置
maven會判斷版本后面是否帶了-SNAPSHOT,如果帶了就發布到snapshots倉庫,否則發布到release倉庫。這里我們可以在pom.xml文件中,設置
<groupId>com.test</groupId>
<artifactId>my-test</artifactId>
<packaging>jar</packaging>
<version>${project.release.version}</version>

<properties>
    <java.version>1.8</java.version>
    <project.release.version>1.0-SNAPSHOT</project.release.version>
</properties>

<profiles>
    <profile>
        <id>product</id>
        <properties>
            <project.release.version>1.0</project.release.version>
        </properties>
    </profile>
</profiles>
說明:通過占位符${project.release.version}來控制需要發布的版本,用命令mvn deploy -P product,發布my-test的1.0版本到releases庫。如果使用命令mvn deploy,則默認使用 1.0-SNAPSHOT版本號,將發布my-test的1.0-SNAPSHOT版本到snapshots庫。
第四:發布時遇到的一些問題
- 部署到snapshot倉庫時,jar包會帶上時間戳,這沒關系,maven會自動取相應版本最新的jar包;
- Failed to execute goal org.apache.maven.plugins:maven-deploy-plugin:2.8.2:deploy (default-deploy) on project my-test: Failed to deploy artifacts: Could not transfer artifact...from/to release...
部署到release倉庫時,相同版本的jar包不能提交。
原因:因為release的部署策略是【disable redeploy】,不允許覆蓋更新組件。
解決辦法:修改一下版本號,再提交即可。
-
持續更新...
https://www.cnblogs.com/yucy/p/7509561.html