前言
最近 slither.io 貌似特別火,中午的時候,同事們都在玩,包括我自己也是玩的不亦樂乎。
好久好久沒折騰過canvas相關的我也是覺得是時候再折騰一番啦,所以就試着仿造一下吧。樓主也沒寫過網絡游戲,所以實現邏輯完全靠自己YY。
而且樓主心里也有點發虛,因為有些邏輯還是不知道怎么實現呀,所以不立flag,實話實說:不一定會更新下去,如果寫到不會寫了,就不一定寫了哈~
為啥取名叫先畫條蛇,畢竟是做個游戲,功能還是蠻多蠻復雜的,一口氣是肯定搞不完的,所以得一步一步來,第一步就是先造條蛇!!
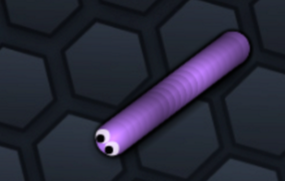
預覽效果
當前項目最新效果:http://whxaxes.github.io/slither/ (由於代碼一直在更新,效果會比本文所述的更多)
實現基類
在這個游戲里,需要一個基類,也就是地圖上的所有元素都會繼承這個基類:Base
export default class Base {
  constructor(options) {
    this.x = options.x;
    this.y = options.y;
    this.width = options.size || options.width;
    this.height = options.size || options.height;
  }

  /**
   * 繪制時的x坐標, 要根據視窗來計算位置
   * @returns {number}
   */
  get paintX() {
    return this.x - frame.x;
  }

  /**
   * 繪制時的y坐標, 要根據視窗來計算位置
   * @returns {number}
   */
  get paintY() {
    return this.y - frame.y;
  }

  /**
   * 在視窗內是否可見
   * @returns {boolean}
   */
  get visible() {
    const paintX = this.paintX;
    const paintY = this.paintY;
    const halfWidth = this.width / 2;
    const halfHeight = this.height / 2;

    return (paintX + halfWidth > 0)
      && (paintX - halfWidth < frame.width)
      && (paintY + halfHeight > 0)
      && (paintY - halfHeight < frame.height);
  }
}
也就是地圖上的元素,都會有幾個基本屬性:水平坐標x,垂直坐標y,寬度width,高度height,水平繪制坐標paintX,垂直繪制坐標paintY,在視窗內是否可見visible。
其中繪制坐標和視窗相關參數這一篇先不用管,這兩個是涉及到地圖的,會在下一篇文章再作解釋。
蛇的構成
不像常見的那種以方格為運動單位的貪吃蛇,slither里的蛇動的動的更自由,先不說怎么動,先說一下蛇體的構成。
這構造很顯然易見,其實就是由一個又一個的圓構成的,可以分為構成身體的圓,以及構成頭部的圓。所以,實現蛇這個類的時候,可以進行拆分,拆分成蛇的基類SnakeBase,繼承蛇基類的蛇頭類SnakeHeader,以及繼承蛇基類的蛇身類SnakeBody,還有一個蛇類Snake用於組合蛇頭和蛇身。
實現蛇基類
為什么要實現一個蛇基類,因為蛇頭和蛇身其實是有很多相似的地方,也會有很多相同屬性,所以實現一個蛇基類會方便方法的復用的。
蛇基類我命名為SnakeBase,繼承基類Base:
// 蛇頭和蛇身的基類
class SnakeBase extends Base {
  constructor(options) {
    super(options);

    // 皮膚顏色
    this.color = options.color;
    // 描邊顏色
    this.color_2 = '#000';

    // 垂直和水平速度
    this.vx = 0;
    this.vy = 0;

    // 生成元素圖片鏡像
    this.createImage();
  }

  // 設置基類的速度
  set speed(val) {
    this._speed = val;

    // 重新計算水平垂直速度
    this.velocity();
  }

  get speed() {
    return this._speed
      ? this._speed
      : (this._speed = this.tracer ? this.tracer.speed : SPEED);
  }

  /**
   * 設置寬度和高度
   * @param width
   * @param height
   */
  setSize(width, height) {
    this.width = width;
    this.height = height || width;
    this.createImage();
  }

  /**
   * 生成圖片鏡像
   */
  createImage() {
    this.img = this.img || document.createElement('canvas');
    this.img.width = this.width + 10;
    this.img.height = this.height + 10;
    this.imgctx = this.img.getContext('2d');

    this.imgctx.lineWidth = 2;
    this.imgctx.save();
    this.imgctx.beginPath();
    this.imgctx.arc(this.img.width / 2, this.img.height / 2, this.width / 2, 0, Math.PI * 2);
    this.imgctx.fillStyle = this.color;
    this.imgctx.strokeStyle = this.color_2;
    this.imgctx.stroke();
    this.imgctx.fill();
    this.imgctx.restore();
  }

  /**
   * 更新位置
   */
  update() {
    this.x += this.vx;
    this.y += this.vy;
  }

  /**
   * 渲染鏡像圖片
   */
  render() {
    this.update();

    // 如果該元素在視窗內不可見, 則不進行繪制
    if (!this.visible) return;

    // 如果該對象有角度屬性, 則使用translate來繪制, 因為要旋轉
    if (this.hasOwnProperty('angle')) {
      map.ctx.save();
      map.ctx.translate(this.paintX, this.paintY);
      map.ctx.rotate(this.angle - BASE_ANGLE - Math.PI / 2);
      map.ctx.drawImage(this.img, -this.img.width / 2, -this.img.height / 2);
      map.ctx.restore();
    } else {
      map.ctx.drawImage(
        this.img,
        this.paintX - this.img.width / 2,
        this.paintY - this.img.height / 2
      );
    }
  }
}
簡單說明一下各個屬性的意義:
x,y基類的坐標r為基類的半徑,因為這個蛇是由圓組成的,所以r就是圓的半徑color、color_2用於着色vx,vy為基類的水平方向的速度,以及垂直方向的速度
再說明一下幾個方法:
createImage方法:用於創建基類的鏡像,雖然基類只是畫個圓,但是繪制操作還是不少,所以最好還是先創建鏡像,之后每次繪制的時候就只需要調用一次drawImage即可,對提升性能還是有效的update方法:每次的動畫循環都會調用的方法,根據基類的速度來更新其位置render方法:基類的繪制自身的方法,里面就只有一個繪制鏡像的操作,不過會判斷一下當前這個實例有無angle屬性,如果有angle則需要用canvas的rotate方法進行轉向后再繪制。
實現蛇頭類
再接下來就是蛇頭SnakeHeader類,蛇頭類會繼承蛇基類,而且,由於蛇的運動就是蛇頭的運動,所以蛇頭是運動的核心,而蛇身是跟着蛇頭動而動。
蛇頭怎么動呢,我代碼里寫的是,蛇會朝着鼠標移動,但是蛇的運動是不會停的,所以不以鼠標位置為終點來計算蛇的運動,而是以鼠標相對於蛇頭的角度來計算蛇的運動方向,然后讓蛇持續的往那個方向運動即可。
所以在蛇頭類里,會新增兩個屬性:angle以及toAngle,angle是蛇頭角度,toAngle是蛇頭要轉向的角度,請看蛇頭的構造函數代碼:
  constructor(options) {
    super(options);

    this.angle = BASE_ANGLE + Math.PI / 2;
    this.toAngle = this.angle;
  }
初始角度為一個基礎角度加上90度,因為畫布的rotate是從x軸正向開始的,而我想把y軸正向作為0度,那么就得加上90度,而基礎角度BASE_ANGLE是一個很大的數值,但是都是360度的倍數:
const BASE_ANGLE = Math.PI * 200; // 用於保證蛇的角度一直都是正數
目的是保證蛇的運動角度一直是正數。
其次,蛇頭需要眼睛,所以在蛇頭的繪制鏡像方法中,加入了繪制眼睛的方法:
  /**
   * 添加畫眼睛的功能
   */
  createImage() {
    super.createImage();
    const self = this;
    const eyeRadius = this.width * 0.2;

    function drawEye(eyeX, eyeY) {
      self.imgctx.beginPath();
      self.imgctx.fillStyle = '#fff';
      self.imgctx.strokeStyle = self.color_2;
      self.imgctx.arc(eyeX, eyeY, eyeRadius, 0, Math.PI * 2);
      self.imgctx.fill();
      self.imgctx.stroke();

      self.imgctx.beginPath();
      self.imgctx.fillStyle = '#000';
      self.imgctx.arc(eyeX + eyeRadius / 2, eyeY, 3, 0, Math.PI * 2);
      self.imgctx.fill();
    }

    // 畫左眼
    drawEye(
      this.img.width / 2 + this.width / 2 - eyeRadius,
      this.img.height / 2 - this.height / 2 + eyeRadius
    );

    // 畫右眼
    drawEye(
      this.img.width / 2 + this.width / 2 - eyeRadius,
      this.img.height / 2 + this.height / 2 - eyeRadius
    );
  }
再者就是蛇頭的運動,蛇頭會根據鼠標與蛇頭的角度來運動,所以需要一個derectTo方法來調整蛇頭角度:
/**
   * 轉向某個角度
   */
  directTo(angle) {
    // 老的目標角度, 但是是小於360度的, 因為每次計算出來的目標角度也是0 - 360度
    const oldAngle = Math.abs(this.toAngle % (Math.PI * 2));

    // 轉了多少圈
    let rounds = ~~(this.toAngle / (Math.PI * 2));

    this.toAngle = angle;

    if (oldAngle >= Math.PI * 3 / 2 && this.toAngle <= Math.PI / 2) {
      // 角度從第四象限左划至第一象限, 增加圈數
      rounds++;
    } else if (oldAngle <= Math.PI / 2 && this.toAngle >= Math.PI * 3 / 2) {
      // 角度從第一象限划至第四象限, 減少圈數
      rounds--;
    }

    // 計算真實要轉到的角度
    this.toAngle += rounds * Math.PI * 2;
  }
如果單純根據鼠標與蛇頭的角度,來給予蛇頭運動方向,會有問題,因為計算出來的目標角度都是0-360的,也就是,當我的鼠標從340度,右划挪到10度。會出現蛇頭變成左轉彎,因為目標度數比蛇頭度數小。
所以就引入了圈數rounds來計算蛇真正要去到的角度。還是當我的鼠標從340度右划到10度的時候,經過計算,我會認為蛇頭的目標度數就是 360度 + 10度。就能保證蛇頭的轉向是符合常識的。
計算出目標角度,就根據目標角度來算出蛇頭的水平速度vx,以及垂直速度vy:
// 根據蛇頭角度計算水平速度和垂直速度
  velocity() {
    const angle = this.angle % (Math.PI * 2);
    const vx = Math.abs(this.speed * Math.sin(angle));
    const vy = Math.abs(this.speed * Math.cos(angle));

    if (angle < Math.PI / 2) {
      this.vx = vx;
      this.vy = -vy;
    } else if (angle < Math.PI) {
      this.vx = vx;
      this.vy = vy;
    } else if (angle < Math.PI * 3 / 2) {
      this.vx = -vx;
      this.vy = vy;
    } else {
      this.vx = -vx;
      this.vy = -vy;
    }
  }
之后再在每一次的重繪中進行轉向的計算,以及移動的計算即可:
  /**
   * 蛇頭轉頭
   */
  turnAround() {
    const angleDistance = this.toAngle - this.angle; // 與目標角度之間的角度差
    const turnSpeed = 0.045; // 轉頭速度

    // 當轉到目標角度, 重置蛇頭角度
    if (Math.abs(angleDistance) <= turnSpeed) {
      this.toAngle = this.angle = BASE_ANGLE + this.toAngle % (Math.PI * 2);
    } else {
      this.angle += Math.sign(angleDistance) * turnSpeed;
    }
  }

  /**
   * 增加蛇頭的逐幀邏輯
   */
  update() {
    this.turnAround();

    this.velocity();

    super.update();
  }
實現蛇身類
蛇頭類寫好了,就可以寫蛇身類SnakeBody了,蛇身需要跟着前面一截的蛇身或者蛇頭運動,所以又新增了幾個屬性,先看部分代碼:
constructor(options) {
    super(options);

    // 設置跟蹤者
    this.tracer = options.tracer;

    this.tracerDis = this.distance;
    this.savex = this.tox = this.tracer.x - this.distance;
    this.savey = this.toy = this.tracer.y;
  }

  get distance() {
    return this.tracer.width * 0.2;
  }
新增了一個tracer跟蹤者屬性,也就是前一截的蛇頭或者蛇身實例,蛇身和前一截實例會有一些位置差距,所以有個distance屬性是用於此,還有就是計算蛇身的目標位置,也就是前一截蛇身的運動方向往后平移distance距離的點。讓蛇身朝着這個方向移動,就可以有跟着動的效果了。
還有tracerDis是用於計算tracer的移動長度,this.savex和this.savey是用於保存tracer的運動軌跡坐標
再來就是計算水平速度,以及垂直速度,還有每一幀的更新邏輯了:
  /**
   * 根據目標點, 計算速度
   * @param x
   * @param y
   */
  velocity(x, y) {
    this.tox = x || this.tox;
    this.toy = y || this.toy;

    const disX = this.tox - this.x;
    const disY = this.toy - this.y;
    const dis = Math.hypot(disX, disY);

    this.vx = this.speed * disX / dis || 0;
    this.vy = this.speed * disY / dis || 0;
  }

 update() {
    if (this.tracerDis >= this.distance) {
      const tracer = this.tracer;

      // 計算位置的偏移量
      this.tox = this.savex + ((this.tracerDis - this.distance) * tracer.vx / tracer.speed);
      this.toy = this.savey + ((this.tracerDis - this.distance) * tracer.vy / tracer.speed);

      this.velocity(this.tox, this.toy);

      this.tracerDis = 0;

      // 保存tracer位置
      this.savex = this.tracer.x;
      this.savey = this.tracer.y;
    }

    this.tracerDis += this.tracer.speed;

    if (Math.abs(this.tox - this.x) <= Math.abs(this.vx)) {
      this.x = this.tox;
    } else {
      this.x += this.vx;
    }

    if (Math.abs(this.toy - this.y) <= Math.abs(this.vy)) {
      this.y = this.toy;
    } else {
      this.y += this.vy;
    }
  }
上面代碼中,update方法,會計算tracer移動距離,當超過distance的時候,就讓蛇身根據此前保存的運動軌跡,計算相應的速度,然后進行移動。這樣就可以實現蛇身會跟着tracer的移動軌跡行動。
組合成蛇
蛇頭、蛇身都寫完了,是時候把兩者組合起來了,所以再創建一個蛇類Snake。
先看構造函數,在創建實例的時候,實例化一個蛇頭,再根據入參的長度,來增加蛇身的實例,並且把蛇身的tracer指向前一截蛇身或者蛇頭實例。
constructor(options) {
    this.bodys = [];

    // 創建腦袋
    this.header = new SnakeHeader(options);

    // 創建身軀, 給予各個身軀跟蹤目標
    options.tracer = this.header;
    for (let i = 0; i < options.length; i++) {
      this.bodys.push(options.tracer = new SnakeBody(options));
    }

    this.binding();
  }
還有就是鼠標事件綁定,包括根據鼠標位置,來調整蛇的運動方向,還有按下鼠標的時候,蛇會進行加速,松開鼠標則不加速的邏輯:
  /**
   * 蛇與鼠標的交互事件
   */
  binding() {
    const header = this.header;
    const bodys = this.bodys;

    // 蛇頭跟隨鼠標的移動而變更移動方向
    window.addEventListener('mousemove', (e = window.event) => {
      const x = e.clientX - header.paintX;
      const y = header.paintY - e.clientY;
      let angle = Math.atan(Math.abs(x / y));

      // 計算角度, 角度值為 0-360
      if (x > 0 && y < 0) {
        angle = Math.PI - angle;
      } else if (x < 0 && y < 0) {
        angle = Math.PI + angle;
      } else if (x < 0 && y > 0) {
        angle = Math.PI * 2 - angle;
      }

      header.directTo(angle);
    });

    // 鼠標按下讓蛇加速
    window.addEventListener('mousedown', () => {
      header.speed = 5;
      bodys.forEach(body => {
        body.speed = 5;
      });
    });

    // 鼠標抬起停止加速
    window.addEventListener('mouseup', () => {
      header.speed = SPEED;
      bodys.forEach(body => {
        body.speed = SPEED;
      });
    });
  }
當然,最終還需要一個渲染方法,逐個渲染即可:
  // 渲染蛇頭蛇身
  render() {
    for (let i = this.bodys.length - 1; i >= 0; i--) {
      this.bodys[i].render();
    }

    this.header.render();
  }
最后
至此,整個蛇類都寫完了,再寫一下動畫循環邏輯即可:
import Snake from './snake';
import frame from './lib/frame';
import Stats from './third/stats.min';

const sprites = [];
const RAF = window.requestAnimationFrame
  || window.webkitRequestAnimationFrame
  || window.mozRequestAnimationFrame
  || window.oRequestAnimationFrame
  || window.msRequestAnimationFrame
  || function(callback) {
    window.setTimeout(callback, 1000 / 60)
  };

const canvas = document.getElementById('cas');
const ctx = canvas.getContext('2d');
canvas.width = window.innerWidth;
canvas.height = window.innerHeight;

const stats = new Stats();
stats.setMode(0);
stats.domElement.style.position = 'absolute';
stats.domElement.style.right = '0px';
stats.domElement.style.top = '0px';
document.body.appendChild( stats.domElement );

function init() {
  const snake = new Snake({
    x: frame.x + frame.width / 2,
    y: frame.y + frame.height / 2,
    size: 40,
    length: 10,
    color: '#fff'
  });

  sprites.push(snake);

  animate();
}

let time = new Date();
let timeout = 0;
function animate() {
  const ntime = new Date();

  if(ntime - time > timeout) {
    ctx.clearRect(0, 0, canvas.width, canvas.height);

    sprites.forEach(function(sprite) {
      sprite.render();
    });

    time = ntime;
  }

  stats.update();

  RAF(animate);
}

init();
這一塊的代碼就很簡單了,生成蛇的實例,通過requestAnimationFrame方法進行動畫循環,並且在每次循環中進行畫布的重繪即可。里面有個叫timeout的參數,用於降低游戲fps,用來debug的。
這個項目目前還是單機的,所以我放在了github,之后加上網絡功能的話,估計就無法預覽了。
github地址:https://github.com/whxaxes/slither