- 原文出自《RxJava Essentials》
- 原文作者 : Ivan Morgillo
- 譯文出自 : 開發技術前線 www.devtf.cn
- 轉載聲明: 本譯文已授權開發者頭條享有獨家轉載權,未經允許,不得轉載!
- 譯者 : yuxingxin
- 項目地址 : RxJava-Essentials-CN
前面一章是最后一章關於RxJava的Observable的創建和操作的章節。我們學習到了如何將兩個或更多的Observables合並在一起,join它們,zip它們,merge它們以及如何創建一個新的Observable來滿足我們特殊的需求。
本章中,我們提升標准看看如何使用RxJava的調度器來處理多線程和並發編程的問題。我們將學習到如何以響應式的方式創建網絡操作,內存訪問,以及耗時任務。
StrictMode
為了獲得更多出現在代碼中的關於公共問題的信息,我們激活了StrictMode模式。
StrictMode幫助我們偵測敏感的活動,如我們無意的在主線程執行磁盤訪問或者網絡調用。正如你所知道的,在主線程執行繁重的或者長時的任務是不可取的。因為Android應用的主線程時UI線程,它被用來處理和UI相關的操作:這也是獲得更平滑的動畫體驗和響應式App的唯一方法。
為了在我們的App中激活StrictMode,我們只需要在MainActivity中添加幾行代碼,即onCreate()方法中這樣:
|
1
2
3
4
5
6
7
8
9
|
@Override
public void onCreate() {
super.onCreate();
if (BuildConfig.DEBUG) {
StrictMode.setThreadPolicy(new StrictMode.ThreadPolicy.Builder().detectAll().penaltyLog().build());
StrictMode.setVmPolicy(new StrictMode.VmPolicy.Builder().detectAll().penaltyLog().build());
}
}
|
我們並不想它總是激活着,因此我們只在debug構建時使用。這種配置將報告每一種關於主線程用法的違規做法,並且這些做法都可能與內存泄露有關:Activities、BroadcastReceivers、Sqlite等對象。
選擇了penaltyLog(),當違規做法發生時,StrictMode將會在logcat打印一條信息。
避免阻塞I/O的操作
阻塞I/O的操作將使App能夠進行下一步操作前會強制使其等待結果的返回。在UI線程上執行一個阻塞操作將強制使UI卡住,這將直接產生不好的用戶體驗。
我們激活StrictMode后,我們開始收到了關於我們的App錯誤操作磁盤I/O的不友好信息。
|
1
2
3
4
5
6
7
8
|
D/StrictMode StrictMode policy violation; ~duration=998 ms: android.os.StrictMode$StrictModeDiskReadViolation: policy=31 violation=2
at android.os.StrictMode$AndroidBlockGuardPolicy.onReadFromDisk (StrictMode.java:1135)
at libcore.io.BlockGuardOs.open(BlockGuardOs.java:106) at libcore.io.IoBridge.open(IoBridge.java:393)
at java.io.FileOutputStream.<init>(FileOutputStream.java:88)
at android.app.ContextImpl.openFileOutput(ContextImpl.java:918)
at android.content.ContextWrapper.openFileOutput(ContextWrapper. java:185)
at com.packtpub.apps.rxjava_essentials.Utils.storeBitmap (Utils.java:30)
|
上一條信息告訴我們Utils.storeBitmap()函數執行完耗時998ms:在UI線程上近1秒的不必要的工作和App上近1秒不必要的遲鈍。這是因為我們以阻塞的方式訪問磁盤。我們的storeBitmap()函數包含了:
|
1
2
|
FileOutputStream fOut = context.openFileOutput(filename, Context.MODE_PRIVATE);
|
它直接訪問智能手機的固態存儲然后就慢了。我們該如何提高訪問速度呢?storeBitmap()函數保存了已安裝App的圖標。他返回了void,因此在執行下一個操作前我們毫無理由去等待直到它完成。我們可以啟動它並讓它執行在不同的線程。Android中這些年線程管理的變化產生了App詭異的行為。我們可以使用AsyncTask,但是我們要避免掉入前幾章里的onPrehttps://github.com/yuxingxin/RxJava-Essentials-CN/raw/master. onPosthttps://github.com/yuxingxin/RxJava-Essentials-CN/raw/master.doInBackGround地獄。我們將使用RxJava的方式;萬歲的調度器!
Schedulers
調度器以一種最簡單的方式將多線程用在你的Apps的中。它們時RxJava重要的一部分並能很好地與Observables協同工作。它們無需處理實現、同步、線程、平台限制、平台變化而可以提供一種靈活的方式來創建並發程序。
RxJava提供了5種調度器:
.io().computation().immediate().newThread().trampoline()
讓我們一個一個的來看下它們:
Schedulers.io()
這個調度器時用於I/O操作。它基於根據需要,增長或縮減來自適應的線程池。我們將使用它來修復我們之前看到的StrictMode違規做法。由於它專用於I/O操作,所以並不是RxJava的默認方法;正確的使用它是由開發者決定的。
重點需要注意的是線程池是無限制的,大量的I/O調度操作將創建許多個線程並占用內存。一如既往的是,我們需要在性能和簡捷兩者之間找到一個有效的平衡點。
Schedulers.computation()
這個是計算工作默認的調度器,它與I/O操作無關。它也是許多RxJava方法的默認調度器:buffer(),debounce(),delay(),interval(),sample(),skip()。
Schedulers.immediate()
這個調度器允許你立即在當前線程執行你指定的工作。它是timeout(),timeInterval(),以及timestamp()方法默認的調度器。
Schedulers.newThread()
這個調度器正如它所看起來的那樣:它為指定任務啟動一個新的線程。
Schedulers.trampoline()
當我們想在當前線程執行一個任務時,並不是立即,我們可以用.trampoline()將它入隊。這個調度器將會處理它的隊列並且按序運行隊列中每一個任務。它是repeat()和retry()方法默認的調度器。
非阻塞I/O操作
現在我們知道如何在一個指定I/O調度器上來調度一個任務,我們可以修改storeBitmap()函數並再次檢查StrictMode的不合規做法。為了這個例子,我們可以在新的blockingStoreBitmap()函數中重排代碼。
|
1
2
3
4
5
6
7
8
9
10
11
12
13
14
15
16
17
18
19
20
|
private static void blockingStoreBitmap(Context context, Bitmap bitmap, String filename) {
FileOutputStream fOut = null;
try {
fOut = context.openFileOutput(filename, Context.MODE_PRIVATE);
bitmap.compress(Bitmap.CompressFormat.PNG, 100, fOut);
fOut.flush();
fOut.close();
} catch (Exception e) {
throw new RuntimeException(e);
} finally {
try {
if (fOut != null) {
fOut.close();
}
} catch (IOException e) {
throw new RuntimeException(e);
}
}
}
|
現在我們可以使用Schedulers.io()創建非阻塞的版本:
|
1
2
3
4
5
6
|
public static void storeBitmap(Context context, Bitmap bitmap, String filename) {
Schedulers.io().createWorker().schedule(() -> {
blockingStoreBitmap(context, bitmap, filename);
});
}
|
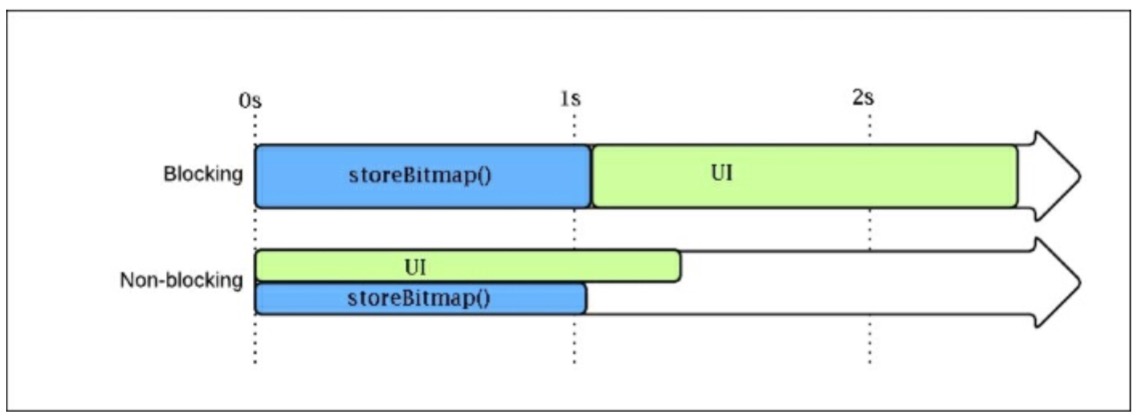
每次我們調用storeBitmap(),RxJava處理創建所有它需要從I / O線程池一個特定的I/ O線程執行我們的任務。所有要執行的操作都避免在UI線程執行並且我們的App比之前要快上1秒:logcat上也不再有StrictMode的不合規做法。
下圖展示了我們在storeBitmap()場景看到的兩種方法的不同:
SubscribeOn and ObserveOn
我們學到了如何在一個調度器上運行一個任務。但是我們如何利用它來和Observables一起工作呢?RxJava提供了subscribeOn()方法來用於每個Observable對象。subscribeOn()方法用Scheduler來作為參數並在這個Scheduler上執行Observable調用。
在“真實世界”這個例子中,我們調整loadList()函數。首先,我們需要一個新的getApps()方法來檢索已安裝的應用列表:
|
1
2
3
4
5
6
7
8
9
10
11
12
13
14
15
16
|
private Observable<AppInfo> getApps() {
return Observable.create(subscriber -> {
List<AppInfo> apps = new ArrayList<>();
SharedPreferences sharedPref = getActivity().getPreferences(Context.MODE_PRIVATE);
Type appInfoType = new TypeToken<List<AppInfo>>(){}.getType();
String serializedApps = sharedPref.getString("APPS", "");
if (!"".equals(serializedApps)) {
apps = new Gson().fromJson(serializedApps,appInfoType);
}
for (AppInfo app : apps) {
subscriber.onNext(app);
}
subscriber.onCompleted();
});
}
|
getApps()方法返回一個AppInfo的Observable。它先從Android的SharePreferences讀取到已安裝的應用程序列表。反序列化,並一個接一個的發射AppInfo數據。使用新的方法來檢索列表,loadList()函數改成下面這樣:
|
1
2
3
4
5
6
7
8
9
10
11
12
13
14
15
16
17
18
19
20
21
22
23
|
private void loadList() {
mRecyclerView.setVisibility(View.VISIBLE);
getApps().subscribe(new Observer<AppInfo>() {
@Override
public void onCompleted() {
mSwipeRefreshLayout.setRefreshing(false);
Toast.makeText(getActivity(), "Here is the list!", Toast.LENGTH_LONG).show();
}
@Override
public void onError(Throwable e) {
Toast.makeText(getActivity(), "Something went wrong!", Toast.LENGTH_SHORT).show();
mSwipeRefreshLayout.setRefreshing(false);
}
@Override
public void onNext(AppInfo appInfo) {
mAddedApps.add(appInfo);
mAdapter.addApplication(mAddedApps.size() - 1, appInfo);
}
});
}
|
如果我們運行代碼,StrictMode將會報告一個不合規操作,這是因為SharePreferences會減慢I/O操作。我們所需要做的是指定getApps()需要在調度器上執行:
|
1
2
3
|
<br />getApps().subscribeOn(Schedulers.io())
.subscribe(new Observer<AppInfo>() { [https://github.com/yuxingxin/RxJava-Essentials-CN/raw/master.]
|
Schedulers.io()將會去掉StrictMode的不合規操作,但是我們的App現在崩潰了是因為:
|
1
2
3
4
5
6
7
8
9
10
11
|
at rx.internal.schedulers.ScheduledAction.run(ScheduledAction.jav a:58)
at java.util.concurrent.Executors$RunnableAdapter.call(Executors. java:422)
at java.util.concurrent.FutureTask.run(FutureTask.java:237)
at java.util.concurrent.ScheduledThreadPoolExecutor$ScheduledFutu reTask.access$201(ScheduledThreadPoolExecutor.java:152)
at java.util.concurrent.ScheduledThreadPoolExecutor$ScheduledFutu reTask.run(ScheduledThreadPoolExecutor.java:265)
at java.util.concurrent.ThreadPoolExecutor.runWorker(ThreadPoolEx ecutor.java:1112)
at java.util.concurrent.ThreadPoolExecutor$Worker.run(ThreadPoolE xecutor.java:587)
at java.lang.Thread.run(Thread.java:841) Caused by:
android.view.ViewRootImpl$CalledFromWrongThreadException: Only the original thread that created a view hierarchy can touch its views.
|
Only the original thread that created a view hierarchy can touch its views.
我們再次回到Android的世界。這條信息簡單的告訴我們我們試圖在一個非UI線程來修改UI操作。意思是我們需要在I/O調度器上執行我們的代碼。因此我們需要和I/O調度器一起執行代碼,但是當結果返回時我們需要在UI線程上操作。RxJava讓你能夠訂閱一個指定的調度器並觀察它。我們只需在loadList()函數添加幾行代碼,那么每一項就都准備好了:
|
1
2
3
4
5
6
|
getApps()
.onBackpressureBuffer()
.subscribeOn(Schedulers.io())
.observeOn(AndroidSchedulers.mainThread())
.subscribe(new Observer<AppInfo>() { [https://github.com/yuxingxin/RxJava-Essentials-CN/raw/master.]
|
observeOn()方法將會在指定的調度器上返回結果:如例子中的UI線程。onBackpressureBuffer()方法將告訴Observable發射的數據如果比觀察者消費的數據要更快的話,它必須把它們存儲在緩存中並提供一個合適的時間給它們。做完這些工作之后,如果我們運行App,就會出現已安裝的程序列表:

處理耗時的任務
我們已經知道如何處理緩慢的I/O操作。讓我們看一個與I/O無關的耗時的任務。例如,我們修改loadList()函數並創建一個新的slow函數發射我們已安裝的app數據。
|
1
2
3
4
5
6
7
8
9
10
11
12
|
private Observable<AppInfo> getObservableApps(List<AppInfo> apps) {
return Observable .create(subscriber -> {
for (double i = 0; i < 1000000000; i++) {
double y = i * i;
}
for (AppInfo app : apps) {
subscriber.onNext(app);
}
subscriber.onCompleted();
});
}
|
正如你看到的,這個函數執行了一些毫無意義的計算,只是針對這個例子消耗時間,然后從List<AppInfo>對象中發射我們的AppInfo數據,現在,我們重排loadList()函數如下:
|
1
2
3
4
5
6
7
8
9
10
11
12
13
14
15
16
17
18
19
20
21
22
23
24
|
private void loadList(List<AppInfo> apps) {
mRecyclerView.setVisibility(View.VISIBLE);
getObservableApps(apps)
.subscribe(new Observer<AppInfo>() {
@Override
public void onCompleted() {
mSwipeRefreshLayout.setRefreshing(false);
Toast.makeText(getActivity(), "Here is the list!", Toast.LENGTH_LONG).show();
}
@Override
public void onError(Throwable e) {
Toast.makeText(getActivity(), "Something went wrong!", Toast.LENGTH_SHORT).show();
mSwipeRefreshLayout.setRefreshing(false);
}
@Override
public void onNext(AppInfo appInfo) {
mAddedApps.add(appInfo);
mAdapter.addApplication(mAddedApps.size() - 1, appInfo);
}
});
}
|
如果我們運行這段代碼,當我們點擊Navigation Drawer菜單項時App將會卡住一會,然后你能看到下圖中半關閉的菜單:

如果我們不夠走運的話,我們可以看到下圖中經典的ANR信息框:

可以確定的是,我們將會看到下面在logcat中不愉快的信息:
|
1
2
|
I/Choreographer Skipped 598 frames! The application may be doing too much work on its main thread.
|
這條信息比較清楚,Android在告訴我們用戶體驗非常差的原因是我們用不必要的工作量阻塞了UI線程。但是我們已經知道了如何處理它:我們有調度器!我們只須添加幾行代碼到我們的Observable鏈中就能去掉加載慢和Choreographer信息:
|
1
2
3
4
5
6
|
getObservableApps(apps)
.onBackpressureBuffer()
.subscribeOn(Schedulers.computation())
.observeOn(AndroidSchedulers.mainThread())
.subscribe(new Observer<AppInfo>() { [https://github.com/yuxingxin/RxJava-Essentials-CN/raw/master.]
|
用這幾行代碼,我們將可以快速關掉Navigation Drawer,一個漂亮的進度條,一個工作在獨立的線程緩慢執行的計算任務,並在主線程返回結果讓我們更新已安裝的應用列表。
執行網絡任務
網絡在今天是99%的移動應用的一部分:我們總是連接遠端服務器來檢索我們App需要的信息。
作為網絡訪問的第一個方法,我們將創建下面這樣一個場景:
- 加載一個進度條。
- 用一個按鈕開始文件下載。
- 下載過程中更新進度條。
- 下載完后開始視頻播放。
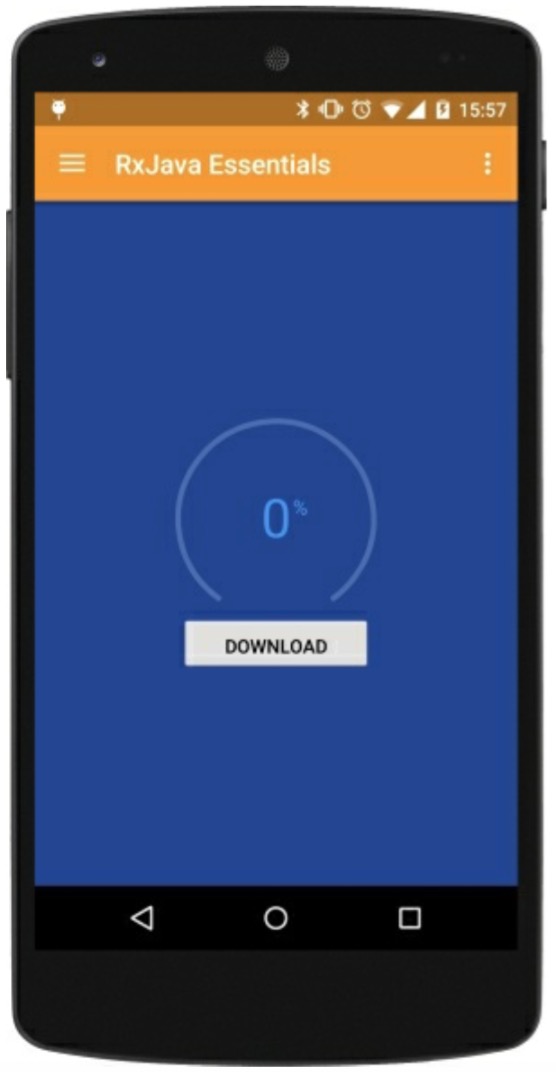
我們的用戶界面非常簡單,我們只需要一個有趣的進度條和一個下載按鈕。
首先,我們創建mDownloadProgress
|
1
2
|
private PublishSubject<Integer>mDownloadProgress = PublishSubject.create();
|
這個主題我們用來管理進度的更新,它和download函數協同工作。
|
1
2
3
4
5
6
7
8
9
10
11
12
13
14
15
16
17
18
19
20
21
22
23
24
25
26
27
28
29
30
31
32
33
34
35
36
37
38
39
40
41
42
43
44
45
46
47
48
49
|
private boolean downloadFile(String source, String destination) {
boolean result = false;
InputStream input = null;
OutputStream output = null;
HttpURLConnection connection = null;
try {
URL url = new URL(source);
connection = (HttpURLConnection) url.openConnection();
connection.connect();
if (connection.getResponseCode() != HttpURLConnection.HTTP_OK) {
return false;
}
int fileLength = connection.getContentLength();
input = connection.getInputStream();
output = new FileOutputStream(destination);
byte data[] = new byte[4096];
long total = 0;
int count;
while ((count = input.read(data)) != -1) {
total += count;
if (fileLength >0) {
int percentage = (int) (total * 100 / fileLength);
mDownloadProgress.onNext(percentage);
}
output.write(data, 0, count);
}
mDownloadProgress.onCompleted();
result = true;
} catch (Exception e) {
mDownloadProgress.onError(e);
} finally {
try {
if (output != null) {
output.close();
}
if (input != null) {
input.close();
}
} catch (IOException e) {
mDownloadProgress.onError(e);
}
if (connection != null) {
connection.disconnect();
mDownloadProgress.onCompleted();
}
}
return result;
}
|
上面的這段代碼將會觸發NetworkOnMainThreadException異常。我們可以創建RxJava版本的函數進入我們摯愛的響應式世界來解決這個問題:
|
1
2
3
4
5
6
7
8
9
10
11
12
13
14
15
16
|
private Observable<Boolean> obserbableDownload(String source, String destination) {
return Observable.create(subscriber -> {
try {
boolean result = downloadFile(source, destination);
if (result) {
subscriber.onNext(true);
subscriber.onCompleted();
} else {
subscriber.onError(new Throwable("Download failed."));
}
} catch (Exception e) {
subscriber.onError(e);
}
});
}
|
現在我們需要觸發下載操作,點擊下載按鈕:
|
1
2
3
4
5
6
7
8
9
10
11
12
13
14
15
16
17
18
19
20
21
22
23
24
25
26
27
28
29
30
31
32
33
34
35
36
37
38
39
40
41
|
@OnClick(R.id.button_download)
void download() {
mButton.setText(getString(R.string.downloading));
mButton.setClickable(false);
mDownloadProgress.distinct()
.observeOn(AndroidSchedulers.mainThread())
.subscribe(new Observer<Integer>() {
@Override
public void onCompleted() {
App.L.debug("Completed");
}
@Override
public void onError(Throwable e) {
App.L.error(e.toString());
}
@Override
public void onNext(Integer progress) {
mArcProgress.setProgress(progress);
}
});
String destination = "sdcardsoftboy.avi";
obserbableDownload("http://archive.blender.org/fileadmin/movies/softboy.avi", destination)
.subscribeOn(Schedulers.io())
.observeOn(AndroidSchedulers.mainThread())
.subscribe(success -> {
resetDownloadButton();
Intent intent = new Intent(android.content.Intent.ACTION_VIEW);
File file = new File(destination);
intent.setDataAndType(Uri.fromFile(file),"video/avi");
intent.addFlags(Intent.FLAG_ACTIVITY_NEW_TASK);
startActivity(intent);
}, error -> {
Toast.makeText(getActivity(), "Something went south", Toast.LENGTH_SHORT).show();
resetDownloadButton();
});
}
|
我們使用Butter Knife的注解@OnClick來綁定按鈕的方法並更新按鈕信息和點擊狀態:我們不想讓用戶點擊多次從而觸發多次下載事件。
然后,我們創建一個subscription來觀察下載進度並相應的更新進度條。很明顯,我們我們觀測主線程是因為進度條是UI元素。
|
1
2
|
obserbableDownload("http://archive.blender.org/fileadmin/movies/softboy.avi", "sdcardsoftboy.avi";)
|
這是一個下載Observable。網絡調用是一個I/O任務和我們預料的那樣使用I/O調度器。當下載完成時,我們在onNext()啟動視頻播放器,並且播放器將會在目的URL找到下載的文件.。
下圖展示了下載進度和視頻播放器對話框:

總結
這一章中,我們學習了如何簡單的將多線程應用在我們的App中。RxJava為此提供了極其有用的工具:調度器。調度器來自不同的指定優化場景並且我們也不避免了StrictMode不合法操作以及阻塞I/O函數。我們現在可以用簡單的,響應式的並在整個App中保持一致的方式來訪問內存和網絡。
下一章中,我們將會提高風險並創建一個真實世界App,並使用Square公司開源的REST API庫Retrofit從不同的遠程資源獲取數據來創建一個復雜的material design UI。